Showing posts with label adjustable. Show all posts

Thursday, March 26, 2026

Fabric Flower Bouquet - 04

I combined my Hot Pink Vase Wrap with my Tulle flower into a Fabric Flower Bouquet.

I cut a blue circle of fabric for the water. The glass I am using for the bouquet is a drinking glass so it has no lid. I cut a piece of chipboard bigger than the opening of the glass.  I made some slits from the outer edge to the size of the opening. I tacked the blue "water" fabric to the chip board and made a hole in the center. I pushed the wire from the flower through the hole then I twisted the wire stem onto a piece of bamboo skewer which measured just under the height of the glass.  Then I placed it inside the glass making sure the fabric was pressed between the chipboard edge and the side of the glass.  This keeps the flower in the center of the vase.

A very bright and cheery color for spring.

Sewing Project - Fabric Vase Wrap - Hot Pink Sparkly

During my visit at my sister's on the weekend we sorted through fabric scraps.  We found a piece of stretchy white sparkly fabric which was no doubt part of a fancy evening dress at one point in its life.

I had been thinking of making adjustable vase wraps and this fabric was the ticket!  I brought it home.

I wanted to change the color so I checked the fabric dye I had and it indicated it would not dye polyester fabric.  So I headed into my paper dye inks.  I chose Ranger Alcohol Ink because that is sticks to shiny surfaces.

Into a yogurt container with tap hot water and several drops of Plum alcohol ink and I set the timer for 20 minutes.  My hopes were not high.

Well, once I pulled it out it was dyed!  It was pretty bright and I added some blue to change the color but it was not alcohol ink and did nothing at all to change the color.  I rinsed it thoroughly and dried it.  It is what it is!

I wanted clean edges so I decided to overlap the raw edges (which don't ravel) over each other flat against the glass. I pinned it well. Now, I needed something to over the one raw edge visible. I chose a piece of white double edged lace. I was not sure I could sew it with the machine because of the small diameter of the wrap. After at lot of hemming and hawing, I just took action.  It went better when I turned it inside out.  I chose a curvy stitch on my machine which is not really a stretch stitch but it's all I have. The stress will be horizontal so it should be okay.  

The embellishments could not be placed horizontally on the wrap because that would limit its ability to expand to larger sizes.  I added French Knots in the open spaces of the lace to repeat the color in the flower.

The fabric measured 12" tall and 9.75" wide.  I realized that I would have to double up the fabric with the join in the middle to have nice smooth edges on the top and bottom.  With about 3/8 inch overlap the final wrap measured 4.5" across folded in half.  It measures 5.75" tall.

Saturday, September 28, 2024

Sewing Project - Adjustable Bookmark

I have been thinking of making some bookmarks for the Christmas sale since we share the space with the library.

With a bit of research, I found a few features I would like to incorporate. Adjustable and a pocket for a writing instrument.

After some measuring, I decided to make the it wrap around the book with an elastic and a couple of buttons for adjustment.  A pocket could be placed on the front and maybe some stitching could be included.

I cut 2 pieces of fabric measuring 3"W x 21" T - one patterned one solid.  I decided to use elastic from old face masks. I cut a piece of mustard fabric for the pocket. The buttons and embroidery need to be added before sewing.  The pocket needs to be sewn on the front of the bookmark. 

The elastic was pinned in place at the opposite end from the pocket. Then, I sewed all the way around the long strip leaving a slit to turn it inside out. I trimmed the corners, turned it inside out, pushed out the corners with a chopstick and pressed it flat.  I then top stitched all the way around. It was very difficult to do the buttons and embroidery after the pocket was sewn on.

Notes: 

  • The pencil pocket is too tall and could be narrower. 
  • Stitching and button(s) need to be done before assembly.
  • This is a hard cover book so the overall length of the bookmark could be shorter to accommodate smaller books.
  • I will use this one and implement improvements to future versions
  • The mask elastic may too soft.

Monday, May 21, 2018

Navy & Block Print Apron

I put together another apron this weekend.

I started with this wonderful botanical print in navy, red, and ivory.  It is a Guaranteed Wax Block Print by HiTarget on 100% cotton.

I selected a navy 100% cotton fabric for the other side.

I made the shoulder ties from the print fabric.  Cut the strips 3.5 inches wide and sewed a half inch seam and turned it inside out.

It is a long apron measuring at 39 inches from the top of bib to bottom edge.

I sewed on 2 navy buttons on the top center corner of the pockets which allows the hanging of a towel on either side.

I used the same strip for the loops at the back which provide adjust-ability to the apron.  I placed 2 loops about an inch apart. 

The wearer can choose both as in the photo or just one of them at the height which works best for them.

Rectangular pockets with slanted openings make them very accessible when the apron is worn. 

You can cross the straps or pull them straight down to the back loops.

The straps are long enough to allow a nice bow when tying the apron.


The print has been brought to the other side of the apron.

There is a band at the bottom and a patch on the bib.


The apron has a loop to hang it when you are not wearing it.

A close up of the back loops.

The buttons placed on the pockets to provide a place to hang a towel at hand.  It can be hung on the left or the right hand side. 


Saturday, April 7, 2018

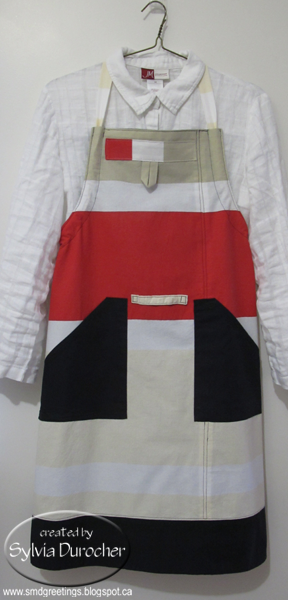
Apron - Adjustable with Casing

I made another apron today so now I have a sample of the three designs I have researched.

This is an adjustable apron with the tied going through a casing along the curve of the bib.  This is the style of my current apron.

I chose this bold striped cotton fabric in red, ivory and white stripes for this side and a black poly cotton for the reverse side.   I placed a seam offset to the left of center and ensured the stripes were maintained across the apron. I chose to top stitch the seam and the outer edge of the apron in black thread.

I added black patch pockets, a towel loop in the center between the pockets and a hanging loop on the accent at the top of the bib. 


The corners of the pockets are well reinforced with a triangle of stitching.


I will have to decide which design I will use for my new apron.  I have not yet decided the fabric yet.

Tuesday, April 3, 2018

My First Apron

I spent my day off yesterday making my first apron.  Last week I had sorted my stash of fabric and put together a couple of piece which coordinated well and there was enough to make a reversible apron.  The fabric is a solid dark green with a printed green/black stripes with white flowers.

The adjustable apron I currently use I purchased several years ago. I love the design but the fabric is very stiff and the pockets are not useable because they are straight up.  I think pockets at an angle would be more natural for how my hand will get into them. It is not reversible. It has a loop to hang it up at the end of the day.

I have researched adjustable styles on line from which I gleaned a couple of add ons to the one I have. Then I took mine to our Easter girls get together with my Mom and sisters.  We girls are of several sizes and heights so that gave me some feedback about what works and what does not work.

There was some ripping out seams and changing things as I tried it on and felt adjustments were necessary.  

Here it is!
The garden flower fabric on the left and the dark green cotton fabric on the right.

I added patch pockets in the alternate fabric on each one.

The shoulder straps for tying are long and can be brought to the front if you want.

The back features loops where you pull the shoulder straps through to then tie the apron at the back or the front.


It allows you to tie couple of ways as well.

The shoulder straps can be crossed at the back and run through the opposite loop and tied at the back or the front.

The shoulder straps can be brought straight down to the loops and then tied at the back or front.

This provides versatility to the apron wearer to adjust the apron to their comfort.


I added a loop in the front on both sides where you can pull a towel through so you have one at hand all the time.

I added a loop on the green side at the top of the bib which allows you to hang it up at the end of your time in the kitchen.

I want to thank the ladies who gave me feedback which helped with this project.