
 We have a family event coming up where we get together over a weekend. These relatives are on my Mom's side of the family. Aunts, uncles, cousins will be showing up to visit, share, eat and generally have a good time.
We always have a table of handmade items, art, or otherwise crafted items which are auctioned to raise funds for the next event.
With much of my supplies packed I decided to make a lined bag with a liner which could be used to carry knitting, crochet or other manner of crafting projects.
I started with a piece of fabric which was meant to be added to some denim but when I found a pink zipper in my stash it became much brighter a project.
I found the white wide grosgrain ribbon for the handles, the white microfiber fabric for the lining, so all I needed was some accent fabric for the pockets.
Off to the second hand store. This was the only pillowcase in the right shade of pink so it came home with me.
I loosely followed this Tutorial on Instructables to make the bag. It is a gusseted bag with pockets. I chose to line it with the leftover microfiber fabric from making my bespoke everyday bag. I do not like microfiber sheets for the bed but some of them are extremely good quality and make superb fabric for sewing projects.

How to Add a Recessed Zipper to Any Tote Bag video. I used the microfiber because it matched the liner and it made the zipper very visible. I'm not sure it was the best choice because of the softness of the fabric. I chose a fancy stitch to attached it to the top of the bag. I went right around the top of the bag to have it nice from the outside.

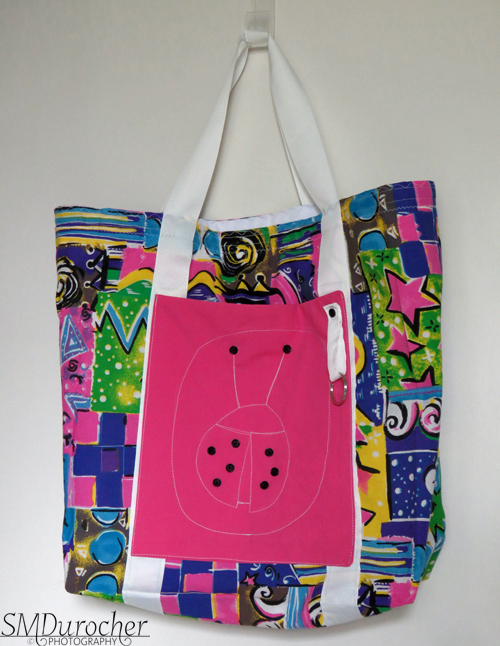
The fabric had a lady bug graphic on it and the other half was solid pink. I chose to trace the graphic onto the pink side and stitched it with white thread. I added small black buttons to the antennae and the spots. For the other side I left the lady bug as it was designed.
I did make the pockets double as it was 50% polyester and 50% cotton and was a bit thin. I cut two and sewed all the way around and turn the patch pocket inside out and ironed flat.
I chose to sew the pockets on top of the handles instead of behind as in the tutorial so I would not lose any of the ladybug. The corners are reinforced. The pockets are a good size at over 8 inches square. Will hold patterns, books, or any other flat object associated with the craft being carried.
The gusset is 5.5 inches wide.


No comments:
Post a Comment
Thanks for visiting. I love to read your comments.