 I started with a card which coordinated with the large sticker. Some were green, salmon, or brown. The white embossed flower is a Cuttlebug embossing folder. I trimmed very close to the border then glued it to the card front leave a small border of card color. I stamped the greeting in Chocolate Chip then punched it out with my 1" circle punch. I used foam tape to pop up the greeting from the card front. I then placed the large brown sticker in the centre of the flower. Quick and easy!

Monday, January 24, 2011
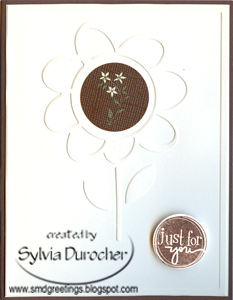
Card Club - January - Circle Sticker
I started with a card which coordinated with the large sticker. Some were green, salmon, or brown. The white embossed flower is a Cuttlebug embossing folder. I trimmed very close to the border then glued it to the card front leave a small border of card color. I stamped the greeting in Chocolate Chip then punched it out with my 1" circle punch. I used foam tape to pop up the greeting from the card front. I then placed the large brown sticker in the centre of the flower. Quick and easy!
Card Club - January - Embossed Heart
 Card Club has returned! It's been 8 months since the last one as I took time for my scrapbooking project. It's good to be back with this group of ladies. We welcomed a few new faces and welcomed back others.
 This could be used for Valentine's or anniversary. There are 3 different options: hearts, leaves or stars with coordinating paper using the same layout. The decorative paper is trimmed and glued. A slit in the fold allows the ribbon to go right around the card front and it's knotted. I layered a Sizzix Oval die cut then a Primitive heart die cut which was embossed with the SU! Finial Press embossing folder.
Tuesday, January 11, 2011
Favor - Angel in a Tin
 These are the favors I created for our Christmas dinner this year. We had 21 around the table which was very good!
I started with an ivory 2" circle. I added a gold Stampin Up! scallop punch shape then a pearl red 1 3/8" punched circle. To that I braded on a ivory angel I found in the button section at Michaels. The small glittered star came from the same package. I put the date and the year on the back.
the place holder was a gold scallop, a 1 3/8 circle in the pearl red and an ivory 1.25" with our names on them. This was held up with a clothes pin. To save, it all fits in the small round tin.
Monday, January 10, 2011
Photo - Candles
 Here's my candle display for the Christmas season this year. I have decided to only use tealights at my house. I needed to create a base for the candle in crackle glass holders so I put small glass beads below and around the tealight. I added some plum glass beads as well along the sides to hide the edges even though the tealight holder is clear. I placed these holders on a large glass plate and added some greenery around the bottoms. I'm happy with the way it turned out.
Friday, January 7, 2011
Cards - Red & White Snowflakes
 Some seasonal cards for my exchange group. I started with kraft colored cardstock which worked with the decorative paper I chose. I used white craft ink and stamped snow dots onto it and embossed those in clear. I cut the red layer and ripped the bottom edge. I added the snowflake layer and ripped it as well. Punched 3 red squares. The snowflakes were buttons which I removed the shank with my sharp plyers. Cleared the back with my exacto knife and used Zots to adhere them to the squares. Mounted them on the diagonal. I added a small greeting stamped in red on a window slot punchie.
Thursday, January 6, 2011
Cmas Card Challenge - Jan - Vintage Christmas
 My first Christmas card of the 2011 challenge! The theme is Vintage so I found a nice St. Nick, printed it and then cut it round with my CM circle cutter. I cut the turquoise ornament with my Cricut with the Joy of the Season cartridge. I cut the silver layers (holder & ball at the bottom), glued them on along with the circle element. I smudged the edges with a Old Olive Green ink pad. I selected a coordinating layer of parchment cardstock for the background. I used the Victorian Cuttlebug embossing folder which fit with the theme very well to add texture to this layer. All this was mounted on a pea green card. I added a satin ribbon and turquoise snowflakes mounted with ivory brads.
 I made 6 of these.

I submitted these to Karen's Christmas Card Challenge and Sparkle Creations Christmas Challenge and Christmas Cards All Year Round.
Saturday, January 1, 2011
Cards - Cmas Thank Yous
 Here's the cute little tree. I mounted the recycled gift wrap element onto card stock and trimmed it with decorative scissors. I mounted the Cuttlebug Swiss Dots layer onto a white card then layered some small rick rack. I mounted the central oval image onto the rick rack with 3D pot dots.
Cards - Cmas Thank Yous
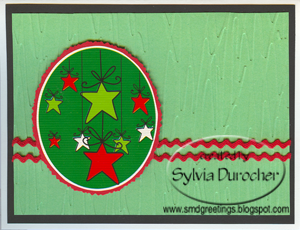 My focal oval image is recycled from gift wrap. I mounted it onto coordinating cardstock and trimmed it with decorative scissors. I started with a white card, then a black layer then added a green Cuttlebug embossed layer. I added 2 rows of small rick rack over which I mounted the oval with 3D foam dots.
Cards - Cmas Thank Yous
 Christmas was a very good! I made these cards for thank you cards for the gifts I received.
The central oval image is recycled from gift wrap that was on a gift I received. I made these with blue card stock. I mounted the central images onto coordinating card stock and trimmed with decorative scissors. The images had reindeer, trees or stars. I added a white Cuttlebug Swiss Dots embossed layer and some red small rick rack.
Tuesday, December 28, 2010
2011 - Christmas Card Challenge
I was really happy with the results of Christmas Card Challenge last year so I'm running another one this year! What I have learned this year is that the cards need to be completely done. I needed to add inserts & credits on many this year which slowed me down.
I will be posting my cards the first of the month along with suggestions and encouragement to participate in the challenge. In the end, the objective is to get your cards made throughout the year and the themes are meant to be inspirational. Join as many months as you want. If you participate, please add a comment including the link to your card so others can be inspired. I'm looking forward to seeing your creations. Become a follower of my blog if you want to be notified of my postings.
Jan - Vintage Christmas - St. Nick, Victorian images & colors, Antique Ornaments, Old Fashioned
Feb - Musical Christmas - Carolers, Instruments, Drummer Boy, Carols & Hymns, Nutcracker
Mar - Color - Monochromatic - several shades of a single color
Apr - Winter - Snowflakes, Snowmen, Penguins, Sleds, Skates, Sleighs, Igloos
May - Reason for the Season - Nativity, Manger, Stars, Angels, Wisemen, Bethlehem, Doves
Jun - Color - Chocolate/Red/Cream - any combinations of these colors
Jul - Christmas Around the World - Feliz Navidad, Poinsettias, Father Christmas
Aug - Christmas Glitters - use glitter on your card
Sep - Color - Non Traditional Colors - Pink, Lime Green, Teal, Turquoise, Kraft, and much more.
Oct - Natural Christmas - Pinecones, Mistletoes, Raffia, Pine Trees, Twig Wreaths
Nov - Christmas Decorations - Ornaments, Stockings, Candy Canes, Lights, Gingerbread
Dec - Color - Metallics - Gold, Silver, Bronze, Copper
Here's my list of themes with a few ideas next to each of them:
Jan - Vintage Christmas - St. Nick, Victorian images & colors, Antique Ornaments, Old Fashioned
Feb - Musical Christmas - Carolers, Instruments, Drummer Boy, Carols & Hymns, Nutcracker
Mar - Color - Monochromatic - several shades of a single color
Apr - Winter - Snowflakes, Snowmen, Penguins, Sleds, Skates, Sleighs, Igloos
May - Reason for the Season - Nativity, Manger, Stars, Angels, Wisemen, Bethlehem, Doves
Jun - Color - Chocolate/Red/Cream - any combinations of these colors
Jul - Christmas Around the World - Feliz Navidad, Poinsettias, Father Christmas
Aug - Christmas Glitters - use glitter on your card
Sep - Color - Non Traditional Colors - Pink, Lime Green, Teal, Turquoise, Kraft, and much more.
Oct - Natural Christmas - Pinecones, Mistletoes, Raffia, Pine Trees, Twig Wreaths
Nov - Christmas Decorations - Ornaments, Stockings, Candy Canes, Lights, Gingerbread
Dec - Color - Metallics - Gold, Silver, Bronze, Copper
Monday, December 27, 2010
Christmas Cards - Custom Designed
 I designed these cards for a client. The music sheet ones are in 4 different colors (green, sepia, mauve, & brown) with 4 Christmas songs (O Little Town of Bethlehem, Away in the Manger, Joy to the World, & Silent Night). The leaves are printed then a red hydrangea silk flower was added with 2 graduated sized gold sequins on a tiny gold brad. The insert was customized to their specifications.
 The Wisemen cards were also designed with a blue and taupe backgrounds and a custom insert.
I'm really happy with the way these turned out.
Friday, December 24, 2010
Photo - Merry Christmas
 It's Christmas Eve and I have way too much left to do!
 I hope you have a great Christmas season over the next few days. We are celebrating ours on Boxing Day!
Tuesday, December 21, 2010
Photo Calender - Angels
 This is this year's calendar. They make great gifts.
 I've put together photos I took over the year into a 2011 calendar. I've been to cemeteries, churches, Christmas displays and other places to take photos of a variety of angels. The photo on the front here is one of the angels that guards the Book of Remembrance in the Peace Tower in Ottawa which holds the names of each Canadian soldier lost in war. I have praying angels, heralding angels, rejoicing angels, singing angels and musical angels. Here's my calendars from last year.
Monday, December 20, 2010
Card - Digital - Poinsettia
 This is a photo I took couple of years ago of a great poinsettia plant. I framed it and added a greeting and voila! another card ready for printing. Print, add an insert, an envelope and a bit of personal note and it's ready to go! Great option for last-minute cards.
Card - Digital - Bethlehem
 Another digital card. I drew the line art quite a while ago but added the oval background this year. The original art took a long time to produce but I have been able to use it for several projects. This is a quick and easy card. It is designed for a person to print, add an insert with a personal greeting and an envelope and be ready to go. One person can make many in a few hours and it is done!
Wednesday, December 15, 2010
Photo - Poinsettias
 I was out to the Muttart Conservatory on Sunday to take in some of the season's atmosphere. Of course, poinsettias were featured extensively. As you can see from this collage, there were many colors on display. I'm not sure about blue poinsettias with glitter besides. There were bears on a train in the feature pavilion. I managed to find holly in the temperate pyramid. It was a good few hours. I updated my blog header as well using one of my photos.
Tuesday, December 14, 2010
Card - Digital - Burgundy Star
 I designed this card with digital elements from AriaSparkle Graphics. The background is a digital scan of a green fabric. The placement of the background involves ensuring that I stay within the printer's margins and align it to ensure even borders when the full sheet is cut in two. The PEACE are individual digital elements. I colored them to match the star element. I placed the star at an angle to the greeting. It was printed on natural parchment card stock. Here's a link to the last year card.
Wednesday, December 8, 2010
Card - Silver Snowflake
 I created this card for a group at work. I used a white card and added a black layer stamped with white ink and embossed. I cut 2 Sizzix snowflakes in white and silver, layered them and used a brad to hold them in place. I added a few tiny brads over the card front to repeat the white circle theme. I cut the sentiment from silver paper with the Cuttlebug Red Tag alphabet.
Wednesday, December 1, 2010
Cmas Card Challenge - Dec - Santa/St.Nick
I have added St. Nick to the category which will allow vintage images and coloring to the category. You can stamp, die-cut, color print, watercolor, chalk, marker or emboss these jolly men onto a card. Here's the cards I made.

 I started with a vintage St. Nick image which I color printed. I layered it onto off white cardstock coordinating with his robe and then burgundy cardstock matching his overcoat. I selected a Blue Bayou cardstock which matched the background.

Left: I embossed the top 2/3 of the card with a Cuttlebug folder. I placed a ribbon just below it and taped the ends to the inside of the card through a slit in the fold. Glued the St. Nick layer to the top left corner. Added a greeting stamped in white below and a MS punched snowflake on the right. Added a silver sparkly in the centre.
Right:I created a gatefold card. I stippled the outside edges of the card with Ruby Red ink. I stamped a small flourish in white ink to the left of the image. I glued the St. Nick layer to the left card flap.
Right:I created a gatefold card. I stippled the outside edges of the card with Ruby Red ink. I stamped a small flourish in white ink to the left of the image. I glued the St. Nick layer to the left card flap.
I made 8 of these cards:
Total to date: 131
Christmas Stack Class - Version 2
 A friend hosted a Christmas Stack Class for co-workers on Monday night. It was a smaller group and a different atmosphere. We had a good time!
I made up some of the card kits in a different way than the one I designed originally. It was fun. I know this happens every time I have a class because there is no rule that the supplies provided in the card kit must be used in a particular way. It's their cards they can make they way they like. Participants use their creativity and come up with great ideas. To the left are a few of the cards I made.
Subscribe to:
Posts (Atom)