 I designed this card with the Happy Dots digital kit from Free Digital Scrapbooking. I created 2 different halves for the card front. One from the plain blue paper and the other from happy dots paper. I created the 3D warm red band and placed over the join in the paper. I created 3 large flat brads in coordinating colors. It is being used at the end of a church retreat so I added the word "Friend" as requested. I printed it on parchment cardstock which worked well with the warm tone of the papers.

Monday, February 7, 2011
Digital Card - Friend
I designed this card with the Happy Dots digital kit from Free Digital Scrapbooking. I created 2 different halves for the card front. One from the plain blue paper and the other from happy dots paper. I created the 3D warm red band and placed over the join in the paper. I created 3 large flat brads in coordinating colors. It is being used at the end of a church retreat so I added the word "Friend" as requested. I printed it on parchment cardstock which worked well with the warm tone of the papers.
Thursday, February 3, 2011
Card Kits - Large silk flower
 I wanted big flowers, they are nearly 4" in diameter. I really like them. I trimmed my decorative paper to 3.5 inches tall and the width of the card. Glued that down. I would recommend hot glue to adhere the silk flower. I colored the chipboard daisy with coordinating ink. I adhered the chip board daisy to the centre of the flower with a Zot. I think it looks great.
 The flowers were all the same but I managed to find 3 or 4 designer paper that worked then added coordinating cardstock.
Card Kits - Maple Leaf Tag
 I wanted to provide a masculine option in the card kits. I started with the ribbon and work through cardstock options. This is Old Olive card which was Cuttlebug embossed on the bottom 2/3. The teal tag is punched as well as the maple leaf. The ribbon is taped to the inside of the card once the tag is slipped on. The button was cut with a Sizzlet die. I managed to find a cranberry thread which worked for the tag and the button.
I provided a variety of cardstock - brown, green, teal, cranberry, Kraft in order to offer cards which look a bit different from each other.
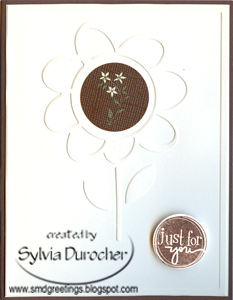
Card Kits - Flower & Sticker
 This is a great simple and elegant card. The flower is embossed with a Cuttlebug folder. I trimmed it next to the frame around the edge. Once mounted on the card it leaves a nice edge of color all the way around. The centre of the card is a sticker. I found a coordinating ink and stamped a circle greeting which I punched out with my 1" punch. The greeting was mounted with 3D foam tape.
Card Kits - Bright Squares
 This card is similar to one I did for Card Club.
 I punched 1.5" squares and corner rounded 2 corners. I color printed the greeting and line. The squares are then mounted with the pointy corners to the centre to create a graphic element next to the greeting. I have provided a variety of greetings to suit several occasions.
Card Kits - Easter - Split DP
 This was a great set of Designer Paper. I matched it with Baja Breeze, Always Artichoke, a salmon colored and orange cardstock to provide a bit of variety in the card kits. I trimmed both papers to 3x4 inch pieces and provide one of each design. I color printed the greeting on a taupe cardstock and ripped the edges and glued it over the join between papers.
 I provided a generous strip with the greeting so participants can trim with scissors or rip the edges. With the 2 pieces gives plenty to be creative.
Cards - Daisy Pink/Brown
 I made a couple of these for my exchange group. I selected my patterned paper then started with a Kraft card. I wanted the element to fit into an opening in the card front. I made the half circle opening on the card front with my 1 3/8" circle punch. I created my circle accent with a dark brown 1 3/8 inch circle, then a 1.25 inch patterned paper circle, then a white daisy punchie. The pink colored brad holds the daisy and the patterned circle which is then glued to the dark brown so the brad would not show on the back of the card. This accent was glued on the bottom half to the back card. I added a bit of rick rack on the right hand side with quick dry adhesive. The daisy flower was repeated on the front right hand corner of the patterned paper layer. I added a quarter sheet insert.
Card Kits - Easter Eggs
 I made these card kits for a lady who does work in a shelter and one of her favorite crafts is cardmaking. Easter is coming and this is a bright and cheery card. I started with a Summer Sun card and added a DP layer. I punched the yellow tag then cut out the white larger layer. I cut an egg from extra paper and glued it to the tag. I added the white satin ribbon and glued the tag to the card front.
The kits include a variety of coorinating cardstock in order that cards are not exactly the same.
Tuesday, February 1, 2011
Cmas Card Challenge - Feb - Musical Christmas
 Musical Christmas could include carolers, instruments, or hymns. What comes to mind?
I started with Bazzil Mocha Divine card stock. I printed a scanned image of the music for the "Little Drummer Boy" song on vanilla card stock (4 per 8.5x11). The quarter sheet was was trimmed, smudged with ink and I distressed it's edges. I wrapped the bronze organza ribbon around just below the song title, knotted it and trimmed it's ends. This layer was glued to the card front. I cut a matching oval of card stock with my Creative Memories oval cutter and then trimmed a sepia colored image of the Little Drummer Boy. This accent was then mounted on the card with 3D foam tape.
I made 6 of these.
Total: 12
Monday, January 24, 2011
Card Club - January - Accordion Greeting
 The centre square is a small accordion greeting. The paper is cut 2 1/8" x 10 5/8" long and is folded at 2 1/8, 4.25, 6 3/8, 8.5. I printed the greeting on the computer then scored it. The decorative paper is trimmed and glued to the card. The greeting has 5 panels which starts with HB, to you, HB, to you, HB to you! (this could be personalized to include the person's name). If you start with the first HB with a mountain fold the rest falls into place. The back of the last panel is glued to the square. Then the ribbon is tied around the whole accent. Make it a bow so that the person can untie it and read the full greeting. Once tied then the accent can be glued to the card front.
Card Club - January - Graphic Flower
 This is a nice bold simple card. I punched 1.5" squares from 5 different Citrus colors then used the corner rounder punch on 2 opposite corners. I printed on a white card the flower stem and greeting. Then I trimmed it and mounted it on a black card to coordinate with the greeting. When gluing down the rounded squares be sure to put the pointy corners in the centre. That helps to make it look like a flower. We had a couple of the girls cut out the leaf just inside the line and place the green square under it and put the orange square into the flower. It was good to see the creative juices flowing!
Card Club - January - Circle Sticker
 I started with a card which coordinated with the large sticker. Some were green, salmon, or brown. The white embossed flower is a Cuttlebug embossing folder. I trimmed very close to the border then glued it to the card front leave a small border of card color. I stamped the greeting in Chocolate Chip then punched it out with my 1" circle punch. I used foam tape to pop up the greeting from the card front. I then placed the large brown sticker in the centre of the flower. Quick and easy!
Card Club - January - Embossed Heart
 Card Club has returned! It's been 8 months since the last one as I took time for my scrapbooking project. It's good to be back with this group of ladies. We welcomed a few new faces and welcomed back others.
 This could be used for Valentine's or anniversary. There are 3 different options: hearts, leaves or stars with coordinating paper using the same layout. The decorative paper is trimmed and glued. A slit in the fold allows the ribbon to go right around the card front and it's knotted. I layered a Sizzix Oval die cut then a Primitive heart die cut which was embossed with the SU! Finial Press embossing folder.
Tuesday, January 11, 2011
Favor - Angel in a Tin
 These are the favors I created for our Christmas dinner this year. We had 21 around the table which was very good!
I started with an ivory 2" circle. I added a gold Stampin Up! scallop punch shape then a pearl red 1 3/8" punched circle. To that I braded on a ivory angel I found in the button section at Michaels. The small glittered star came from the same package. I put the date and the year on the back.
the place holder was a gold scallop, a 1 3/8 circle in the pearl red and an ivory 1.25" with our names on them. This was held up with a clothes pin. To save, it all fits in the small round tin.
Monday, January 10, 2011
Photo - Candles
 Here's my candle display for the Christmas season this year. I have decided to only use tealights at my house. I needed to create a base for the candle in crackle glass holders so I put small glass beads below and around the tealight. I added some plum glass beads as well along the sides to hide the edges even though the tealight holder is clear. I placed these holders on a large glass plate and added some greenery around the bottoms. I'm happy with the way it turned out.
Friday, January 7, 2011
Cards - Red & White Snowflakes
 Some seasonal cards for my exchange group. I started with kraft colored cardstock which worked with the decorative paper I chose. I used white craft ink and stamped snow dots onto it and embossed those in clear. I cut the red layer and ripped the bottom edge. I added the snowflake layer and ripped it as well. Punched 3 red squares. The snowflakes were buttons which I removed the shank with my sharp plyers. Cleared the back with my exacto knife and used Zots to adhere them to the squares. Mounted them on the diagonal. I added a small greeting stamped in red on a window slot punchie.
Thursday, January 6, 2011
Cmas Card Challenge - Jan - Vintage Christmas
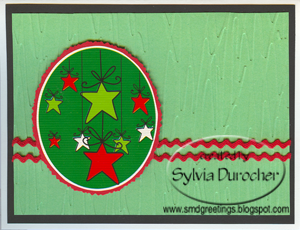
 My first Christmas card of the 2011 challenge! The theme is Vintage so I found a nice St. Nick, printed it and then cut it round with my CM circle cutter. I cut the turquoise ornament with my Cricut with the Joy of the Season cartridge. I cut the silver layers (holder & ball at the bottom), glued them on along with the circle element. I smudged the edges with a Old Olive Green ink pad. I selected a coordinating layer of parchment cardstock for the background. I used the Victorian Cuttlebug embossing folder which fit with the theme very well to add texture to this layer. All this was mounted on a pea green card. I added a satin ribbon and turquoise snowflakes mounted with ivory brads.
 I made 6 of these.

I submitted these to Karen's Christmas Card Challenge and Sparkle Creations Christmas Challenge and Christmas Cards All Year Round.
Saturday, January 1, 2011
Cards - Cmas Thank Yous
 Here's the cute little tree. I mounted the recycled gift wrap element onto card stock and trimmed it with decorative scissors. I mounted the Cuttlebug Swiss Dots layer onto a white card then layered some small rick rack. I mounted the central oval image onto the rick rack with 3D pot dots.
Cards - Cmas Thank Yous
 My focal oval image is recycled from gift wrap. I mounted it onto coordinating cardstock and trimmed it with decorative scissors. I started with a white card, then a black layer then added a green Cuttlebug embossed layer. I added 2 rows of small rick rack over which I mounted the oval with 3D foam dots.
Cards - Cmas Thank Yous
 Christmas was a very good! I made these cards for thank you cards for the gifts I received.
The central oval image is recycled from gift wrap that was on a gift I received. I made these with blue card stock. I mounted the central images onto coordinating card stock and trimmed with decorative scissors. The images had reindeer, trees or stars. I added a white Cuttlebug Swiss Dots embossed layer and some red small rick rack.
Subscribe to:
Posts (Atom)