Friday, November 23, 2018

All Occasion Photo Cards - Craft Sale

I am working on photo cards for my craft sale tomorrow at the Millwoods United Church.  This is my first time being juried for photo cards so I decided to work on 5x7 inch cards which were very popular last year at a sale I attended.

This is Mrs. Bear all decked out in her finest.  I took the photo during my visit to the antique mall a while back.  It required a good amount of editing to create a pleasing image.  Turned out pretty good. 

This would make a great all occasion card for any female recipient. 


Love this beautiful Dahlia - Alpen Diamond - taken at the St. Albert Botanical Garden this summer.  I love how the petals are separate which makes it a bit unusual as far as dahlias go. They usually have many petals tightly organized around a barely visible center.

Again, perfect for an all occasion card. 


These are the cosmos flowers I planted and harvested in a friend`s garden this summer.  I did not get very many but these are lovely. 

I paired them with my yellow glass vase.  Love how the yellow in the center of the flowers is repeated in the vase.  I was able to hide the water mark behind the yellow in the neck of the vase.

Super all occasion card.

I initialed all the photos to confirm my art work.

Friday, November 16, 2018

R2Go Christmas Stack - Prism Snowflakes & Trees

I started with a navy card base.

I tacked a 4" square of vellum leaving even borders top and bottom.

I added the silver metallic ribbon wrapped around the card front and taped to the front over the vellum where the accent will cover it.

The snowflake element starts with a small white sequin then a silver fiber one, then the prism one and finally the Stampin Up Snow Flurry white one cut from card stock.  Make holes as needed in each of the snowflakes. These are held together with a navy mini brad where the prongs are spread apart on the back.

Adhere the snowflake element with the 3D foam tape.

Glue the quarter sheet insert.


I started with a warm green card base.

I assembled my trees by cutting the black strip into 3 pieces then adding one to each tree with a tiny brad. The trees are adhered to the card front with double sided tape.

Remove the star & Zot from release paper and adhere to card front at the top of the tree one at a time.

Rip the white paper to create your snowbank.  Trim it to the card edge if necessary. 

Layer the white circle greeting onto the black larger circle. Add the 3D foam tape to the back and adhere to card front as shown.  Glue the quarter sheet insert to the inside.

R2Go Christmas Stack - Gold, Red, Green

I cut the Merry Christmas layer with one of the thinlets from the Sizzix Square set which is 3.75 inches square.  I cut the Christmas green layer to 4 inches square.  These are adhered together. I used a push pin to create the 2 holes for the brads - Star Glitter and Green Pine tree brads.

I spattered the red card base with gold Gleams acrylic paint and let it sit till it was dry - a couple hours. Once dry I wrapped a piece of ivory and gold metallic organza ribbon around the card front and taped the ends to the card front under where the greeting will cover.

I cut the 3D foam tape square into 4 pieces and placed them in the four corners.  I then adhered the greeting square over the taped ribbon ends leaving even border top and bottom.

Glue the quarter sheet insert inside.


I cut the metallic gold NOEL layer with the Tim Holtz Bracket die.

I used a push pin to create the hole in the middle of the O in NOEL and pushed the brad through and spread the prongs apart on the back. 
Inny Outie Bow - Put one end of the ribbon through the left hand hole then repeat with the other end through the right hand hole. Cross the ends on the back and reinsert the ends through the opposite hole from the back. Pull gently to take up the slack. 

I cut the 3D foam tape square in 4 and put on on each corner.  I then adhered the NOEL layer to the front of the green card.

Trimmed the ends of the ribbon with scissors and glued the quarter sheet insert on the inside of the card.

Thursday, November 15, 2018

Welcome to my Kitchen

Our ladies fellowship group met this morning and we had 22 ladies attend.  We were fortunate that our hostess has a social room where she lives which provided lots of space for all of us.

The ladies on snack provided toast, muffins, fruit, mini quiches and great tea and coffee.

The size of group meant I only visited with a few people because there were 7 tables.

Our devotion was on Friendship.  We are blessed to have friends who love us, support us, and appreciate us. 

A poem was read from the Psalms Now book which was very good.

Our prayer list was long but we are committed to being praying ladies which is one way can can support each other.

Books were exchanged.

Wednesday, November 14, 2018

Cardmaking - CH - Class 4

Style 2 - I started with clear embossed double sided designer paper from Imaginisce.

I cut the designer paper at a logical line to ensure I did not cut through a strip of the design.  I turned the top over to reveal the green polka dot pattern. These were taped back together.

I added gold foil ribbon across the join and the ends were taped to the back.

I added an accent of silk flowers.  White and red poinsettias were layered together with a gold sequin onto a gold mini brad.  Using a push pin I created a hole in the designer layer. I pushed the prongs through and spread them apart on the back holding the poinsettia accent in place.

I then adhered the layer to the front of a cranberry card base.


Style 3 - I started with this decorative card stock featuring a colorful ornaments .  The dark areas are gold foil. It was cut to 3 3/8 inches with a Sizzix square thin-lit.

I chose a eggplant purple layer of card stock cut to 3 5/8 inches to highlight some of the colors in the tree.

The next layer is a gold moire texture decorative paper which has been cut to 5.25 x 4 inches. 

I chose a warm blue card base to coordinate with another color in the tree.

The greeting is a Stampin Up Decorative Label in the same color as the card base.  I added a SU Word Window punchie in warm white card stock with coordinating color.   These are adhered together then it is adhered to the card front with 3D foam tape.

Style 7 - I started with designer paper from the My Mind`s Eye - Holiday Avenue - Sweet Dreams Glittered Holiday Paper pad. It was cut to 5.25 x 4 inches with the embossing placed on the left hand side.

The star element was created with a star die cut and a gold star circle. The die cut was cut from ivory pearl card stock with the the Joy of the Season cartridge on the Cricute Create machine.

The gold star circle was attached to the star with 2 tiny gold brads.  The element was adhered to the card front with ds tape.

Tuesday, November 13, 2018

Iris Flower

This is an iris from the my Aunt Winnie`s casket as I attended the service this afternoon.

She was woman who raised 5 children and was predeceased by my uncle a few years ago. She was also predeceased by 2 of her children.

She enjoyed gardening, growing food, collecting seeds and having flowers bloom.

She was recycling before it was cool.  She made sure good stuff was refurbished and donated to those who could use it.

Had a great visit with cousins, aunts and uncles.

I appreciated the time she took when I was 18 and needed to get some practice driving after I had taken my course and before I took my road test.  If I recall it was once a week for about 6 weeks.   I did pass my test and bought my first vehicle shortly there after.


Monday, November 12, 2018

Antique Mall Visit

I made a visit to the Antique Mall yesterday in search of some cool stuff and a few photos.

Found this Royal Doulton Toby Jug called the Poacher 1954.  There were several of them and they were well displayed.   At a price of nearly $50 I'm not sure how soon it will leave the shelf.

My Macro Monday challenge was green do I took a photo of these vintage salt and pepper shakers.  They were within the 3" limit.

These certainly are from the 50s or 60s and very classic shape and color.  The gold accents are really nice.

I ended up with another photo abstract from the Mall you can check out here.


I found the Lady Teddy all dressed up for a day on the town.   Her leopard print outfit I am sure is all the rage.  Pearls around her neck and a feather boa to finish off her outfit.

I love the button on her hat. 


Speaking of halts I found this gorgeous ladies felt hat in a light grey.  Very well done. Elegant and stylish.

There was a good variety of vintage glass Christmas Tree Ornaments in a variety of conditions. 

I noticed a lot of pink ones.  The trees used to display them also came in different styles.

This is my mosaic for sharing.

Mosaic Monday #2 hosted by Angie at Letting Go of the Bay Leaf.

Sunday, November 11, 2018

Remembrance Day

We owe those who fought for the freedoms we enjoy, respect.

I am blessed to live in my country.

Thank you for all who served and are currently serving to maintain the freedoms I enjoy.


Tuesday, November 6, 2018

Thank You Cards - Donation

This is a 4" square of woodgrain designer paper which was ripped into 2 pieces.  The pieces were adhered off set top and bottom on the front of a tan card.

I adhered a greeting of an oval color printed punchie adhered to a Soft Suede scalloped oval.  It was adhered with 3D foam tape to add some dimension to the card.

I am dropping off another set of Thank You cards as I teach my Christmas Card class at Compassion House.


I wrote a note to the ED in this hand painted daisy card.  I used to make these years ago and I love that it is my own work.

I need to get back to creating my own art which I do mostly with photography.  I do my own decorative paper and a bit of painting.

Cardmaking - CH - Class 3

Style 3 - I started with this decorative card stock featuring a colorful tree of peacock feathers with birds.  The dark areas are gold foil. It was cut to 3 3/8 inches with a Sizzix square thin-lit.

I chose a turquoise layer of card stock cut to 3 5/8 inches to highlight some of the colors in the tree.

The next layer is a gold moire texture decorative paper which has been cut to 5.25 x 4 inches. 

I chose a purple card base to coordinate with another color in the tree.

The greeting is a Stampin Up Decorative Label in the same color as the card base.  I added a SU Word Window punchie in warm white card stock with coordinating color.   These are adhered together then it is adhered to the card front with 3D foam tape.


Style 7 - I started with designer paper from the My Mind`s Eye - Holiday Avenue - Sweet Dreams Glittered Holiday Paper pad. It was cut to 5.25 x 4 inches with the embossing placed on the left hand side. 

The star element was created with a star die cut and a gold star circle. The die cut was cut from ivory pearl card stock with the Sizzix Star original die.  The gold star circle was attached to the star with 2 tiny gold brads.  The element was adhered to the card front with ds tape.

Style 2 - I started with clear embossed double sided designer paper from Imaginisce.

I cut the designer paper at a logical line to ensure I did not cut through a strip of the design.  I turned the top over to reveal the green polka dot pattern. These were taped back together.

I added gold foil ribbon across the join and the ends were taped to the back. 

I added an accent of silk flowers.  White and red poinsettias were layered together with a gold sequin onto a gold mini brad.  Using a push pin I created a hole in the designer layer. I pushed the prongs through and spread them apart on the back holding the poinsettia accent in place.

I then adhered the layer to the front of a cranberry card base. 

Monday, November 5, 2018

Mosaic Monday - Recently

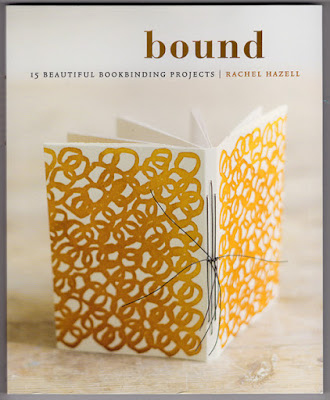
Bound by Rachel Hazell arrived today!  It is a book on book making and I am very excited to read it cover to cover then provide a review and make some of the projects in it.

Keep an eye out here on my blog for further posts of projects.

I have dabbled in book making but this book provides detailed instruction based on a quick perusal of it.

I love the handmade decorative paper she has created for the book covers.   If you follow this blog you will know that I love to make my own decorative paper.


I finished my second Kate Morton book today.  A friend gave me this book a month ago knowing how much I had loved The Forgotten Garden I read this summer.  I read The Lake House amidst preparing for a large craft sale which ran the few days so my full attention was not on my reading.  Fortunately, I own the book so I will be able to read it again in the new year when I have more time.

Again, this story runs in 2 time periods the 1930's and the 2000's and involves a beautiful property in Cornwall England.  A young boy disappears and at the time the mystery is not solved as not many clues are found.

A detective in London is given an opportunity to take up the solving of the mystery.  Fortunately, one of the key persons at the Lake House in the 30's is still living but it will take her cooperation to get to the bottom of it.

It has a great ending!

I am working my way through this journal from one of my favorite authors Ann Voskamp.

I have read the book this is based on "The Broken Way".  It did not resonate with me as much as her earlier book 1000 Gifts did.

I am always interested in seeing things from a different perspective and working on my self improvement.


The sale on the weekend was successful in raising a good some of money for missionaries over seas.

It helps a lot when most of the items being sold have been donated so the funds are pure profit.   I purchased a set of wooden coasters from one of the other tables.  They will be useful in my photography.

I purchased some glass beads from a lady at another table. 

They have 925 imprinted on them which implies sterling silver cores.

I thought I got a great deal but it turns out I paid the going rate for them.  I bought them because I liked them and they will be a great addition to my macro photography so everyone is a winner.

I love the scissors charm as I have added sewing to my balliwick of skills this summer.

I did sell several sewing projects so I am very happy about that.


Joining Mosaic Monday #1 hosted by Angie at Letting Go of the Bay Leaf.  She is the new hostess for the photo linky.  The hours are better now so I may be able to participate regularly again.

Friday, November 2, 2018

R2Give SMDPics Calendars

I got 4 Ready 2 Give calendars ready for the sale. 

These are half sheet calendars filled with my photographs in the 3.5x5 inch size.  The subject matter is nature and flowers.  I did get some great shots this summer.


Photograph Framed - Bumblee on Globe Thistle

I managed to get a couple of photos framed for the sale today.

I captured the Bumble Bee on the the Blue Globe Thistle at the Muttart Conservatory. 

It is matted in a steel blue and black mat into a steel blue metal frame.  It is a 5x7 photo framed to and 8x10 size. 

12 Days of Advent

I created a smaller version of my Advent Calendar which may be more manageable for busy families.

You can start on the 1st of December and fit in the 12 days over the 24 days of Advent or you can start on December 12th and conclude on Christmas Day.

It features my photograph of Teddy and the small nativity taken for my photo calendar last year.  Teddy will be appealing to small children I expect.

It is packaged in a black metal frame which holds the 4x6 sheets.  The sheets can just be moved to the back as the days go by.

Silent Auction Donation

I am participating in our Mission Possible Sale this weekend and they requested a donation for the silent auction.

I am donating this photograph of a red poppy.  It was taken in July at the Community Garden in my neighborhood on my morning walk.  I generally don't leave the house with out the camera.

It is framed in a 12x12 inch black metal frame with a white mat with black insert.  The photograph was printed at 8x8 inches.

There is some great stuff up for auction.

Thank You Cards - Pink Heart

This is a recycled card.  I cut the main element from the original and reused it.

I layered it onto a piece of purple and then punched small daisy flowers from the cutoffs.  I placed them below the main element and held them in place with pink brads.

The purple layer was adhered to the card front of a pink card.  The insert inside is blank.


Another card with the same heart element.

I ripped right edge and mounted it on a brown card stock layer.  It was adhered to the front of a pink card aligned to the right hand side. 

I added some stitching in brown thread on the left hand side.  Placed a pink handmade paper flower in the wide opening held in place with a pink brad.

These are headed to my Thank You Card box.

Thursday, November 1, 2018

Thank You Cards - Prism Trees

Playing around with layouts, designs and card stock colors for these prism trees. 

This one I placed them close together rather than symmetrical.   I changed the stars as well for some large silver brads. 

The snow bank was ripped and adhered over the trunks and them trimmed to the bottom edge of the card.

I added a circle greeting to the top right hand corner.

I added a Thanks word window greeting to this one and it's going into the box.


12 Mini Meditations Photo Collection

We all need tools to manage the hectic life we live.  I wanted to create a tool for those who need to be reminded how to destress.

Meditations are a great way.  I found 12 Mini Meditations authored by Meg Selig on line.  We all can take 30 seconds to invest in ourselves. I chose only the title of each meditation for this project.  I provide the link to the full information for those who want to persue that.

I have paired my photography with phrases of mini meditations. 

This tool sits in your space whether that is your desk at work, the organization corner in your kitchen, or your home office. 

I recommend that you rotate them every week or month so that you get familiar with the concepts so when stress hits you have quick access to a way to handle it.  You can enjoy the images which provide a bit of a bright spot to enjoy each day.

I have been given permission by the author to produce these.  I am offering them in this craft season and we will see if folks see the value. 

The photographs were selected to provide a single element of focus to provide a calming composition.

The words are placed to be easily read but not overwhelming to the composition.

Photo Christmas Card - 5x7 - WC Nativity

Here's my little nativity again with the great stable background.This time a wide or landscape layout.

This time I removed the words from the garments of Joseph and Mary and left the ones on Baby Jesus.

The ceramic star in hung in the sky in the background that helps to ground the focal figures to the composition.

You get more of the stable in this photo so it comes down to personal preference.

Christmas Card Challenge - Green Tree

I cut some bright green designer paper into triangle trees.  This is a very efficient use of paper.  I used a 6x12 piece and cut 7 trees with 3 inch base and 5 inches tall.

I cut a piece of My Mind's Eye designer paper featuring triangle trees into rectangles 4.00x5.25 inches.

I chose 3 different card base colors to coordinate with colors in the paper. Kraft, white and Soft Sky.

I glue the triangle tree onto the designer paper.  I added a sequin star at the top with a Bling Zot.  I added one white snowflake and red sequins on the tree with Zots.

The greeting was cut from ribbon.  It was adhered with double sided tape at the bottom of the tree.

As you can see from the samples below I chose different colored sequins too!