
 Here are the cards for the Glorious Greetings class. I've included the 2 color options I offered. I sometimes have extra stack class kits available so if you are in the Edmonton area send me an email.
The wreath was cut with the Cricut - Joy of the Season cartridge at 3.5". I cut the layer out of green watercolored scrapbook paper. Those get glued on every other leaf cluster. Just find the ones that match. The greeting was cut with a QuicKutz nested oval thin dies. Glue the greeting to the colored oval. Tie a bow in the red and green plaid ribbon. Glue the gold or silver metallic paper to the card front. Adhere the ribbon bow to the top of the wreath with double sided tape or hot glue. Glue the greeting below the wreath. Fold the insert with the Christmas sentiment in half, place it inside the card with the fold tuck into the card fold. Lift the card front, place glue on the insert along the fold and press down the card front.


 I started with this great blue bird. It's really a post it note I bought a Michaels a while ago. I selected a white card with designer paper that coordinated with the tone of the blue in the bird. I trimmed that and glued it to the card front. I cut the leaves and the branch with the Cricut - Straight from the Nest p.42. It allows you to cut the branch then you can cut the leaves seperately in a different color and then glue them over the ones cut with the branch. Very cool! I placed my bird over the 3rd leaf on the branch. Some of the girls turned the branch around and placed the bird in the dip on that same end of the branch. Works well. I cut the wing with the Cricut - Create a Critter p.45. Once cut I embossed it with the Cuttlebug Devine Swirl folder. I glued the wing to mirror the sweep of the bird's tail. A beak defined with a white gel marker. A white brad for the eye. I used this in my All Occasion Class in April with a different sketch.

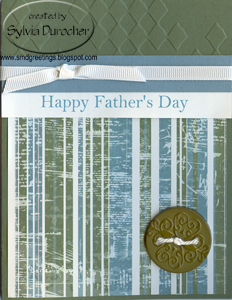
 This one was the Father's Day option. I started with always artichoke card and embossed the top 1/4 with an Cuttlebug embossing folder. I cut my designer paper to 4x4" and glue it to the bottom half of the card. I layered my greeting and the blue accent strip together then glued these both to the card between the embossing and the DP. I placed a slit in the card fold with an Exacto knife just wide enough to allow the ribbon to be pulled through. I placed the ribbon across the card, leaving enough ribbon to tape the ends to the inside card I cut the leftover off (about 2"). Once the secured on the card just tie a knot with the same piece onto the long piece and it makes a quick bow very easily. I put white cotton yarn through the holes in the button then applied a Zot to the back and mounted it in the bottom right hand corner. I offered a Happy Birthday greeting with this set.


