Saturday, March 12, 2016

Share Your Cup


During my walk yesterday I could hear a racket going on but it took me a while to find the source.  This is the squirrel I found in a tree,  his partner I did not find as he was in a full pine tree and was hidden in the branches.  I'm not sure if I was the source of the commotion and discussion but they were really vocalizing.  It was a gorgeous morning and it was good to find signs of spring in the air.


This was lunch one day this week.  Pumpernickel toast with a bit of butter and Italian Wedding soup with a dollop of sour cream. Yummy!


This is the tulip tile I posted about here.  The frame has had a make over.   The frame was dark brown and not really what I wanted.  I've been working on a painting project and I was inspired to paint the frame.  Now it is yellow and much more in keeping with the colors in the tile and my favorite colors.  More about the painting project in a future post.
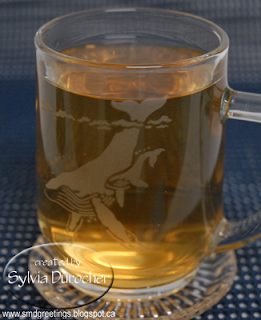


This is a clear glass mug with herbal tea in it.  It's a gift from a friend who took a trip to Hawaii this February.  Thanks so much for thinking of me while in those wonderful climes.


My trip to the library this week saw me bring home several books focused on the internet.  This book is very interesting for someone who has been blogging for 7 years.  I'm about half way through and much of it so far are the work to put in before you actually set up a blog and start posting.  Some really good ideas.  Chapters are introduction (anatomy of a blog),  finding your voice and niche (your aesthetic and your name),  Powering your Blog (platform, domain names, what to post and how often).  I'm enjoying the book and the rest is going to be interesting.

Submitting to Share Your Cup hosted my Carol at Art & Sand.

Friday's Hunt 11


I'm submitting these to Friday's Hunt hosted by Teresa at Eden Hills.
The prompts are Starts with K, Favorite and Flower.

This is one of the Ks I have in my Alphabet Photography collection.

This another of the umbrellas at the Conservatory.  I think it's a daisy but it must be the lighting that makes it look purple to me.  They were hung from the ceiling and really made the space look great.

There were several others more brightly colored which will show up in other posts.   You can see the sunflower in this post.


This is my favorite shot for this post.


This is a flower I took on my trip to the Conservatory.  I thought the open centre with the flowerlets all the way around was very graphic.  As you can see in the centre the flowers are coming to eventually create a nice full bunch.  As it's early in the season we have the in between stage which I captured.

Paper Crafting Garage Sale

Come and check out the sale today.

Scrapbooking/Cardmaking Garage Sale will be held at
Kenilworth Hall
7104-87 Avenue
 Saturday, March 12 at 10 to 2:00 p.m. 

Great bargains for you for your next projects!

Thursday, March 10, 2016

Thinking of You Sunburst

I made this card for a lady who has significant health issues.  Her name came across my desk this morning and I thought I should just send a card to let her knowing I'm thinking about her.

Can you guess I love my Stampin Up Sunburst Thinlit?  It makes bright cheery cards fast and easy.  I had cut the designer paper to 4 inches so I needed a layer that wide to make it work.  I added 4" the green layer onto the warm yellow card then I I adhered my bright sunburst.  I created a sentiment accent with Spellbinder Nestabilities Large Circle Set - 1 scallop circle and 1 smooth circle then the greeting which was color printed and then punched with the 1 3/8 inch circle from Stampin Up.

I hope it finds her well.

Spring Gift

I made a bright spring card.  The stamp is Gift by Magenta Stamps (a Canadian Company).  I embossed it with bright pink powder and fussy cut around the image with scissors.  I layered it onto a piece of turquoise cardstock onto which I printed my own background design of stars.  I punched 2 holes near to middle of the bow and pulled through a length of grosgrain ribbon in yellow and tied a bow.  Trimmed the ribbon ends.  This layer was adhered to a yellow layer repeating the yellow color then onto a bright pink card.  It creates a wonderful spring card.

The stamp I have owned for 20 years or so and have not used in forever. The bright pink embossing powder I don't think I have ever used.
Never-Before-Used-Schtuff (Stamps, Dies, EFs, etc.)
The cards are going to the girls on my card exchange group list for March.


Submitting this to:
NBUS Challenge hosted by Darnell at DJKardKreations
CST Home Page Challenge - something from our stash we have not used in a while

A Winner - Holly Jolly Christmas Card Challenges


My Three Wisemen/Kings card was a winner at Holly Jolly Christmas Challenge.  The sponsor is Lacy Sunshine Stamps and I 'm waiting to see what I have won.  I'll update once I know.

Made my day!!!

Here are my selections
http://lacysunshine.weebly.com/store/p1139/Melanie_and_Benny_Boo's_~_Holy_Night.html

http://lacysunshine.weebly.com/store/p1203/Sammi_Boo's_Hot_Cocoa.html

http://lacysunshine.weebly.com/store/p1813/Emmi_Lou_Boo's__Snow_Day_Fun.html

Looking forward to combining these with my decorative papers.  

Tuesday, March 8, 2016

Birthday Party Invites - Easily Personalized


I`ve developed a few birthday party invites.  These are distributed as digital files which are personalized then forwarded by email.  They can be printed at home, at the photo developer of your choice, or sent out digitally to those invited.  Makes it very quick and easy for busy Moms.

The one on the left features balloons which are my own art.  I have filled them with some of my watercolor backgrounds.  It has a banner across the top which has been colored to complement the balloons.  This one is designed as a quarter sheet of a regular letter sized sheet.
Updated: I've changed the background on this one which works much better.


The one on the right features one of my watercolor backgrounds and my happy birthday cake on a stand graphic.  The cake has been designed with the colors in the background.  This creates a bright and catchy invite for any party.  This one is 4x6 inches.


This one is in contrast to the bright and bold ones below. It's feel is soft and gentle. It was done with one of my bubble paper backgrounds in green, purple and turquoise.  I added the polka dot overlay to repeat the concept of bubbles.  I added my own daisy graphic in a coordinating color to add a feminine touch.  I chose to put the words in a delicate font to go with the overall feel of the background. 


Pink and purple for girls.  This one is in the wide orientation with the same birthday cake graphic from the top one.   The colors have been changed to work for a girl's party.  This is 4x6 inches.


Another watercolor background with wonderful feathered edges featuring bolder colors. The birthday cake graphics has again been used in this invite. The blues and purples in the background have been repeated in the cake.  This one is in the tall orientation and is 4x6 inches.


This one features ink spot decorated paper I made a while back.  I choose this one because of it's bold & bright colors.  The circle invite repeats the circles in the ink spots. The details are placed on a shaded box to insured they are visible and easily read.

These all can be personalized and will be delivered digitally.  They are available in 4x6 photo files or 2 or 4 quarter sheets in printable PDF. This makes printing at home easy. You can find them on my Digital Cards tab.

I will have samples at the Vintage Bazaar on March 19 2016.

Sympathy - WC & Tree

A simple sympathy card for a dear friend Bev who lost her Dad this week.  It`s such a hard thing to lose a parent even when we ourselves are not so young.

I found this great piece of watercolor paper in my stash.  I decided to use it and created a frame for it.  I felt it needed something else besides the sentiment so I added this great old tree graphic from CKLER.  I changed the color to Wild Wasabi to coordinate with the colors at the bottom of the watercolor piece. I think this works well.

I need to make more of this paper. It`s such fun and a great resource for all kinds of cards.

Monday, March 7, 2016

Monday Mosaic - New Items

I`ve been working to supplement my collection of dinnerware. 

I`ve added a white tablecloth with a wonderful shiny texture.  The water pitcher is sitting on a white crochet doily. I`ve added 2 of these to my collection as I have been using paper doilies but I wanted something more substantial.

I purchased the butter or spread knife which is silver plate I think. It was a very good price. It`s heavy and has Woodbridge pressed on the back side of the blade.

Red plates which are not quite round but complement the rest of the plates I have. I stacked blue, white, then red plates. The bottom photo is a full photo of a place setting. 

I`ve been looking for blue salad plates but blue is so hard to match so the hunt continues. 

Submitting this for Mosaic Monday hosted by Judith at Lavender Cottage.

Sunday, March 6, 2016

St. Patrick's Day HB

I made this card for a friend who have an aunt who celebrates her birthday on St. Patrick's Day. 

I started with an olive card and found a piece of damask designer paper in a color that matched well.  I cut that layer to leave a small border.  I then punched my 4 hearts with the Stampin Up Sweetheart punch to create the four leaf clover.  With that I designed the greeting layer, color printed in Always Artichoke it on vellum, embossed it with clear and trimmed it near the border.  I adhered the 4 hearts onto the vellum aligning them with the stem. Then I placed adhesive again only behind the hearts and placed it onto the damask designer paper.  I wrapped a piece of white seam binding around this layer and tied a knot in the front. Trimmed the ends and adhered it to the card front.

Friday's Hunt 10

I'm joining Friday's Hunt hosted by Terese at Eden Hills. The prompts are Starts with J, Favorite and A Cuppa.

Starts with "J". Its a Jug. I took a picture of my jug of water.  To make sure I drink enough water every day I fill this jug and leave it on the counter.  Hopefully by the end of the day it's empty and I have had my 8 glasses of H20 for the day. It does not always work out.


This is my favorite shot of the week. At my visit to the Conservatory I took this shot of the Prickly Pear Cactus with it's purple fruit which are filled with seeds. The leaves and fruit are edible once the spines are removed. Leaf pads are eaten as a vegetable. Fruit are eaten raw and used to make juice, jelly and candy.  I was excited to see the new green shoot growing which means spring has to be around the corner.

This is this morning's cuppa of tea. It's Rooibos (Red) Chai tea with some honey and cream.  I'm having it in a stoneware mug featuring blue with painted organics below the border.  This was a gift from a friend.

SMD Greetings Promo - Vintage Bazaar

I will be in a Vintage Bazaar on March 19 2016.

I will have my photo calendars with metal frames or pocket frames.  The sheets go from April 2016 to March 2017.

Alphabet Photography in Ready2Go words and order forms for custom words.

Individual cards sold or placed in Gift Card Sets and Nifty Notes.

I've been working on digital cards for other occasions similar to the ones I designed for Christmas. These are personalized and sent out by email.

I am putting together Kid Activity Kits which will be good for kids off on Easter break.

Share Your Cup #187

This is the cupboard on the back wall of my kitchen.  It has been a mess for a very long time.  I choose this cupboard to do some messy crafting that I don't want to do in my craft corner. Like heat embossing, some decorative paper making, etc. Well, this week it got a clean up.  The counter got some bleach to remove some stamping that strayed from the card, the embossing powder and the dust are all gone.  As you can see sunflowers feature a lot in my kitchen. The painting is from my niece and her visit to Europe. The twig wreath I made many years ago.  The new water glasses have made it to the shelf.  I will have to work on maintaining it.

Isn't this a great image.  I made a visit to the Conservatory this week and they had these wonderful flower umbrellas hung from the ceiling.  I just loved it!!!  I will have to check the gift shop to see if they are carrying these.  How wonderful to have a sunflower protecting me from the rain this summer.


I brought this little piece of children's furniture home from the thrift store the other day for a whopping $2. It is very well made so I expect it's quite old. The decals on the front are pretty old school.  I will be transforming it into storage for my tea stuff.  I have started the transformation.  The doors have been removed, every inch has been cleaned, the feet have been removed and the clothes hanger has been removed from the wardrobe side.  The sanding has started. From the jar of paint you can see it will be painted yellow.

Linking with Share Your Cup 187 hosted by Carol at Art and Sand.

Friday, March 4, 2016

Decorative Paper - Card Set 4

This is another alcohol ink background in yellow and turquoise on 4x6 inch photo paper.  I trimmed it and adhered it to the card front of a yellow card.  I cut a blue card stock layer with the Memory Box Grand Happy Birthday thin die.  I added deep yellow washi tape in chevron pattern across the bottom.  I adhered that to the alcohol ink background.  I added a small piece of yellow chevron washi tape in the upper right hand corner.


This background paper was made with liquid acrylic ink in blues and yellows.  It was very diluted with water and applied to photo paper with a large paint brush.  I just love the watery feel.  I added a white double edge punched border with the Martha Stewart daisy border punch.  I added a narrow piece of turquoise card stock down it's centre.  I added a medium and small silk white flower over the scallop accent held in place with a large turquoise brad.


This decorative paper is paste paper was made with acrylic paint and home paste.  The paste was applied and then the paper was folded in half and pulled apart.  Then marks were made with a tool. I cut the paper with the Stampin Up Top Note and the vellum greeting was cut with the same die.  I adhered the top note to the front of the navy card.  I adhered the clear embossed greeting with a tiny star brad.  I added a lime green butterfly punchie made with Martha Stewart punch in the top right hand corner.

Decorative Paper - Card Set 3

This bright bold paper was done with alcohol ink on an acrylic plate and picked it up with 4x6 photo paper.  I printed the large greeting on white then I cut the FRIEND word from it with the Stampin Up Little Letters Thinlits.  I adhered the alcohol background paper to a black card.  I added some black washi tape to the centre of the white.  I then added 3 sets silk flowers onto it held in place with tiny brads. I adhered the white greeting layer with 3D foam tape.

The decorative paper on this card was done with masking areas on white heavy bond paper with every day items.  The diamond shapes were done with a net material.  Other areas were spritzed with colored ink a bottle.  I placed a piece of aqua chevron washi tape on the left. I adhered it to a yellow card.  I placed a teal teapot cut with the Cricut and the Folk Art Festival cartridge.  I added a greeting punched with the Stampin Up Decorative Label punch.  I then placed an green one cut in half and offset on the back.


This card would be nice for a guy.  I used a piece of white heavy bond paper and sponged on acrylic paint in a variety of colors such as green, brown, tan and yellow.  I trimmed the paper to leave a small border on the black card.  I applied several lengths of black and white chevron washi tape in several directions.  I added a Tim Holtz Old Jalopy die cut in black. It is raised with 3D foam tape.

Decorative Paper - Card Set 2

This decorative paper was done with liquid acrylic paint applied to a piece of acrylic board. I then picked it up with a 4x6 photo paper.  This features a warm yellow with deep blue and where they merged a deep green.  I trimmed the decorative paper to leave a small border.  I adhered it to the front of a dark green card.  The greeting was color printed in navy on vellum and clear embossed.  It was trimmed and placed in the bottom third of the card and held in place with tiny navy brads.  I added green sequins onto the brads then added a few more held in place with Bling Zots.


This card features letterpress decorative paper in pink and navy.  I added a piece of navy crisp ribbon across the bottom third of the card.  I added a white and blue silk flowers and a white sequin all held in place with a tiny navy brad.  This accent was placed on the right hand side and is offset with a scallop oval greeting in the top left corner.

This paper was created with watercolor onto heavy bond paper.  It features teal and purple colors in a very diluted colors.  I cut the paper to leave a small border. I ripped the top and bottom edges of the vellum greeting.  I placed the heart to the left then put adhesive under it and added it to the card front. I cut the wedding couple with the Cricut and the Stretch Your Imagination cartridge.  It was cut at 4 inches with the silhouette option.  I cut it from brushed white card stock.  I used quick dry adhesive applied with a very narrow tip to get the glue only where I wanted. it.

Decorative Paper - Card Set 1

This is another collection of cards for sale at the gallery.  I started with the green paste paper which I trimmed to leave small border.  I adhered it to a dark green card.  I printed a large greeting layer on white then cut out the Happy with the Sizzix Phrase die.  This was adhered to the paste paper then I added 3 gold stars cut with the Sizzix Stars die.


This card features a piece of decorative paper made with pink ink and marked with a letterpress die from Sizzix. I brayed some Night of Navy ink onto it then pressed it onto the pink paper.  It only left a faint mark.  I cut the piece to leave a small border.  I place a piece of crisp ribbon down the centre and taped the ends to the back. It was adhered to the card front.  I then place a silver metallic scallop circle then a white silk flower topped with a smaller pink one held in place with a tiny navy brad.  I trimmed the vellum greeting to 4" and placed onto the card front as shown and held it in place with 2 tiny brads.
This card features ink sponged background paper in light to dark green. I printed some script and postage digital stamps onto it in black.  The paper was trimmed and adhered with postage on the left to a medium warm teal card front.  I added a teal teapot cut with the Cricut and the Folk Art Festival cartridge.  I mounted the teapot with 3D foam tape.  Before I adhered it I placed a piece of mint green card stock behind the holes to highlight them.

Thursday, March 3, 2016

2016-17 Photo Calendar - Beauty


Another calendar for the Vintage Bazaar at end of the month. This is a 4x6 photo calendar which includes a page for each month. It starts with April 2016 and goes to March 2017.  These are a collection of my own photos.  The center presents all the images in the calendar.  I have included floral and nature images. Check my calendar page of details on prices and formats.

Wednesday, March 2, 2016

2016-17 Photo Calendar - Retro


I'm going to be in a Vintage Bazaar towards the end of the month so I decided to create a photo calendar for the sale. This is a 4x6 photo calendar which includes a page for each month. It starts with April 2016 and goes to March 2017.  These retro images are created with my own photos.  The center presents all the images in the calendar.  I have included tea, floral, nature and street images.  I'm really liking the look!  Check my calendar page of details on prices and formats.

Sunburst Birthday Wishes

I purchased the Stampin Up Sunburst Thinlit during Sale a bration. I love this die!! Makes a great looking card in a hurry.

I chose a navy card and cut a scalloped circle with my Spellbinder Nestabilities Large Circle Set No.2 from the center from the same card stock.  I cut the sunburst from yellow designer paper.  I quite sure it's by Basic Grey. I designed a large circle greeting and printed and punched it out with the SU 1.75" circle punch.  I wanted something between the card and the sunburst.  I decided on vellum. I printed a bit of texture onto the vellum, heated some gold embossing powder then trimmed to leave a small border. Adhering of these layers was challenging because not wanting the glue to show through the vellum and the rays on the sunburst.

I've checked out samples on line and the next time I use it I will make it with another color.