I picked some apples from the ones I picked from my Mom`s tree last weekend. I removed the ends and stems, cut them into quarters, cored them and sliced them. I filled my casserole with sliced apples and some rhubarb. I added the crumb topping and put it into the oven.
Here`s the apple rhubarb crisp out of the oven. I let it cool a little bit. I love my Kitchen Aid casserole. Its a great color and it cleans up real easy.
I made a cup of tea to enjoy with my crisp. Chai Tea is one of my favorites. I recently purchased this Cochin Masala Chai tea. This small white teapot works well for tea for one.
I plated a serving of crisp on a Myott The Hunter in blue cobalt plate. I added a small cup of tea for this evening dessert with a bit of honey and half and half.
Yes, I did add a bit of half and half cream to add the bit of decadence to the serving. There was some sugar in the crumb topping but no additional sugar in with the fruit. It was not too sweet at all.
I really enjoyed this dessert.
Sharing with Cuppa Tea Tuesday hosted by Ruth at Antiques and Tea Cups.
Friday, August 19, 2016
Share Your Cup #211
This is one of the books I read recently. A couple who are separated in their teens but make a pact to meet in 11 years. He has always tried to find her but she made choice she was not proud of so, took steps to make it hard to find her. It was a very good book from this great author and it was hard to put down.

I added some letters to my Alphabet Photography collection. A wonderful S and an I.
Some colorful flowers and nature shots I took during my walks this week.
My latest offering in photo calendars. It meant many trips to get the shots I wanted and then vetting them to get the 12 best ones.
I've been working on digital watermarks for my photos as well. I have started participating in Flickr challenges and see some nice ones on the site. I thought I could design one for myself from my own art. I'm not sure it's the final ones because it's a bit on the big side. It is my first effort and I will have to sit with them for a while then decide if any changes will be made.
You can check out my Flickr page.
Sharing with Carol at Art & Sand for Share Your Cup.
Labels:
4x6,
Alphabet Photography,
book,
book2016,
cityscape,
Flowers,
KKIngsbury,
photo calendar,
SYC,
watermark
Cityscapes Photo Calendar
Labels:
2017 Photo Calendar,
4x6,
b&w,
buildings,
cityscape,
photo calendar
Thursday, August 18, 2016
Simple Sentiments
These are a new level of card I am producing. It is a note card with a layer adhered to the front. For this set it is one of my 4x4 inch photos I used for my photo calendars. This is one way to reuse the photo once the calendar page has expired.
The 4x6 calendar page was cut with one of the dies from the Sizzix Squares Thinlits which cuts at 3.75 inches square which is perfect. The sentiment is color printed on white card stock in Smoky Slate.

The set is 6 cards with envelopes with sentiments one might need without much notice. Get Well Soon, Sympathy, a simple thanks, Thinking of You or plain card with no sentiment.
They are simply packaged in a cellophane portfolio so 4 of the 6 cards a visible. An insert is enclosed with product information.

Labels:
4x4,
photo card,
photos,
reuse,
Simple Sentiments,
Sizzix Squares Thinlits
Monday, August 15, 2016
Monday Mosaic #3
I was home to take care of Mom while she recovers from surgery. There were meals to prepare and dishes to wash.
She is not able to do her regular harvesting of fruits and vegetables. I picked raspberries. We picked apples and processed them for crisps and she found her body was letting her know she had over done it. Sunday had to be a day of rest. The crab apple tree on the right as you can see is loaded.
I watered flowers and tomatoes, lettuce, carrots in the garden and her wonderful grapes. I forgot to take a photo!!!
I picked Nanking cherries. She has several bushes and some had been picked but there remained one full bush to pick. They were gorgeous and plentiful. They are delicious and easy to pick.
I'm sharing with Mosaic Monday hosted by Maggie at Normandy Life.

I watered flowers and tomatoes, lettuce, carrots in the garden and her wonderful grapes. I forgot to take a photo!!!

The pansies are volunteer this year but it means she still has a planter of great flowers to enjoy up. She was collecting seeds to plant next year.
I found this Rudbeckia - Prairie Sun on my walk this morning. I love the two tone of dark and light. It has a green center where many others have dark centers.
Labels:
crab apples,
Mom,
MosaicM,
Nanking Cherries,
pansy,
Rudbeckia,
surgery
Friday, August 12, 2016
Share Your Cup #210
These are a couple of books I finished recently.
I really enjoyed Robin's book. She comes across as a regular girl as she describes her early years. She clearly expresses the decisions she made along the way to change how the her own family would be compared to the one she grew up in.
Karen's books was filled with hope, despair, and much of the emotions in between. I had a hard time to put it down.
I really enjoyed Robin's book. She comes across as a regular girl as she describes her early years. She clearly expresses the decisions she made along the way to change how the her own family would be compared to the one she grew up in.

This is the sun shining on my bedroom closet doors. It's only there for a few minutes. I noticed it the other day and made a point of taking a photo of it this morning.
Mom had surgery this week at the age of 82. She takes good care of herself so I am pleased to say that she came through very well. I will with her on the weekend to support her during her recovery. We are fortunate to be several girls and each has taken part in the process to help Mom as needed. Picture of the building. In the morning, a wonderful marble sculpture in the foyer and the rainbow in the sky when we departed at the end of the day. I took the rainbow as a good sign as to Mom's future.
Sharing with Share Your Cup #210 hosted by Carol at Art & Sand.
Tuesday, August 9, 2016
Cards - Reuse of 4x4 Photos
Yet another design to re-use the 4x4 inch photos from my calendars after the year is through.
This one has a wonderful pink flower. I selected a card in pink to coordinate with the flower.
I found a nice label clip art on Graphics Fairy which I colored to match. I added the sentiment in the center then printed the greeting layer on white card stock and trimmed it to leave a small border of card color.
I adhered the photo within the frame printed in black on the sentiment layer.
This card features a Canada Goose photo on a blue card.
The clip art has been colored appropriately. Again, thanks to The Graphic Fairy.
This card features a butterfly photo from the Retro Calendar.
It has a get well sentiment in french.
The clipart is from Clker.
The card is brown to pull all the elements together.
Decorative Paper Cards
We had a good day on Saturday. Today, more cards for the Gallery.
I created these sentiment layers which have the words in the middle of the frame line. I printed them on a white quarter sheet then trimmed it. I chose a piece of blue acrylic paper and ripped the bottom edge. Trimmed it to leave a border inside the border. Adhere to the sentiment layer then that layer to the card front on a textured navy card. Punched a navy star from the same card stock as the card and adhered it to the card front with 3D foam tape.
This card features ink applied with a sponge onto Whisper White card stock. Colors are Melon Mambo, Crushed Curry and Rich Razzleberry. I printed the greeting in RR directly onto the decorative paper. I punched a large daisy flower from the Crushed Curry card stock to match the card. I glued the decorative layer to the card front. Placing the large daisy going with the movement in the pattern I drew a stem and leaves with a black marker. I then adhered the daisy punchie and the black centre to coordinate with the stem.
This card features spattered dots of liquid purple ink which has silver mixed into it. You can see the silver pooled to the center.
I printed the sentiment directly onto the decorative paper. It was trimmed to fit the card front leaving a border. It was then adhered to the purple card front.
I die cut the candle with the QuikKutz die which cuts the solid and decorative one. The decorative one and the flame is silver foil. Adhered the candle layers together then glued the candle to the card front.
Monday, August 8, 2016
Mosaic Monday #2
I'm sharing a few things which have happened this week.
I took the dandelion photo last night for a challenge on the Flickr Group - Macro Monday. I went for a walk with a friend around a man made lake in the evening and the sun caught this flower making it sparkle. You can find my photo here.
The London box I found at the Re-Use center when I dropped off my donations last week. It was in pristine condition and it reminded me that several of my Blog friends visited England this summer. I think I will fill it with small note cards and give it away. I love that it looks like a suitcase.
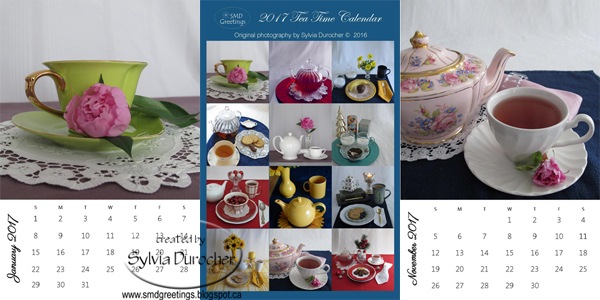
Photo calendars are projects I spend much time on throughout the year. I am always with my camera in hand and snap shots for creating these 4x6 photo calendars for the fall craft sale season. I decided bring more of a focus for a couple of the ones I am creating this year.
Tea Time features tea tablescapes.

I created Owl Art through the process of paper piecing for this one.
Check out my calendar page for details.
I'm sharing with Maggie at Normandy Life for Mosaic Monday #2.
I created my mosaic in Photo Elements with my own watercolor background.
I took the dandelion photo last night for a challenge on the Flickr Group - Macro Monday. I went for a walk with a friend around a man made lake in the evening and the sun caught this flower making it sparkle. You can find my photo here.
The London box I found at the Re-Use center when I dropped off my donations last week. It was in pristine condition and it reminded me that several of my Blog friends visited England this summer. I think I will fill it with small note cards and give it away. I love that it looks like a suitcase.

Tea Time features tea tablescapes.

I created Owl Art through the process of paper piecing for this one.
Check out my calendar page for details.
I'm sharing with Maggie at Normandy Life for Mosaic Monday #2.
I created my mosaic in Photo Elements with my own watercolor background.
Sunday, August 7, 2016
Tea Time Photo Calendar
This calendar features tea related tablescapes which I photographed. I tried to vary the colors, the layout and tea pots. I have collected tableware that I like and mostly they all coordinate so I can mix and match pieces quite easily.
The calendar features heart shaped teacups and saucers by Steeped Tea, white bone china teapot and tea cup by Royal Worcester, a clear glass Sophe teapot by Primula, Cobalt 365 mugs from Ikea, yellow Infusion teapot by Maxwell and Williams, white teapot from Stokes, earthern ware mug in warm blues from a local potter, Johnston Brothers Regency white teacup and saucer, golden yellow cream and sugar set by Chantal, and finally a vintage Sadler lamp shape pink teapot with pink roses & periwinkle forget-me-nots with gold trim. It was my aunt's and my research suggested it is 75 years old.
I see that some of my other tableware did not make it to this calendar so there is tablescapes to create for another calendar.
You can find my calendars on the calendar page.
Labels:
2017,
2017 Photo Calendar,
4x6,
photo calendar,
tablescape,
tea,
tea cup,
teapot,
vintage
Owl Art Photo Calendar
You can find it for sale on my Calendar page.
Labels:
2017,
2017 Photo Calendar,
4x6,
branch,
circle punch,
Designer Paper,
googly eyes,
my designs,
Owl,
paper piecing,
photo calendar
Saturday, August 6, 2016
Sidewalk Sale - Saturday
I will be participating in the Sidewalk Sale held at the Center for Visual Arts on Saturday. I will be launching my 2017 Photo Calendars - Tea Time & Owl Art.
I will be clearing old stock of greeting cards so the prices on those will be good.
I have several pieces of mixed media art of sale.
I would love to see you and get in on the deals.
I will be clearing old stock of greeting cards so the prices on those will be good.
I have several pieces of mixed media art of sale.
I would love to see you and get in on the deals.
Hot Air Baloon Mixed Media Art
I've added a hot air balloon to my painting that I did at reunion a couple of years ago.
I hope to be able to sell it today at the sidewalk sale.
Sympathy & Get Well Cards
I made this card for a friend who lost her husband to brain cancer recently. He fought a brave fight for several years. I will miss him.
I started with a warm brown card.
I cut a piece of designer paper to 4.00 x 5.25 inches then cut it again at 3.5 inches. I flipped the larger piece over to reveal the polka dots. I taped these pieces back together then placed a piece of ginger colored ribbon across the join and taped the ends tot he back. This layer was then adhered to the card front.
I punched a Stampin Up Decorative Label a coordinating blue card stock and printed the greeting in the same blue onto ivory card stock. Punched the greeting. I cut the blue label in half crosswise and trimmed the points off. I then adhered the halves offset to the left and right sides. I adhered the greeting to the card front aligned over the ribbon with 3D foam tape.
The get well card was assembled in the same way as the first card but I placed the dots on the top this time.
I started with a warm brown card.
I cut a piece of designer paper to 4.00 x 5.25 inches then cut it again at 3.5 inches. I flipped the larger piece over to reveal the polka dots. I taped these pieces back together then placed a piece of ginger colored ribbon across the join and taped the ends tot he back. This layer was then adhered to the card front.

The get well card was assembled in the same way as the first card but I placed the dots on the top this time.
Labels:
Bashful Blue,
DSP split,
Get Well,
ginger,
LynF,
ribbon,
sympathy,
Teeny Tiny Wishes
Friday, August 5, 2016
Printed Sticker Greeting
During my sorting out in my stash I discovered some clear sticker labels. I inherited the cut offs from some project. I thought I could make my own stickers. I was thinking greetings in particular. I'm not sure that this was as effective use of this resource but this was my first try.
I printed the greeting from the Stampin Up Lemonade Stand digital stamp set. I colored it in Night of Navy and placed a Summer Sun border around it. Once printed I embossed it with clear powder. I trimmed it to the yellow border with scissors.
I placed this on a piece of Whisper White. I added a layer of Night of Navy then onto a card in Summer Sun. I placed a piece of Summer Sun grosgrain ribbon across the bottom of the white. I then added 3 yellow handmade paper flowers topped by lighter ones all held in place with navy star brads. The stars a bit of a nod to the nautical theme in the inspiration photo.
Sharing with Stampin Celebration Challenges - #SC132
I printed the greeting from the Stampin Up Lemonade Stand digital stamp set. I colored it in Night of Navy and placed a Summer Sun border around it. Once printed I embossed it with clear powder. I trimmed it to the yellow border with scissors.

Sharing with Stampin Celebration Challenges - #SC132
Labels:
challenge,
Flowers,
grosgrain ribbon,
handmade paper,
HB,
Lemonade Stand,
Night of Navy,
SC,
star brad,
Summer Sun
Thursday, August 4, 2016
Friends - Exchange Cards
I made these 2 cards for my card exchange this month. I managed to purchase the Elizabeth Crafts Designs Friends thin die on sale. I love the calligraphy style of lettering. This is a A Word with Words collection by Suzanne Cannon - Quietfire Design - a Canadian.
I chose the designer paper which I ripped and removed a section and adhered the 2 pieces at each end of the warm light blue card. I cut the word from the green and the ivory card stocks and layered them onto each other. I punched flowers from the same colors on the word. These were layered and held in place on the card front with ivory brads.
I chose a turquoise card. I ripped the designer paper as the first card except I switched the orientation to tall. The word was cut from cherry red and brown card stock. They were layered again using quick dry adhesive. I punched daisies from turquoise and brown. They are held in place with taupe brown brads.
I am sharing these cards with my friends on the card exchange list for August.
Labels:
CCE,
Elizabeth Craft dies,
exchange,
Friends,
Quietfire,
word,
word collection
Snowflake Christmas Cards
While I was at it the other day I made another set of 6 snowflake cards for the card box. Used the same designer paper paper by Recollections from Micheals. I trimmed to 4.00 x 5.25" leaving a small border.
I adhered it to a true blue card which was Bazzil textured card stock.
I printed the greetings in Bashful Blue on vellum and clear embossed them. This time I ripped the edges. I placed the greeting to work with the snowflakes on the paper.
I placed one tiny white brad on the left hand side to hold down the vellum to the card front. I placed the other on the left. I added a small iridescent confetti snowflake and used a white star brad.
Love this sentiment. Snowflakes are winter's butterfly.
Labels:
bazzil,
blue,
Christmas card,
snowflake,
star brad,
textured card stock,
white
Wednesday, August 3, 2016
Share Your Cup #209
Sunflower Tile Framed
You will see my original plan on this post. I was not able to get the existing tile from the frame so I just purchased another frame.
I removed the print and glass from this one. I painted the back board with Blue Velvet acrylic paint so that the tiny gap between the tile and frame would not show. I also painted the edge of the tile with the same paint. I then dry brushed the same paint onto the frame to create a distressed look.
I am happy with how it turned out and it is hanging in my kitchen.
I have had the small blue saucers and the large plates for quite a while.
Yesterday, I found salad plates and cups to match. I was very happy. They will allow me to create tablescapes with more pieces. They work very well with my Myott The Hunter salad plates which are just a bit smaller. The white plate with scallop edge is IKEA.
Here is a few flower shots taken after completing my photo shoot for the 2017 Tea Calendar. I had gathered flowers for the calendar shoot and when I was done with that process I said to myself "I should take some shots of these lovely flowers." So I did. A white aster, a pink rose and a deep raspberry zinnia.
Sharing with Carol at Art & Sand for Share Your Cup #209.
Monday, August 1, 2016
Christmas Card Challenge - Aug - Light Blue / Winter
I chose designer paper - Snowflakes by Recollections purchased at Michaels. I cut 2 sheets of the paper into 4 x 5.25 inch pieces. I chose the one with dark snowflakes for this set of cards and coordinated it with card teal card stock. I adhered it to the card front leaving a small border. I then printed the greeting on vellum and clear embossed it. It was cut to 1.25 inches tall and 5.25 inches wide. I placed a white snowflake confetti to the left and held it, the vellum to card front with a tiny white star brad. I added a tiny white round brad on the right hand side to keep it from shifting.
This is a great card to make in volume. I made six of these for my card box.
Sharing with Christmas Card Challenges - #34 - Anything Goes
This is a great card to make in volume. I made six of these for my card box.
Sharing with Christmas Card Challenges - #34 - Anything Goes
Subscribe to:
Posts (Atom)