Tuesday, August 30, 2011

Photo - Vacation Pics

Here's a few shots from my summer. I was up early one morning and took this great sunrise with the pine tree in silhouette, Queen Anne lace against a dark sky (we nearly got wet), a swan on Lake Ontario with a great reflection, the Canada Flag in late evening, a punched tin lantern at the Canadian Canoe Museum in Peterborough and the dew on the car as we were leaving at 6:30 am for a day of photo taking (now that the life of a photographer). We were trying to avoid the heat of the day and the harshness of the midday light.

I spent time with my sister and we took lots of pictures, make lots of cards, chatted and walked most days. It was very good!

Monday, August 29, 2011

Card - CST Challenge #16 - Summer Inspired

Sunflowers are my favorite and a great summer flower. I started with a photo of a sunflower I took at Muttart Conservatory on Friday. I printed it and cut it out with my Nestabilities circles, then cut a yellow circle a bit larger and then a corresponding circle scallop in brown. I placed this central element on a ginger colored card. I found some fiber in my bucket which matched. I have notched both sides of the card edges to accommodate the chunky fiber tied around the front of the card. I add a sentiment stamped on a SU word window punchie in Chocolate Chip ink. Held in place with a bit of adhesive and a tiny copper brad. I added the copper butterfly cut with my Spellbinder die. I added a bit of dark brown to the body. Rubbed my ink pad along the edges of the card.

Thursday, August 25, 2011

Card - CST Challenge #15 - SSS Sketch

I made this card for the CST challenge based on this sketch. I started with another photo of a lily from my Mom's garden. It's got this really nice dark purple edge which makes it look exquisite. I printed the lily and cut into an oval. I mounted it onto a coordinate plum textured cardstock rectangle. I chose an cream card to match the center of the lily to which I added a couple lines of embossing on the top half using a border folder. I stamped the greeting in Orchid. I added a moss green satin ribbon. I glued the plum rectangle on an angle. Found a silk flower for the top left corner and bling for the bottom right hand corner.

Friday, August 19, 2011

New Blog Header - Tiger Lily

I took some pictures while I was on vacation. I really liked this Tiger Lily one so I chose it for my new blog header. I'm getting the header to look more like I want. It's taking a while.

Thursday, August 18, 2011

Card - CST Challenge #14 - Sympathy Card

I created this card for this week's challenge - Sympathy card. I had just taken several photos a couple of days before and thought they would make nice sympathy cards and here's the challenge. I cropped the photo into an oval shape and printed it on heavy white paper. I cut it out and glued it to white cardstock which I trimmed with scallop scissors. I stamped the Stampendous sentiment with Always Artichoke ink on same color card. I glued the oval just above it and added a white satin ribbon bow on the right hand side through a slit in the fold.

Sunday, August 14, 2011

Card - Bird Cage

I used some mellow yellow cardstock and stamped a background with Ancient Page Sienna ink using some swirls and dotted stamps. I rubbed the edge of the card with the sienna pad. I cut a Tim Holtz bird card die cut in a sienna cardstock and chalked it would dark brown. I used a black marker to define the ring at the top. I distressed some green crochet cotton with the sienna ink pad. I cut the bird from dark brown cardstock and added a eye and beak in black marker. I glued him with his beak coming through the bars and his wing stick out. I added a Sizzix leafy branch in always artichoke and glued it to the cage. Punched some ivory flowers that were chalked with brown, orange and yellow. I pressed the edges of the flowers in the dark brown inkpad to add some contrast to the edges against the yellow card. Two were glued to the card/cage and the center one was mounted with 3d foam tape. I made 2 of these cards for my exchange group.

Tuesday, August 9, 2011

Card - CST Challenge #13 - Large Sentiment

I made this card for the weekly challenge on CST. The challenge was to make the sentiment the main element on the card. I stamped a Stampin Up! greeting "Warm Wishes" on white and watercolored it in fall colors. I cut it out with Nestabilities scallop circle thin die. I cut a scalloped circle the next size up in brown. I embossed a tan layer with a leaf embossing folder which I ripped on the bottom. It was layered onto a brown rectangle which I ripped on the bottom too. I chose a warm orange card. I glued the brown, the tan, the 2 scallop circles then I added a small tag on which I had stamped the word FALL and added several small leaves with a tan brad.

Sunday, August 7, 2011

Card - CST Challenge #12 - Fav Coloring Technique

I created this card for the CST challenge. My favorite technique is watercoloring so I selected this peony and use a watercolor palette and paintbrush. I painted the whole flower in a light layer of color. Adding a second layer of a bit darker color in the shaded areas adds depth to the flowers. I layered it onto a coordinating pink cardstock then onto a green card. I added a stamped "Happy Birthday " greeting in green.

Monday, August 1, 2011

Cmas Card Challenge - August - Christmas Glitters

I found this POW glitter paper at a local scrapbook store. It is gorgeous! Unfortunately, scanning does not do justice to it. The paper is plastic backed with created a bit of a challenge for the Sizzlet die.
I bought the polka dot paper at the same time because they worked together well. I found a dusty blue cardstock for the card. I created a gate-fold card with the split in the middle. I trimmed the designer paper to fit both sides of the card fronts. Then, I selected a taupe cardstock to cut the scalloped circle with my Nestabilities Classic die. The brown layer is cut with the coordinating Nestabilities circle dies. The word "Peace" was cut with a Sizzlet border die, recently discontinued by Stampin Up! I used a snail tape runner to apply glue to the back of the die-cut because it is very shiny. I wanted a touch of blue repeated so I use a Martha Stewart snowflake punch to add it.
I made 5 of these so bring my total to 72 cards.

Wednesday, July 27, 2011

Card - CST Challenge #11 - Fav Background Technique

I used spritzed Radiant Rain Shimmering Mist - Egyptian Gold on brown card stock to make my background. I found gold paper to match and glued it to another paper to make it heavier. I cut the frame with my Sizzix Retro Frame original die. I mounted the background paper on an ivory card then cut the coffee mug with the Cricut -Graphically Speaking cartridge in ivory as well. I stamped the sentiment with Chocolate Chip ink with Hero Arts stamp. I applied a bit of ink to the ivory to make it less stark then I added some walnut ink on the "coffee" in the mug with a paint brush. I repeated the dark brown in the 3 brads in the upper left corner.

Monday, July 25, 2011

Card - Birthday

This a large card. I started with an 8.5x11 folded in half then trimmed it to the envelope size. I chose a turquoise card based on the colors in the decorative paper. The background paper is tissue paper ironed to freezer paper. I selected the flower colors based on the background paper - purple and pink. I cut the flowers with my spellbinder Sunflower die as well as the centre. I mounted the centre with 3D glue dots. I added the large gold brad in the upper right hand corner and small ones in the other three corners. I put a pink Happy Birthday on the insert.

Freezer paper is the brown paper used by butchers. The plastic coating provides a barrier to air and moisture to protect the quality, flavor and nutrition of foods during freezing. Reynolds sells it in white on a roll.

Thursday, July 21, 2011

Card Kit - Christmas Tree with Burgundy Scallop

I made another Christmas card kit for a silent auction at a family reunion this summer.
I used a parchment card stock cut to 5.5x8.5" which is folded in half. I trimmed the decorative plaid paper to be 1/8" smaller than the card front. The tree is cut with a Sizzix die from moss green paper. It has been chalked green on the tree and brown on the trunk. I added burgundy balls (.25 punched shapes) to it. I created the greeting and color printed it onto parchment paper and punched it with 1.25" punch. It is layered onto a 1 3/8" moss green layer then onto the burgundy scallop. I glued the Christmas tree onto the card front then added the scallop greeting. The burgundy sequin star is held in place with a glue dot.

Wednesday, July 20, 2011

Card - CST Challenge #10 - Baby

CST Challenge #10 is a card with a special fold. I selected a gate-fold for this card. A pink card with gingham decorative paper on the two halves of the card front. White scallop is cut with Nestabilities and the gingham layer is cut with coordinating circle dies. The baby carriage was cut from Cricut Graphically Speaking cartridge with shadow in pink and the outline in white. I ensured the gingham on the scallop was opposite the card direction to provide more contrast. The insert is just a quarter sheet with sentiment printed in pink.

Sunday, July 17, 2011

Card - CST Challenge #9 - Flourish

I created this card for the CST challenge this week which was use black and white with splash of color.
I started with a black card and added a white embossed layer (Cuttlebug - Floral Fantasy) trimmed to just a bit smaller than the card. Then I cut a die with the Sizzix Flourish in black and cut again the hearts in hot pink. I thought it worked well with the hearts and flourishes on the embossed layer. I glued it down and added my hot pink hearts. It was for someone having a birthday so I added a stamped greeting in hot pink and smudged the edge with a black ink pad.

Tuesday, July 5, 2011

Card - CST Challenge #8 - Sketch Pears

I made this card following a sketch challenge. I bought this metallic copper ribbon on clearance and I'm learning why it might have been on sale. It's been the hardest thing to work into a design because I've not been able to find something else that matches.
I started with an olive green card cut 4.25x11" and scored in half to make a top fold card. I added the copper ribbon knot at the top (tacked with a glue dot) and a length near the bottom held in place with a bit of double sided tape and scotch tape on the inside. The sketch had scallops near the bottom so I cut a border with Die-namics die in dark brown. I laid this over the copper ribbon. I cut 2 yellow pears and the stem and leaf with a QuicKutz die from the same dark brown. Added a bit of accent on the bottom with a brown marker.

Sunday, July 3, 2011

Card Kit - Red Velvet on Always Artichoke

I made another Christmas Card Stack kit. I used Always Artichoke card with coordinating Designer paper from Stampin Up! I cut the paper to 5.25x4.00" then cut it again at 3.75 giving me 2 pieces 4.00x1.5 and 4.00x3.75. As the paper is double sided I turned one of them over. Once I have the layout I wanted I turned them over and tape them together to have a piece that is 4.00x5.25". I glued this decorative paper layer onto the card front. I placed the ribbon along the join of the papers to determine the placement of a slit in the fold of the card just the width of the ribbon. Pull one end through the slit and tape to the inside of the card. Turn the card over to have the card front facing you. You may want to add a bit of glue to the back of the ribbon and glue it over the joint of the papers. Wrap the ribbon end around the card edge and glue it to the inside of the card with tape. The red velvet flower accent has 2 glue dots on the back. Remove the release paper and place the flower accent as desired. Check out available card kits.

Friday, July 1, 2011

Cmas Card Challenge - July - Around the World

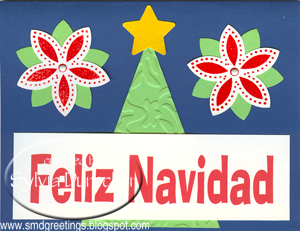
I chose Mexico for this challenge. Which country would you choose? Father Christmas from England or SinterKlass from the Netherlands? What tradition did you grew up with? Leave me a comment.
Did you know that poinsettias come from Mexico? The plant is named for the first U.S. Ambassador to Mexico, Dr. Joel Roberts Poinsett, who introduced America to the poinsettia in 1828, after discovering it in the wilderness in southern Mexico. So what does a poinsettia have to do with Christmas? A Mexican legend tells of a girl who could only offer weeds as a gift to Jesus on Christmas Eve. When she brought the weeds into a church, they blossomed into the beautiful red plants we know as poinsettias, known as Flores de Noche Buena in Mexico (Spanish for "flowers of the holy night").
Cards on-line used a lot of bright colors so I selected a medium blue for the card. I stamped the five petal poinsettias in red with a set from Stampin Up then embossed them with Candy Red powder then used the matching punch on them. I used Green Galore for the leaves and held them in place with a tiny white brad. The tree which was embossed with the Victorian folder. I added a yellow star at the top of the tree. Color printed the greeting in red.
With all the classes in the last month I'm at 61 cards
I make 6 of these.
Total so far: 67

Wednesday, June 29, 2011

Card - Christmas JOY

Cleaning up leftovers. I made this card with materials cut while working out the card kit I posted earlier. I chose cherry card stock to go with button. Die cut the shadows in dark green with the Sizzix Shadow Box alphabet and the letters J&Y in cherry. Glued the cherry letters to the dark green shadows. The ornament under the button in green is a Sizzix as well. Cut the hanger from cherry and glued it on. I pulled some cherry thread through a hole made with a push pin. I glued the J then the Y then centered the ornament in between. I brought the thread up over the edge of the decorative paper and taped it to the back. Glued the decorative paper onto the card front. I'm submitting this card to Sparkles Christmas Challenge this week which needed die cuts.

Card Kit - Gold Glitter Ornament

Here's another Christmas Stack Card kit. The focal point is a glitter card stock ornament cut with a Cuttlebug die. I selected red and green card stock and split the cards in half between each. I punched snowflakes with MS punch. I found satin ribbon in the right colors with a speckle of gold. I cut the decorative paper and glued it to the card front. Attached the ribbon to the ornament hanger. I used a bit of glue to tack the ornament in place then added the snowflake over the centre. Use a push pin to create a hole through all three layers and add the gold brad. Trim the ends of the ribbons to the edge of the card. Check the link on the right hand side or follow this link for available card kits. Great idea for time at the lake this summer.

Card - CST Challenge #7 - Baby

A card for a baby is the CST challenge this week. I checked earlier this week and the cards were pink so decided on a boy's card. I started with a white card. I added a piece of striped paper then a blue crinkled paper. I printed the sentiment on red card stock, trimmed it and placed over the join of the decorative papers. Use white yarn in the button then glue dot to keep it in place. The top need something so I tried several options until these stars punchies were just right.