I created these larger enclosure cards for my card club girls. I printed the frames and backgrounds with Opoxy Underlay digitals by Prima Hybrid. I added a Sizzix flower, a coordinating green leaf and a yellow circle punchie in the centre.
Monday, January 28, 2013
Card - Card Club Incentive
Labels:
2013 Card Club,
blue,
flower,
green,
incentive,
leaf,
oval frame,
pink,
script background,
Sizzix die,
yellow
Sunday, January 27, 2013
Scrapbook - Retirement Book of Remembrance
A friend and I created this 12x12 scrapbook album for a couple who retired. Friends and colleagues sent greetings which were collected into this album. We decided on a black fabric album with a photo on the front. We selected black, red and white as the color scheme for this book. Most pages are black except for those set up for co-workers and friends to include their sentiments. We created borders with Stampin Up! Tasteful Trim Bigz XL, ribbon, Martha Stewart and EK Success border punches. We prepared about approximately 40 pages onto which letters, emails, and cards were mounted. I think it turned out really well.
Labels:
12x12,
black,
border die,
border punch,
red,
retirement,
ribbon,
scrapbook,
white
Saturday, January 26, 2013
Cool Tool - 12x12 drawers - Paper Storage
I use these 12x12 drawer units for patterned paper storage. I have 2 units which gives me 8 drawers. One unit holds paper sorted by color. The other holds other paper like Christmas paper, Specialty paper like acetate, vellum, glitter etc, multicolored paper and one drawer for scraps of patterned paper. It works for me because I can see the paper. When the scraps drawer gets too full I go through it and purge. I bought the units at Walmart. The labelling is not too sophisticated and I should replace them with clear labels now that I have a label maker. One day soon.
Labels:
12x12,
clear,
cool tools,
drawers,
paper,
patterned paper,
scraps,
storage
Wednesday, January 23, 2013
Cards - Birthday in Greens
I created these cards for a friend who has a family member who celebrates a birthday on March 17 - St. Patrick's Day. I made some for her a while back. Check it out.
Left: The card is Certainly Celery with double sided designer paper by Stampin Up! It was cut 1/3 to 2/3 and the top piece was flipped over. I color printed the greeting in CC on Very Vanilla and cut it with a Spellbinder Ribbon Slider thin die. I placed it onto a piece of CC ribbon which was placed over the join of the 2 piece of DSP. The ribbon is pulled through a slit in the card fold and taped to the inside. I added a large silk flower and dyed a smaller one with Tim Holtz Peeled Paint Distress Ink. They are held in place with a vanilla brad.
Right: I selected a dark green textured card stock. I selected some green DP by Basic Grey - porcelain arabella. I color printed the greeting and punched it out with the SU! Decorative Label punch. I punched another from the green cardstock. I cut it in half and mounted the halves top and bottom of the punchie. I added a coordinating gross grain ribbon.
Left: The card is Certainly Celery with double sided designer paper by Stampin Up! It was cut 1/3 to 2/3 and the top piece was flipped over. I color printed the greeting in CC on Very Vanilla and cut it with a Spellbinder Ribbon Slider thin die. I placed it onto a piece of CC ribbon which was placed over the join of the 2 piece of DSP. The ribbon is pulled through a slit in the card fold and taped to the inside. I added a large silk flower and dyed a smaller one with Tim Holtz Peeled Paint Distress Ink. They are held in place with a vanilla brad.
Right: I selected a dark green textured card stock. I selected some green DP by Basic Grey - porcelain arabella. I color printed the greeting and punched it out with the SU! Decorative Label punch. I punched another from the green cardstock. I cut it in half and mounted the halves top and bottom of the punchie. I added a coordinating gross grain ribbon.
Labels:
aunt,
brad,
Certainly Celery,
color printing,
decorative label punch,
DSP split,
FW,
green,
grosgrain ribbon,
HB,
JD,
ribbon,
ribbon slider,
SB,
silk flowers,
sister,
SU,
vanilla,
white
Monday, January 21, 2013
R2G Card Kits - Woodsie Felts Cmas
I created these cute card kits with felt shapes. Red moose, green trees and white snowflakes. I selected wood background Designer Paper from Rusty Pickle call Game Time. I printed the greetings on off white card stock in Chocolate Chip. The greeting is cut to 1/2 tall and 4 1/4 inches wide. I selected dark brown card stock onto which I glued the DP. I placed the Woodsie Felt shape near the bottom of the card and using a push pin created a hole through the felt and the card. On the moose I selected a place where his eye would be and inserted a brad which holds the felt in place. On the tree there is a hole at the top so I place a star brad there. On the snowflake I placed the brad in the centre. On the greeting I cut a flag end on the right and aligned the left to the edge of the DP and glued it down. I used a Zot to hold the button in place to the left of the greeting.
Wednesday, January 16, 2013
Card - Stampin Up Birthday
I made this card for a friend with a birthday today. I used this Stampin Up! retired DSP called Dots & Dashes. This paper was a bunch of circles which I cut apart. I selected the blues and greens and I glued them onto Whisper White. I stamped a greeting in the centre in Tempting Turquoise. This was mounted onto a Green Galore card.
The colors are Only Orange, Tempting Turquoise, Green Galore, Passion Pink, Certainly Celery. After some serious internet searching I found it. Thanks.
Friday, January 4, 2013
Card - SU Thank You
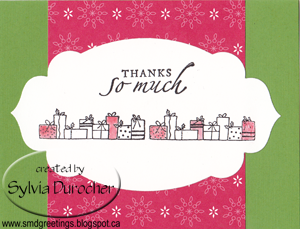
I made this thank you for my Stampin Up friend. I just changed a few pieces. Same green card which is similar to Wild Wasabi. The Real Red snowflake background paper is from SU! Winter Bright Designer Paper collection. I used the largest framelit from the Apothecary Set cut in white. I stamped the sentiment from the SU! Sincere Salutations Thank You in black. I stamped the same small gifts twice. It needed something so I wet a paint brush and dipped it on my Real Red stamp pad and painted a few of the presents.
Labels:
Apothecary Framelit,
Christmas cards,
framelit,
gift,
green,
painted,
red,
SU,
SU Style,
thank you,
white,
Winter Bright DSP
Thursday, January 3, 2013
Cards - Christmas Thank Yous
Here are my Thank You cards for gifts received this Christmas. I started with a leaf green textured card. I cut a piece of designer paper 3 3/8 x 4 1/4 inches and adhered that to the centre of the landscape card. I cut both Tim Holtz Stylized Labels in red then stamped a small clear stamp of gifts across the centre in Versafine Onyx Black ink. The label was glued to over the DP centered. I printed the sentiment in black on white card stock and punched it out with my SU! 1 3/4 inch circle punch. It was adhered to the card with 3D foam tape. I'm grateful for all gifts I received this year!
Labels:
black,
card,
Christmas,
circle punch,
color printing,
green,
red,
TH,
TH Stylized Labels Die,
thank you,
white
Wednesday, January 2, 2013
Calendar - Vintage Photos
I created a photo calendar for my office. I decided to make one of vintage photos. I love to visit all types of museums so I had a good collection of photos of old items. I selected vintage planes, cars, buildings, and pioneer items. I converted my color pictures to sepia tones. The color scheme of the calendar is also in the same colors. I printed it on 8.5 x 11 inch natural parchment card stock.
I placed the workshop of Walter Edward Walker who was a master canoe builder and worked in the mid 1940's. The photo was taken at the Canadian Canoe Museum in Peterborough Ontario. The photo for September is the Gray Ghost - Goodyear FG-1D CORSAIR which visited the Edmonton Aviation Museum in 2010.
I placed the workshop of Walter Edward Walker who was a master canoe builder and worked in the mid 1940's. The photo was taken at the Canadian Canoe Museum in Peterborough Ontario. The photo for September is the Gray Ghost - Goodyear FG-1D CORSAIR which visited the Edmonton Aviation Museum in 2010.Tuesday, January 1, 2013
Christmas Card Challenge - Jan - Folds
Here's my first Christmas Card of 2013. I am hosting a blog challenge again this year.
January's theme is Folds. You can try gate folds, Z folds, Joy Folds, iris folding and twisted card to mention a few.
I chose a Joy Fold card. It is quite easy to make. I chose double sided designer paper so that the colors would coordinate well. The paper is by Basic Grey named Eskimo Kisses - rooftop. I chose a light blue card base cut 4.25 x 8.5 scored at 3". I laid the large piece of DP with the houses showing then turned a smaller piece over to show the blue and white swirls which I put on the small flap of the blue base. I cut my second piece of card stock from pink 3x8 folded in half. I added a 1.5x2.875 piece of the house paper on the left side and added a color printed greeting in coordinating colors. I added a small pink Sizzix heart embossed with Cuttlebug Swiss Dots on the left hand side to keep the flap closed. Check out this pic giving you a top view.
January's theme is Folds. You can try gate folds, Z folds, Joy Folds, iris folding and twisted card to mention a few.
I chose a Joy Fold card. It is quite easy to make. I chose double sided designer paper so that the colors would coordinate well. The paper is by Basic Grey named Eskimo Kisses - rooftop. I chose a light blue card base cut 4.25 x 8.5 scored at 3". I laid the large piece of DP with the houses showing then turned a smaller piece over to show the blue and white swirls which I put on the small flap of the blue base. I cut my second piece of card stock from pink 3x8 folded in half. I added a 1.5x2.875 piece of the house paper on the left side and added a color printed greeting in coordinating colors. I added a small pink Sizzix heart embossed with Cuttlebug Swiss Dots on the left hand side to keep the flap closed. Check out this pic giving you a top view.
2013 Christmas Card Challenge
I'm having a Christmas Card Challenge every month in 2013. I find I get my Christmas Cards made in time and with much less stress when I make some every month. I will post my theme and my card the first of every month. Join me in getting Christmas cards done in good time for sending.
January - Technique - Folds - Tri-fold, Z Fold, Gate Fold, Joy Fold, Twisted Card, Iris folding
February - Accent - Buttons - Wooden, Plastic, Die-cut, Shaped
March - Focus - Hearts - Die-cut, Quilted, Punchies, Stamped
April - Technique - Coloring - Watercolor, Copics, Acrylic, Crayons, Stain, Markers,
May - Accent - Textiles - Fabric, Felt, Velvet, Ribbon, Tulle, Lace
June - Focus - Candles - Die-Cut, Stamped, Paper Pieced
July - Technique - Shaped - Mittens, Trees, Round, Scalloped
August - Accent - Stickers - 3D, Letters, Glittered
September - Focus - Christmas Foliage - Poinsettia, Boughs, Trees, Wreaths, Holly
October - Technique - Paper Piecing - Squares, Banners, Flags, Quilting, DP, Trees, Pinwheel
November - Accent - Chipboard - Diecuts, Letters, Ornaments, Snowflakes, Trees
December - Focus - Christmas Thank You - Cards ready for sending right after Christmas
January - Technique - Folds - Tri-fold, Z Fold, Gate Fold, Joy Fold, Twisted Card, Iris folding
February - Accent - Buttons - Wooden, Plastic, Die-cut, Shaped
March - Focus - Hearts - Die-cut, Quilted, Punchies, Stamped
April - Technique - Coloring - Watercolor, Copics, Acrylic, Crayons, Stain, Markers,
May - Accent - Textiles - Fabric, Felt, Velvet, Ribbon, Tulle, Lace
June - Focus - Candles - Die-Cut, Stamped, Paper Pieced
July - Technique - Shaped - Mittens, Trees, Round, Scalloped
August - Accent - Stickers - 3D, Letters, Glittered
September - Focus - Christmas Foliage - Poinsettia, Boughs, Trees, Wreaths, Holly
October - Technique - Paper Piecing - Squares, Banners, Flags, Quilting, DP, Trees, Pinwheel
November - Accent - Chipboard - Diecuts, Letters, Ornaments, Snowflakes, Trees
December - Focus - Christmas Thank You - Cards ready for sending right after Christmas
Monday, December 31, 2012
Happy New Year 2013!!!
Wishing you a very Happy New Year!
I'm looking forward to family get togethers, lunch with friends, classes, Christmas Cards all year, and a few surprises I'm sure.
Saturday, December 29, 2012
Calendar - Coaster with SU DP
I made this Coaster Calendar with SU! Winter Bright Designer Paper. I used the stripes paper glued it to the coaster and once dry trimmed around the edge. I added a Pretty in Pink gross grain ribbon across the width then the Real Red stamped Joy ornament.
The colors in this DSP is: Bashful Blue, Pretty in Pink, Real Red, Whisper White, Wild Wasabi
Card - Birthday Wishes
I started with a purple card which I spattered with Iridescent Radiant Rain. I die cut a large label in navy with the SU! one of the Apothecary Framelits. The Cherry Blossom flower was cut with the Cricut. See the original post here. It was adhered to the top half of the navy label. I color printed the greeting and then flagged the right hand end and tucked the left hand end right next to the card edge. Glued it down.
Labels:
Apothecary Framelit,
Cricut,
flag ends,
flower,
framelit,
HB,
navy,
purple,
Radiant Rain,
spattered
Tuesday, December 25, 2012
Merry Christmas
Wishing everyone a Merry Christmas.
May the day be a special one! It may include - family, friends, memories, the outdoors, lights, trees, and things that are special to you!
Sunday, December 23, 2012
Calendars - Tall & Slim Scriptures
I created these calendars from my 4x11 blank calendars. For the top one I printed selected scriptures onto Designer Paper and glued them down. For the bottom one, I printed the scriptures on card stock and trimmed them. I rubbed the edges of the rectangles with a black ink pad.
Thursday, December 20, 2012
Cards - Herald Angels
I made a bunch of these cards for a customer. I designed the card front with a heralding angel from Dover. I was fortunate that I could change the color of these images, so I coordinated the angel color with the strip of paper I added on the left hand side. I selected foil paper in all cases. I had the request not to have sticking out from the card front so brads, 3D foam, rhinestones were eliminated. It was a bit challenging but the design works.
Labels:
angel,
aqua,
black,
Christmas cards,
color printed images,
foil paper,
gold,
green,
herald angel,
one layer embellished,
paper strips,
purple,
red,
silver
Tuesday, December 11, 2012
Card - Winter Birthday
I made this card for my Dad who has a December birthday. I chose a Handsome Hunter card and added this red and green plaid designer paper. I added a dark green gross grain ribbon across the bottom third with the ends tape to the inside. I added 3 white sequin snowflakes held in place with tiny white brads. I then added the greeting which was color printed and punched out with the Decorative Label Punch from Stampin Up!
Labels:
birthday,
black,
brad,
color printing,
decorative label punch,
green,
greeting,
grosgrain ribbon,
plaid,
red,
sequin,
snowflake,
white
Thursday, December 6, 2012
Photo - Office Decorating - Nativity
We are having a office decorating contest at work and I created this display on the floor tucked into a nook at the front of my desk. A friend lent me the nativity set which is unbreakable and about 12-14 inches high. I struggled on what to use for background but this morning I realized I had heavy weight wrapping paper in navy that would do just great. I spritzed it with Maya Mist in Snow White then adhered it to the nook in the front of my desk with double sided tape. I added white fiberfill snow then covered it with is gold mesh fabric. Works very well. I added Mary, Jesus and Joseph and the 3 Wisemen. I added the green garland which is the same one I used last year. I found a coppery gold foil gift bag the other day which worked with the some of the color on the head coverings on the Wisemen. I cut the central Bethlehem star by hand then die cut the others with a Sizzix star die which provided 3 different sizes. Adhered those along the sky. I added a tree made with a Styrofoam form covered with foil gift wrap paper. I added a bamboo skewer through the center to hold the die cut star at the top. I added some sequin held in place with pearl straight pins.
Labels:
nativity,
office decorating,
Photo,
Sizzix Star & Starbursts die,
star
Saturday, December 1, 2012
Christmas Card Challenge - Focus - Reason for the Season
The Card Challenge this month is a focus challenge which is the Reason for the Season. I selected a Santa and baby Jesus image and a sentiment by MelonHeadz Illustrations. I made the sentiment the same color as Santa's suit. Then I arranged the digital images and then color printed them on white card stock. I then cut the card stock with the SU! Top Note die. I found card stock to coordinate with the halo on Jesus' head. I cut it slightly smaller than the card front and embossed it with the Cuttlebug Swiss Dots folder. This was adhered to the cherry red card front. I then added a piece of black gross grain ribbon just below the middle of the card and taped the ends to the inside of the card. I mounted the top note to the card front with 3D foam tape. I nice quick card. I have about 140 cards made with this final challenge of the year. I need about about 160 so I will have to visit a few more ideas. I hope you have your cards made. I will host another challenge in 2013. Keep an eye out for it.
Labels:
2012 Christmas Card Challenge,
black,
cherry,
color printing,
green,
grosgrain ribbon,
Jesus,
reason for the season,
red,
santa,
SU,
top note
Subscribe to:
Posts (Atom)