Saturday, August 31, 2024

Sylvia's Simple Shots

It's been busy!  

I had my aunt and her husband over for tea on Sunday.

It's been a long while since she was over so we had a good visit.  I was able to ask a couple of guy questions - about the DeWalt drill I inherited from my Dad. One of the batteries won't charge so he recommended calling DeWalt.  On the ToDo List

I sent peaches from the case home with them.


The car went in for servicing at 7:30 am so I had to spend half a day in the area.  I read my book in a bit of a coffee shop till businesses opened at 9:00 am.  I stopped at Starbuck and did some craft ideas journaling while I drank my $4 chocolate milk! 

I then headed to VV.  I sure can spent a few hours there. Forgot my coupons at home.

I bought myself a light backpack because I did not take my big one from college days because it weighs too much. It has a slot inside to keep the water bottle upright and a waist strap. Yes we will take that.

I had several stops on my list.
I stopped in at Dollarama that day as well.  I was looking for tape but came out with these metallic watercolors for $2.

They are great.  Very impressed.

Easily moistened, sit in full sized pans and provide good coverage.  I will have to find a container/box to keep them in.

I have been using them a lot.


The Call of the Wrens by Jenni L. Walsh was the book a read this week.  A wonderful book with strong female main characters.  We meet Marion Horton in WWI and Evelyn Fairchild in the WWII which served in the WRENs. WREN stands for Women's Royal Naval Service in the United Kingdom.  

Marion Horton is an orphan and at eighteen she ages out of the support system and has to find her way in the world.  The war is on so she joins the WRENs and finds family.  Her boyfriend Eddie Smith,  a fellow orphan lies about his age to join the war effort as well.  They do their basic training and motorcycle dispatch training and are posted close enough to see each other.

Evelyn Fairchild is a teenager and loves to drive fast. She is found at Brooklands regularly.  She has a clubfoot for which she has had many surgeries to correct. It has not kept her down and she has pursued her goals. Her mother is very protective of Evelyn. Evelyn thinks it is too much and she does not want to just get married.

There is a wonderful twist at the end of the book was made a great conclusion to the story.

With needing to embellish my linen coasters I decided that maybe some Sashiko work might be useful.

I looked up where I might find such things where I live.

I discovered a new to me quilt shop - Trapunto ( which means quilt in Italian). 

The ladies were very helpful and I came home with the cheaper needles and some thread as well.  I have heard of this type of stitching through Kathryn and my slow stitching challenge.

We shall see.


I have decided to trade in my great Contigo plastic water bottle for metal ones.  keeping water in plastic contributes to micro plastic in my body so I made the switch.  Of course, metal Contigo bottles on the second hand market are non existant.  Will other brands be water spill proof?

I did buy a few before I found a couple I was happy with. I have the blue one for the car and the white one fits in the new backpack.  MTF had a 50% sale on the whole store. Good to go!
It feels like back to school. 

I have bought myself a couple of jean type pants in the last couple of weeks.  This pair of stretchy jeans are a bit short waisted so they needed a belt.

I bought the belt a couple of days later after I had worn the jeans a couple of times.  I still have to shorten them.  The price was $10 but with the 50% sale I was happy with the final cost.

The belt was $2 at VV later in the week.

Keeping with the feel of back to school I bought a pair of new to me runners as well.  

They fit well,the color was good at teal and black and they were in good condition.  They needed a good cleaning.

The cost was more than I am used to but that is with everything these days.  At $16 but after I looked them up on line I was happy.  The regular price runs between $130 to $150.

I gave them a good wash and let them dry in the sun on the balcony for a couple of days.

Good as new!

I dropped off art at the Spruce Grove Gallery for the Open Art Competition

Then did some shopping at VV.  The Goodwill store has closed. Bummer! 

I connected with my aunt and dropped by for a visit and a game of scrabble.


It has been a very busy week!

Thursday, August 29, 2024

Cards - Self Closing Card - No need for envelopes

I'm working on a new card design. 

It is a self closing card where the card closes onto itself and seals for mailing all in one go.

For this one I used a 1/2 sheet of 12x12 designer paper and cut it in half.  I chose to put the plain side out and the patterned inside.  I added a TH Cameo Frame die in red to coordinate then adhered one of my 4x4 photos from past calendars in the center trimmed to fit.  Then came the bling of gold star sequins on the top and bottom held in place with red tiny brads.

An ivory insert on the right hand side with a stamped sentiment.  These cards provide a good amount of room to include a few lines of greetings to the recipient. 

Once it is ready to go the card is closed and the double sided tape on the small flap seals the card.  Turn it over and address it, add a stamp and a return address and you are ready to mail.

I will cello them so the card front and sentiment are visible.  This allows the one to choose the one that fits the occasion the best.

Each will be an original and unique design.


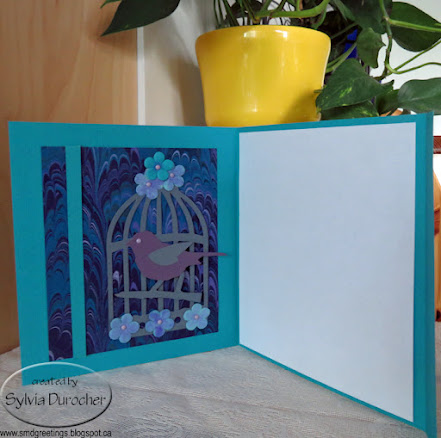
I used the TH Caged Bird die for this card.

My background is a piece of marbled paper. I chose my colors based on it, so grey for the cage and branch and dusty purple for the bird. I then watercolored some handmade paper flowers to coordinate and place them at the top and bottom of the cage. They are held in place with tiny lavender brads. 

I added a strip of the card base card stock along the left hand side of the layout. Taped the ends to the back.  Adhere the element to the card with double sided tape. 

A white insert on the right hand side.

I thought I would try a landscape orientation and watercolor.  

The wide does not work so well because you can't see the art and the sentiment at the same time.  

A quick watercolor which worked out pretty well.

I spent most of the day making these cards then trying to decide if they are a viable product for the Christmas Store.

I go through this every year and I will just do what I like and not worry about who else might like it.

I need quite a few more Christmas cards so that works.

I love Bethlehem cards and I have not included a palm tree before.

The stamp is from a Stampin Up set in royal blue ink.

Wednesday, August 28, 2024

Sewing Project - Pencil Case for Sketch Book

Now that the sketchbook is done What does one need with their sketch book? A pencil and eraser at least.

After researching pencil erasers which I could add to a journaling bookmark, I decided to save the expense. STAEDTLER erasers are readily available and low cost.

I decided my sketchbook needed a pencil case.  I started by finding a short zipper black will do. Then fabric to match the cover. Done!

I created a narrow zipper insert with tabs at both ends. Then I just pressed the seams in on the rust back piece and sewed the 2 side seams.  I then chose black elastic and determined how long it needed to be and stitched the ends into the ends of the pencil case.

It slips over the sketch book cover snugly and holds a pencil and eraser and likely a black marker during Inktober 2024. 

Very happy with that.  It is slap dash job and I may refine the construction at a later date.

Sketch Book Cover - Paste Paper

I bought this Scrapbook Binder a while ago for under $5.  I was trying out ideas for what would work for me as a sketch book.  After using it for a few months I have decided to move forward and finalizing it.  

It was just cardboard so it needed a cover.  I dug into my stash of paste paper and there was a piece big enough.  I used a large glue stick and put glue on the cardboard and the paper and adhered pieces to the front and back separately and pressed them with books. Once that was dry I glued down the inside flaps and dried those under books.  I then added the dark spine which is also paste paper.  That was a bit tricky to press but I did my best.  Then I cut down a letter sheet of 24lb bond paper to line the inside back and front.  Pressed again.  

Finally, I could put my sketch paper back inside.  I am using 65lb card stock from Micheals which I find too light for card making so it needs to be repurposed. I just it cut down to 10 inches and punch 3 holes in the left end. Works great.  

I still have the original 8x8 scrapbook sleeves which allow me to store paper that does not fit in the 3 hole system.

I have decided not to put any words or images on the front cover.

I am getting ready for Inktober 2024.  I hope to produce more drawings this year.


Paste Paper is kind of matte and a bit rough so I decided it needed sealing.

I dug out the bottle of Modge Podge matte finish I applied a thin coat to the outside.


Slow Stitching - No. 035 - Thread Sampler - ORTS - Satin Stitch

Week 35 of the K3N Cloth Tales Slow Stitching Challenge 2024 - Hanging by a Thread - Thread Sampler and Satin Stitch. 

Somewhere in the video Kathryn said "think of your thread as paint" or words to that effect.  

For me a paint palette came to mind. So I found a line drawing of a palette online and traced it onto my orange fabric and cut it out. It was appliqued with the blanket stitch. 

Then I pulled out the ORTS tin and started satin stitching bits of paint onto the palette.  My paint brush was next.  This was all done on the fly so all in all I am happy with the final result.

Tuesday, August 27, 2024

Cards - Christmas Cards - Trees

I have done these colorful trees on a smaller scale before.

This is an A2 card in landscape orientation.

The bottom of the card is wet with clear water and then you paint your trees above wet on dry until at the bottom you reach the puddle of water you laid earlier.

I did work out how to print the greeting on the bottom of the watercolor panel.

This is Taken with Teal with a seasonal insert and white envelope.


I think these trees are a bit too far apart but at least they are green.

The black greeting printed on the panel with the printer before mounting to card front.

Mounted on a Kiwi Kiss card base with a seasonal insert and white envelope.


Not sure how well this color works but there it is!

Black printed greeting on the watercolor panel.

Card base is Island Indigo with a seasonal insert and white envelope.


Cards - Christmas Trees - Watercolor

I am going to need a lot more Christmas Cards so I decided today to start.

I found a tutorial video on line for these 5 trees last week.

Masked the bottom of the trees then drew 5 triangles with pencil. Painted them with watercolor, drew designs on them, and added metallic accents.  Then spattered the watercolor piece by loading brush with color and tapping it against another brush to produce the blue spots.

I traced the greeting.

Trimmed the watercolor paper to fit on an A2 card. Mounted it onto a SU Baja Breeze card base.

Add a seasonal insert and white envelope.

This one is in non-tradional colors.

Purples and warm tones of yellow / orange.

On the last 2 I worked out how to print a greeting on the printer.  Took quite a bit of time but now I can repeat it when I want.

I did add a black line to ground the trees.

The card base is SU Pumpkin Pie with a seasonal insert and white envelope.


This card is all in blue tones with silver metallic accents.

Mounted on a SU Taken with Teal card base in the A2 set in portrait orientation.

Seasonal insert and white envelope.


Saturday, August 24, 2024

Sylvia's Simple Shots

One of my aunts celebrated a birthday so a few of us got together for Chinese food which was delicious.  Then she invited us over to her house for blueberry cheesecake. 

It was a raffle prize at reunion and she froze it till her birthday. My sister had made it in a dish which went along with a casserole carrier.

It was delicious.

I started the week early in the morning by meeting road blocks in just about every way to get out of my neighborhood.   People were frustrated and going the wrong way down one ways. I managed to get myself out of the grid lock and headed into the river valley.  I missed the signage warning about the marathon route.

I am so glad I can start having folks over again, now that the floor project is done.

I prepared a bit of a snack for my visit with a friend of mine on Monday.

A few veggies and dip and some ginger cookies

Of course, some Chamomile tea and great conversation.

At one point I thought maybe she should head out before rush hour traffic but it was already an hour later than that.

I guess were having a good time.

N is for Noose by Sue Graton.  I finished this book in the last couple of days.

Another great time spent with Kinsey Millhone as she dug down to investigate the final couple months of a fellow's life.  His wife was concerned about his troubles and hired Kinsey to investigate.

It's early spring and the weather is not the best but she heads north to meet with Selma Newquist whose husband passed away a couple of months ago.  

She started asking questions about Tom and his life and the locals in Nota Lake were having none of it because he was a good guy.  Well there may be other reasons.

There was a big reveal in the last chapter as to who killed those 2 guys.
It's Concord Grape time!  

We always had these as a treat when we were kids. I buy a basket of them every year.

My sister and brother-in-law dropped by on Tuesday to see the place put back together, pick up a couple things headed to their house then we went for supper at the Bul-go-gi House a Korean restaurant which as been in business since 1973.

It was delicious as always and good company.


Headed to the St. Albert Botanic Park to photograph the dahlias.  It is that time of year again where the bed of these flowers are in full bloom.

I did walk the whole garden but here are 4 of the great dahlias in their full glory.


I found out on Sunday that there would be no BC peaches this year as there was a killing frost when the flowers in bloom.

I guess that means Ontario peaches if we can get any.

I stopped at Superstore and they had cases of 25 lbs for $35.00 which is $1.50 a pound. Yes, please.

I took one home.  They are pretty much ready to eat and process so that will be on the agenda right away.

I will share with family, friends and neighbors.


I had a neighbour over for a visit and a tour of the new floor and laundry closet.

We had a great catch up.


My sister dropped by Saturday afternoon for tea and a visit.

It's been a while since she's been here so it was nice to host for a change.  She has been generous with her invites.

I sent her home with several peaches.


It's been a busy week.  It was so nice to have people over.


Peaches - Freezing

With no BC peaches this year I was worried I would not get any.  Friday, my sister let me know that Superstore had some.  When I walked in the door they had cases! 

I bought a case and this morning I got down to the task of freezing some.

They get a dip in hot water to help the removal of the skin, then into cold water, peel off the skin and cut into chunks, onto a cookie sheet with parchment paper, into the freezer, when solid into bags for the winter. Since they were frozen seperate it makes it easy to just take the amount I want for breakfast. 

Wednesday, August 21, 2024

Slow Stitching - No. 034 - Mola Inspired - Reverse Applique

Week 34 in the K3N Cloth Tales Slow Stitching Challenge - prompt - Mola Inspired Reverse Applique. This is practiced by the Guna people of Panama.

I designed my own geometric pattern and I used 4 layers of fabric.  True blue, then lime green, then royal blue and finally tangerine orange.

This was quite stiff - the top & bottom layers were poly cotton, the lime is silky and the blue is for sure polyester.

The shapes are a square, a triangle, a rectangle and a circle.

I used sewing thread to based around the edge. Found embroidery thread to match each color and outlined the shapes with running stitches.   Debated about adding additional stitches and decided against it.

Sunday, August 18, 2024

Card - HB watercolor - Purple

A large purple watercolor card for my aunt who is celebrating a birthday soon.

There is several layers and colors of watercolor brushed across then dried.

Later, I just let color drip down the paper while it was standing.  Catching the drips at the bottom on the desk.

It was then pressed flat.

A simple flower where I punched the flower and painted it with the bits left on the palette. Added a stem and a center.

Half sheet sized card on SU Lavendar Lace cardstock.

I added some clear  rhinestones held in place with Bling Zots. Full sheet insert to hide the brad in the center of the flower. White envelope and it's done.   

Found a new place to take my card pictures where I did not have to move stuff all the time.  See how it goes.

Saturday, August 17, 2024

Slow Stitching - No. 031 - Shisha and Kutch Area in India

I have caught up on my slow stitching.  This piece is for week 31 of K3N Cloth Tales Slow Stitching Challenge.

The shisha are the small decorative mirrors on Indian clothing.  I chose a plastic sequin since I anticipate this piece being put into a possible quilt. This is washable.

I decided to use a piece of salmon colored linen on a cotton foundation cloth.  I also decided to make a paisley pattern with the shisha at the round end.  I traced with a white marker.

I managed the stitching on the shisha. The proceeded with satin stitch.  I had a really hard time when I  stitched through a single strand.  

I added the a blanket stitch around the outer edge of the paisley then closed it with a row of back stitch. After my problems with the satin stitch I took the easy way out.

I used 3 strand embroidery thread in several colors. I made several circles around the shisha.  Then I followed the inside edge of the with a couple of rows of satin stitch. Then I added the daisy flower and filled the field around it with satin stitch.  I used gold, teal, purple, yellow, and pink thread in various places.

I put a border in blue at the bottom and an upper in gold. 

Friday, August 16, 2024

Slow Stitching - No. 033 - Nature of Cloth

This week's prompt in the K3N Cloth Tale's Slow Stitching challenge is "Nature of Cloth".  

Kathryn explored her bundle of fabric.  How does it feel? Does it pass the needle test? Does it ravel? Does it have texture?

Once we had selected our fabrics then we were to make a fabric collage.

I chose a corduroy, wool plaid, orange cotton, yellow cotton and a small triangle of mustard colored silk. 

I placed a circle of stitching around the intersection of these fabric pieces.  Then random running stitching, seed stitching, with a sprinkling of French Knots.  This was a lot of fun to make.

Thursday, August 15, 2024

Sewing Project - Chair Pads

 
The wood table chairs are now more comfortable.  I made chair pads for the dining table chairs this morning.

I used some blue mustard fabric I picked up for free a while back.  Nice floral pattern.  The back side of the pads are the mustard linen fabric I had in my stash.

The seats measure 15.25" across at the front and 13" at the back so there is plenty of each fabric.

I had checked out foam rolls at a fabric store at the beginning of the month and the price was $39 but not enough to make all of the pads.

I continued my research.  

I purchased a 1.5" memory top mattress topper for the foam in the pad. They were on sale recently for $50 which is more than enough to make them all with leftovers.  

The triangular shape of the seats will allow me to make good use of the foam and fabric by rotating the pattern.  The funky textures will be put to the underside which will work out alright.

There were some decisions to be made:

1. Zipper closure so I can wash them?  Where does it go? How long does it have to be? Do I have 4 in the right color and length?  Don't have what I need to proceed this morning. Next!

2. Fold over flap at the back.  This makes them not reversible and I would need to velcro the flap to keep it closed.  The math is a bit more complicated. Next!

3. Sew the foam in and see how it goes.  This is the fastest and easiest option. Yes!

The foam was thin enough to cut with scissors but not my fabric ones.  I just traced the shape with a marker.  I rotated the shape so that I could use the cut side for the next one.  Very efficient use of the material.

I cut 4 of these one for each chair.


I placed the printed fabric over the solid fabric and pinned the pattern in place.  I had to add a 1/2 inch seam allowance then a full inch for the foam pad.


I started sewing along the back towards the corner, back stitched the corners and ended just after the last corner leaving most of the back open so I could insert the foam.
The foam is very sticky so it was a bit of a challenge to get it in place but it should help it stay in the envelope.

The twill tape ties were about 15 inches folded in half.  I placed them so they would be aligned with the inside corner of the chair back.  Using twill tape meant I did not have to make ties which made the project move along.  

I pinned the back opening closed and as I went along I placed the folded tie aligned along the pinned seams edge.  

Then, I just sewed the closure seam which also tacked down the ties.  Did some back stitching  where the ties were for added strength. 


It took about 3 hours to make four pads so I am happy with that.

Here's is one on the chair and it looks great.


I have managed to keep my plants on the balcony alive so a small pansy bouquet on the table and I am set to host company!

Wednesday, August 14, 2024

Sewing Project - Seat Belt Adjuster

This is a hand sewn project as the sewing machine had not yet been unearthed from the flooring project.

The width is 2" which is how wide a seat belt is.  Then enough fabric to overlap for the closure. 

I put a piece of stiff plastic in between the layers and stitched it in place on both sides.

I added the 2 sewn snaps and then grey squares on top flap so it was pretty.

It works really well.  I no longer have to fight to keep the seat belt from cutting me off at the neck. This brings the belt across my chest instead of higher.

Tuesday, August 13, 2024

Slow Stitching - No. 032 - Inspired by Judy Martin

I am catching up on my slow stitching now that the floor has been installed and all the furniture is back in place.

This is week 32 of K3N Cloth Tale's Slow Stitching challenge.  Prompt - Inspired by Judy Martin. K saw Judy's show in Birmingham but was inspired by an older piece.

The piece took 3 years (over 1000 days) to complete and was over 200 feet long and titled "Not to know but to go on".  The idea to stitch every day and take things as it comes. 

I chose the items to couch from one of my scrap bags and just laid them down as they came along. Started with one color and just changed as that one ran out.  I couched yarn, ribbon, rickrack and cording.  I really loved how the tiny rick rack looked couched. All kinds of ways to stitch it as well. Of course, there is as many colors as the rainbow.  I then stitched in between the couched rows till I was happy with the whole piece from either side.

Not sure how this will make it into my squares as it is too long.  Can I fold it effectively, I am not sure.  

Saturday, August 3, 2024

Flooring Project - Thank You cards

I made a few Thank You cards for those who helped in this big flooring project. 

This was for the sister and her husband who came to the city to help me remove the carpet from the living room and dining room and expose the cement floor on a very hot and sweaty day.

I chose Stampin Up Rich Razzleberry card base in A2 size. I dipped into my commercially made handmade paper and cut a piece of this wax resist in teals, rich purples with swishes of gold.

I left the beautiful deckle edge on the bottom and taped it to the card front.

I stitched 3 small gold beads in the top right hand corner.

A white insert and envelope.


This card has an Old Olive card base.

I chose an origami paper front layer which was taped on.

I added a gold star sequin in the left hand corner.  To balance I added 2 square brads in the bottom right hand corner with a green one in the middle.

This paper has beautiful gold details.

This card is for the folks from whom I bought the flooring which answered all my questions during the process.


I chose a SU Kraft A2 card base for this card.

The front of the this card is a piece of botanical pressed wax paper.  A nice little flower and a piece of green leaf.  It needed to be mechanically adhered as it resisted taping.  

I wrapped a length of gold thread around the top a few times and then knotted it.  I then place the gold mini brad over the knot and pressed it through the card front. I added a gold bulb pin in the bottom right hand corner which went through the wax paper and card stock front.

A white half sheet insert to hide the metal pieces which have gone through the card stock.

A white envelope to finish it off.

This is for the flooring company which recommended the underlay which saved the project.

This card is for my niece who dropped everything on the Monday morning to pick up the 2 large rolls of underlay and deliver them to my brother in law who was going to install the floor.  Saved me a round trip to the south.

The card base is SU Always Artichoke.  I found this piece of lacy handmade paper in the stash.  Lightly glued to a piece of white card stock.  Trimmed to fit across the card front and taped in place.

I added a coordinating button with gold thread held in place with a Zot. White insert and envelope.
Started with a piece of Not Quite Navy card stock.  

Layered a piece of marbled paper in blue tones with copper accents on the card front.  I added a copper star sequin held in place with a Zot.  Then I added a coordinating bead held in place with a star copper tiny brad.

White insert and envelope. 

This is for my brother in law who installed the floor and my sister who hosted me at her house.  We did a few fun things while he was working at my place. There was a bottle of scotch delivered with the card.


I am loving the lacy curtains casting a wonderful shadow on the vinyl floor!