Saturday, November 25, 2023

Sylvia's Simple Shots

I am always on the look out for small nativity sets that I can photograph for Christmas cards. 

I found this one at a thrift store a few weeks back.   They are snow people. 

My new ceramic tree has come in handy again. That was a good purchase.

The NOEL came from the ReUse Center.  The tiny lights also came from the thrift store.  They use AA batteries which I always have on hand.

I plan on applying a wash to these ceramic figures to give them more definition.  This was a very quick set up. I will have to take a few shots on the nativity while it is white because I will not be able to reverse the process.

Here's the box for the nativity.  I expect it is discount store purchase which did not cost a lot to buy new.

As you can see it has more characters which includes the 3 wisemen, a couple of animals so there is plenty of potential there.


The construction in my area just continues.  I am not sure who will occupy these tall apartment buildings when they are done.

The very tall building they built several years ago which limits the sun that hits my window is about half full.

This project started late summer so I heard through my open windows for all the fall.  At least we have very good windows and now that they are closed I don't hear it any more.


I finished this book this week. The Left-Handed Booksellers of London by Garth Nix.  When I looked it up online it is designated as a teen novel.  I really enjoyed the book.

The main character is Susan Arkshaw who is a twenty something looking for her father.  She has the summer to look before she started class at university in the fall in London.  She finds herself a job and a place to stay. Her Mom is keeping the details of his identity to herself so she turns to the man who has been a family friend for years.  He always sent gifts at Christmas and her birthday - Frank Thringley. When she is at his house things get really weird. He is dispatched by Merlin a young left-handed bookseller (one of the fighting ones).  With the right-handed bookseller they form an extended family of magical beings who police the mythic and legendary Old World when it intrudes on the modern world - in addition to running several bookshops.

Her life is turned upside down that summer as the magical beings help her make sense of who she is and the powers that are just being awakened in her which leads to the identify of her father.

I replaced the glass in my bathroom.  I bought the glass at the thrift shop for less than $2.  The one I had been using was a Mikasa which I purchased at least a year ago.  I was now finding that it's bowl was too large now it seemed for my hand. 

This is a great drinking vessel of very thin glass. Very nice quality.  I looked up the name Spielgelau - this is a water glass from the Definition series.  It is 16 ounces.  A set of 4 small ones retails for $80.00 so I guess I did alright.

I like to start my day with a large glass of water and this fits the bill.  The bowl is a better size for my hand.

Easy to clean as my hand fits into the top easily.

An excellent addition.

Friday, November 24, 2023

Christmas Cards - Watercolor Ornaments - Process

I decided I wanted to make some special cards for my family.  I wanted to use watercolor and ink. What to make? I considered using die cuts so that I would have a framework to work within.  I did get rid of quite a few so I had to investigate what I had left.

Gingerbread - nice size but not enough artistic options

Snowman - too big and limited artistic options

I have quite a few ornament dies.  

Some too big.  These don't leave any room for a branch or other thing to have the ornament hang.


Others too small.  Not enough to stand alone, then I could make 3 three but that is 3 times the painting and design.  Are they all the same color and design? 

This one is one of the Stampin Up Keepsakes Ornaments as are the 2 small ones above. 

I could have used the three different ones but again a lot of decisions to make and designs to come up with.  

It was very cute.

I decided to use a permanent marker instead of the dip pen because I had watercolor containers, several brushes and several palettes out so I could have easily dip the wrong tool into the wrong liquid.


This is the Sizzix Ornament #2 die which was the right size. It had a nice hanger. 

It had this bump below the round part and here was my first attempt.  I did not like to highlight it by tracing it with the marker. Then it should be shaded to make it look nice.


I could cut the bump off as you can see in this photo.  Yes, that was better.  I was inclined to create the main part of the ornament as a circle which would limit my options.


Then, I remembered that I had designed a digital ornament quite a few years ago. You can see it in this post.   I decided to pursue this option.      Pros: Using my own design was a great idea.  It meant I could size it exactly the height I wanted. It had a hanger. Cons: I would have to cut them out myself.  I decided that would add to the handmade original feel.
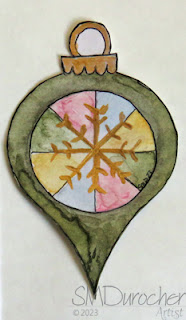
I traced the shape onto my nice mixed media paper with a pencil.  I then cut them out and then added the black line with the marker. Eventually, I learned it was better to do the line first then erase the pencil lines and then cut out the shape.  Here is one of my rejects.  I was not happy with the green watercolor on the outside, the circle limited my designs, then I used acrylic gold to try and save this one and I was not happy to mix mediums.
After a lot of trial and error I finally found a process that worked for me. I wanted to put these ornaments on a green watercolor background then onto a card base.   I had problems with the green watercolor layer as well.  I used salt to create texture but it must not have been wet enough so I got very little of it. This is one of my cards.  I'm not sure about just having it stuck there.  It should have a connection but I don't what it will be. Should it be a bow? a ribbon?  Would have been better to think of that before I adhered it.  We shall see what I come up with. 

Saturday, November 18, 2023

Sylvia's Simple Shots

I took this shot at the Sturgeon River a few days ago.  

Ice is forming along the edge of the river but we still do not have snow.

We have had some flurries which whitened the ground for a few days and then disappeared.  I have to say that it has made driving wonderful in November.  I am so thankful.


I took a trip to the south this week in search of C7 light bulbs for my Mom's Christmas Light Window Candelabra.  I wanted to make sure that I had replacements when one burned out.

I checked the website which indicated that they had several packages of just yellow bulbs but when I arrived and inquired I was told they don't have any - data error.  So I bought a large box to get the 5 yellow ones.


I have taken photos of these lights many times over the years that Mom had them.  She loved them and it was one of the decorations she took with for her year at the lodge. 

These were in the picture window at the house every year.  She loved them and I loved them.  I just love the halos.

It was the only thing I wanted to inherit of hers when she passed.  They bring me comfort.  It is a little thing but a big deal to me.

I will enjoy them the whole season.


This is a cobalt blue glass bottle made from recycled glass made in Spain.

I love the pattern on the bottom, the texture of the glass and the fact that it is a flat bottle so does not take a lot of space despite it's height.

It will serve as a flower vase when I want flowers on the table and I have the yellow table cloth.

I have some blue linen that I want to make a table runner - the project is on the back burner.

I have been working on Christmas stuff a lot.


V is for Vengeance by Sue Grafton.  This is my thirteenth novel in this series.

This one was a bit slow in my reading of it.  I could be my mood.

Kinsey Millhone witnesses a shoplifting incident at a shopping mall. What are the chances.  She so rarely visits department stores so to get embroiled in a conspiracy was a surprise.  Turns out Audrey Vance, the lady Kinsey saw take lingerie from the department store turns up dead a few days later.

This story involves a highly sophisticated fencing operation of stolen goods.  It is well organized where cells don't know all the players, works like a well oiled machine until Audrey is found dead.  She had her cog in the wheel and now there is no one to prepared the stolen goods and the stuff backs in the system. Kinsey is hired by her fiance to investigate and find out why Audrey died.

The mastermind of the operation is a crime boss, financier, "private banker" Lorenzo Dante.  He inherited the family business from his father who got into from his father. They all live on a large compound that Lorenzo supports for the aging members of his family.  He also supports a brother who has not inherited the gift for the business and has been in and out prison.  The should have cut those ties but it's family.  The brother makes a decision that will cost Dante all of it.

Thursday, November 16, 2023

1 of a Kind - Tree Scent Oranments - Set 4

It has been very enjoyable to pick up needle and thread while I watch TV in the evenings.

I pulled out another 5 wooden spools from my stash and started another set of One of a Kind Christmas Tree Scent Ornaments.

Here we have red wool with black blanket stitch around the top and bottom edges.

I added open circled around the center of the essential oil diffuser.

A black felt circle cut with the smallest die in the large smooth circle set for both ends.

The buttons matched the wool very nicely.


I did find a few new small pieces of felted wool at the ReUse Center again last week.

This is one is charcoal grey.  

I added plum blanket stitch on the top and bottom edges.

A turquoise daisy flowers with a yellow center in the middle.

Turquoise felt circles on both ends topped with warm golden yellow buttons.

The hanger is the same turquoise thread as the flowers.


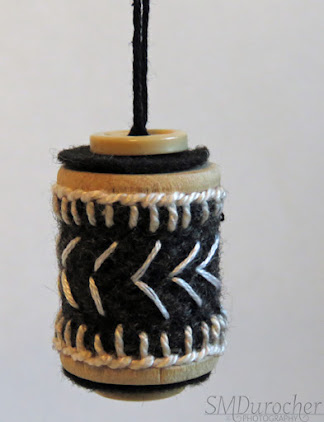
This Tree Scent ornament starts with felted wool with a herringbone pattern.

I used ivory thread on the blanket stitch as well as the arrow pattern around the middle.

Black felt circles on top and bottom with tan buttons which coordinate with the wood in the spool.

This is a more masculine pattern as every one can use aromatherapy.  Essential oils diffuse completely which allows for a change of scent the next time. 

Most do not stain the fabric but the black is for sure not going to show.


This is the felted wool has aqua stitching accents.  

I followed suit and used aqua for the blanket stitching around the top and bottom edges.

The short and long stitch pattern around the middle in the same thread color.

Dark felt circles and aqua buttons on the top and bottom with stitching pattern around the outside edge.


The tree scent ornament mimics the warm green tones of a real live tree.

The felted wool is multi colored in warm tones.

I added a coordinating tiny button on the front with arrow pattern around the middle with brown thread.

The felt circles were cut from the same wool and I added warm green button on both ends.

I really anticipate a good response to these precious hand made gems.

They are all unique - One of a Kind - and will be a special ornament even if not used as a diffuser.

I really love this one!

Cards - Silent Auction Donation


I made a couple sets of cards to donate to the Silent Auction at the Gallery Holiday Party.

The first set features a chipboard deer that was stained with Tim Holtz Distress Stain - Gathered Twigs. I chose a designer paper by We R Memory Keepers - Botanical for the background.  It comes in 12x12 so I could 6 cards with the one sheet. I ripped snowbanks from textures off white card stock.  The moon is champagne card stock punched with the 1`circle punch.  The trees are created with 1) Hampton Arts Tree Art die and stamp set, with olive card stock, 2) the Memory Box Birch Tree Trio die and 3) the Stampendous Truck Tidings die set. The card base is Stampin Up Pool Party. 


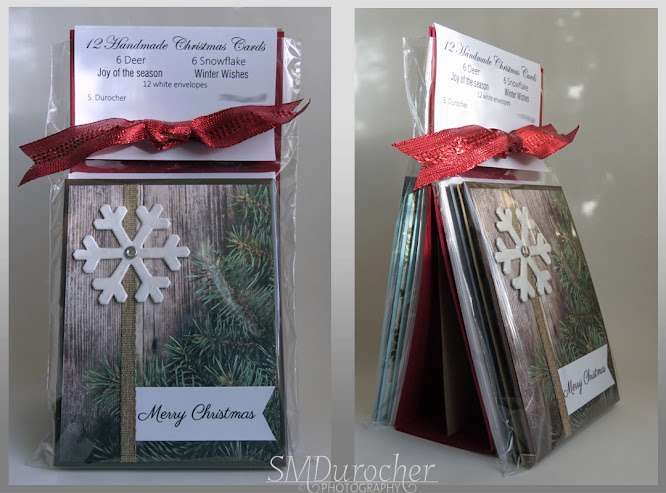
The second set of cards features a chipboard snowflake.  I painted them with white acrylic paint then a coat of Pearl Finish. I chose 3 designer paper from the Stampin Up Adventure Bound paper stack.  

For the Pine Boughs set of cards I selected Early Espresso, Chocolate Chip and Baked Brown Sugar card bases. I chose a ginger colored 1/4 inch smooth ribbon. The snowflake is attached with a large clear crystal brad. The greeting is black and white with a flagged end.

For the Birch Tree design I chose Basic Grey card bases. I chose a 1/4 inch black grosgrain ribbon. Again, a clear crystal brad to attach the snowflake. The greetings were left with square corners on this set.

I added white envelopes for all 12 cards.  These were sealed in cellophane - 6 deer then 6 snowflake.


I created a structure to display the 2 sets of cards. I started with heavy red card stock with which I created a pyramid shape then added a piece of chipboard in the middle to provide support to the structure.

I added the sealed packs of cards on either side.  I created a product label to fold over the top.  I then put 2 holes through all the layers with my Crop-a-Dile.  I pulled a red metallic ribbon through the holes and knotted in on the front.

I hope that it generates a few dollars for out club.

I also donated my weaving from a Tactile show, you can check it out here.

Update: All the items sold which is very good news!

Tuesday, November 14, 2023

2024 Photo Calendar - Wings


2024 Wings - Here is my nature calendar which features flyers of different descriptions.  This features birds and insects. It represents what I have seen on my trips to the Edmonton Valley Zoo, the U of A Botanic Gardens, several wetlands in the area and my regular morning walks. The holidays have been marked in red.

This calendar has 13 4x6 pages which is 12 month pages with an index/title page.

January - Snowy Owl                                July - House Sparrow

February -  Golden Dragonfly                   August - Ashy Mining Bee

March - Tundra Swan                                September - Peregrine Falcon

April - Fritillary Butterfly                             October - Honey Bee

May - Black-crowned Night-Heron            November - Spotted Sandpiper

June - Hoverfly                                          December - Fiery Skipper

2024 Photo Calendar - Flower

 My photo calendars are ready!

2024 Flower - This is my floral calendar this year.  It represents what I have seen on my morning walks, the flowers I have enjoyed at the St. Albert Botanic Park and the wonderful front yards in the neighborhood.

This calendar has 13 4x6 pages which is 12 month pages with an index/title page.  The holidays have been marked in red.

January - Hosta Bloom                      July - Blue Flax

February -  Coral Sunset Peony        August - Alium

March - False Sunflower                    September - Sunflower

April - Plum Blossom                         October - Common Spiderwort

May - Tulips                                       November - Snowdrop Anemone

June - Alberta Rose                          December - Temptation Amaryllis

Monday, November 13, 2023

Greenland Garden Center

I met the girls at Tim Horton's for coffee then headed to Greenland Garden Center for a photo shoot!

Mistake! It is a day off today in lieu of Remembrance Day so the place was packed with wonderful Christmas decorations but also a ton of people young and old.

I did manage a few shots before I just gave up.  I did buy a pick of jingle bells on my way out. 

There was a light which reminded of my stained glass light project. There were many nativities available, I liked this one a lot.  Nice and simple for one with very little space. The birds are always great. 

I see that the felt ball garland is still in vogue this year.  These were gorgeous but with a crazy price and no tree to put it on it stayed on the shelf. It could hang elsewhere I suppose.

Saturday, November 11, 2023

Sylvia's Simple Shots

This week was a time to remember those who served, fought and paid a price for the freedoms I enjoy.

I have uncles and those closer than that who served to protect our country.

I am so blessed and appreciated what I have.


I have been looking for a container to hold my unPaperTowels.  These are pieces of fabric that I can use around the house that will clean up messes that I would have used a disposable paper towel.  These then can be laundered and returned to be used many other times.  Saves trees.

A Dollarama purchase with is exactly 10 inches wide and 5 inches across which is what a unPaperTowel measures folded in half.  

Perfect!

I had this book on my night stand for a while.

I bought at the Thrift Store because it was J R R Tolkien.  I read the basic story which was good but there is lots of background stuff.

This is a edit by Christopher of his fathers writings and I just did not want to read about when the stuff was written, how much was kept, how much was rewritten and changed.

I will put it with the other J R R Tolkien books and lit it sit.


I repaired some of my reusable bags this week.  These are not made to last in some cases.  This one is very good but the inside seams needed to be finished so they would stop unravelling and leaving tiny red threads every time I used
it.

The manufacturer put a seam at the top of the handles where the most strain is placed.  Of course, that is silly.

The hems were keeping the handles from falling apart completely so I wrapped a piece of poly/cotton fabric around the top of each handle and sewed them securely.

This will be in service for a few more years.

This bag was one I collected at the ReUse center to bring my goodies home this week.  

The handles hand become disconnected even before I got home.  I thought I will just sew them back on.  Upon further examination the handles just disintegrated as I tug on them to test the strength.

Fortunately, a few weeks back I found some webbing for $1 so I was able to give this bag new handles for a song.

This bag is made of much light material because it is meant to fold up in a small pouch.

I was fortunate to bring home some poly/cotton scraps from the ReUse Center this week and they match perfectly.

I added a bottom to the bag which had 1 hole worn into it from dragging.  The handles are a little long. 

The seams had to be reinforced on the inside to ensure they did not unravel.

I added a strip of fabric around the top edge as well where the handles are attached to the bag.  At least the handles are one piece unlike the other. 

I am so glad the fabric matched so well.  Back into the grocery bag collection.


I found this very cute ceramic tree at the arts and crafts store last week. You can see that it is meant to be an ornament but is is way too heavy for that purpose.

I thought it would work well with my small Nativity Sets.  It is a bit small for this set but will work well for the smaller one.

I have a few bottle brush trees as well that fit this purpose.

It is super cute and it was on sale 50% so I could not leave it behind.


This is a glass ornament which opens and you can put something inside.

I used to have one but it broke a couple of years ago.  I am glad I was able to replace it.

It's that time of year.

A few people I know put up their Christmas Tree the Remembrance Day weekend.

My wall Christmas Tree will not go up until after December 1st.  My crafting projects are caught up and I have Christmas cards to do so I should be ready in plenty of time.

Friday, November 10, 2023

Sewing Project - Tote Bag - Red Tulips

I made another tote bag for charity. See the previous one here.

This is a beautiful red tulip microfiber with green accents and a red zipper.

This pillowcase was small so only 18 inches wide. I was lucky that one of my shorter zippers was red. Win Win.

I used the fabric from a forest green pillowcase of poly cotton for the accents on this bag.  The handles will be more durable rather 100% cotton.

I added a fabric on the bottom again to help with keeping the bag looking good and providing more strength to the bag if it is very full.  I boxed the corners again.

I chose to fold over 3 inches at the top of the bag to strengthen the to edge and help with the proportions. I created handles with the poly cotton green fabric. They were cut 3.5 inches and were 40 inches long on each side. 

I put pockets on both side because I had the fabric and who can't use an extra pocket. Phones, keys, day books always need to be close at hand.

I used the same zipper panel as before.  This works so well.  The red zipper is very visible in the green panel.  I followed the Zipper Panel Tutorial by The Crafty Gemini. Tabs at each end makes it easy to find and open the zipper.  It goes completely across so gives full access to the bag.

I chose to make the handles only go down just below the pockets on both sides.  Well anchored ends and connections at the top.

Boxed corners and a decorative stitch along the top edge of the pocket and the seam which holds the zipper panel in place.

Will be off to charity before Christmas.

Wednesday, November 8, 2023

Christmas Cards - Joyeux Noel - Blue


Another set of French Christmas cards. These feature blue paste paper my sister and I made years ago.

I chose Stampin Up Brocade Blue card stock for this set.  I cut a layer of Whisper White to leave a small border all the way around.

I cut the paste paper 3.5 inches wide and 4.75 inches tall. I aligned the Memory Box Grand Joyeux Noel thinlit along the top edge top edge up and cut with magnetic platform. The cutting has created many little pieces that I had to make sure to collect.  I adhered the die cut to the white layer with tape and quick dry adhesive around the Noel word to keep it stuck down. I then had to find the right piece for the noel O and E and stick those on with quick dry adhesive. 

The accents were cut with the Martha Stewart large snowflake punch and the Stampin Up Ornament punch. I used a tiny navy star brad for the dot on the J and a blue round sequin in the middle of the snowflake. I adhered a blue star confetti in the middle of the ornament with a Bling Zot. I drew a line to the top with a fine blue marker. A tiny blue sequin was placed for the dot on top of the J. 

Christmas Cards - Joyeux Noel - Green

 Another set of Christmas Cards. 

In this set of cards I used Stampin Up Garden Green as the card base.  Cut one sheet in half, scored and folded each in half to make two A2 cards.

I cut a layer of Whisper White cut to 4.00 x 5.25 inches to leave a small border all the way around.

I chose green paste paper my sister made many years ago.  I cut a piece 3.50 inches wide and 4.75 inches tall. I aligned the top of the thinlit die along the top of the paper making sure it was right end up. The die is the Grand Joyeux Noel by Memory Box. Once cut I adhered the diecut to the white layer with tape and quick dry adhesive around the noel letters to make sure they were stuck to the paper. I then had to find the cutouts that matched and glue the middle of the O and the middle of the E.  I used my QuicKutz - The Quicker-Poker-Picker-Upper tool to hold the tiny piece of paper while I put a dab of glue on it and then carefully put in place. 

The accents are the Martha Stewart Large Snowflake punch and the Hampton Art Tree die from the set. I cut the tree from a warm green card stock and added decorations to it with my white opaque marker. Tiny gold sequins on the top of the J held with Bling Zots. The sequins are gold. A large one on the snowflake and a star on top of the tree.

Christmas Cards - Joyeux Noel - Purple

I made some French cards for my aunts and uncles who are still with us.  Joyeux Noel means Merry Christmas.

I started with the purple paste paper my sister and I made many years ago.  It has been paper that I though too special to use just willy nilly and so it has not been used.  I have to get out of the scarcity mentality and use stuff I think beautiful knowing that more will come when it needs to.

I cut the paste paper to 3.5 inches wide and about 4.75 inches tall.  The die is a thinlit by Memory Box.  I used my magnetic spacer to keep the die in place while cutting.  I cut the paste paper then pulled it off the paper. This requires gentleness because those letters up top are very delicate. I did mark the die with an up this way arrow this time because I did lay it upside down and of course had the greeting the wrong way.

I chose Stampin Up Lavender Lace for the card bases for these cards.  I added a layer of Whisper White cut to leave a small border all the way around. I used double sided tape on the bottom and side and Scotch Quick Dry Adhesive around the noel letters. The bottle has a very fine tip so it was easy to put just where I wanted it.  

Once that was adhered to the white layer, I added my accent pieces. The tree is by Hampton Art and cut from Elegant Eggplant. I added decorations with my white opaque marker. I added silver star and sequin on the top of the J. The snowflake is a large Martha Stewart punch. I adhered to the layer with a dusty purple mini brad and a silver sequin and a tiny sequin on the J. 


Tuesday, November 7, 2023

Christmas Cards - Teddy Bears

I found 2 Teddy Bear pages in my stash of old calendar pages. Here's the original post to the calendar. 

Here's Teddy with the small Nativity set.  A gorgeous mercury glass tree in the background.

To create the card I chose Stampin Up Midnight Muse card stock for the base.

I cut a piece of Bashful Blue card stock with the Tim Holtz Cameo Frame die.  I trimmed the photo to 3 5/8 inches wide and 3 3/4 inches tall. I just love how well this works.

I added iridescent snowflakes with small white sequins held in place with navy star tiny brads at the top and bottom of the photo.

This was adhered to the card front.

I added a blank quarter sheet insert which should have had a sentiment.  I will stamp something.  A white envelope and it's done.

Here's the other Teddy photo.  Same mercury glass tree and a beautiful wire ball box which is meant to gift a memento.

The card base on this card is textured paper in a navy blue.

The layer is again Bashful Blue which was trimmed to leave a small border once the photo was trimmed to 3.75 inches square.

This layer was adhered to the front of the card.

I added an oval greeting adhered with 3D foam tape.

A quarter sheet insert and a white envelope.

Another couple added to the Christmas card box.


Sunday, November 5, 2023

Simple Sentiments - Photo - Set 5

I chose to add a banner to this fifth set of Simple Sentiment cards.

I started with a Stampin Up Lucky Limeade card base, cut, scored and folded.

I chose a SU Pale Plum card stock banner which was 2" wide and banner cut with the Banner Triple Punch by Stampin Up.  I added 2 mini brads to the banner placing them just below the photo. 

I adhered the banner to the card aligning it to the focal point on the flower. The flower is a White Geranium which is a 4x4 photo taken at the St. Albert Botanic Park.

I added a quarter sheet insert and a white envelope.


I started with  this small crab apple 4x4 inch photo.

The card base for this card is Ruby Red card stock.  Cut 8.5 W x 5.5 T inches, scored and folded in half.

I chose More Mustard for the banner which was cut with the Banner Triple punch.

I added 3 warm red mini brads aligned on the center of the banner.  It was then adhered to the card front.

The photo was then adhered on top of the banner. Nice to have the banner reach the edge of the card so the color repeats at the top.

Added an ivory envelope and a quarter sheet insert.


The photo on this card is a close up shot of the plant Mother of Thousands as each of the plantlets along the edge of the leaf can produce a new plant. Took this one at the Muttart Conservtory.

The card base is Glorious Grape.

The Banner is Green Galore. It was cut to 2 inches wide, the end cut into a banner with the Banner Triple punch.  I aligned the banner alogn the focal point of the photo.

I added 3 purple eyelets to the banner which I mounted with the Crop-a-Dile tool.  I did mark the spaces on the back to ensure they were even.

The banner and the photo were adhered to the card front.

A white quarter sheet insert and a white A2 envelope were added.

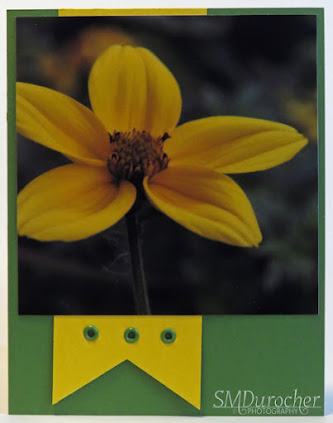
This flower is a False Sunflower.  It is a gorgeous bloom in any garden.

I chose Garden Green card stock for the card base. Considering that most of the flowers are taken in gardens makes sense. I may need to source out some more of this color.

I aligned the banner with it's green eyelets along the focal point of the 4x4 inch flower photo.

These were both adhered to the card front.

I added an A2 envelope and a quarter sheet insert.

Super pleased with these cards.

I will pair them in sets of two - one flower and the other a nature one.