Wednesday, February 19, 2025

Cards - Charity Set 2

I chose a SU Cherry Cobbler card base in A2 size.  I trimmed a piece of designer paper in kraft with white polka dots and adhered to the card front.

I added a couple pieces of SU designer paper in chevron pattern in red to the the card front.  

I stuck the wood butterfly to the SU Artisan Label Punchie with a Zot and then it to the card front with 3D foam tape. 

I adhered the SU Small Oval punchie greeting to the horizontal piece of designer paper.


The chevron paper is from a Stampin Up designer paper pack.

I wrapped a piece of red and copper metallic ribbon around the top and then taped the layer to the A2 card front.

I created an accent with a red SU Decorative Label punchie topped with a SU Small Oval greeting punchie and the wood butterfly.

A Zot holds the butterfly and double sided tape for the rest.

Each card has a quarter sheet white insert.


The dark brown card base is topped with a gold polka dot on kraft card stock.

I added a kraft and gold ribbon along the left hand side. The brown SU Artisan Label punchie is topped with a wood butterfly held in place with a Zot.

The SU Small oval punche greeting is placed in the bottom right hand corner.


This brown card base again topped with the gold polka dot card stock.

This time I used the SU Decorative Label punch and topped it with the SU Small Oval punchie greeting.

The wood butterfly in the top left hand corner stuck with a Zot.

These will get to my sister who has the contact for this card donation.

Cards - Charity

I set out this morning to make cards for IWin which is a charity which helps vulnerable women.  When they finish their program they get a card in their backpack to remind them that someone is thinking of them.

Each card needs a Thinking of you greeting and a butterfly.

I found a bag of wooden butterflies at the thrift shop the other day and brought them home.

I have been at a disadvantage to making cards for this project because of my home situation.  Back home and feeling like crafting again.  Not all is unpacked but I move forward.

I chose this designer paper with flowers printed in green. I trimmed it to leave a small border and adhered it to the front of a A2 card in SU Summer Sun.

I punched a Stampin Up Artisan punchie in Always Artichoke and adhered the butterfly with a Zot. I placed the short length of SU chevron ribbon under it and followed the pattern to trim it.  I added the greeting in the bottom right hand with a shadow of a green oval punchie.

For this yellow card base I trimmed a piece of floral designer paper to leave a small border. Wrapped the red ribbon along the bottom edge and taped the ends to the back.  It was adhered to the card front with DS tape. 

I added the yellow SU Decorative Label punchie, topped with the SU Small Oval greeting then topped with the wood butterfly accent held in place with a Zot.

Love the bright colors in this card.


Carrying on with the green floral designer paper I added it to an SU Always Artichoke card base.

I added a card stock strip on the left hand side and adhered with double sided tape.

I made the wood butterfly and the SU Small Oval greeting punchie touch and attached with a Zot and tape.


This card features a water colored piece of the green floral designer paper.  It was not very thick so I had to be really careful with the amount of water. I adhered it to the card front.

I combined the wood butterfly and the greeting in the bottom right hand corner.  

A Zot for the butterfly and DS tape for the SU Small Oval greeting punchie.


Slow Stitching 2025 - Feb - Week 3

Slow stitching with K3N Cloth Tales Comfort Coverlet 2025.  February week 3. 

I continued my composition of subjects that I photograph.  

The top curlicue got some spring blossoms with tiny leaves, a song bird in blue ( I don't often see blue birds but the color made me happy) and a woodland mushroom.  Again, the ones I photograph are generally in the brown tones.

The shapes I just mostly hand draw to get them into the spaces that they need to occupy.

I am happy with my progress. 


Wednesday, February 12, 2025

Slow Stitching 2025 - Feb - Week 2

 K3N Cloth Tales - Slow Stitching 2025 - Comfort Coverlet. February 2025 - Week 2

I added curlicues around the edge in several colors. 

Then, I added the flowers and insects - bee, butterfly and ladybug to the left hand side.

I created a flower with long stitches then added some weaving at the center of the petals.  Several yellow French Knots for the center of the flower.  I used the end of the curliecue for the flower stem and added a large leaf at the top for the ladybug to sit on. 

There will be 3 more compositions to come to fill in the space on this square.

Monday, February 10, 2025

Puzzle Board - A good thing

This is the way my dining room table looks like most of the time.

I always have a tablecloth.

Here I have yellow placemats and the flowers my friend gave me 2 weeks ago is still looking good.  The lilies faded in a week but the mums are still bright.

There lurks a secret under there.


I bought a piece of hardboard which I had cut to the size of the top of the table.

I sanded the edges smooth.

Now it sits on top of a the secret lying under there.

Of course, when the table cloth is on one is the wiser.


There's a puzzle under the hardboard!

I just don't have enough space to dedicate a horizontal surface to just puzzle making.

I started puzzle making while I was away from home in temporary accommodation with little of my other crafting things at hand.

I understand it is good activity for my brain so I had to find a solution.

The hardboard was less than $20 so a project that did not break the bank.

The hardboard sits near the table while it is off the puzzle. This works great.

The box of extra pieces will be stored under the end table near my chair when the puzzle is covered.

I am really happy with this idea. 

Friday, February 7, 2025

Thank You Cards and Gifts - Renovation

I managed to get my small gifts and thank you cards for folks who were involved with the renovation project at my house that started back in September and finished up a couple of weeks ago.

I am still unpacking and will be for the next few weeks.  

I had some great people working and helping during this stressful time of my life and I wanted to let them know how much I appreciated it.

I was up early this morning in my kitchen and I made some caramel popcorn.  I did not get the opportunity to do that this Christmas as I was living in temporary accommodations.  

I check off the things I needed.

  1. Recipe
  2. Margarine
  3. Nuts
  4. Popcorn
  5. Corn Syrup
  6. Brown Sugar
  7. Stainless Steel sauce pan
  8. Large yellow bowls
  9. Popcorn maker and Ultra21
  10. Measuring Cups
  11. Stirring spoon
  12. Brown Sugar
Where's the brown sugar.  After checking my packing list most of my food Tupperware had not been unpacked.  After unloading 3 boxes I found the brown sugar.  I am good to go.

I made 3 bags of caramel popcorn and 6 cards.

It was great to be back in my kitchen doing what I have done for years at Christmas time.  Well, this year there was a 6 week delay but I enjoyed do it.  I expect the recipients will enjoy the popcorn.


Next the thank you cards. 

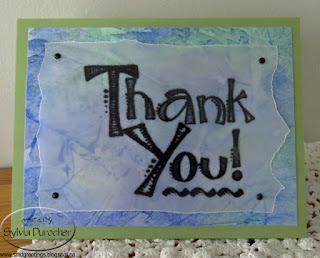
I decided to use watercolor paper I made a long while ago with a clear embossed black greetings.

The greeting is printed on vellum then heat embossed with clear powder.

I downloaded some free graphics from online.

The card stock is coordinated with the piece of watercolor paper then the vellum is trimmed and held in place with brads

The card stock is Pear Pizzaz in the A2 size.

The card stock is Brilliant Blue with the watercolor paper trimmed to leave a small border.

The greeting is cut to 3.5 inches square and aligned along the right hand side.  Held in place with pink mini brads.

The cards are for the tradesmen that worked on the project, the managers that were involved, the staff at the temporary accommodation, and my insurance agent.

The gifts were delivered and were graciously received.

The card stock is Stampin Up Island Indigo.

The greeting is placed along the bottom edge to soften the pink in the watercolor paper.

Held in place with silver tiny brads.
The card stock is SU Soft Suede.

The greeting was just designed with fonts on my computer.

Ripped the top and bottom edge of the vellum.

Held in place with brown mini brads.
The card stock is SU True Thyme.

The greeting was aligned with the bottom edge and held in place with tiny black brads.
The card stock is SU Elegant Eggplant.

The greeting was aligned with the top edge and held in place with deep purple mini brads. 


Wednesday, February 5, 2025

Slow Stitching 2025 - Feb - Week 1

This is my February piece for K3N Cloth Tales - Slow Stitching Comfort Coverlet 2025.

I chose my photography as the subject for this piece.

I have 2 layers - a top layer of light grey 100% cotton on a foundation of 50-50 cotton poly.

I placed a frame of running stitch about 1 inch from the edge. Using light grey 2 strands of floss. 

I drew a top down view of a camera in the top right hand corner stitched in black with accents of grey and champagne.

I will be adding subjects I photograph throughout the year.