Showing posts with label thin dies. Show all posts

Monday, April 18, 2016

Card Club - April - Square Frame Photo

I'm holding another Card Club class today.

I started with a 4" photo featuring a beautiful butterfly. I cut it with the Die-namics Stitched Square Frame thin dies which gives me the frame and the inner square. I trimmed the inner square with the paper cutter to make it a bit smaller than the opening of the frame. I chose a turquoise card which matched the butterly very well.  I adhered the stitched frame to the card front.  The center square is adhered with 3D foam tape to raise it a bit.  Now the border of blue shows through the frame.  The greeting was color printed onto the card stock before I adhered my layers.

Love it!


I see that on this one I forgot to trim the center square so there is only a shadow on the center vs the frame.

Sunday, January 17, 2016

Birthday Card Order - Set 1

I made several birthday cards for a friend.  She wanted cards for their sons and daughters.

Left: For this card I chose double sided designer card stock by Webster Pages called Winter Wonder and placed the fold at the top.  I cut the Spellbinder A2 Ribbon Threader die in white card stock.  I added a length of pink seam binding threaded through the slots, tied a knot and trimmed the ends.  I adhered that to the card front.  I then printed the greeting which features a background I designed with the sentiment in a shaded oval.  This was trimmed and adhered in the center of the die cut.

Right: I chose double sided designer paper in this hounds tooth type pattern by Authentique - Autumn
Three.  I selected a deep terracotta color for the card base.  I tied a piece of dark chocolate brown seam binding about the DSP before I adhered it to the card front.  The  knot was placed to the right so I could place the greeting on the left.  The greeting was designed with a digital rope oval frame into which I added the sentiment.  Once printed, I cut it with the Stampin Up Window Frame framelits.  I added a square (2 3/8") of the same card stock as the card behind.  This was mounted to the card front with 3D foam tape.

I started with a light green card base.  I cut a layer from the Winter Wonder DSP as I used in the first card.  I tied a piece of pink seam binding around the DSP aligned on the right side.  I then tied another piece onto it to make the bow. This was then adhered to the card front. I created a digital version of the pop bottle flower from this project.  I designed the greeting with the digital flower, an oval and the sentiment in dark grey with a frame. It printed and trimmed to the edge and mounted to the DSP layer to the left of the bow.


This card is made with the reverse side of the designer paper from card two on the same card stock.  I tied a piece of dark chocolate seam binding across the bottom third of the DSP then adhered it to the card front.  I then printed the greeting with a tree from CKLER.  I added the square measuring 2 3/8 inches of the color as the card.  This was adhered to the card front with 3D foam tape.

Wednesday, January 21, 2015

HPC - Butterfly Trio

I made this card for the Home Page Card Challenge.  We were asked to use one of our new crafting supplies.  The butterfly is a new thin die for me. It's the Sizzix Winged Beauties thin dies.  I used the 2nd in size.  I had hoped to make the card landscape but 3 across does not fit so I switched the orientation to portrait.  I cut the butterflies from sparkly decorative paper. I applied adhesive just to the centre of the die. I layered them onto a banner of white and added thin borders of black card stock on either side.  I offset this accent to the left a bit.  I stamped some small flowers on the right hand side with black Onyx Versafine.  I added a black die cut banner from the Stampin Up Itty Bitty Banners.

Saturday, January 4, 2014

Card - Christmas TY - Washi Tape

A few more thank you cards for the gifts I have received.

These feature washi tape.  On the left I placed a wide piece of washi tape across the bottom.  I cut my greeting in black with the Memory Box thin die.  I used snail adhesive to attach it to the card. 


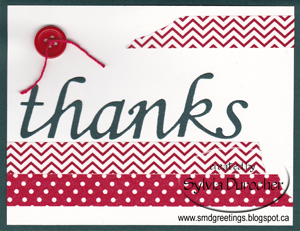
On this one I used some red and white washi tape combined with a green thanks creates a Christmas colored card.  I added a red button with red thread tied into it's holes on the top left hand cord.

Sunday, December 1, 2013

Christmas Card Challenge - December - Thank Yous

I chose Washi tape to use on my Thank You cards.  I had a limited supply of Christmas tape.  I chose this hounds tooth and reindeer in cream and red.  I ran them aligned with the bottom edge and cut to the left and right edge of the card.  I cut my thanks from hunter green card stock with a Memory Box thin die.  I used snail adhesive to attach it to the card.  I find this adhesive easily rolls off the areas that are not behind the die. I tied red thread to the holes in a cream button and attached on the corner with a Zot.

This other version is done with Kraft card stock with the same hunter green greeting.  I chose a larger button because it matched well with card stock.  I added heavier thread to balance with the larger button.


Sunday, September 1, 2013

Christmas Card Challenge - Sept - Foliage

The theme for my Christmas Card Challenge for September is Foliage.  That could be Poinsettia, Pine Boughs, Trees, Wreaths, Holly & Berries, Pine Cones, Mistletoe, Evergreens, and much more. 
I chose boughs for my card.  I started with an ivory card. I put a piece of muted striped DSP onto it.  I stamped my ornament with warm red ink on the same ivory card stock.  The ornament is from the Stampin Up! Tags till Christmas set.  I punched out the ornament with the matching punch. I wrapped a piece of ivory crochet cotton around the hanger, knotted it then adhered the ornament to the card front with 3D foam tape. I pulled the string up and placed a hole in the card front aligning so it would be covered by the bough later.  I pulled both ends of the strings through the card front and taped them to the inside.  I cut the bough from warm green card stock with the Impression Obsession die of a branch/bough (DEI021-N). I chalked it with a couple different shades of green to add some depth. I glued it to the card front with quick dry adhesive applied with a small pointed tip making sure to cover the start of the string. It needed something more so I added 3 small dots of ivory card stock on the right hand side.

Thursday, July 18, 2013

Cool Tool - CD Rack Thin Die Storage

I've been storing my thin dies in the thicker original CD cases for a while but now I have a collection of cases. What to do? See this post on Thin Die Storage.  My niece gave me some of these cases ready to go last Christmas.  What a great idea!
The challenge is to have the CDs easily accessible and find the one I need quickly.  Now I have them all organized and labeled on the top.  I can just pull out a bit and read the label.  I'm really happy with this storage solution.

Tuesday, June 18, 2013

Card - Farewell - Taupe Orchids

I made this half sheet card for a couple leaving our office.  I started with a taupe card onto which I layered a piece of Designer Paper by LilyBeeDesign - Buttercup - Puddles.  I trimmed the paper to center the paisley like design on the card front. I cut a Spellbinders Nestabilities Label 13 from the same cardstock and spattered it with white acrylic paint.  I punched holes in the top and bottom with the Stampin Up! slot punch.  I pulled 3/8` grosgrain ribbon through and taped the ends to the back of the DP.  I chose one of my photos of orchids and applied a sepia filter to it and printed it on white card stock. I cut it with a Spellbinders Oval Nestabilities and then cut a white oval in the next increment.  These were layered and adhered with 3D foam tape to the center of the label.  I placed a taupe brad through the ribbon and card front just above and below the oval center. 

Monday, November 26, 2012

Card Club - Christmas Tag

It was a good class today.  I had a good number of ladies out and we had a good time.
This card is based on red, white and blue tags. I started with white cards.  I found Designer Paper to match the tags as some were red and some were blue.  I used a CottageCutz Picket Fence thin die for the border. Once cut in white I trimmed off the pointed ends. I strung the gross grain ribbon through it.  Taped the ribbon to the background DP paper. I adhered the DP layer to the card front.  I glued the tag to the DP with 3D foam tape. I tied the tag onto the border die with the silver cord but it is purely decorative.

I found DP in the light blue in the tag for the red tags and some with red swirls for the blue tags. I used red ribbon for the red tags and blue ribbon for the blue tags.

Monday, October 8, 2012

R2G - Ice Cream Layered Tree - Card Kits

I created this kit with the inspiration from these I made last year.  I selected the ice cream colors of turquoise, pink and green. I cut the tree with a new die from Dee's Distinctively Dies called Christmas Tree Stackers.  I cut of lot of them in these 3 colors then mixed up the colors to create trees about 4.5 inches high.  I designed the background of snowflakes, stem, hill and greeting.  This was printed onto the card leaving space for the tree and star to be added.  I glued the tree down then added the yellow star.

Saturday, August 18, 2012

How To: Storing Thin Dies

Now that we have a few sets of thin dies, the question becomes how to store them so they don't get bent and damaged and yet are easily accessible.  In my opinion magnet sheet is the answer.  I have presented a couple of ways to store them.  Keeping the really nice envelope from Stampin Up! or using CD cases.

1) Original Pkge - If you are going to keep the SU envelope I propose just adding a piece of cardstock the same size as the original cardboard.  Apply the exact same size sheet of adhesive magnet and voila your framelits are easy to get to, protected, labeled and can be organized.  For those thin dies sold in clam shell cases likely you will need to go to plan 2.

2) CD Cases - You must find the old style (thick) CD jewel cases.  Can still be found in thrift stores and some dollar stores. Carefully remove the black inserts which hold the CD.  Cut to size and apply adhesive magnet sheet to both sides of the case.  Now the thin dies will adhere well but will be easy to access.  With a label maker I placed identification information on the outside of the case.  Now I store them in regular CD storage rack. I can quickly see which ones are sitting there.  My niece gave me some of these for Christmas ready to go.  It was such a nice idea.  Thanks.
How are you storing your thin dies?  Leave me a comment.

How To: Cut one Thin Die inside another

I wanted to cut my MemoryBox Script Thanks die inside my SU Apothecary die. I thought since they are both thin dies that should work.
Pic 1 - I place the thanks first and aligned it using the lines on the all purpose platform. I used some double sided squares to hold the dies in place.  I laid the Apothecary Frame die over it, aligned it and held it in place with a sticky.  I was not concerned about the stickies because if they caught the card stock they would be on the piece I was not keeping.

Pic 2 - I ran it through the machine and I got the thanks cut out of the frame like I wanted.  When you look at the die cut you see that the hole for the A and the K are still in the die.  I collected these so  I could put them back into the work when I used it on a card.

Pic 3 - The final die cut ready to go!

Friday, June 1, 2012

Thanks - Chocolate


I made this card for my card exchange group.  I started with chocolate brown card which I spritzed with white pearly.  Does not show up well, maybe that is why it was on sale at a good price.  I cut a 12" scallop border with a Sizzix Decorative Strip Die - Scallops Giant sizzlet border die with Designer paper.  I cut two lengths so I could align the lines on the paper.  Once aligned I taped them together on the back.  This was then adhered to the card centering the scallop accent then I trimmed them off at the card edges. I added a white satin ribbon over the join between the two scallop elements and taped the ends inside the card.  I then knotted a shorter piece of ribbon onto the longer piece and trimmed the ends.  I cut the greeting with a Memory Box thin die in white.  I used snail adhesive to attach it to the card.  I find this adhesive easily rolls off the areas that are not behind the die.

Thanks - Scallop Border

I made this card for my card exchange group.  I started with a pink card that a spritzed with white pearly but it doesn't not show like I expected.  I cut the Scallop Border with a Sizzix sizzlet die.  Cut it in half and centered them on the top and bottom edges.  I cut the greeting with a Memory Box thin die.  I used snail adhesive to glue it to the centre space of the card.  I added a blue satin ribbon on the left.  I placed a slit in the card fold and pulled it through and taped the ends in place. I tied a knot onto the first piece with a short piece of the same ribbon. 

Saturday, May 26, 2012

Thanks - Good Customer Service

I made this card for a lady who I bought some dies from recently.  She's a Canadian supplier which is great.  I received my first order within 2 days of her letting me know it was in the mail.  The second order she managed to get a die that was being discontinued by making some calls. Thanks Elaine from Integrity Designs.
The greeting on this card is one of the dies I bought. It's a Memory Box thin die.  I love it.  It's a bit fiddly to glue down but it's worth it.  I started with a ivory card and die cut scallops with a Sizzix 12" border die.  This double sided designer paper so I used the few leftovers to create a strip of rose at the top and bottom of the card.  The scallop border was only glued at the straight edge so it creates a bit of dimension.  I added the greeting is a bit of a darker version of the color. Then added a ribbon across the card above the greeting and added a bow.

Monday, July 25, 2011

Card - Birthday

This a large card. I started with an 8.5x11 folded in half then trimmed it to the envelope size. I chose a turquoise card based on the colors in the decorative paper. The background paper is tissue paper ironed to freezer paper. I selected the flower colors based on the background paper - purple and pink. I cut the flowers with my spellbinder Sunflower die as well as the centre. I mounted the centre with 3D glue dots. I added the large gold brad in the upper right hand corner and small ones in the other three corners. I put a pink Happy Birthday on the insert.

Freezer paper is the brown paper used by butchers. The plastic coating provides a barrier to air and moisture to protect the quality, flavor and nutrition of foods during freezing. Reynolds sells it in white on a roll.

Sunday, June 5, 2011

GG - Irridescent 3D Snowflake

The design depends on having double sided paper. I selected Stampin UP! designer paper. The colors are Bayou Blue and Soft Sky. Any double sided paper would create a different looking card.
The 3D snowflake was purchased as an ornament. I cut off the hanger circle from the top with sharp pliers. I cut a piece of DP 4"x5.25" then cut at 1" from the bottom. This is double sided paper so I turned over the 1" piece. These were glued to the card front. I placed the ribbon over the join of two papers. I created a slit in the fold and pulled the ribbon through and scotch taped the 2 ends to the inside of the card front. I glued the color printed greeting below the ribbon on the right hand side. I cut the scalloped circle with Spellbinder Classic Nestabilities thin die in card stock same as the card. Remove the release paper from the Zot on the back of the snowflake and place in the centre of the scalloped circle.
I made 10 cards for my stash.
Total Cards: 48

Tuesday, May 3, 2011

Card - Embossed Sunflowers

I love sunflowers which would explain why I had 2 of the same card in my bucket of cards I've received over the years.
I was inspired by a card I received in my exchange group. Here's the card Therese sent. I decided to use my Cuttlebug Oval frame embossing folder. I cut my recycled commercial card to just smaller than the card front. Placed it in the embossing folder and as the folder is translucent you can see where the main image will fall and adjust accordingly. Ran the sandwich through the Big Kick. While the card is still on the embossing folder use sand paper to rub the high parts removing the color leaving the white card color. Then, I found a complimentary card in a blue green color. I added a yellow gross grain ribbon across then glued it to the card. I added a Spellbinder embossed butterfly and a muted orange color. I added a head and body with a black marker.

This is a great technique. Check out your stack of embossing folders and received cards you are willing to part with and have a try at this! Works great.

Sunday, April 3, 2011

Card - Purple HB

Here's a card I made for a friend's birthday. I placed the organza ribbon about 1/3 down from the top fold using tape to hold the ends onto the inside of the card front. I layered the Spellbinder Nestabilities scallop circles purple onto white. I then layered the Stampin Up! five petal punchies over one another and placed a hole in the centre. Added a hole in the large scallop and through the card front and added the tiny white brad. I stamped the birthday greeting in blueberry with a small clear stamp.

The purple centre scallop was created with paper called Invisibles! by Heidi Swapp. I bought it on clearance at my local craft store. The paper has clear embossed patterns which show up when you paint the paper with color. I used watercolor applied with a wet foam brush. Worked like a darn. I made aqua, purple and yellow paper. There were several different designs. This one is "ornate art". 

Sunday, March 13, 2011

Card - Kiwi Flower Trio

Another green card. I started with a Kiwi Kiss card. I had dyed several white silk flowers with the matching re-inker and let them dry over night. I added white smaller silk flowers and attached them to the card with terracotta colored brads to coordinate with my decorative paper. I cut my striped decorative paper with a scallop thin die. I glued 2 of the scallop borders to the top half of the card. I color printed my greeting, ripped the top and bottom edges and added 3 small buttons with Zots to the right hand side. This greeting was layered over the scallop die cuts.

I have a new scallop Die-namics border die - thin dies from My Favorite Things MFTStamps.com. I am very happy with it's proportions for card making. It's six inches long. Perfect.