Showing posts with label thank you. Show all posts

Friday, August 15, 2025

Thank You Cards - Finally Set 2

The card base is SU Taken with Teal in the A2 size in portrait orientation.

Trimmed the rough edges off this piece and ripped the bottom edge.

I saw flowers in the salt marks in this piece so I took my fine black marker and drew them in.

Added stems and leaves reaching to the bottom of the paper with additional grassy strokes.


It pays to save bits of ephemera.  The green yarn came in really handy.

The A2 card base is SU Pumpkin Pie with a watecolor panel marked with saran wrap on wet color and left to dry.

I punched 4 holes with the 1/8 inch punch. Two on the right and 2 on the left.  I taped the end of the green yarn found in the stash and was able string it through the holes and knot both ends.

I added a SU Artisan Label punchie colored with pencils and held on the yarn with a orange clip.


With the yarn still on my table I used in this card.

I trimmed the waterolor to crisp straight edges.

I layed a strip of double sided tape to the back of the watercolor piece.  Layed my pieces of green yarn then added another piece of ds tape and adhered it to the SU Dusty Durango card base.

Once adhered, I picked apart the strands of the yarn to create this wavy row of goodness.

I added an 2 inch oval punchie greeting below the yarn frill.

The A2 card base is SU Island Indigo.

I added a piece of SU ribbon in So Saffron and flagged the bottom end.  Trimmed the top edge to the top of the card.

I mounted the piece of rough edge watercolor panel over the ribbon aligned along the top.

Each card has a white quarter sheet insert with a white envelope.

Thursday, August 14, 2025

Thank You Cards - Finally!

I finally have most of my craft room set up so I could get some cards made. With seeing family tomorrow I pushed through to get quite a few done.

I created watercolor abstract art on a sheet of 12x18 inch Strathmore Cold Press 140lb paper.  I added salt in some areas.  I ripped my masking tape which held down my edges which gave wonderful irregular edges to my watercolor art.  Great idea. 

Left: SU Pear Pizazz green card stock in A2 size because I know where those envelopes are.

I ripped the bottom edge and added a sequin star in the top right hand corner with half of the one piece of 3D foam tape I could find.

Still stuff to unpack.

I chose blues - Prussian Blue, Ultramarine, and Turquoise along with some Sap Green and Cadmiium Yellow Hue.

Of course not all pieces have the same colors.

The card base is SU Night of Navy with a landscape orientation.  The right hand side ripped with an oval punchie greeting overlapping the ripped edge.


The A2 card base is SU Bermuda Bay.

I ripped the top edge of the watercolor and aligned the right hand edge to the card edge.

I chose to create a flower with watercolor and metallic watercolor around the dot of color left by a grain of coarse salt.

I added a line of pearl watercolor along the top and mounted a greeting over it.

Greeting is SU Modern Label punchie with a Word Window greeting.

Thursday, May 22, 2025

Card - Flowers - Thank You

I made this card for my real estate agent who helped my purchase my next home.

She as been amazing. I paired it with a yellow flower potted plant and dropped it off at her office today.

Card base A7 in Stampin Up Crushed Curry.  I cut a layer of striped designer paper to leave a small border. I used a leftover scrap of card stock to put a band across the top third of the card.  

I used Tim Holtz Tattered Flowers die to cut a Not Quite Navy flower, a Marina Mist medium and a Crushed Curry small one. Adhered together with a blue mini brad then adhered to the card front with double sided tape.

A white single insert and a yellow envelope and it's ready to go.

Friday, February 7, 2025

Thank You Cards and Gifts - Renovation

I managed to get my small gifts and thank you cards for folks who were involved with the renovation project at my house that started back in September and finished up a couple of weeks ago.

I am still unpacking and will be for the next few weeks.  

I had some great people working and helping during this stressful time of my life and I wanted to let them know how much I appreciated it.

I was up early this morning in my kitchen and I made some caramel popcorn.  I did not get the opportunity to do that this Christmas as I was living in temporary accommodations.  

I check off the things I needed.

  1. Recipe
  2. Margarine
  3. Nuts
  4. Popcorn
  5. Corn Syrup
  6. Brown Sugar
  7. Stainless Steel sauce pan
  8. Large yellow bowls
  9. Popcorn maker and Ultra21
  10. Measuring Cups
  11. Stirring spoon
  12. Brown Sugar
Where's the brown sugar.  After checking my packing list most of my food Tupperware had not been unpacked.  After unloading 3 boxes I found the brown sugar.  I am good to go.

I made 3 bags of caramel popcorn and 6 cards.

It was great to be back in my kitchen doing what I have done for years at Christmas time.  Well, this year there was a 6 week delay but I enjoyed do it.  I expect the recipients will enjoy the popcorn.


Next the thank you cards. 

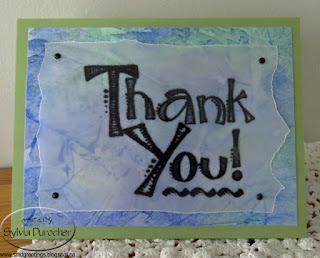
I decided to use watercolor paper I made a long while ago with a clear embossed black greetings.

The greeting is printed on vellum then heat embossed with clear powder.

I downloaded some free graphics from online.

The card stock is coordinated with the piece of watercolor paper then the vellum is trimmed and held in place with brads

The card stock is Pear Pizzaz in the A2 size.

The card stock is Brilliant Blue with the watercolor paper trimmed to leave a small border.

The greeting is cut to 3.5 inches square and aligned along the right hand side.  Held in place with pink mini brads.

The cards are for the tradesmen that worked on the project, the managers that were involved, the staff at the temporary accommodation, and my insurance agent.

The gifts were delivered and were graciously received.

The card stock is Stampin Up Island Indigo.

The greeting is placed along the bottom edge to soften the pink in the watercolor paper.

Held in place with silver tiny brads.
The card stock is SU Soft Suede.

The greeting was just designed with fonts on my computer.

Ripped the top and bottom edge of the vellum.

Held in place with brown mini brads.
The card stock is SU True Thyme.

The greeting was aligned with the bottom edge and held in place with tiny black brads.
The card stock is SU Elegant Eggplant.

The greeting was aligned with the top edge and held in place with deep purple mini brads. 


Saturday, August 3, 2024

Flooring Project - Thank You cards

I made a few Thank You cards for those who helped in this big flooring project. 

This was for the sister and her husband who came to the city to help me remove the carpet from the living room and dining room and expose the cement floor on a very hot and sweaty day.

I chose Stampin Up Rich Razzleberry card base in A2 size. I dipped into my commercially made handmade paper and cut a piece of this wax resist in teals, rich purples with swishes of gold.

I left the beautiful deckle edge on the bottom and taped it to the card front.

I stitched 3 small gold beads in the top right hand corner.

A white insert and envelope.


This card has an Old Olive card base.

I chose an origami paper front layer which was taped on.

I added a gold star sequin in the left hand corner.  To balance I added 2 square brads in the bottom right hand corner with a green one in the middle.

This paper has beautiful gold details.

This card is for the folks from whom I bought the flooring which answered all my questions during the process.


I chose a SU Kraft A2 card base for this card.

The front of the this card is a piece of botanical pressed wax paper.  A nice little flower and a piece of green leaf.  It needed to be mechanically adhered as it resisted taping.  

I wrapped a length of gold thread around the top a few times and then knotted it.  I then place the gold mini brad over the knot and pressed it through the card front. I added a gold bulb pin in the bottom right hand corner which went through the wax paper and card stock front.

A white half sheet insert to hide the metal pieces which have gone through the card stock.

A white envelope to finish it off.

This is for the flooring company which recommended the underlay which saved the project.

This card is for my niece who dropped everything on the Monday morning to pick up the 2 large rolls of underlay and deliver them to my brother in law who was going to install the floor.  Saved me a round trip to the south.

The card base is SU Always Artichoke.  I found this piece of lacy handmade paper in the stash.  Lightly glued to a piece of white card stock.  Trimmed to fit across the card front and taped in place.

I added a coordinating button with gold thread held in place with a Zot. White insert and envelope.
Started with a piece of Not Quite Navy card stock.  

Layered a piece of marbled paper in blue tones with copper accents on the card front.  I added a copper star sequin held in place with a Zot.  Then I added a coordinating bead held in place with a star copper tiny brad.

White insert and envelope. 

This is for my brother in law who installed the floor and my sister who hosted me at her house.  We did a few fun things while he was working at my place. There was a bottle of scotch delivered with the card.


I am loving the lacy curtains casting a wonderful shadow on the vinyl floor!

Wednesday, January 24, 2024

Cards - Christmas Thank Yous


I finally got my thank you cards for Christmas gifts out today.  They have been made since early January.

I always like to use pacakaging from my gifts to make my thank you cards.  In this case, I used some gorgeous yellow paper which was on some body care products. 


I used my large daisy punch and cut 2 flowers - one yellow one white.  I layered these alternating the petals.  I added a small black flower punchie in the center and a green leaf die cut on the right hand side.  Leaf cut with the Sizzix Flower Layers and Leaves die.

I chose different colored card bases.  Black, Navy and Orange. I cut  frames with my Stitched Square dies and adhered those to the top of the folded card.

With all layers adhered on my flower I then used double sided tape to adhere it in the middle of the white frame.

These are out in the mail today!

Wednesday, August 23, 2023

Card - Thank You

I am so grateful for the physiotherapy I received at the beginning of this year.  

It's been six months since I was released by my physiotherapist. I decided to drop off a thank you card to express in my gratitude in being able to climb stairs, be pain free, and in general enjoying walking and movement again.

It does mean 30 minutes of ongoing therapy at home but I know all my routine and it is keeping  my mobile.

Thank you!


The card base is Stampin Up Lost Lagoon in the A2 size.  I cut a piece of watercolor saran paper I made years ago.  I cut it to leave a nice border all the way around. I wrapped a length of SU Pool Party tiny rick rack around the front of the landscape oriented card.  I cut the word from heavy white card stock. It was adhered with Bling Zots. A few of those also keep the knot in place and the rick rack straight on the inside. 

Sunday, April 23, 2023

Card - Thank You with Bees

I made a card for my niece who passed along a great deal on a Janome Serger earlier this year. After a servicing it has been working really well. 

I wanted a card with warm tones. I found a bee graphic on line that I liked then transferred some of the elements to watercolor paper.

I watercolored the background in a light shade of Daffodil Delight. The image was painted with Daffodil Delight and More Mustard. Outlined the elements with dark grey watercolor and a fine brush.  I then created a few shadow hexagons around the outlined ones which I think worked out really well.

Once dry, I mounted the painting onto a Summer Sun card in the A6 size (just a bit smaller than half sheet size).  I placed a piece of narrow stitched grosgrain ribbon in Basic Grey around the inside of the card and taped the ends to be under the watercolor layer.  I added a Modern Label punchie greeting with a yellow offset with a grey greeting on white.  I watercolored the white punchie to be just a little less stark.

Friday, June 3, 2022

Digital Cards - Daisy

I worked on a digital card today.  

I worked with a bubble background I create a few years ago featuring warm green colors and warm blue colors. 

I added a daisy digital image I create a long time ago.  It is a vector image so it can be sized and colored easily.

I added some circles with different l percentages of transparency to allow me to add a greeting to the card. It works well with the bubble concept in the background.  I added 5 circles of varying sizes.

I placed the one I wanted to feature a greeting in the center of the card top to bottom and aligned to the left.

I added a black greeting with a shadow to add dimension.

I sized the image to work well with A2 (4.25x5.5 inch) cards.

This can be printed quickly on white card stock and mailed in short order.

I think I will develop a few more of these.

This went out as a thank you for the lovely bouquet of flowers I received.

Sunday, December 5, 2021

Special Project - Thank You Set 2


I made another set of cards this morning for the special project at Mom & Dad's.

I chose a piece of 12x12 designer paper in Soft Sky color with white polka dots and cut 9 circles with the Spellbinder smooth circle thinlets measruing 3.25 inches.  I again traced loosely the images of butterflies, garden and bird with a border with black marker.

Layered the white Cuttlebug Thanks Words embossed layer onto the card front. 

Used a brad to hold the ornament in place so it can be removed by the recipient.

Loving these! 

Thank You - Large Card

I created the card to put next to the treats at Mom and Dad's apartment.

The small cards will be addressed to individuals that Mom & Dad choose.

This is a general card to communicate with the other neighbours.

I have chosen nuts, chocolates and candies to share with these wonderful people.

I started with a Taken with Teal card base in the A7 (5x7) size.

I adhered a piece of alcohol ink paper in 4x6 size to the card front.

I then printed the words on vellum with the ink jet printer and embossed the words with silver powder.

I trimmed the vellum to allow the background to show.  Adhered the vellum with tiny white brads in the four corners.

Special Project - Thank You cards


I made some thank you cards for the friends and neighbours at Mom & Dad's apartment building.  They have been so good to them.  We planned some treats for them which I will deliver this week.

I started with the watercolor paper which I taped to glass then applied the color to the wet paper.   It was allowed to dry overnight which left it very flat.   I cut the circles with Spellbinder smooth circle thinlets - this one measures 3.25 inches.  I added a length of silver metallic embroidery thread.

I found a few simple images on line - birds, garden and butterflies.  I placed them on my light table and loosely traced them onto the watercolored circles with a black marker.  I added the border all the way around.

I cut pieces of white card stock which measured exactly what I needed then ran them in the BigShot with the Cuttlebug Thanks Words folder.  

I chose a card base that matched the colors in the ornament. I adhered the Thanks layer to the card base then used a black brad to attach the ornament to the card front.  This will allow the receiver to remove it and hanging it in a favorite place.


Wednesday, May 19, 2021

Cards - Thanks

Another few cards for Compassion House.

This is reusing a small thank you card. The words are silver foil.  

I just swiped a bit of watercolor in yellow across the words. Then I paired it with a deep yellow card.  

I added a yellow handmade paper flower in the top left hand corner held in place with a silver flower sequin and a silver tiny brad.

This layer was then adhered to the front of the card.


I reused a nature print I did a long time ago.  This is a maple leaf print using a variety of acrylic paints - brown, red, yellow and orange.  Once dry, I spritzed it with orange red watercolor.

I paired it with a warm red card base.  The nature print was adhered to the card front.

I added an oval color printed greeting in warm orange tones and punched out with the 2" oval.


A deep brown card with a designer paper layer of warm blue grey stripes. I wrapped a length of ivory grosgrain ribbon and tape the ends to the back. This was adhered to the card front.

I added the scallop circle greeting in ivory and warm blue grey.  The punches are all Stampin Up - scallop circle, 1 3/8 and 1 1/4 inch circles.  This was mounted with 3D foam tape.

I arranged the 3 hexagons and adhered with double sided tape.  Cut with the SB Hexagon Nestablities.

Wednesday, March 17, 2021

Cards - 4x4 Photos - Thanks

A few more thank you cards.

This Don Juan Cricut "thanks" die cut is perfect for my 4x4 inch photo cards made with recycling my calendar images.

A wonderful Black Capped Chickadee perched on a branch on navy card stock.  The greeting was cut from white pearl card stock and adhered with double sided tape.


A rain soaked pink rose at the park for this card on a magenta card base.  The greeting is diecut with the Cricut in white pearl card stock.


This owl is one of my paper piecing creations.  I designed 12 owls for my calendar in 2016. 

I mounted it to a navy card base. 

A Don Juan Cricut die cut as the greeting.  Adhered with Quick Dry adhesive.

Really like these.

Monday, July 20, 2020

Thank You for Rescue

I made thank you cards for the friends and neighbours who helped me yesterday.  I ended up locked out of my place through my own inattention and needed rescuing.  Thanks for being willing to help, calling a locksmith and checking in on me while I waited. Expensive day.

This card is for the neighbor who stepped into action despite no knowing me and being new to the building.

Navy card, a wavy black remnant and some hexagon die cuts.

A Stampin Up Modern Label greeting adhered with 3D foam tape.


This card is for the friend who helped me unwind after my adventure.

A bright green card with yellow polka dot designer paper.

A ripped strip of blue with a floral accent.

A 2 inch oval greeting in the bottom right hand corner adhered with 3D foam tape that coordinates with the blue strip.


This card is for the neighbour who hung out while I waited for the locksmith.

Turquoise card with watercolor designer paper.

A large diecut flower accent held in place with 3D foam tape.

A Stampin Up Modern Label and Word Window greeting in the bottom right hand corner.

Thanks to the young locksmith K who came on a Sunday night.   There is still good in the world.

Friday, February 14, 2020

Thank You Cards - Compassion House

I worked on my Thank You cards for Compassion House which I will deliver next week.

These are mainly DSP Split lay outs with a variety of greeting styles.

This one is red and grey designer paper in stripped and geometric. Paper cut to 4.00 x 5.25 inches then cut again at 3.5 inches. The smaller piece turned over and taped back into one layer. 

I added white grosgrain ribbon across the join then adhered to the front of a deep grey card. 

I added a scallop greeting in red and white with grey text.  The greeting is adhered with 3D foam tape.

Some are leftover kits from the class at the house.

Looking forward to my class.