Showing posts with label book carry. Show all posts

Tuesday, May 21, 2024

Sewing Project - Book Sleeve

I decided to make a book sleeve today.

It about the same dimensions as the book bag but it has no handles or closure.

I chose these yellow cotton fabric because I have a bit of it and could afford to lose a bit if it was a bust.

I chose a deep brown very polyester fabric which was stiff and slidy.

Making this took a lot of brain power to translate the process I developed for the wine bags to this one.  

The differences were no box corners, a fold on the bottom instead of a seam, and a portrait orientation vs the landscape one on the book bag.

It does hold the largest novel book I own which I have been using as my guide.

The tab originally was to going to keep it closed but that did not work out so it became a decorative tab instead.  The closure would need to be elastic to accommodate the various thicknesses of books.

I added a button to match the yellow fabric on a brown tab.

There is an opening in the lining where I could turn it inside out.

I did zigzag all the seams as the brown lining fabric was thin and may give it put under too much stress,

It should be nice for this purpose.

I used my wavy decorative stitch again to to top stitch the top edge.

I used fleece for the batting in between the outer and lining fabrics.

I used straight lines of stitching to quilt the outer fabric to the batting.

I prefer to have handles but based on my research many of these sleeves are being made and sold so I thought I would give it a try.

I added my "My Bag" tag to the top edge.


Sunday, March 17, 2024

Sewing Project - Book Bag - Navy Calico

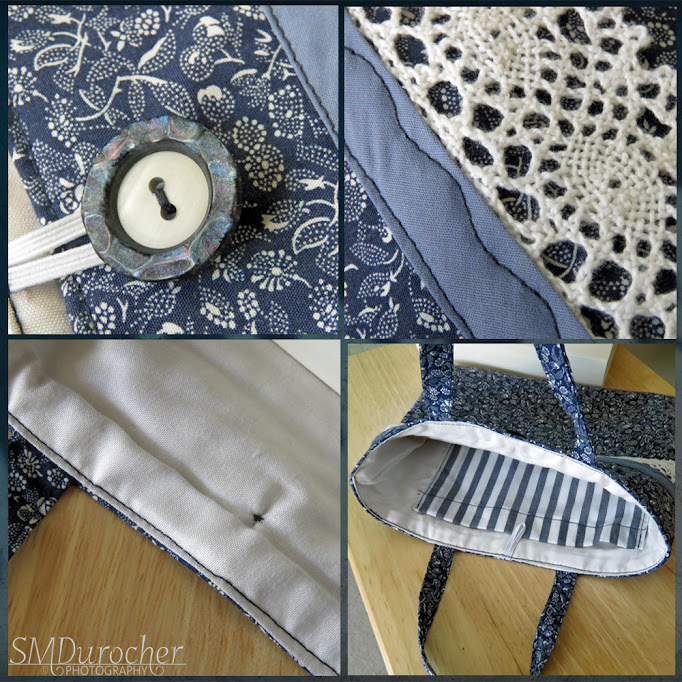
I made another book bag/sleeve.  This time I chose a navy calico fabric from my stash.  I believe I was given this piece from a quilter that was de-stashing. 

I found the beautiful cotton lace at the ReUse Center in the last couple of weeks.  The blue bias tape is a leftover from making these ReUsable Bags

This was a smaller piece of fabric so I had to stick to the 12x19 inches to get handles as well.  I cut my flannel padding layer the same.  I then used the stitching of the bias tape then the lace for my first 2 quilting seams.  I then made them every 3 inches with the wavy decorative stitch width wise across the bag.

I used a piece of white microfiber cloth to make the lining.  I added a large inside pocket using a piece of striped cotton poly as I had no calico big enough.

The handles were cut 2x12 inches then just a 1/4 fold over on each side and then down the middle again making them 1/2 inch wide.  I would like more but it is what it is.

I found a beautiful vintage button and used white flat elastic for the closure.


For information on the "My Bag" Line

Saturday, March 16, 2024

Sewing Project - Book Sleeve - Perfect Pear


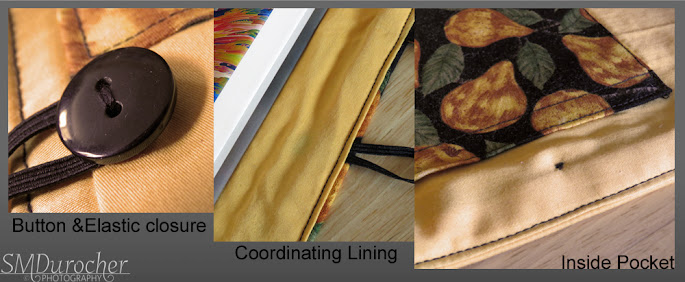
 I am using up my smallish pieces of fabric.  Here I have a book sleeve/bag made with some nice cotton pear fabric in yellow and black.  I have made a banded front with yellow, black and pear fabric.  The bottom is black which works well for keeping dirt from showing.  The back is a full piece of pear fabric.

I chose a cotton/Tencel (fabric made from wood fiber) blend fabric for the lining.  It is also the panel on the front and the band at the top. Feels wonderful. 

I stitched the front to the flannel padding layer with top stitching along the black and pear pieces.  The handles are made of the pear fabric and are 3/4 inches wide and about 11 inches long.

The bag has an elastic and button closure. 

I did put a pocket on the inside which will accommodate something extra. 


For information on the "My Bag" Line

Friday, March 15, 2024

Sewing Project - Book Sleeve - Blue Abstract


I found this cotton poly fabric at the thrift store and thought that would make a great bag. I liked the blue abstract pattern at the top which was different than the rest.

Cut the outer fabric, flannel padding and the ivory lining cotton poly fabric to 9 x 12 inches. Quilted the outer fabric to the padding with a wavy decorative stitch. Sewed both side seams on both pieces.  Managed to cut handles 3 x 12 inches with similar pattern.  Folded both edges in then again in half to make .75 inch wide handles. Top stitched left and right edges with ivory thread.

Placed the handles 3 inches from the edge and pinned, added the elastic on the back piece and tacked those down with a bit of stitching and checked their orientation o make sure I got it right.  Then pinned the two pieces together and sewing the top seam leaving a gap to turn out the piece. Back to flat elastic. 

Top stitched the top edge to close the gap and finish the edge.  

Added a vintage button just the right color.


For information on the "My Bag" Line


Thursday, March 14, 2024

Sewing Project - Book Sleeve - Red Batik


I started with the red piece of batik fabric.  I did not have enough to make the whole sleeve so I pulled a few fabric from my stash to complete the colors in the fabric.  I added some black, red and taupe.

I wanted most of the front to feature the batik fabric.  I added black on either side then a piece of taupe on the right hand side.  The back features 2 pieces of batik and black and taupe.  The taupe was on the opposite side so they would not be together when I sewed the bag. I added a strip of red along the top front to finish off the piece of fabric.  Piecing together the fabric took much longer than using a single piece of fabric. There were more choices to make coordinating the colors and the fabrics.

I then laid it onto my flannel padding piece and top stitched the red pieces with red thread and the black the matching thread. Now those pieces were one.

I used some red cotton poly as the liner.  Again, cut the the same size at the main fabric which is 12 inches wide by 19 inches tall.

I wanted the handles both to be black as it was sturdy fabric and a dark color. I just had one piece so I made the back handle out of all red fabric.  The handles were cut to 12 inches long with top stitching.

I used a hair elastic for the loop but I would not do it again.  The center is very hard and the elastic is very dimensional which made it harder to sew into the seam.

I chose a vintage cream button for the front of the sleeve.


For information on the "My Bag" Line


Tuesday, March 12, 2024

Sewing Project - Book Sleeve - Pin Stripe


I chose 100% cotton fabric from a men's shirt for the outside of this bag/sleeve.  Really nice crisp fabric.  I chose black thread for this project.

I created some cotton poly fabric from some of squares I got from the box of fabric donated to me.  I used 4 squares and sewed them together staggering the seams and then trim the excess and added it back to the length to get what I needed.  

I cut all my layers the same size 12 inches wide and 19 inches tall.  Pin Stripe outer fabric, flannel, and black taupe patterned fabric I made. The stitching I did to attached the flannel to the outer fabric was a rectangle on the front and back about 2 inches away from the edge.

I created my handles from the cotton poly fabric squares of the patterned fabric.  I cut a stripe then folded the edges into the center then ironed it half again.  I placed 4 lines of stitching both outer edges and then 2 in the middle. The handles measure 1.25 inches wide and were cut to 12 inches long.

Tacked the handles and black elastic in place then placed the bags one inside the other and sewed the top edges together leaving a gap to turn it inside out. Turned right sides out and ironed flat then pushed the lining into the bag.  I top stitched the top very close to the edge then added another line of stiching 1/2 inch from the top.

I chose a beige button but I would have preferred a gold one.


For information on the "My Bag" Line

Monday, March 11, 2024

Sewing Project - Book Sleeve - Blue Mottled

 
I made another book sleeve but with a different process - where we make the outer layer and the lining layer and then insert one into the other. I chose light grey thread for this project.

I cut my blue outer fabric, the flannel padding then the grey lining fabric all the same size - 12 inches wide and 19 inches tall. 

I quilted the padding to the wrong side of the outer blue fabric with a pretty stitch.  This one though is too thread intensive and very slow. 

I prepare my handles which measured 12 inches long and 3 inches wide and I folded in the edges then ironed it in half and sewed both edges.

I then sewed the side seams on the outer blue fabric. I decided to add a tiny pocket on the inside for a pen so I prepared that piece then pinned it into the seam and sewed the side seams of the lining fabric. I made sure that it stood the right side up this time.

I then tacked my handles in place on the outer fabric along with the small elastic just to give me a last chance to make sure they are not twisted. 

I inserted one into the other with right sides together and pinned it very well. I sewed them together leaving a small opening to turn them inside out. I then turned them right side out, ironed them, and pushed the lining into the bag. I top stitched the edge very close to the edge all the way around closing the gap in the same process.

I chose a button which matched very well.  This process is working well. It fits my large paper back book which is my guide.


For information on the "My Bag" Line

Sewing Project - Book Sleeve - Butterflies

I decided to jump right in and try again to make a book sleeve.  I chose this beautiful butterfly fabric given to me by a fellow quilter. Used the same light blue cotton poly for lining.

I had changed my mind but my mind had a mind of it's own and I ended up with another book cover instead of a sleeve so I added side panels again.  I had just enough fabric.

I added a pocket on the inside.  I did add a pocket made with the lining fabric but it end up upside down in the side seam.  Pretty useless. 

It has handles and an elastic button closure as the earlier one did.

I did quilt a piece of flannelette which is an inch smaller than the outside fabric to provide some padding but not bulk up the seams.

The finishes size of the book sleeve:

11 inches wide

9 inches tall

2 inches deep

handles 8.25 inches long

One of the handles was twisted so I had to take it apart, turn it and sew it back in but it will not be as strong as they others.

I probably should have waited for the sun to rise into a new day before I tried again.
 
I spent some time this morning trying to define what my book sleeves will be like - size, padding, closure and handles.

Sunday, March 10, 2024

Sewing Project - Book Cover/Carrier

My sister and I had a discussion recently about products we could sew.

Book sleeves seen to sell well.  They just protect a book but don't allow you to read without folks seeing what you are reading.  I'm not sure how import that is.

We did find adjustable book covers which are not as adjustable on the height of the book only the thickness of the book.

There were book cover carriers which allow you to protect the book, open the book to read and will a flexible closure would adjust somewhat.

I did watch one video which I followed the instructions which made this book cover much larger than it should be.  I have put one of my hard cover books in it and it's still a bit too tall but about right for thickness.


The book carrier has great handles which I think are the right length. It has yellow pocket sleeves which provides a contrast to the pale blue lining fabric. There is a layer of cotton flannel in it to provide some padding. There are 2 mini pockets to carry a pen and maybe a small notebook. It has an elastic closure which allows tension to keep closed and flexibility on the thickness of the book. it has two bookmarks which may be handy. I have added a pony bead to the elastic which shorten it and works better. It also provide purchase to pull it across to the button.

The final measurements of the book cover/carrier are:

16.5 inches wide, 10.5 inches tall, cover pockets are 4.5 inches deep, mini pockets measure 2.5" w X 4.5" tall, handles are 9.5 inches long.

There are a few things to improve upon with this design. 

  • I attached some reinforcements for the elastic and the button and sewed them directly through the cover pockets which now limits the width of the cover you can put in the sleeve. 
  • I think the overall height is too tall. 
  • The width of the overall carrier may be to much as well. 
UPDATE:

I have decided to convert my book cover to a sleeve where it is a much better size and it will accommodate any book almost.  It holds my largest paper back book which measures 5.5 inches wide by 8.5 inches tall. 

I just created a narrow tab for each end and finished the ends - top folded and bottom hemmed and top stitched it into the folded length of the bag.  The pockets on the inside are largely inaccessible and I cut off the book marks. 

I am happy with this.

This book sleeve because it is in the landscape orientation allows you to hide your book cover if you choose.