Showing posts with label ribbon. Show all posts

Tuesday, October 29, 2024

Slow Stitching - No. 044 - Stitching Blind

K3N Cloth Tales Slow Stitching Challenge 2024

Week 44 - Stitching Blind

This was a challenge and uncomfortable. 

Prep - threaded 3 needles - green, yellow and navy. My base piece looks like wool but it is not. 

I put an applique pin to let me know what I thought was bottom.

I gathered green cotton, white lace, navy ribbon, and yellow yarn as layers on this piece.

I sewed the green cotton on first.  I see that I did not pull my thread taut which left me with loose thread on the front.  I thought this one had gone fairly well. 

Next, I did the lace which I thought was pretty straight but not really. I was using yellow thread but you can see I pulled the thread out of the needle and I just abandoned it halfway through.

The navy ribbon went pretty well.  I had lost one of my needles so I cut the navy thread, knotted it and used the rest of the navy to couch the yellow yarn which went very well. 

I will finish the few stitches so that I have a finished piece.

Friday, September 6, 2024

Art Show - Open Arts Reception

Well, it was quite a night.  We have 140 pieces in the show and we had a great number of people in attendance. The food was good, sorry no pics.

I headed to the reception with no idea what was coming. The email with the news arrived after I checked email this morning.

All three of my pieces placed!  Wow, what an amazing thing.  I hit a cord with the judges. 


You can find my submissions post here

First and Honorable Mention in photography and Honorable Mention for my watercolor!

I met a few new people.

You can find all the art in the show and in the gallery at this link. Allied Arts Council - Spruce Grove Gallery. There are links for each category.


Here's a few of my favorite pieces.

Tuesday, August 13, 2024

Slow Stitching - No. 032 - Inspired by Judy Martin

I am catching up on my slow stitching now that the floor has been installed and all the furniture is back in place.

This is week 32 of K3N Cloth Tale's Slow Stitching challenge.  Prompt - Inspired by Judy Martin. K saw Judy's show in Birmingham but was inspired by an older piece.

The piece took 3 years (over 1000 days) to complete and was over 200 feet long and titled "Not to know but to go on".  The idea to stitch every day and take things as it comes. 

I chose the items to couch from one of my scrap bags and just laid them down as they came along. Started with one color and just changed as that one ran out.  I couched yarn, ribbon, rickrack and cording.  I really loved how the tiny rick rack looked couched. All kinds of ways to stitch it as well. Of course, there is as many colors as the rainbow.  I then stitched in between the couched rows till I was happy with the whole piece from either side.

Not sure how this will make it into my squares as it is too long.  Can I fold it effectively, I am not sure.  

Tuesday, June 18, 2024

Cards - All Occasion

I wanted to finish a few more cards before cleaning up my space for company as well as use up the rest of this gold speckled paper. 

An Island Indigo card base with a piece of the gold decorative paper adhered with ds tape and glue stick.  

I added a gold fabric ribbon along the left hand edge knotted to the top of the card.

A flower element with leftover flowers from the earlier set. Cut with the Tim Holtz Tattered Flowers die.

Rust, golden yellow and blue to match the card all held in place with a copper mini brad.

White quarter sheet insert and envelope.

A masculine themed card with Not Quite Navy card base with a piece of the gold speckled decorative paper. 

A length of gold fabric ribbon tied along the top edge and knotted.

I cut a Tim Holtz mover and shaper Jalopy truck from same card stock as card and adhered with 3D tape.

A white quarter sheet insert with a white envelope.


For this card I used a SU Handsome Hunter A2 card base.

Adhered a piece of gold speckled decorative paper and trimmed the left hand side to the card edge with scissors.

Added a length of gold fabric ribbon along the fold edge of the card and knotted.

There was a star shaped hole where I had cut a shape earlier.  I cut a yellow star with the same cutter (SU Star Thinlits). It was adhered over the hold with 3D foam tape.

A white quarter sheet insert and white envelope and it is ready to give.


A bit of change of pace in color for this card.

The star was a leftover from earlier cardmaking so I mounted it to a piece of Tempting Turquoise card stock trimmed to leave a border.

I chose a bright green card base - Glorious Green I think.

I tacked the large star in Summer Sun then the small star in the same color as the blue layer. 

Made a hole in these layers and added a yellow star brad.

This layer was then adhered to the green card front.

White quarter sheet insert and envelope.

Sunday, June 16, 2024

Card - HB - Floral Ribbon

I found this floral ribbon at the ReUse Center this week and I thought it would work for a card.

I chose to make an A7 card because it did not cut off any of the rose ovals.

I chose a SU Handsome Hunter green card base. Then I added a smaller layer of SU Rose Red card stock. Then a piece of Very Vanilla to highlight the rose ovals in the ribbon.

I painted the right hand side of the VV layer with some rose colored watercolor leaving a spot of a greeting. Once the watercolor was dry and pressed flat I adhered the pieces in the layers you see.

I stamped the greeting with SU Cherry Cobbler ink with a SU greeting stamp.

I then wrapped the ribbon along the left hand side and taped the ends to the inside of the card.   I added an insert and 5x7 inch envelope and the card is ready to go.  This is for my sister who celebrates a birthday soon.

Wednesday, April 17, 2024

Sewing Project - Wine Bottle Bag - Gold Accents

I made a few more bags today.  This fabric came from my sister and we paired it with a pink cotton poly for the lining.

I was able to figure out how to sew this bag with the slit in the lining and still have the regular box corners. I will post a How To when I have it ready.

This fabric has some gold accents in it so that informed my accents.

I had not decided what my accent would be so I had to hand stitch the gold ribbon on afterward making sure that I did not go to deep.  I used gold thread which worked really well.  With my slow stitching experience I am more confident to pick up a needle and thread.

I found a green cloth button in my stash which worked out very well in size and color.


Here's the other bag from the same fabric but it was the other half and this one read blue instead of green.  That is a bonus.

I am learning that I should be deciding on my accent before I start sewing because accents machine sewn seams are better.

For this one, I stitched the blue grosgrain ribbon in the 2 top stitch seams then added a gold metal button.

I am happy with these as I could customized the color and make 2 different looking bags.


For information of "My Bag" Line:


Monday, May 29, 2023

Exchange Cards

I got my Exchange cards made for May.

I have decided to use my 4x4 photos from my past calendars.

This is a beautiful Red Poppy I think taken at the community garden.

I chose Tangerine Tango card base with a small piece of green card stock that I taped together on the back.

I stamped the green with Border Builder stamp set - script in Basic Black ink to just to knock down the plainness.

I wrapped a piece of Daffodil Delight ribbon around the element over the join and taped the ends to the back.

I then adhered the full layer to the card front with double sided tape.


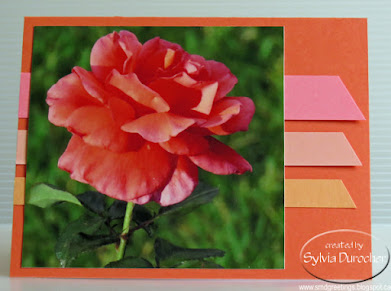
This card features a warm rich orange rose taken at the Botanic Park.

I chose the same Tangerine Tango card base.

I added some complimentary strips of card stock behind the photo. Cameo Coral, Groove Guava and Peach Parfait.

I adhered the strips and trim the right hand end with scissors cutting at an angle.

Adhered photo with double sided tape.

Monday, February 27, 2023

Card - Welcome Back

I made this card for a lady who has been away from work for a long time.  She has been battling for her life and has survived.

I am so glad to see her back at work.

I started with a Really Rust A2 card base and added 2 pieces of paste paper that I made a long time ago. The one on the left worked with the rusty color really well and the one on the right provide nice contrast.

I added a piece of Soft Suede ribbon wrapped around this layer and taped the ends to the back.   I adhered the whole piece to the card front with double sided tape. 

The greeting was adhered with 3D foam tape over the ribbon and overlap in the decorative pieces of paste paper.

A quarter sheet insert and beige envelope finished it off. 

Saturday, February 29, 2020

Christmas Card Challenge - February - Star

My card design for the February Christmas Card Challenge - Star.

I used foil paper with stars on it which was cut to 4.00 x 5.25 inches.

It was cut with the Stampin Up Star Framelits and adhered to the front of a black card.  I chose the next size down and cut foil chipboard and mounted it in the center of the hole I had cut earlier with 3D foam tape.

I color printed a greeting in black on white card stock.   I then punched it out with the Stampin Up Artisan Label.

It was mounted in the bottom right hand corner with 3D foam tape.

I have several ready for the card box.


I just couldn't leave those star cut outs on my craft table.

I found some silver/black ribbon which coodinated with the stars.

I chose a red card base.  I added a bit of texture to the card front by piercing lines with my dressmaking tool.

I put a length of ribbon across the bottom of the card and taped the ends to the inside.

I adhered the star matching the flat end to the bottom of the card.

Add the same greeting as the one above with 3D foam tape.

Tuesday, June 18, 2019

2019 Cardmaking - CH - Class 6

I have decided to stick to one layout which allows one to make a wide variety of cards.  Because I never know how many ladies will show up it makes it hard to plan the number of card kits I need. This way I can just add card kits to my box at any time and be ready for the class. The remaining kits will just go to the next class.  The ladies attending turns over regularly as they finish their treatment and others take their place.

These kits are based on the DSP Split layout where the designer paper layer is cut to 5.25x4 inches then cut again at 3.5 inches. One of the pieces is turned over and the pieces are taped together on the back.  A ribbon is laid across the join and the ends are taped to the back of the DSP layer.  This layer is then adhered to the card front.  This is a versatile layout as you can see it can work tall or wide with the narrow piece on the left or right. With alternating the combo on the double sided paper each card can be different.

The Stampin Up Artisan Label was used on this set.  The greeting was printed on white card with Kiwi Kiss and Early Espresso and punched with the coordinating punch.

The designer paper used on the card shown is by BoBunny - Little Miss - Little Miss Dorothy.  The other I selected is Basic Grey - True Love - Giddy.

The grosgrain ribbon is pink.

The greeting is adhered over the ribbon with 3D foam tape.

I chose this set of cards to have no greeting which allows it to be used for any occasion.  The designer paper for this set is by Simple Stories - Snap Color Vibe - Dot/Stripe in Green and Yellow.

The ribbon is white grosgrain ribbon.

The textured card bases coordinate with the color of the DSP in green and mustard.

It label was cut with one of the Stampin Up Apothecary Framelits.

The accent has a white silk flower in the center held in place with a coordinating mini brad.  The 2 white buttons on either side are held in place with Bling Zots.

 It is adhered to the card front over the ribbon with 3D foam tape pieces.

This is supplies from last month's class which I have converted into the DSP split style card kit.

I chose Stampin Up Print Pattern in Garden Green with the Early Espresso card stock. Some kits have the Garden Green card base.

I added a length of white grosgrain ribbon for across the split.

The star accent was assembled by layering all three and adding the tiny star brad in the center.  This was adhered over the ribbon with 3D foam tape.

I create the greetings in Early Espresso with the Teeny Tiny Wishes set and punched them with the Decorative Label Punch.  I cut the label in half along the points.  It is adhered aligned along the bottom of the card.

Tuesday, January 22, 2019

2019 Cardmaking - CH - Class 1

I taught my card making session at CH tonight.  I had some enthusiastic ladies participate.

This card features music paper cut to leave a small border on an ivory card. 

The flower was cut with the Sizzix Flower, Leaves & Stem #4 from black card stock.  The stem was cut to fit the length of the card. 

I poked a hole in the center of the flower with a push pin. I placed the gold sequin and Prima paper flower onto the tiny black brad and inserted into the hole I made.  I pressed the prongs apart on the inside of the card.

With no greeting it makes a great card for any occasion for a music lover.


This card makes a great one for the guys in your life.


I chose a grey card and cut the designer paper to leave a small margin and adhered it to the card front.

I wrapped the black ribbon around the card front and tied in a square knot on the front left. 

The black label was cut with the Stampin Up Deco Label framelit. I printed the pelican and punched with 2" circle punch.  It was adhered over the ribbon with 3D foam tape.

I started with a deep teal card.  I cut the polka dot designer paper to leave a small border and adhered it to the card front.

I cut the flower from copper card stock with the Sizzix Daisy #4 die.  It was adhered to the card front.

With a push pin I made a hole through the card front for the brad which holds the two handmade paper flowers (teal and terracotta) in the center of the flower.

The greeting was printed in a warm blue then punched with the Stampin Up Artisan Label Punch. 

It was adhered to the card front with 3D foam tape.

Saturday, October 27, 2018

R2Go Christmas Stack Kit - Dove & Joyful Watercolor

This card has portrait / tall orientation.

The Joyful layer was cut from a piece of printed card stock.  I used the Stampin Up Window Frame thin lits to cut the gold foil word with it's watercolor background in red and greens.  I then cut a layer of warm green card stock with one of the Sizzix Square thinlits which allows a nice border around the square on the watercolor diecut.  These are adhered together. 

I chose a warm red card base onto which I adhered a length of gold metallic ribbon across the front and taped the ends to the inside of the card.  This repeats the gold in the accent.

The Joyful watercolor accent is adhered over the ribbon to the card front with 4 squares 3D foam tape.  I aligned it a bit to the left of center.

This is the same sketch but placed in the landscape or wide orientation.

I chose a white card base onto which I adhered a length of white satin ribbon with turquoise writing "Peace" printed at regular intervals. I taped the ends to the inside of the card.

The gold moire square was adhered behind the turquoise and gold dove Window Frame diecut.  This accent was adhered to the card front over the ribbon with 4 pieces of 3D foam tape.  I aligned it to allow me to see 2 full words.

Thursday, February 1, 2018

Christmas Card Challenge - February - Red Heart

This card is for my monthly Christmas Card Challenge which is Red Heart for February.

I chose a red card and added a layer of designer paper - Bazzill Basics Paper - Holiday Style - Stitched Green.

I tied a plaid ribbon on the right hand side and trimmed the ends.

I used the Stampin Up Sweetheart Punch with red metallic paper to create the heart accents which were adhered with 3D foam tape. 

I printed the greeting and trimmed it to end under the ribbon on the right.  I used red and green to repeat the colors from the card in the greeting.

Monday, May 29, 2017

Card Club - May - Bright Blossom

This is a nice bright card.  It features clear embossed designer paper from a 12 x12 card stock pad by SEI - Bright Blossom.  The blossom paper was cut 4x4 which yielded 9 pieces.  I chose a solid pink card stock which coordinated, which was cut to 4.00 x 1.25 inches.  These were butted up and tape together on the back to make one piece to cover the yellow card front leaving a small border.  I did do the alternate colors where the card was pink and the ribbon was yellow.
The ribbon was pulled across the designer layer and the ends were taped to the back.  This layer was then adhered to the card front.
The greeting has a solid layer which is offset behind the white color printed greeting.  The label is the Decorative Label punch by Stampin Up.  The solid label is cut across on the center point.  The point is then cut off both pieces. The halves are adhered behind the greeting offset on the left and right hand sides.  This greeting was then adhered to the card front over the ribbon with 3D foam tape.

Monday, March 27, 2017

Card Club - March - Yellow and Blue Polka Dots

I started with a dark blue card.

I chose 2 patterns of designer in the same family. It is from All My Memories - Herbanella - Design 30 which matches well with the navy in the designer paper.  I cut the paper to 4x5.25 then cut again at 3.5 inches. I turned the small one over and tape them back together on the back. 

I wrapped a length of green grosgrain ribbon across the join and taped the ends to the back. It was adhered to the card front.

I then placed 3 small yellow handmade paper flowers along the ribbon with tiny yellow brads.  I used a push pin to make the holes for the brads before inserting them, then press apart the prongs on the inside of the card.

Monday, September 26, 2016

Card Club - Sept - Square Greeting

I wanted to include a card suitable for male recipients.
I chose an olive card and this designer paper from Bella Boulevard - One Fall Day by Stephanie Hunt - Needle in a Haystack. It was trimmed to leave a small border.
I then wrapped a piece of wide So Saffron ribbon across the bottom third of the designer paper piece and taped the ends to the back.
I trimmed the greeting close to the border then layered it onto a deep teal layer.  The greeting was adhered to the card front with 3D foam tape.

Saturday, August 6, 2016

Sympathy & Get Well Cards

I made this card for a friend who lost her husband to brain cancer recently.  He fought a brave fight for several years.  I will miss him. 

I started with a warm brown card. 

I cut a piece of designer paper to 4.00 x 5.25 inches then cut it again at 3.5 inches.  I flipped the larger piece over to reveal the polka dots.  I taped these pieces back together then placed a piece of ginger colored ribbon across the join and taped the ends tot he back.  This layer was then adhered to the card front.

I punched a Stampin Up Decorative Label a coordinating blue card stock and printed the greeting in the same blue onto ivory card stock.  Punched the greeting.  I cut the blue label in half crosswise and trimmed the points off.  I then adhered the halves offset to the left and right sides. I adhered the greeting to the card front aligned over the ribbon with 3D foam tape.

The get well card was assembled in the same way as the first card but I placed the dots on the top this time. 

Thursday, June 16, 2016

Wedding Anniversary - 40th

I made this card for my sister and brother-in-law who are celebrating 40 years of marriage at the end of the month.

I started with a Stampin Up Cherry Cobbler card.  I punched the 2 hearts from deep red glitter card stock.  I color printed the greeting onto a piece of Whisper White which was just under 3" wide.  I adhered the 2 hearts above the greeting with Zots. I ripped the bottom edge of the greeting layer. I layered it onto a piece of Basic Black and did the same to it's bottom edge. I placed 2 pieces of white twill ribbon on the diagonal to the upper right hand corner and adhered them to the card front.  The first one has a small fold in it.  I trimmed the ends with scissors. I then layered the heart layer onto the card front leaving a small border top and right hand side. 

Submitting the the following challenges:

Fab Friday #89 - Sketch

Monday, November 23, 2015

Card Club - November - Joy Pennant


Today, is Card Club and we are making Christmas cards.  This is a double class which means 8 cards.
I started with the white felt pennant through which I strung the Christmas plaid ribbon in traditional red and green colors.  The ribbon is wrapped around the card front and tied at front in the middle.  I colored printed the greeting on vellum and clear embossed it.  I positioned it with the O of JOY in the center of the bottom half of the pennant.  I then, held the vellum in place with a gold glitter star in the center.  The ends are trimmed as desired. 

I chose red and green for card colors for these cards and the ribbon works well with both colors.  The color on the vellum was alternated as well based on the card color.


Wednesday, July 29, 2015

Banner Thank You

I made this card for color challenge.  I started with the thank banner as I need a card for a friend who hosted me at her cottage a while ago. 
I stamped the Thank You from the Stampin Up Noteworthy stamp set in Night of Navy 3 times on a piece of white about 1.75" wide.  In my recent order the Banner Triple punch arrived as well.  I punched the bottom of the white layer then cut a NofNavy layer and punched that one too.  I then adhered the white to the blue and trimmed the top to match. I love that I can make my banner as long as I want. I tied a Calypso Coral ribbon around the banner above the words.  I added a small flower button in NofN with a Zot. I printed a
section of a Decorative Overlay in NofN onto the front of the More Mustard card.  I adhered the banner to the right of center.

Submitting the card to the following challenge(s):
Color Q #301