Showing posts with label red. Show all posts

Saturday, April 26, 2025

Sewing Project - Fabric Cheque Book Covers

I find myself the owner of 2 chequing accounts.  It happened back in November when I had to write my annual cheques and had a limited supply because the rest were packed in a box.

I have had a chequing account which allowed me all I wanted as long as I kept a certain balance. 

I was convinced to apply a plan to my account so the cost of my cheques would be covered.  If I maintain a certain balance the cost of the plan will be reversed automatically every month.  I have had to go to the branch every month and have the charge reversed manually.  The issue was escalated to the tech team and the second time the answer was found.  I had the wrong type of account.  So a few weeks ago I went and opened another chequing account and applied the plan to that account which allows me to have 20 accounts under the plan. Who needs that many accounts?

I have not tested the theory yet as the end of the month has not arrived but soon we shall see.

Since I have all those cheques I wanted to keep that old account for my regular chequing activities and use the new one for my online and debit transactions.

I went to the pay my bills and realized that I need a cheque register for this new account so I headed to the bank and asked a young teller for one.  She was perplexed.  I asked the young man who had helped to open my new chequing account and he was perplexed.  I dug the one I had from my purse and off he went to the back room and returned with 4. I was very happy but they don't have any plastic cheque book covers.

I decided that I needed to make my own and here we are.

An online source suggested cutting the fabric 7x13 inches. I added the grey patterned fabric to add some interest.  I chose poly cotton fabric so it will wear well. The grey one was a bit too narrow at 7 inches so I had to cobble an additional strip.  It has plastic inserts on each pocket to keep it stiff.  The knots on the front and back keep them in place.

When checking condition of the plastic cover on my old cheque book it was obvious that I needed another. I cut the fabric 8x13 for this cover and that worked out well. 

Again, I chose poly cotton fabric red on the outside and yellow as the lining. I added a few accents on this one as well. Added top stitching to close the opening and add a bit of structure.

This one is big enough for me to tuck the book of cheques in one of the pockets. Happy with these.

Monday, November 25, 2024

Drawing - Quick Doodle

A quick doodle with a graphite pencil after a day of packing more of the kitchen.

I used a Faber-Castell Ecco Pigment pen to add more details.

The washes were added with Payne's Grey and Deep Red watercolor pencils by Faber-Castell.  Got deeper color by letting it dry and doing it over again.

Like it!


Wednesday, October 30, 2024

Inktober 2024 - 30 Umbrellas

Inktober 2024 Challenge

30 - Umbrellas

Black markers on Mixed Media 154lb paper with several layers of watercolor.

Primary color umbrellas.

Different orientations in the space.

Monday, October 28, 2024

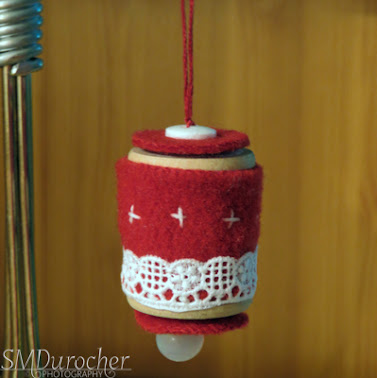
Tree Scent Ornaments - Spools

A few additions to the collection of 1 of a Kind Tree Scent ornaments.

Vintage wooden spool wrapped with red felt. I stitched a length of white lace to the bottom and added a bit of white stitch above it.

Cut two 1 inch circles of red felt to put on each end. 

The bottom features a white pearl drop bead and the top a small white button. All hung with red wool yarn.


A wooden spool wrapped with lime green fleece.  

Once that was stitched on I wrapped the spool with dark green embroidery floss onto which I placed matte gold EBeads along the way.

I cut 1" circles for the bottom and top of the spool.

I added a gold button with a shank on the bottom and a gold bead at the top above the green felt circle.
 
All hung on variegated green yarn.


I stitched a length of plum wool ftlt with a few stitches in green, white and yellow.

This was wrapped around a vintage wooden spool . 

I cut two 1" circles in mustard felt for the top and bottom.

I added a plum colored button with a shank on the bottom and a tiny green button on the top over the felt circle.

All hung with plum embroidery thread.


I used a traditional red and green color theme on this Tree Scent ornament. 

A red felt piece was stitched with white and green thread then stitched onto the wooden spool.

I selected 2 red buttons to go on the bottom and top of the ornament.

I cut two 1" circles of dark green felt for the top and bottom of the spool.

I ran red wool yarn to hold all the peices together and knotted at the top with several knots along the way.

These can be used as personal passive oil diffusers as you relax.

Inktober 2024 - 28 Spheres

Inktober 2024 Challenge

28 Spheres

A black permanent marker to go over my pencil drawing.

I realized that I had used very little red so I wanted more of it in this sketch.

Lines with a ruler.

Stippling with the marker.


Friday, September 27, 2024

Oil Diffusers - Travel Case - Set 1

Blue Bird of Happiness - This diffuser features a bluebird sitting on a branch applique with stitched flower in the upper left corner. The back is a light blue denim with a blue felt drop, a loop and hanger. 

Blanket stitched all the way around to kept both layers together.  All fits in a clear plastic travel case.


Embrace Life - This diffuser features layered felt flowers with a dark center which would work well for a spot to place the essential oil.  The flowers were appliqued to green felt using running stitch and long stitches. The leaf was stitched in place first with the flowers overlapping it.  The back on this one is light mustard linen fabric with a brown drop, green loop and a hanger.

Again, blanket stitch all the way around. All fits in a clear plastic travel case.


Be Happy - A happy face is always fun and uplifting. I used a white felt background for good contrast. I cut the yellow circle then used a hole lunch to create the eyes then filled them with black felt circles. These were stitched in place. The smile was stitched in stem stitch then a satin stitch on the outer edge.  That took a long time.  I used a piece of quilting cotton in coordination colors for the back.  The edge of the cotton is folded over before stitching to provide a finished edge. The back has a yellow loop and felt drop and a hanger.

Blanket stitched all the way around the perimeter with yellow embroidery cotton. All fits in a clear plastic travel case.


Wine O'Clock - I  hope that I have conveyed the message clearly enough with the clock in a wine glass. I chose a bright red felt for the background then cut a white circle for the clock. Black French Knots do for the numbers and then I stitched the hands.  I then stitched the wine glass in grey thread to represent glass but maybe black would have been better.   The back is a grey fabric to coordinate with the grey on the front.  A black loop,a red felt drop and a hanger on the back. 

Again, blanket stitched all the way around with red thread. All fits in a clear plastic travel case.

For overall information you can check  Oil Diffusers - Hand Stitched Original Designs with Travel Case.

Sunday, September 22, 2024

Cards - SC - All Occasion Flowers

 I was brainstorming ideas of what Celebration paper would look like for art in the December show.

I created some decorative paper by blowing liquid acrylic ink on paper with a straw. I used yellow, purple, red, and orange ink.

It did not work out quite the way I thought so I decided to use the paper for card making instead.

The card base is yellow linen card stock in linen finish. 

I chose a piece of dark green white core card stock, ripped in half and adhered the piece to the right hand side trimming it to the card edge with scissors.

I cut the flowers with the QuicKutz Large Flower die from the decorative paper, red, yellow and purple card stock then just swapped out the pieces. The flowers are held together with scotch tape.

I used the red flower with the decorative paper ring and a purple center.  The stem and leaves were cut from the decorative paper. The leaves are from the Sizzix Flower Layers and Leaves die. Stem is just cut with the paper cutter and adhered with QuickDry Adhesive.

A white insert and ds tape with carrier on the flap.

Here I started with a dark purple linen card base measuring 6x12 inches and scored at 5.5" and just short of 1" for the flap.

This time I chose a light green white core card stock on the left.  This flower is mostly decorative paper and is very punchy in color.


Here we have a solid yellow flower with decorative bits in the center ring and the stem and leaves.

The other half of the light green card stock on the right.


Another mostly decorative paper flower with dark green panel.


Super happy with how these turned out.


Wednesday, September 18, 2024

Cards - SC Christmas - Colored Pencil

I worked on more Christmas cards this morning.

I chose to use images I have drawn digitally.  This is my Bethlehem which I had to resize to accommodate this card size but that was easy. It was printed on ivory 65lb card stock.

I used colored pencils and colored the sky, the sand dunes and the windows. 

I cut the large star with the Sizzix Star & Starbursts die in silver card stock. I then punched the others with a CM Star Border punch. Large star adhered with 3D foam and the littles with QuickDry Adhesive.

The image was then adhered to the card with double sided tape, the white insert adhered with glue stick and a strip of d/s tape with carrier on the flap.  This is a self closing card made with 1/2 sheet of 12x12 navy card stock.

I really love how this one came out.

This is an angel a drew digitally based on a wicker angel I saw in a garden center at Christmas many years ago.

Subtle blue background, metallic halo, green metallic on the wings, a red dress with a green and gold border at the bottom.

A bit of flesh color on the face.

A self closing card from a 6x12 inch piece of card stock.  I adhered the drawing onto the card with a white insert opposite.  A length of double sided tape with carrier on the the flap.


A nativity I drew a few years ago. 

A subtle night sky, a yellow star with a wooden stable. 

The figures were colored with traditional blue for Mary and brown for Joseph. Just a wee head for Jesus.

Subtle blue sky, green and tan for the ground background.

Drawing adhered to the card, a blank white insert (not sure if I will regret this later when I have to handwrite the sentiment), carrier tape on the flap. 

Card is 6x12 navy blue linen card stock.


Friday, September 13, 2024

Cards - Christmas - Self Closing

 I am carrying on making Christmas cards.  Again, these are the self closing kind which require no envelope and use up some of the 12x12 card stock I have in my stash.

For this card I used a warm green for the card base.  Cut 6 inches high and left 12 inches wide.  I then scored it at 5.5 inches then just short of 1" on the other edge for the flap.

I used the Tim Holtz Tattered Poinsettia die with heavy red card stock.  I used scrap green card stock to cut 3 leaves. 

I adhered a strip of the same red as the flower along the right hand side. Then a piece of gold gift wrap paper on the left hand side with a ripped edge overlapping the red strip. 

A white insert and some double sided tape with carrier on the flap and it's ready to go.  

I used a teal card stock for the base of this card. 

The decorative paper is from Stampin Up. I trimmed a bit off the bottom and top to have the pattern evenly placed on the card.

I spattered a strip of red with pearl metallic watercolor from my recent purchase. it was adhered on the right hand side.

I cut a star with the Sizzix Primitive #2 die and embossed it with it's folder.

I wrapped a length of red cotton ribbon over the DSP, taped the ends to the back, and adhered it to the left hand side.

The embossed star is adhered with 3D foam tape.  A white insert on the right with double sided tape with carrier on the flap.

This is the second piece of warm green card stock.

I added a piece of gold gift wrap on the left hand side an then added a strip of Soft Sky card stock with ripped edge to the right hand side.

I punched a branch with a border punch by Martha Stewart.  It was adhered with QuickDry glue carefully placed along the stem and leaves.

I cut an ornament with the largest of the 2011 Nestabilities Ornaments from a winter botanical DSP. I cut the hanger from warm green scrap and adhered with QuickDry glue. I punched a snowflake in the center from the same light blue card stock and held it in place with a tiny gold star brad. After punching a hole in the top of the hanger I added a length of Baja Breeze seam binding to it.  The ornament is adhered with several pieces of 3D foam tape.  A white insert and a bit of double sided tape with carrier on the flap and it is ready to go.

Friday, September 6, 2024

Cards - Self Closing Cards - Christmas & Poppies

I made this card the other day but did not have double sided tape to complete the cards.

This is a card that does not need an envelope because the tape on the small flap will close the card once you have written in it.

This card has a turquoise base that measures 5.5" W x 6" T and a 1" flap to close.

I place a piece of lavender origami paper which was spattered with watercolor.  The white frame was cut with the Stampin Up Clear Oval Accent die with the matching mover shaper die. Spattered with same watercolor.

I cut the flowers with the Row of Poppies die by Memory Box in the same card stock as base. 

They were adhered to a watercolor background with Scotch Quick Dry Glue but they are difficult to glue down.  An insert was glued to the right hand side. Finally, tape with carrier for the flap.

I have not used this type of double sided tape for a long while because I don't run classes anymore and I am always crafting at home.

I needed it for the flap so that I could put it on when making the card.  I could have waited till I prepared them in December but having to cut tape then would have been a pain.

My sister let me know I could buy it at Dollar Tree.  This roll should do it.


I folded the card so that the pattern was on the inside to keep the solid side for addressing.

I cut the arch with the TH Arch Frame die out of deep red card stock.
I cut the Nativity with the QuicKutz Nativity long die.  I just cut my So Saffron cardstock to 5.5 inches and took the characters I could get with was the Shepherd and lamb. I adhered the manger section onto the deep red arch.

I added gold stars with a paint brush and metallic watercolor.  I painted the large star onto of the stable too.

I added a plain insert which I will just hand write when I prepare them in December.

Tape on the flap.

This card base is royal blue linen finish card stock cut 6x12 inches scored at 5.5" and then 1" for the flap.

I cut the ornament with Sizzix Ornaments #4 die in blue, then cut just the hanger from silver card stock. I used a decorative paper background from my stash as the background. The ornament is held in place with a silver glitter swirl brad. I added a few more around the card.

I added blue vellum on the left hand side to add some interest adhered with vellum adhesive.

White insert and d/s tape on the flap.


I created 2 Snowman cards.  One with a royal blue card base and the other with a grey card base. I cut the snowman with the Sizzix Snowman and Hat die.  On this card there enough space for the hat! I added a ripped snowbank. Painted buttons on this front and a face, added a ribbon scarf.  I watercolored the hats which turned out great. Added a snowflake die cut/punchie in the top right hand corner. Really happy with these.  The white insert on the right hand side and tape on the flap.  I can always stamp a sentiment later on the insert.

Wednesday, August 28, 2024

Sewing Project - Pencil Case for Sketch Book

Now that the sketchbook is done What does one need with their sketch book? A pencil and eraser at least.

After researching pencil erasers which I could add to a journaling bookmark, I decided to save the expense. STAEDTLER erasers are readily available and low cost.

I decided my sketchbook needed a pencil case.  I started by finding a short zipper black will do. Then fabric to match the cover. Done!

I created a narrow zipper insert with tabs at both ends. Then I just pressed the seams in on the rust back piece and sewed the 2 side seams.  I then chose black elastic and determined how long it needed to be and stitched the ends into the ends of the pencil case.

It slips over the sketch book cover snugly and holds a pencil and eraser and likely a black marker during Inktober 2024. 

Very happy with that.  It is slap dash job and I may refine the construction at a later date.

Sketch Book Cover - Paste Paper

I bought this Scrapbook Binder a while ago for under $5.  I was trying out ideas for what would work for me as a sketch book.  After using it for a few months I have decided to move forward and finalizing it.  

It was just cardboard so it needed a cover.  I dug into my stash of paste paper and there was a piece big enough.  I used a large glue stick and put glue on the cardboard and the paper and adhered pieces to the front and back separately and pressed them with books. Once that was dry I glued down the inside flaps and dried those under books.  I then added the dark spine which is also paste paper.  That was a bit tricky to press but I did my best.  Then I cut down a letter sheet of 24lb bond paper to line the inside back and front.  Pressed again.  

Finally, I could put my sketch paper back inside.  I am using 65lb card stock from Micheals which I find too light for card making so it needs to be repurposed. I just it cut down to 10 inches and punch 3 holes in the left end. Works great.  

I still have the original 8x8 scrapbook sleeves which allow me to store paper that does not fit in the 3 hole system.

I have decided not to put any words or images on the front cover.

I am getting ready for Inktober 2024.  I hope to produce more drawings this year.


Paste Paper is kind of matte and a bit rough so I decided it needed sealing.

I dug out the bottle of Modge Podge matte finish I applied a thin coat to the outside.


Thursday, June 13, 2024

Cards - All Occasion - Gold Decorative Paper

 I found a sheet of this decorative paper at the ReUse Center a while back. I have used it as a background for photography but now it had to be used.

I recognized that almost any card color would work with it so then it was to decide embellishments.  

I need cards for my card box.

I chose SU Soft Sky A2 card base. I ripped a piece of the paper and adhered it to card front with ds tape and some glue stick. 

I cut a label with one of the labels from the Chalk Talk die set which included the small oval hole die.

I chose a gold ribbon to go across the bottom so I had to use the SU Slot punch to make a hole in the fold to allow the ribbon to go through.  Once pulled across I taped the ends to the inside of the card.

I cut a star from the gold decorative paper and adhered it to the label.  The insert had to be adjusted a bit to allow for the slot in the fold.  I used the slot punch again.  A half sheet insert and a white envelope.

For this card I chose a red A2 card base and again ripped a piece of the gold decorative paper to fit the card front.  I use double sided tape and glue stick to ensure adhesion.

I wrapped a piece of gold grosgrain ribbon across the front and taped the ends to the inside.  

I cut a heart with one of Sizzix Hearts thinlit die set.  I embossed it with the D'vine Swirl folder.  I mounted it over the paper and ribbon with 3D foam tape.

A half sheet insert and white envelope and an another card in the box.


This card has a SU Crushed Curry textured card stock base in the A2 size. 

I ripped a piece of the decorative paper for the card front and used DS tape and glue stick to stick it to the front.

I added a length of So Saffron rick rack along the left side and taped the ends to the inside.

I chose a SU Really Rust and So Saffron quarter sheet pieces of card stock and ran them through the Big Shot with the Tim Holtz Tattered Flowers die.   Then I choose the alternating sized flowers and layered them.  I did embossed the 3rd one with the Swiss Dots folder. I added a gold round sequin on to the gold mini brad which holds all the layers to the card front.   I added a half sheet insert and white envelope.

I chose a SU So Saffron A2 card base for this card. 

I ripped a piece of the gold decorative paper and adhered to the card front. 

I ran a length of So Saffron rick rack along the top edge of the card and taped the ends to the inside. 

I cut a star from SU Daffodil Delight card stock with the SU Star thinlit dies and glued a gold star sequin onto it with a Bling Zot.  Then this accent was adhered tot he card front with 3D foam tape.

A half sheet insert and white envelope and I had a set of 4 cards.

Saturday, June 1, 2024

Card - Happy Birthday - Night of Navy

A card for my brother who is celebrating a birthday this week.

I chose a beige card base with navy and red accents.

The red layer was embossed with a recent thrift store purchase.  See below.

I punched a navy 1.75" circle and added a 1 3/8 circle greeting on beige cardstock.

I trimmed the embossed layer to place the circle off center, then ran a length of Night of Navy seam binding along the left hand side.

I attached the 2 circles over the embossed circle and held them in place with a navy mini brad.

A quarter sheet insert and an envelope and it is ready to deliver. 

No company branding on these but considering that the price was 2 for $1 and I have all the Stamping Up circle punches and Nestabilities dies which will cut circles I decided that it was a good investment.

One is masculine and the other would work for feminine cards it was a great combo.

There is some room in the embossing folder storage box which is priority as well.

Wednesday, May 29, 2024

Slow Stitching - No. 022 - Comfort Blanket

Slow stitching with K3N Cloth Tales Challenge.

Week 22 - Comfort Cloth and Blanket Stitch.

I created a small blanket.

I chose the flannel which defined the colors for the project.

I found my top layer and then cut some rectangles in red and black.  Some stitched with white or red.

I then used the blanket stitch again to assemble my small blanket to the flannel plaid backer.

It could have used a layer of batting as well but I only came to that conclusion once I was done the outside edge.

It is what it is.

I really like this one.


Thursday, May 23, 2024

Slow Stitching - No. 21 - Boro and Sashiko Stitching

This piece is for the K3N Cloth Tales slow stitching challenge.  

This is Week 21 and the prompt is Mending is healing. Japanese Boro and Sashiko stitching. The stitching was to keep garments in wearable order for peasants. They made use of every usable scrap.

I chose the light blue fabric in the center which had holes in it. I stitched around to stabilize those. I then continued to stitch pieces around. I used white, red, and blue thread.  

I added several patches in the form of the white square, navy ribbon and the red heart.  In some places I stitched in both directions. 

Wednesday, May 8, 2024

Cards - Christmas Ornaments

I have to get started on Christmas Cards because it is already May. 

I created the green watercolor paper yesterday.  The water color paper is 9x12". It cut it 3.75 x 5 " so I would have leftovers.

I cut red velvet paper with the Sizzix Ornament #2 die.  I chose gold foil paper for cutting the hanger.

I had enough leftover watercolor to punch 4 SU Scallop circles. I chose a gold heart brad as the accent and it will hold the 3 layers together.

I chose a SU Real Red A2 card base.  The water color layer was then adhered to the card front with double sided tape. I then a length of Real Red grosgrain ribbon which I just inserted into the hanger and adhered with ds tape.  The front piece got another tiny piece of tape. 

I seasonal insert and a white envelope for each of the 4 cards I made.  Onto the book press for the rest of the day then into the Christmas Card box for later this year.

Friday, May 3, 2024

Sewing Project - Picnic Placemats - QAYG - Red,Yellow and Blue

This is the last one for a while as I have to get ready for contractors on Monday.

The deep floral fabric in this placemat was the inspiration.  It came in the box of free fabric I received back in February.

I chose the main colors in it and added coordinating strips in the quilt as you go method. I used flannel as my foundation layer.

The zipper is upcycled and it had been cut along the way so I was able to make it longer.

I chose black for the zipper insert/pocket as well as the backing.

These ties are about 11 inches long.   These will be donated to Grandma Africa sale in June.

Wednesday, May 1, 2024

Sewing Project - Picnic Placemats - QAYG Warm Colors

I sorted through my scraps this morning and gathered like colors to see if I had enough to make the front of the picnic placemat. 

I am trying to keep the pocket on the right hand side distinct from the rest of the placemat. I created the zipper pocket like an insert with the brown fabric.

I then cut a 13x13 inch square of flannel to which I sewed the various strips of fabric. 

I chose a beige cotton poly leftover for the back. 

I created ties from the same fabric.

I laid these layers facing right sides together and pinned the ties on the opposite side to the pocket.  I ran a seam all the way around leaving a space to turn it right side out. I top stitched the wavy line to define the pocket then added 2 more similar seams to quilt the 2 layers together.

I am happy with it.

Monday, April 29, 2024

Sewing Project - Wine Bottle Bag - Celery and Red

I cleaned up this morning after this frenzy of sewing.

I found this celery textured fabric that I had set aside a while back and forgot about.  It had all its elements so I just decided to make it up. 

I will be keeping a few of these for the Christmas Market and the others will go to Grandma Africa merchandise sale in June.

I found this scrap of red patterned fabric which worked well.  There was just enough for 2 stripes so I just crossed them.

This fabric is not cotton and a bit tricksy.  It is heavier than the cotton I have been using so I skipped the flannel but added a thin layer of poly cotton to stabilize it and keep it square. 

The lining is a pale yellow polycotton fabric. The thread was a pretty good match to the celery color.

I did add a small square of flannel in the very bottom which I sewed between the layers and sewed to the lining bottom.  Just some cushion for a glass bottle as it is placed on a hard surface.

The button was a great match.  I am very grateful for things to be falling into place for all of these sewing projects.


For information on the "My Bag" Line