Showing posts with label plaid. Show all posts

Monday, July 8, 2024

Slow Stitching - No. 028 - Zokin - Japanese Cleaning Cloth

Week 28 in K3N 's Slow Stitching Challenge on her Youtube channel, K3NClothTales

This week we learn about Zokin - Japanese Cleaning Cloths.  A method of making worn cloth useful again by stitching 2 or more layers together.

I easily found several options in my rag bin.  For this piece I combined a piece of plaid flannel that was part of Dad's pajamas and a piece of navy terrycloth.

The stitching is all over the place but with my hectic renovation schedule I was not as relaxed as I should have been.

I am loving this idea and forsee a few more of these in my future.  I have a hard time throwing away cloths - dish cloths, face cloths, tea towels etc. Now I can layer them and make them useful.

Wednesday, May 29, 2024

Slow Stitching - No. 022 - Comfort Blanket

Slow stitching with K3N Cloth Tales Challenge.

Week 22 - Comfort Cloth and Blanket Stitch.

I created a small blanket.

I chose the flannel which defined the colors for the project.

I found my top layer and then cut some rectangles in red and black.  Some stitched with white or red.

I then used the blanket stitch again to assemble my small blanket to the flannel plaid backer.

It could have used a layer of batting as well but I only came to that conclusion once I was done the outside edge.

It is what it is.

I really like this one.


Friday, October 13, 2023

1 of a Kind - Tree Scent Ornaments - Set 2 and Stand

I made a few more 1 of a King Tree Scent Ornaments.  These ornaments can hold your favorite tree scent essential oil to give your artificial tree the right scent.

It could also be a favorite Christmas scent of your choice. The scent will dissipate and you can choose a different oil another day.

Love this bold black and white check felted wool.

I decided to pair it with red.

I put blanket stitch along both edges with black embroidery thead. 

I changed color to red and using the squares in the fabric I put X and dashes along to bottom half and just dashes long the top.

Red felt on top with a large black button on top of that.  Black embroidery hanger.

I had most of my buttons spread around my work area in separate bowls.  I found this cute small oval button which matched well with the thread I had selected so I decided to use it.

For this bright felted wool I chose bright green and blue.

I put blanket stitch in green along the top and bottom edges. 

I then stitched the button in the center front and then added dash stitches in blue above and below the button.

The top felt is green with a button button. 

True Blue embroidery floss hanger.

I decided to do one ornament in Oiler colors - blue and orange.

I used the wool denim colored felt.

I added a blanket stitch along the top and bottom edges in orange. 

The center pattern is a set of crossed dash stitches.

I cut the top felt circle from the same fabric with my smallest die from the Large Nestabilities smooth circle dies.  Fits perfectly.

Topped with orange buttons and the same orange embroidery thread for the hanger in all 6 plys.


Another Tree Scent ornament with bright colors.

The wool cuff is bright green and I chose purple embroidery thread.

I put a blanket stitch along the top and bottom edges.

I put stars patterns along the center of the wool layer.

The top has a purple felt circle and then a bright green medium sized button.

Purple 6ply embroidery thread hanger.


The fabric for this ornament was wool suiting so I folded it top to the back and bottom to the back so I had 3 layers to work with. 

I did have to stitch the ends which were stitched over with my connecting stitches.

White blanket stitches along the top and bottom edges.

I followed the plaid pattern with my white thread in dash stitches.

The top felt circle is red topped with a medium white button.

The hanger is white in 6 ply thread.


I needed another stand for Tree Scent Ornaments.  I went shopping this week and found this black folding stand. 

The Christmas stuff was out as well so I picked up a package of silver wire hangers.  I just squeezed them onto the wire frame.

I will put my sign on the back wire with the clothes pin.

I had the piece of wood in my stash which was perfect. It stabilizes the stand when there are ornaments on it. I will have to secure the legs into the slots.

Enough space on this stand for my 1 of a Kind Tree Scent Ornaments.


Saturday, April 1, 2023

Card Kits - Flowers

I volunteered to help my sister prepare card kits for my other sister`s daycare.

I first assembled the flower main accents.  Onto the yellow brad I placed a white flower sequin, then a yellow small silk flower, then a medium white one, then a pink bit larger one then a blue large silk flower.  I pressed the prongs of the brad apart on the back. I added a large Zot glue dot still on it`s release paper.

I selected the card stock to match the color of the flower accent.  Here, I choose navy blue.  The various kits feature red, green, turquoise, pink, and peach. The card base measured 11 inches wide and 8.25 inches tall. I scored it at 5.5 inches and folded in half.

I selected green plaid glitter paper to suggest the greenery for the flower.  I cut the plaid paper to 3.25 inches wide and 7 7/8 inches tall which allowed a full 9 scallops.  

The scallops were punched with a Martha Stewart border punch on both side of the strip of glitter paper.

I included a white insert measuring 5 x 8 inches and yellow envelope.

With the card already folded, the green glitter band is adhered onto the card front, the release paper is removed from the back of the flower accent and it is adhered onto the green plaid strip. The white insert is glued to the right hand side of the fold on the inside of the card.  I made 23 kits and provided 1 actual card sample and instructions for the staff. 

All put together, ready to deliver on the Easter weekend.


Monday, December 26, 2022

Small Gifts - Car Cup Holders Coasters - Bunch 1

A bunch of 3" car cup holder coasters - V2. 

I chose thicker felt or fleece scraps for this bunch of car coasters.

For the top left hand set I resized a bird post it  note I have used on cards before. I cut the wing by hand. The background is a very textured caramel colored fleece.  I chose light blue felt for the bird, a dark blue for the wing and a light blue grosgrain ribbon. I chose a yellow denim fabric for the cotton piece on the back.  

The top right hand is a thick teal fleece with a yellow start felt accent. Yellow grosgrain ribbon and a teal cotton flannelette on the back. 

The middle right hand is the same caramel fleece as the first set.  I cut small mushrooms from orange and brown felt. This set has orange grosgrain and the same yellow cotton denim on the back. 

Back to the left center. This set feature red fleece with grey tuques. The tuques were cut by hand with a hand drawn pattern.  I sewed the ribs on the body and the rim. A grey grosgrain ribbon and a cotton tshirt fabric on the back. Bottom right set. I loved this scrap of plaid fleece. The colors are great so I just matched the colors with grosgrain ribbon. I chose Stampin Up colors More Mustard and Rich Razzleberry and stuck to the plaid geometric pattern.  More Mustard grosgrain ribbon tabs and black cotton backer fabric. Bottom left features royal blue fleece for the background and die cut hearts in white and grey felt. The back is jean denim. These are Christmas gifts for my sisters and niece. 


Thursday, November 14, 2019

Thank You Cards - Renovation

I have been making Thank You cards for those who contributed to the success of this renovation.

This is a Double Sided Paper Split using designer paper from Rusty Pickle - Run It Collection - Game Time.

The paper was cut to 4.00 x 5.50 inches then cut again at 3.5 inches. The smaller piece was turn over and taped back to make a single piece.

I wrapped a piece of dark brown grosgrain ribbon across the join and tape the ends to the back.

I then adhered the layer to the dark brown card front.

I printed the greetings in Early
Espresso on white card stock using the Canada Goose from the Stampin Up set Wetlands.  I trimmed it very close to the printed border.   It was designed to fit perfectly in the square on the label die cut.

I cut the label with the Stampin Up Window Frame thinlits from Early Espresso textured card stock. The greeting was adhered to the label then the label was adhered to the card front over the ribbon with 3D foam tape.

The card on the right started with a dark brown card base as well.  It is a DSP split using designer paper from Authentique - Seasons Collection - Autumn Three. Love the hounds tooth pattern.

The label is the same as above and the car is from the SU Classic Dad set in Early Espresso.  The grosgrain ribbon is the same as above.


This card started with a deep teal card base.

I added a piece of designer paper by Karen Foster Design - My Grandpa - My Hero Collage paper collection. Love the bird houses and tools.

I cut a label as those above in a light blue card stock.  I added the Cardinal from the Stampin Up Cardinal Christmas set in black.  Trimmed close to the border.  Aligned with the square on the die cut label.

I added a turquoise ribbon wrapped around the designer paper layer ends taped to the back about 1/3 up from the bottom edge.

 The label was adhered to the card front with 3D foam tape.


The card on the right started with a dark warm grey card base.  The designer paper from Graphics 45 - A Proper Gentleman Collection - Cultured Reserve.  Love the wonderful plaid pattern in warm colors.

I adhered 2 strips of the designer paper to either side of a warm dark blue piece of card stock.

I added a length of vanilla grosgrain ribbon which ends were taped to the back.  The warm blue layer was adhered to the card front.

The greeting was printed in grey on Vanilla card stock and punched with the Stampin Up Decorative Label punch.  I offset a green punchie to the back of the greeting.  It was then adhered to the card front with 3D foam tape.


I chose a medium blue card base which was cut 11 x 4.25 and folded a 5.5 inches to create a top fold card.

To the red gingham piece of designer paper cut to a 3.75 inch square I adhered a denim flower, a yellow center held by a yellow flower brad.  I used a push pin to create the hole for the prongs.  I used double sided tape to adhere the green fabric leaf.  This layer was adhered to the card front.

I wrapped a length of white pearl thread around the card front and knotted it on the front.

I added a large circle greeting printed in the royal blue ink and punched with a 2 inch circle punch.  i was adhered over the thread with 3D foam tape.

All these cards have white quarter sheet inserts.


 Another DSP Split with blue and yellow designer paper with a stripe on the other side.

I added white grosgrain ribbon over the join.

Adhered to a pale aqua card.

I added a deep warm green greeting with a green label punchie adhered to the back off set.  Stampin Up Decorative Label punchies.  Adhered over the ribbon with 3D foam tape.

Wednesday, October 23, 2019

Ready 2 Go Christmas Card Kit - Set 10

Working on card kits for my stack card class on November 4th.

I started with a red card in the landscape orientation.

I added a piece of red plaid metallic paper which was cut to 4.00 x 5.25 inches and adhered to the front

I added the Christmas green tree brad to the gold foil NOEL label cut with the Stampin Up Apothecary Framelits. I made a hole with a push pin, inserted the brad and pressed the prongs apart at the back. I added 2 pieces of 3D foam tape and adhered it to the card front.

The gold fabric snowflake was adhered in the top left hand corner with a Bling Zot.

I started with a red card in the portrait orientation.

I cut a layer of green card stock to 4.00 x 5.25 inches.  I added a length of red cotton ribbon aligned left of center and taped the ends to the back. The layer was then adhered to the card front.

The musical holly accent square as adhered to the card front over the ribbon with 4 pieces of 3D foam tape.

I added a greeting in the bottom right hand corner.  It was color printed and punched out with the Stampin Up Modern Label punch.

It was adhered to the card front with 3D foam tape.

You can check out my R2G card kits on the tab above.

Friday, March 29, 2019

R2Go Stack Kit - Custom

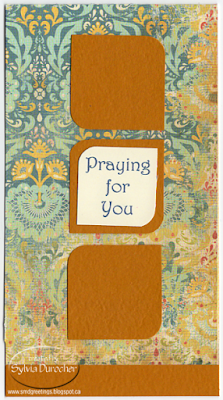
I had a request for a custom Ready 2 Go Stack Kit.  She wanted the greetings to be about praying.

I chose to used No.8 envelopes with double sided designer card stock.  The 12x12 was cut 3 3/8 inch wide and 12 inch tall.  I then scored the fold at 6.25 inches. I added a 1/2 inch strip of black card stock at the bottom.  The easiest way to do that is to tape a strip bigger than what you need along the edge with invisible tape.  Then trim all 3 sides with the paper trimmer.

To repeat the black I cut a scallop border in black as well which I glued along the top edge and again trimmed on the left and right sides with scissors. 

The vellum greetings are 2 x 4.25 inches.  Color printed in black and clear embossed.  It this then adhered aligned with the top of the card and centered.  The scallop border is then adhered on top of that aligned with the top.

A white insert is added for the giver's personal message.

The paper is by The Girls' Paperie - Jubilee - Carousel.

This time I cut the paper the same way.  I scored it at 2 inches then from there 6.25 inches. This creates a gatefold card with the opening in the middle.

I added an Espresso brown strip of card stock along the edge and taped it down.  This one is wider than the .5 inch needed so it over laps onto the flap on the right.

I created greetings on stone colored paper which would work both pieces of designer paper I chose.  The letters are the dark brown of the small strip.  They are cut to 2" square.  It was adhered centered on the brown strip but with double sided tape only on the left hand side.

The paper is by Carta Bella - Beautiful Moments - Beautiful Banner Paper.  The other paper also had horizontal lines going across the card.

Another portrait tall card.  You have to be careful when folding designer paper because it has a white core and if the paper fibers are not well scored they will crease and expose the core which does not look great.  I ran my tool along the score line from both sides to stretch and soften the fibers.  Works well.

I added a half inch strip of coordinating ginger card stock along the bottom again attached with invisible tape. 

With the same card stock I punched the squares with the Creative Memories Double Square punch which does 1.5 and 1.25 inch squares which layer well.  The solid card stock is the larger and the greeting is the smaller. I used my corner rounder punch to do 2 of the corners. I adhered 3 squares aligned down the center of the card.

The greeting was printed in blue on ivory card stock, punched and corner rounded.  It was adhered to the center square. 

The paper is by Carta Bella - Traditions - Antique Damask. The other designer is very similar in pattern and color.

Saturday, October 27, 2018

Thank You cards

I used left overs from my recent Ready 2 Go Cmas Stack kit to create some thank you cards. 

I chose a black card base.

I used the cut pine cone square element and added a layer of white card stock. 

I then cut a strip of left over from the back of a black and red plaid card stock.  I cut it to 4.25 inches and adhered it across the card. 

I punched a Stampin Up Modern Label punchie from the plaid leftover and ensured red on both ends.   I added a SU Word Window punch in the center. That was adhered in the top left hand corner.

I adhered the square pinecone element with 3D foam tape to the card front leave even borders on the left bottom and right hand sides.


I started with a black card. 

I added the strip of snowflake designer paper by Terese Collins on the left hand side.

I added a 1 inch strip of gold moire paper in the center of the card overlapping the snowflake layer. 

I created an accent with a square of black card stock, a 1 inch circle of gold paper, a white dove brad and a SU word window punchie.  This was adhered to the card front with 3D foam tape.

Added these to the Thank You box.

Friday, October 19, 2018

Apron - Purple Plaid

Another apron for my sale in November.   This one is made from a large ENYCE men`s 100 cotton shirt in purple plaid.

I added purple bias tape around the neck opening, arm holes and the slant on the patch pockets.

As always I have reinforced the stress points on the pockets.

The ties have been tacked to the middle back of the apron which allows them to adjust as needed when tied in front.

I added a hanging loop at the back. 

Wednesday, October 10, 2018

Card Exchange

I love this color combination. Yellow and black with silver which is not easy to see in the scan.

This is a sketch I have used before.  I chose a black card base.  I cut the yellow decorative floral card stock to 3.75 x 5.00 inches.

I cut a hole in it with the Stampin Up Decorative Label thinlits. 

I tied a short length of black 1/8 inch satin ribbon on the right hand side then adhered it to the card front. 

The greeting is color printed in black to match the card and punched out with the 1.25 inch circle punch.  I added a 1 3/8 inch circle in yellow to coordinate with the color in the paper. I adhered the greeting layer in the center of the label hole.  Added a quarter sheet insert.

The red card is the same sketch with a bold red and black checkered plaid.  The red circle coordinates with the plaid.

These card are off to my card exchange friends.

Monday, September 24, 2018

Upcycled Shirt - Smock Apron

I designed a new apron to use a used men's shirt.

This is a men's large 100% cotton plaid shirt in red white and navy.  The fabric is beautiful.

I cut the neck line into a nice round ensuring that the first button was close to the neck line.  I cut the sleeves off leaving the seam on the apron.  I chose red bias tape for this project.  I then sewed on the bias tape on the neckline and the sleeves.

I used one of the long sheets to make the extra long tie which allows tying in the front to back to the back.  In some situation you may not want these ties dangling in front. It was sewn to the center of the back of the apron.

The second sleeve became 2 patch pockets on the front of the apron.  I used the last the red bias tape on the slant edge of the pocket to coordinate with the rest of the apron.  The pockets had the seam allowance ironed then it was top stitched in place below the waist tie.

This is a great apron which provides great clothing coverage, excellent pockets, and a versatile tie.

The original shirt pocket remains as well as the button down front.  This one worked out so well.  It would work for a smaller person as you will be wearing it over clothes.

Friday, June 1, 2018

Christmas Card Challenge - June - Brown Gingerbread

The prompt for the Christmas Card Challenge for June is Brown Gingerbread.

I selected a plaid designer paper which had a nice variety of colors.  It has brown, green, pink, blue and ivory.  For this set of cards I selected blue, pink and green card bases.  I cut the designer paper to leave a small border and adhered it to the card front.

I cut the gingerbread men with the Sizzix Gingerbread Man die from warm brown card stock.  I coordinated the pieces behind the gingerbread for eyes and hearts with the card base. I used my white opaque marker to create the marks around the edge of the die cut.

I adhered the gingerbread to the card front.  I then made 1/8 inch holes in the top of the card with hole punch.  I then pulled a length of Martha Stewart brown seam binding through the holes and created a knot in the center of the card.  I trimmed the ends with scissors.

With a great pink option on the back of the DSP I was able to create six cards which a just a bit different from one another.

I finally threw out my white gel markers.  They have not worked from the beginning.  I will have to find a fine white marker because this gingerbread is a regular accent for my Christmas cards.

Thursday, February 1, 2018

Christmas Card Challenge - February - Red Heart

This card is for my monthly Christmas Card Challenge which is Red Heart for February.

I chose a red card and added a layer of designer paper - Bazzill Basics Paper - Holiday Style - Stitched Green.

I tied a plaid ribbon on the right hand side and trimmed the ends.

I used the Stampin Up Sweetheart Punch with red metallic paper to create the heart accents which were adhered with 3D foam tape. 

I printed the greeting and trimmed it to end under the ribbon on the right.  I used red and green to repeat the colors from the card in the greeting.

Monday, January 22, 2018

Card Club Kit - Set 2 - Card 3

I chose a deep warm blue card.

The designer paper is Graphics 45 - A Proper Gentleman Collection - Cultured Reserve.  It is a great plaid with navy and ivory.  The 12x12 was cut into 6 pieces measuring 5.25x4.00 inches.

I punched the top edge of the designer paper with the Fiskars Leave it to Weaver Border Punch. I did the center first then added a couple on each side. I strung the ribbon through the slots starting in the center and return to it, tie a knot, and trimmed the ends.  This layer was adhered to the card front.

The greeting includes a sailing image from CLKER. It was printed on ivory card stock. I then trimmed the layer very close to the frame. Once, trimmed I cut 4 pieces of 3D foam and placed them in each corner of the sailing greeting.

Adhere the greeting to the bottom of the card leaving even borders on three sides.

Friday, November 3, 2017

Embossed Snowman

This is a Sizzix Snowman and hat die which I used on ivory card stock. I them embossed it with the coordinating embossing folder.

I used the snowflake spokes to make twig arms for him from gold paper. I cut tiny hearts from gold and adhered them onto his belly.

I loved this plaid paper and I am down to my last few pieces.  This layer was adhered to a warm brown card. 

The snowman was adhered to the plaid. 

A quarter sheet insert was added to the inside.

Saturday, June 24, 2017

Tea Cup Thank You

I have decided to participate in the Coffee Loving Cardmakers Summer Bloghop

http://coffeelovingcardmakers.com/2017/06/2017-summer-coffee-lovers-blog-hop/

I cut my tea cup with the Cricut and the Joy of the Season cartridge at a size of 2.5 inches.  The designer paper is plaid in red and green with a bit of pink.
I chose my neutral layer card stock with a slightly green tinge to it.  I chose a greeting downloaded from Desert Diva.  I also printed a square into which I was going to place my cup.  Once printed, it was browner than the original red color I had chosen since it was printed on slightly green paper. The color wheel tells you that red and green make brown.  I had to change the card base selected to be more burgundy than my original selection. 
I trimmed the square and greeting to leave even borders on the card front as they were adhered. 
I could see pink in the designer paper so I punched small flowers from pink card stock and cut a couple of straight strips from a pink card stock.  I glued the strips at the top and bottom of the tea cup then trimmed them to the cup edge.  I placed the flowers across the cup below the pink strip.  I added small iridescent flower sequins and held it all in place with tiny pink brads.   I added another flower on the greeting. The cup was adhered to the square with 3D foam tape.  I added little heart steam by hand with a burgundy marker.

Monday, January 23, 2017

Card Club - January - Airplane

I wanted a male birthday card so this is what I designed.

The paper is Grandpa's Plaid from the Grandpa's Tool Shed collection made by Echo Park Paper Co.  It was cut to leave a small border on the olive card.

The red seam binding was placed across the designer paper the the ends taped to the back. 

The airplane graphics is from Pixabay.  I changed the colors to coordinate with the designer paper.  I added the greeting low enough that if the card maker wants to cut it off they can. I printed it onto ivory card stock. It is mounted to the card front with 3D foam tape over the red seam binding.  I tied the short piece of binding on the right hand side of the focal element.

Thursday, November 10, 2016

R2G Christmas Stack Kit - Set 3&4

I started with the Stampin Up Gentle Peace stamp set.  I stamped the Holy Family onto vellum and embossed it with copper powder.  I trimmed the vellum close the edge of the image with scissors.
I glued the designer paper by Creative Imaginations - Sonnets - Plum Wash to the deep plum card front.

I adhered the vellum layer to the card front with 2 tiny round copper brads in the bottom left and right corners.  I used a copper star brad in the top center.

I designed the greeting with the Stampin Up Artisan Label punch in Perfect Plum and printed. Once punched, I used 3D foam tape to stick the greeting to the card front.


I started with the foil joy wreath on linen card stock.  I cut it with my Spellbinders smooth circle Nestabilities.  I then cut the corresponding scallop circle from light blue card stock.  These were glued together.
I chose a piece of My Mind's Eye - Countdown to Christmas - Plaid cut to leave a small border. I placed a piece of silver sticker paper 1" tall and over 6 inches wide across the center of the plaid designer paper and folded the ends to the back. It was then adhered to a Cherry Cobbler card.
I then adhered the "to the World" greeting over the silver foil paper band.  The large circle Joy greeting was then adhered to the left side of the card with 3D foam tape.

I started with the gold metal star ornament.

I cut gold metallic card stock to 4.00x5.25 inches.  This layer was adhered to the front of the black card.

I designed the starry night Bethlehem layer in black with my own drawing.  It was printed on white card stock trimmed to 3.75x5.00 inches.

I put gold metallic thread through the hole in the ornament. I adhered the metal star to the Bethlehem layer with a Zot then pulled the thread to the back of the white layer and taped down the ends. This layer was then adhered to the gold layer on the card front.

Monday, September 19, 2016

Normandy Life #8 - Garage Sale Finds


I found these red, green and gold plaid Christmas place mats at a large community garage sale last weekend.  They look brand new and were a steal at .10 cent each.  The washed up beautifully. They work very well here with my red table cloth.  The ones I have had are headed to the second hand store.

This is a single blue and white dinner plate I bought recently for a couple dollars.  It is Liberty Blue - Independence Hall original copper engraving of historic colonial scenes printed on Staffordshire Ironstone.  I paired it with my IKEA Cobalt Blue cup and saucer on a warm blue table runner.  I used a white Battenburg Lace napkin to provide contrast against the blue table runner and the plate.


I bought this tea cup to pair with my Sadler tea pot.  It needed to be a warm background tea cup to work with the pink tea pot. It has roses and gold gilding which the tea pot has as well so it will work well.

You will see the table runner under the tea cup which is woven with some shiny threads.  I'm sure it is wool and is very soft and luxurious. Again, a find at the garage sale for a couple of dollars.  It has a great fringe.


Sharing with Mosaic Monday hosted by Maggie at Normandy Life.