Showing posts with label SMD Art. Show all posts

Saturday, December 2, 2023

Christmas Cards - Watercolor - Siblings

I made some special watercolor ornaments to put on my siblings Christmas cards this year.  This is the first year that Mom and Dad are both gone. We are getting together early December for a get together which is close to what would be Dad's birthday. 

This is an ornament I designed myself.  You can read more about the process here.  The ornaments were cut out by hand.

All the designs were hand drawn then I used a permanent black marker for all the outlining.  

I used my Stampin Up Watercolor Wonder Crayons for all the painting. The background is watercolor paper with a mixture of Always Artichoke and Garden Green.  I painted a wash on a couple of 9x12 sheets of wc paper.  I made it a bit darker at the top and lighter at the bottom. I did put salt on but it was not wet enough to produce much of an effect. When dry I added a spatter of Always Artichoke.  Once cut to the 4.00 x 5.25 inches I pained the branch and I spattered the pieces with Always Artichoke. 


The ornament has a Bethlehem Star in the night sky colored with More Mustard.  Some Elegant Eggplant and Night of Navy for the sky. On the snow banks in the foreground I used Marina Mist for the wash and Night of Navy for the contours.  Always Artichoke for the tree.

The card base is Elegant Eggplant.


A full moon in the night sky.  The moon is colored with Daffodil Delight with a light wash of Night of Navy for the sky.  I drew a house on the hills with was colored with Ruby Red and More Mustard for the windows.  Elegant Eggplant for the hills.  

The card base is Ruby Red.


This one features a sunrise which I had experience drawing when I did my glass art piece for the window a couple of years ago.

The sky is a light wash of Tempting Turquoise with the sunrise rays being first wash of Daffodil Delight, then More Mustard closer to the center then Tango Tangerine at the center. The hills are a combination of Garden Green, Always Artichoke. 

The card base is More Mustard.


I decided on a water theme for this one and drew a light house.  The sky is a light wash of Tempting Turquoise.  The lighthouse and rocks are done with a light wash of black gouache. The sea is Night of Navy.

The card base is Basic Grey.


This one here is a Christmas flower but I would not go so far as saying a poinsettia.  It turned out like a sunflower in the shape.  The ornament is Tango Tangerine wash.  The flower is a mix of Ruby Red, Bravo Burgundy and Cherry Cobbler.

The card base is Ruby Red.


This one features another Bethlehem Star in the night sky.  The star is More Mustard with a light wash of Marina Mist for the sky.  The mountains are 3 gradient washes of Elegant Eggplant.  Tiny black marker dots in the sky with a touch of More Mustard.

The card base is Elegant Eggplant.


This one features a large star in the center of the ornament.  I did trace the shape from the Stampin Up Star thinlit set, using the smallest one.

The star was washed in Daffodil Delight all over then one half of the points was painted with More Mustard. The ornament is a dark wash of Night of Navy.

The card base is Night of Navy. 

Friday, June 16, 2023

Card - Watercolor Pansies

This is a card for my sister.  She celebrates her birthday soon and I wanted it in the mail so it arrives on time.

I found a coloring book page on line to help me with the line drawing of these flowers.

I used Stampin Up Wonder Watercolor Crayons so it would match with the card stock I selected.

The colors are Night of Navy, Elegant Eggplant, Daffodil Delight, More Mustard, and Always Artichoke. Once painted and dry I outlined the image with a fine Micron permanent black marker.  It pressed overnight under several heavy books.

The back petals are a mix of Navy and Eggplant, the center ones are EE and the front one is Daffodil with darker marks with More Mustard. Put a pale background with Night of Navy on the top and Always Artichoke on the bottom.

I chose to trim the watercolor piece to 3.75 x 5 inches. I taped a couple of lengths of grosgrain ribbon in the AA and EE to the back of the watercolor. Brought them forward and held in place with double sided tape and trimmed the ends on an angle. This was adhered to an Eggplant layer leave a small border.  Then that was adhered to the Always Artichoke A2 card base.

Sunday, October 30, 2022

Small Gifts - Art Magnets

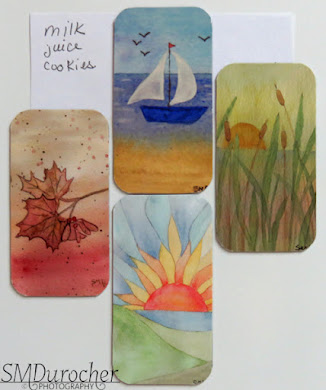
I used some of the watercolors I painted this year to make some art magnets. 

The fall leaves on my niece's card, the sail boat from my aunt's card, the bulrushes on my brother in law's card and the sunrise from my stained glass project.

I sized them to fit the magnets I had which measure 1.5 x 2.75 inches. I layed them out digitally onto a 4x6 document then had them professionally printed on photo paper.

I had sized them a wee bit bigger to allow for some leeway with placement.  I trimmed one side exactlyl then it was easy to lay that against the edge of the sticky magnet.  Once layed down I burnished them with a brayer to ensure good adhesion.  I trimmed the extra paper away with scissors then did the corners with my blue corner rounder which matched perfectly the corner on the magnets. Unfortunately, my signature generally in the bottom right hand corner was affected.

A beautiful set of magnets with watercolor images.  I made several sets.

Wednesday, October 31, 2018

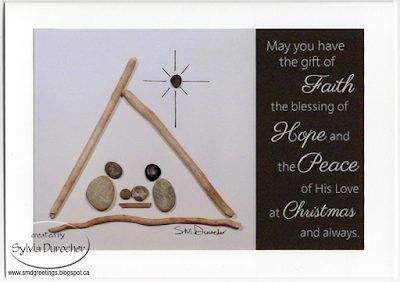
Photo Christmas Card - 5x7 - Pebble Art Nativity

I created my own art for this card.

I discovered Pebble Art this summer.  I was inspired and started collecting small rocks with flat one side. 

This fall I put together this Nativity and photographed it.  I added the sentiment and had it printed.

This is a 5x7 card.

There will be several of this one on my sales table as well.

Sunday, April 22, 2018

How To: Spinner Art

I'm starting to get some creativity back and this morning decided to create some spinner art for cards for the gallery, my exchange partners and classes.

I settled on the salad spinner after checking a few things on line. 

Pros: The mess is contained within the container
          You can spin very fast
Cons: You can't see the art as it happens

I see some recent salad spinners have a hole in the top where you can add water which would be great to allow you to add paint on the fly which I think would create a different look to the art.  Not buying a new one for this feature. 

The kids art spinners are kind of cool and they run into $40-$50 range. Salad spinner around $10.

I used 4x6 photo paper as a I have good supply of those and for making cards the are the perfect size. 

Supplies:
  • a plastic tablecloth to keep table clean
  • a salad spinner
  • 4x6 photo paper
  • a collection of liquid acrylic paint
  • water
  • small containers to hold the paint and a place to thin it
  • double sided tape
 I selected my colors and placed a few drops in each container.  Generally, I added the same number of drops of water as the ink did not spread if it was too thick.

Into the process I decided on 3 containers.
1. color one
2. color two
3. combination of the 2 colors


I used a bit of double sided tape on the center spindle to keep the paper flat to the bottom of the bowl.  I gently pressed the sheet of paper onto the tape so as not to create a mark on my paper.

Sometimes the paper released early and I would open the spinner to find my sheet against the side.

Apply drops of ink on the paper, close the lid and spin.  Open the lid and see what happened.  Repeat process until you are happy with the results.  Thin the color to add shades of the same color.

I also splattered a few with the same ink with a toothbrush and knife to add more dimension to the art.

Ta Da you have art!  The sheets are placed on plastic to dry.  When dry, they can be pressed under books to flatten them.

This is a great process and I just loved it.


Keep an eye for the stuff that I make with these wonderful papers.

Sunday, July 20, 2014

Family Get Together - Art Class

I just got back from a family get together on the weekend.  We had a great time with about 60 in attendance. There were great conversations with those from near and far and great food!
We had bingo games, raffle draws, a calendar fundraiser (more about that later), baseball, and an art class.
My aunt who is an artist held a class Saturday afternoon and I was one of the students.  This is my very first painting.  This was done with acrylic paints.  We did some charcoal doodles as practice to engage our right brain. Then  we sketched what we wanted to do on the canvas then we laid it out in the drawing in light grey to get all our elements in place then she gave us colors and we went for it.  I think we had about 12-15 folks paint canvas by the end of the afternoon.  It was a blast!!