Showing posts with label silver. Show all posts

Wednesday, May 14, 2025

Chair Repairs - Broken Spring

After pushing my recliner back last week I heard a funny sound.

I did not find the broken spring till the next morning.

What shall I do about this?  Not a hassle I need with everything going on.

I called a local store which sells this type of recliner and asked for their service department.  I was asked to email a photo and they would get back to me.

The lady referred me to a link of Amazon but it was not exactly the same as what was broken.

I don't shop on line so I started sourcing a spring locally.  

I found this set of springs at Rona.  The length is about right but it is bigger in diameter. Should be 1/2 inch instead of 3/4 inch.  Also the hooks on each end don't quite match in placement.

For less than $10 I was willing to see what I could do with these. 

You can see wire at the bottom on the photo which will feature prominently in the solution.  I tried just hooking the ends to the 2 points in question but the closer one would not stay on the peg. I tried several things that did not work.

I needed something stronger than my first attempts.

The wire I am sure I picked up on a morning walk a couple of years ago.  Never know when something will come in handy.

By creating the loop for the pin on the chair I was able to address the fact that the hook on the one end was in the wrong direction.

As well, I could twisted the loop once it was on the pin to tighten it which kept in place.

This works well.

You can see that with the wider diameter it curves a little bit but does not obstruct any vital functionality.  Works for now.


Friday, April 18, 2025

Cards - Donation - Teachers Appreciation

I made a few cards for my niece who is working on a project for Teacher's Appreciation Day which is May 7th this year.

I dipped into my decorative paper stash and found a few pieces I could work with.

Top card is black A2 card base with a wide strip of gold card stock adhered to the card front. I then glued a black/gold decorative paper and then 2 diamond gold punchies.

Next, is black and grey marbled paper which I mounted on a Stampin Up Smoky Slate card base in the wide orientation. 

I afixed a narrow strip of the same card stock along the bottom edge of the decorative paper.

I then added 5 black round sequins onto the grey strip held in place with Bling Zots.


This card is a black card base onto which I mounted a piece of handmade decorative paper from India with silver leaf motifs.

I added a black strip of card stock along the top and then a SU Decorative Label punchie topped with a silver daisy punchie, sequin and black brad.

These were all given a white quarter sheet insert and envelope.

Monday, February 24, 2025

Cards - Charity

Three more cards for IWin.

The designer paper is Stampin Up Painted Blooms. Nice watercolor design.

I chose SU Lucky Limeade A2 card base for this card.  I added a piece of DSP trimmed to leave a small border.

I adhered the glitter butterfly to 100lb card stock then cut the oval with the Creative Memories cutter.  I added a border of Thalo Blue watercolor pencil then brushed it with water brush.

I created a greeting accent with a Modern Label in blue and taped a Word Window greeting to it.  

I adhered the oval accent to the card front then added the greeting with 3D foam tape.

This card base is SU Summer Sun in the A2 size.

A layer of floral designer paper adhered to the card front.

I adhered the silver glitter butterfly sticker to a piece of vellum trimmed to leave a large border.

I added a Not Quite Navy card stock strip along the top attached with 3 silver brads. 

I added the round greeting in the top right hand corner with 3D foam tape.


On this card the A2 card base is Always Artichoke.

Trimmed another piece of designer paper to leave a small border.

I adhered the butterfly sticker to a piece of Regal Rose card stock then trimmed it with the CM oval cutter.

I added an Always Artichoke mini brad to the head of the butterfly.

The greeting is a combination of a Modern Label Punchie and a Wordl Window greeting.


Thursday, September 19, 2024

Cards - SC Christmas - Nativity

Another set of Christmas cards for the box. Again, self closing cards measuring 6x5.5 inches.

I did take one to the post office Monday and it was mailed with regular postage.

A dark green linen textured card stock base.  With a gold metallic Stampin Up Sunburst diecut adhered over a paste paper background.  This layer was adhered to the card with d/s tape.

I punched a red 2" circle and cut the Penny Black Manger die from ivory pearl card stock.  These were layered with QuickDry adhesive.  It was then adhered to the sunburst with 3D foam tape.

A white insert and some d/s tape with carrier on the flap and it's done.

For this card I used a navy linen card stock cut to 6 x12 inches which was scored at 5.5 and just less than 1" for the flap.

I chose a piece of blue paste paper and cut the SU Sunburst die in silver metallic paper. These were adhered together with QuickDry glue then adhered to the card with d/s tape.

The manger scene was cut from ivory pearl cardstock and mounted onto a 2" circle punchie then mounted to the sunburst with 3D foam tape.

A white insert and a d/s tape with carrier on the flap.


A monochromatic theme for this one.  I olive green linen card base with a coordinating paste paper. 

A 2 inch circle punchie from the same card stock to back the ivory pearl manger die cut.  Once adhered to each other this layer was adhered to the card over the center of the sunburst with 3D foam tape.

A white insert and a strip of d/s tape with carrier on the flap.

I have about 55 cards ready which is close to what I need.


Wednesday, September 18, 2024

Cards - SC Christmas - Colored Pencil

I worked on more Christmas cards this morning.

I chose to use images I have drawn digitally.  This is my Bethlehem which I had to resize to accommodate this card size but that was easy. It was printed on ivory 65lb card stock.

I used colored pencils and colored the sky, the sand dunes and the windows. 

I cut the large star with the Sizzix Star & Starbursts die in silver card stock. I then punched the others with a CM Star Border punch. Large star adhered with 3D foam and the littles with QuickDry Adhesive.

The image was then adhered to the card with double sided tape, the white insert adhered with glue stick and a strip of d/s tape with carrier on the flap.  This is a self closing card made with 1/2 sheet of 12x12 navy card stock.

I really love how this one came out.

This is an angel a drew digitally based on a wicker angel I saw in a garden center at Christmas many years ago.

Subtle blue background, metallic halo, green metallic on the wings, a red dress with a green and gold border at the bottom.

A bit of flesh color on the face.

A self closing card from a 6x12 inch piece of card stock.  I adhered the drawing onto the card with a white insert opposite.  A length of double sided tape with carrier on the the flap.


A nativity I drew a few years ago. 

A subtle night sky, a yellow star with a wooden stable. 

The figures were colored with traditional blue for Mary and brown for Joseph. Just a wee head for Jesus.

Subtle blue sky, green and tan for the ground background.

Drawing adhered to the card, a blank white insert (not sure if I will regret this later when I have to handwrite the sentiment), carrier tape on the flap. 

Card is 6x12 navy blue linen card stock.


Wednesday, June 26, 2024

Cards - Christmas - Night of Navy Snowflake

This designer paper is from the Season of Cheer collection by Stampin Up.

I cut the DSP to leave a small border. I strung these silver circles on navy crochet thread and tape the ends to the back. Then it was adhered to the card front with DS tape.

The ornaments were cut with the Gleaming Ornaments punch from silver paper and adhered behind the circles.

It makes them looks like light bulbs.

A seasonal insert and white envelope.

I was not fussy about the reverse print on this sheet of DSP so I chose the snowflake side for all these cards.

This A2 card base is Baja Breeze but it could have been Soft Sky as well.  I cut it to leave s small border all the way around.

I added an oval color printed greeting to the bottom left hand side to keep the warm blue corner visible.  It was mounted with 3 D tape.

A seasonal quarter sheet insert and white envelope completes it.


This is a similar colored layer as the previous one but on Night of Navy card base this time.


I added a Martha Stewart snowflake punchie made from 110lb card stock


I added a large blue sequin in the center. A tiny brad holds these to the DSP then that layer was adhered with DS tape to the blue card.


A seasonal quarter sheet insert and white envelope and these are done.


Glad to have a few more in the box.

Thursday, June 6, 2024

Cards - Christmas Ornament

I make another set of Christmas cards today as I had plumbers in for an inspection and a slow draining bathroom sink.

I glued some of the mosaic gift wrap to light card stock and pressed it over night.

I chose Cuttlebug 2 in 1 Ornament set die to cut the ornaments.  I then cut the hangers from silver designer paper and glued them with Quick Dry Adhesive.

I chose Orchid Opulence card bases in the A2 size. 

I chose Soft Sky for the embossed layer and used the Stampin Up Pine Bough folder.  I trimmed the layer before I embossed it. I glued it to the card front.  I added a silver star sequin to the center of the ornament and a short white grosgrain ribbon to the ornament and adhered it to the card front.

I had some left over inserts in the landscape orientation so I went with it.  White envelopes and I have 5 more cards in the Christmas Card box.

Wednesday, September 6, 2023

Art Show - Open Art Competition

I submitted two pieces to the AAC Open Art Competition - photography.


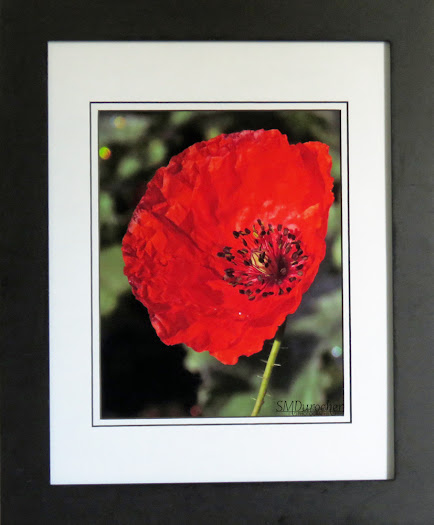
Title: Red Poppy

Size: 14.00 x 17.00 inches

Medium: Photography

Print 8.5 x 11 inches

Mat: Double Archival white with black core

Frame: Black wood wide profile


This is a gorgeous Red Poppy facing the morning sun head on and looking so gorgeous. Managed some bokeh in the background from the water drops on foliage.


Title: Red Dot

Size: 12.00 x 14.00 inches

Medium: Photography/Digital

Print 8 x 10 inches

Mat: Archival off white with black

Frame: Silver Metal


This started out as a photograph which was altered a lot with filters then turned into a black and white image. I rotated it which gave it an oriental feel so I placed a red dot on it.

Reception is Saturday, September 8 at 7 pm.  - I placed Second in the Photography Category!!

From the judges: Good colour choice for composition. Interesting composition, love the simplicity and execution. 

Wednesday, July 12, 2023

Belated Birthday

I made this card for a friend whose birthday was in April but I just lost track of it.  

She is here visiting so I will give it to her at supper tonight.

Card base is A2 in Rich Razzleberry with a top fold.

I cut another piece from my larger watercolor paper piece and chose this blue purple section. I cut a Stampin Up Top Note die.

I added a length of Elegant Eggplant grosgrain ribbon wrapped top to bottom on Top Note die and held it in place with a crystal large brad.

I cut large flower in Elegant Eggplant and smaller one in Not Quite Navy and added a small silk all held with a silver mini brad.  The flowers are Tim Holtz - Tattered Flowers.

White insert quarter sheet on the inside.

Sunday, January 1, 2023

Card Exchange - Jan - Silver Snowflakes

Some snow flake cards for January exchange.

I started with Not Quite Navy card base.

I added a blue snowflake designer paper which coordinated well but I purchased from Michaels years ago.  Cut it down to 4.00 x 5.25 inches.

I pulled out some old Satin Stitched Ribbon in the color Midnight Muse which was an in color at the time.  Works well with the warm dark blue. Wrapped around the designer paper and taped the ends to the back.

I created the accent with a silver fabric snowflake from the dollar store, then a white plastic snowflake sequin held together with a warm navy star tiny brad. Pushed through the DSP.  

The whole layer was adhered to the card front with double sided tape.

The card is in the tall or portrait orientation and the next is in the wide or landscape orientation.

This card is identical to the first one except the orientation is changed.

I added a quarter sheet white insert to the inside and a white A2 card.

These will be out to my partners very soon.


Sunday, April 17, 2022

Exchange Cards - April

We are starting a new session of card exchange.  I've decided to get my cards ready ahead of time so I will not disappoint folks when I am busy moving.

I had these silver chrome metal earrings in my stash so I off the hanger and mounted them with brads.

I chose Striped designer paper by SU in Rose Red and cut it to about 4x3 inches. I adhered it to a piece of sold Rose Red card stock measuring 4.75 x 3.5 inches. I placed pink and silver brads into the holes in the larger flowers in the metal accent.  

I strung a piece of silver cord through one of the flowers and wrapped around this layer and knotted it on the right. This layer was then adhered to the front of a Pretty in Pink card with 3D foam tape.  I added the round greeting in the bottom right hand side again with 3D foam tape.

On this card it the same layout with different colors.  The card base is Chocolate Chip.  The designer paper seems to have pink and brown lines so I chose those colors for the brads in the metal accent.

I cut the designer paper larger this time to 4.00 x 5.5 inches.  Attached the silver cord in the same way.

The greeting is punched with the Modern Label Punch in color printed in Chocolate Chip with an offset of solid card stock same as the card base. It was adhered with 3D foam tape.

Wednesday, September 1, 2021

Exchange Cards - Blue Wash

I am using up supplies from old kits.  I had the blue card base, the white silk flower, the metal flower, the brad and silver ribbon.  

I needed a new background and some sort of greeting.

I found a couple of pieces of the Blue Wash designer paper which matched the Brilliant Blue card base so that was trimmed to leave a small border.

I taped the ribbon to the back and across the front and again to the back. I found the greeting in my Stampin Up box.  I aligned the flowers to the left of the greeting and adhered these layers together.  I then adhered this layer to the card front.   I then trimmed the greeting to the card edges with scissors.


I used similar supplies for this card. 

I needed a flower diecut which had 6 petals. After perusing my stash of dies, I used largest flower from the Sizzix Flower Layers and Leaves die and some heavy card stock.   I colored it with a bit of Brilliant Blue reinker in watered down and brushed on.

I added the ribbon across the designer paper and then adhered the three flowers with the tiny brad over the ribbon. 

I stamped the greeting on the same heavy card stock, ripped the top edge and soften it with a bit of water. Adhered with double sided tape.

These are headed out to my exchange partners.


Tuesday, May 4, 2021

Exchange Cards - May

These are my cards for May.  Turquoise, white and silver is the color scheme.

The white card base has a designer paper layer with a plaid pattern.  

I created the focal point with SB Circle Nestablities in 3 sizes.  The large white was embossed with the Cuttlebug Script folder, then the middle circle is turquoise solid card stock then a silver foil layer embossed with the  Cuttlebug Diamond in the Rough folder. I added a white daisy confetti with a blue tiny brad.  

The greeting is color printed and punched with the Stampin Up Modern Label.  It was adhered to the card front with 3D foam tape.


I flipped the designer paper over and used the polka dot side for this card and changed the orientation to landscape.

I cut the squares layers with the Sizzix Square Thinlits in the same colors as the first one. I added a little note brad in the center.


Sunday, May 2, 2021

Art Project - My Square

My aunt has proposed an art project and requested a fabric art piece from all the women in our extended family.

This is my piece.  It was recommended that 6x6 be the largest it could be so that is what I chose.

Being a photographer I decided to feature a camera on my square.  I did some research on camera quilts and there were a few patterns out there but of course way too big. 

I designed the block on grid paper so I did not get the proportions wrong. Originally, I wanted to create the camera like paper piecing but it quickly became obvious this was too small a scale for that technique.

I chose a printed white on white background fabric.  Based on the grid pattern I cut my camera from black cotton fabric and appliqued it to the background.  I cut a 2" circle from silver lame metallic fabric which my sister contributed.  Thanks!  I cut the black and white circle at the same time with my Spellbinder Nestabilities and the Big Shot machine.  Then I cut the black and white again to reveal the silver behind.  These were appliqued to the front of the camera. 

I found a translucent button for the sensor which was sewn on with silver metallic thread.  I cut silver fabric for the shutter button and the flash.  These were appliqued on with stitching. 

I found a couple of ivory heart buttons and placed those on either side of my word which is a staple for portrait photographers.  I cut the word out with my Stampin Up Little Letters thinlit dies from red and white fabric to which I had ironed Heat and Bond on the back.  I just lined them up and ironed them above the camera.  I then stitched on the heart buttons. I added silver thread light flashes going out from the flash on the camera. 

I lined the square with a piece of flannelette for a bit of padding.  I cut my backing fabric 1" bigger than my 6" front square.  I then pressed the binding to the front and pinned it very carefully.  I then stitched it down with a straight stitch.  

I added my name in permanent marker in the bottom right hand corner.  It will be off in the mail this week.

Friday, March 5, 2021

Christmas Card Challenge - March - Large Greetings Small Cards

I continued my large greeting Christmas Cards making with the aim to create A2 (4.25"x5.5") sized cards. 

I continued to use the Winter Frolic Cricut Cartridge. This greeting is 3.5" T x 3.5" W. I cut it from Champagne pearl card stock and paired it with an ivory card base.   

The acrylic ink background features royal purple color with some bright spots.

I used copper accents layers with the crown is part of the shift layer of the greeting then I cut stars with the Sizzix Star#2 die.  

These were adhered to the acrylic ink background and the large greeting was adhered with 3D foam tape.

I spattered it with copper acrylic color, a toothbrush and straight edge.


 This next card I chose a blue green piece of acrylic ink background on glossy photo paper.  It was trimmed from 4x6 to 3.75 x 5 inches.

It was adhered to a white card base.

The pearl white large greeting was mounted aligned to the bottom of the background with 3D foam tape.  

I added a silver star in the upper left hand corner.  It was cut with the Sizzix die.

It was spattered with an iridescent liquid acrylic.


Another ivory card with the champagne large greeting.  

I cut the crown from gold card stock and adhered with double sided tape. 

I added sequins in gold and copper adhered with Bling Zots. 

Since the copper was out this one was spattered at the same time as the other.

I added seasonal quarter inserts and white envelopes and they are ready for December 1st.

Monday, May 11, 2020

Sylvia's Simple Shots

I had a wonderful photo day at the wetlands yesterday morning but it was COLD!

This is the first time I see this bird - an American Avocet.  They were feeding in a large pool of water in a construction site.  There were about 30 of them wandering around in about 8 inches of water.

I was thrilled to see them but I was completely frozen so keep the camera steady was a challenge.

They did not seem troubled by my presence at all.

I saw as a Song Sparrow, a flock of Tree Swallows,  Golden Eyes, a Blue Winged Teal and of course a Red Wing Blackbird male but no good photos.

The Canada Geese were cranky!

They were raising a fuss, making a racket, and flying overhead chasing each other.

You can see the left one's tongue is sticking out as it honks at the other one.

They were acting like some of us are feeling due to sheltering in place.


This book has been on my night stand for a couple of weeks I have just given up on it. It's depressing.

I don't really need to read about 2 couples in marriages who are unhappy and unhealthy.  I did read more than half of it but it was not getting better so I am cutting my losses and moving on.

Love the setting of Venise though.


A female Red Wing Blackbird perched on the very top of a dried bullrush.

As you can see she is all fluffed up trying to stay warm.

Really happy with the capture.

I was at the Lois Hole Provincial Park and the John Poole Wetlands.  Nature carries on in this time of isolation.

It was good to be outside, taking photos and not having to worry about someone getting too close.  A tuque would have been nice.

A nice hot shower when I got home did the trick. 

This American Robin had her feathers all puffed up as well trying to stay warm.

It was very windy and you can see her feathers are being moved about by it.

She stayed very still as I took  many shots.

Great bird captures is always rewarding.

I saw only one other person yesterday morning about 7:30 am.  It was threatening rain but it did not rain till the afternoon.

They have made the boardwalk one way for physical distancing so I had to walk all the way around.

The challenge for Flickr Macro Monday was Gold or Silver.  There is a lot of wedding rings being submitted.

I had all kinds of options and here are a few.

I used a gold oval brooch, a gold Chinese fan necklace,  an Anne Klein earring that makes me think of a shoe and an silver aluminum cigar tube where I used to store dimes. 

You can check out my SMDPics photostream to see the shot I submitted.

Sharing with Angie who hosts Mosaic Monday #79.

Mersad who hosts Through My Lens #240.

Thursday, April 16, 2020

Christmas Card - Merry and Bright

I am working on May's Christmas Card challenge - large greeting.  I thought I would force myself to use this 'merry' die cut - Poppy Stamps - MAGNIFICENT MERRY die cut.  I have been working on ideas for several days and nothing is gelling.  This card is what I have so far but I think it 's missing something.

I cut it from red card stock.

I selected this striped red and green designer paper and cut it to leave a small border and adhere it to a Kiwi Kiss card base.  I have no credits for the paper.

I glued the 'merry' towards the top of the card. I added a black ampersand cut with the Cricut and the Base Camp cartridge at 1.25".  I cut the BRIGHT from silver non shed glitter paper with the Stampin Up Little Letters thin lits.  I aligned them towards the bottom of the card.  All these pieces were adhered with Scotch quick dry adhesive.

I added an accent of stars on the left in black, red, and silver all held together with a tiny red brad and adhered to the card front with 3D foam tape.  Stay tuned for another iteration.

Update: I decided overnight that it needed some black. Here's the updated version.

I think adding the star streams has saved this card.  I used a ruler and just aligned it along the Vs in the silver star and made markings to the edge of the card.

I am quite happy with it now. 

Saturday, February 29, 2020

Christmas Card Challenge - February - Star

My card design for the February Christmas Card Challenge - Star.

I used foil paper with stars on it which was cut to 4.00 x 5.25 inches.

It was cut with the Stampin Up Star Framelits and adhered to the front of a black card.  I chose the next size down and cut foil chipboard and mounted it in the center of the hole I had cut earlier with 3D foam tape.

I color printed a greeting in black on white card stock.   I then punched it out with the Stampin Up Artisan Label.

It was mounted in the bottom right hand corner with 3D foam tape.

I have several ready for the card box.


I just couldn't leave those star cut outs on my craft table.

I found some silver/black ribbon which coodinated with the stars.

I chose a red card base.  I added a bit of texture to the card front by piercing lines with my dressmaking tool.

I put a length of ribbon across the bottom of the card and taped the ends to the inside.

I adhered the star matching the flat end to the bottom of the card.

Add the same greeting as the one above with 3D foam tape.

Wednesday, January 8, 2020

Polar Bear Card

I cut a few polar bears this morning to include in my exchange cards so I decided to add to my Christmas card stash.

I cut a piece of sparkly paper and adhered it to a piece of white card stock then trimmed the layer to leave a small border on the navy card base.

I ripped some snowbanks from white card stock.  I chalked the rough edges and the horizon line as well.

The polar bear was cut with the Cricut and the Joy of the Season cartridge.  I cut a navy scarf for him.

He is adhered to the card front with 3D foam tape.   I added a silver star in the upper right hand corner.

Tuesday, November 19, 2019

2019 Cardmaking - CH - Class 9

I am back to leading card making classes at Compassion House.  Of course November means Christmas cards.

I am recycling small square Christmas cards.  I trimmed the card to 3.75 inches.

I added a layer of white card stock cut to 4 inches and layered that behind the main layer.

The card base was cut to 4.25 x 11 inches then folded with it at the top.  The silver blue layer was adhered to the navy card base aligned at the top of the card leaving a small border with 3D foam tape.

A length of white grosgrain ribbon was wrapped around the card front and tied on the front.  The ends were trimmed on a slant with scissors.


This card is the same card pieces but put together in a different layout.

I started with a warm grey card base.

I added a Stampin Up Ballet Blue layer cut to 4.00 inches square.

The silver blue layer was trimmed to 3.75 inches.

I chose red grosgrain ribbon which was wrapped around the card base and tied in the front. Ends trimmed with scissors.

The card base is Stampin Up Ballet Blue.

The 4 inch layer is silver metallic card stock.

The ribbon is metallic silver.

Each has a seasonal quarter sheet insert which is glued to the inside.

Loving the colors, the layout and nice and cheery cards.

I had 5 great ladies in this class and all the kits were made.  Wonderful.

Making the kits in the same layout really helped the process.