Showing posts with label Stitched Square Frames. Show all posts

Wednesday, January 24, 2024

Cards - Christmas Thank Yous


I finally got my thank you cards for Christmas gifts out today.  They have been made since early January.

I always like to use pacakaging from my gifts to make my thank you cards.  In this case, I used some gorgeous yellow paper which was on some body care products. 


I used my large daisy punch and cut 2 flowers - one yellow one white.  I layered these alternating the petals.  I added a small black flower punchie in the center and a green leaf die cut on the right hand side.  Leaf cut with the Sizzix Flower Layers and Leaves die.

I chose different colored card bases.  Black, Navy and Orange. I cut  frames with my Stitched Square dies and adhered those to the top of the folded card.

With all layers adhered on my flower I then used double sided tape to adhere it in the middle of the white frame.

These are out in the mail today!

Wednesday, December 27, 2023

Watercolor - Tree Line


I brought home a small watercolor palette from the ReUse Center last week. I saw a video in the last month that the artist makes the practice of doing this tree line with a new palette so she has documented the colors in the palette.  I thought I would give it a try.  Wet on the bottom and dry on top.  Just go along the colors and this is the result.  

I wanted to do something with the art.

I have a set stitched squares dies which makes a nice frame. The large one which I have used on cards was too large for the small strip of 3" tall watercolor paper I had.  I used the middle one. The easiest was to make the watercolor this size of the cut out.  This gives less of a look of framed art.

I debated what color the frame should be.  I used a grey here. Could it be black?

The next challenge was that the card seemed too plain so adding some embossing worked really well. 

On this card I used Stampin Up Summer Sun card base,  a Cuttlebug folder with a diamond pattern for the back ground. Diamond in the Rough folder.


On this card I used SU Daffodil Delight card base with again a grey frame.  I think it works a little better on this card.

The embossing folder is Sizzix Softly Falling.  


I remembered that I had an instant camera die so I dug that out. Sure glad it made the cut during the destashing.  

On this card the white card seemed to white so I brushed it with Very Vanilla chalk.  Forgot to emboss this one.

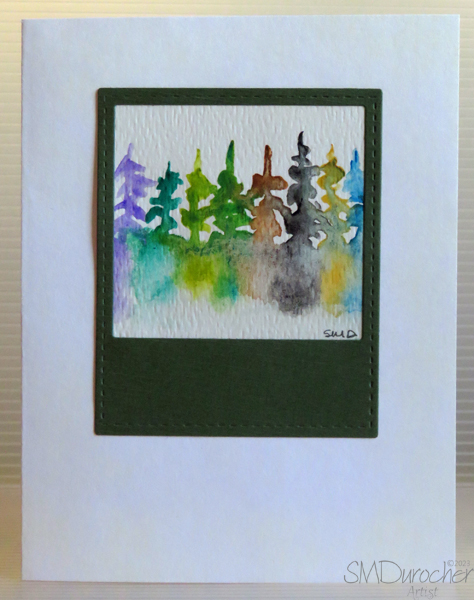
A dark green die cut works.

With this die I could cut my watercolor strip just under 2.75 inches wide and it fit behind the frame.  I like this better.


On this card, I chose SU Baja Breeze as the card base.

The cool grey for the frame die cut.

I used Quick Dry glue along the back of the die cut and just layed the watercolor on to it.  Hold it down for half a minute and it is well adhered.

Again, I think the card front could have used some texture.


I finally remembered to emboss the card front.

I think this SU Gable Green card base with a Sizzix Tim Holtz Alterations Star embossing folder.

I like the contrast of these colors.


Wednesday, November 1, 2017

Christmas Card Challenge - Nov - Navy Square

This is my card for the Christmas Card Challenge this month.  I have chosen Navy and Square for this card.

I chose a navy card.  I created a vellum greeting layer with a frame where the greeting is placed at the bottom of frame replacing the line. I printed it then embossed with gold powder.  It was trimmed to leave a small border of navy.

I cut the holy family with the Penny Black Manger thin die from gold card stock.

The frame was cut from white card stock with the Stitched Square Frames by Die-Namics.  I adhered the frame on the diagonal to the vellum then placed adhesive behind the frame on the back of the vellum to ensure that the adhesive does not show through the vellum.  The vellum was then adhered to the card front.

I then placed the gold holy family die cut in the center of the diamond square and attached it with a tiny gold star brad in the center of the star of the die. I have over 100 cards in my box so I am ready to start addressing.

I have posted an alternative with a clear vellum and banner greeting which was adhered to the card front with 3D foam tape.

Tuesday, August 1, 2017

Christmas Card Challenge - Aug - Copper/Square

This is my card for the Christmas Card blog challenge.  The challenge this month is Copper and Square.  I ensure that I get all my Christmas cards by November 1st.  Will you join me?

I started with the metallic copper card stock. I cut it with the Sizzix Dove die and Stitched Squares Frame.

I selected a medium purple card.

I created a star background which I printed on vellum, embossed with copper powder and trimmed it to leave a small border.

I placed the square on the angle and adhered it to the vellum and centered the dove in the middle.  I then applied adhesive behind the vellum under the same places and placed it on the card front.

I then selected 4 places to add a tiny copper star  brad to ensure all pieces stay in place, in 2 stars at the top and the 2 stars beside the greeting.

You can check this link to see the cards so far and the first post contains all the challenge. Pick the one that inspires you.   If  make a card leave me a comment. 

Joining the summer Christmas Card link up at Merry Monday.

Sunday, June 25, 2017

Sweet Tea

Doesn't a tall glass of sweet tea sound appealing?

I created this card with one of my own tea photos which features a pitcher of sweet tea.  I applied a photo filter to create the monochromatic image.  Love the orange!  This photo is reused from this photo calendar.

The reused image is 4x4.  It was trimmed down slightly to ensure it fit behind the frame.

I cut a frame with the Die-namics Stitched Square Frames thinlet set from a soft teal card stock.  I adhered the frame to the tea photo.

I adhered the tea element to the top of a orange card base.

I designed the greeting, printed it onto white card stock, ripped the top and bottom edges.  It was adhered below the frame.
 
Submitting this card to the
Coffee Loving Cardmaker's Summer Blog Hop.

Thursday, February 23, 2017

Round Manger in Burgundy

I was looking for another die that would do manger/nativity Christmas cards.  I found this die at a local scrapbook store.  The selection was not great because we are just passed the season but I was grateful there were a couple to consider.

I created this Christmas Card with a new die - Creative Die 51-254 Manger by Penny Black.  It measures 2 inches in diameter.  I cut it and the Die-namics Stitched Square Frame from burgundy linen card stock.  I ran the square die again through the Big Shot with non shed gold glitter card stock.  I trimmed it a little bit to leave the tiny border of card color between it and the frame. The frame was adhered to a ivory textured card and the gold glitter square as adhered in the center of the frame.

The Manger die cut is held in place with just a tiny gold star brad which repeats the star shape and means no gluing tiny pieces of paper. Yeah!

The greeting is a Stampin Up Modern Label punchie in the same burgundy linen card stock  with a sentiment punched with the SU Word Window punch.  These are layered then adhered to the card front with 3D foam tape.

Submitting to City Crafter Challenge - 350 - A Few Stitches.  

Monday, June 20, 2016

Card Club - June - Photo Frame

We are having card club today.

Left: Another photo frame card.  I chose a card that coordinated with the photo.  I added a piece of 7/8" grosgrain ribbon down the center of the card and taped the ends to the inside of the card.  Make sure your layout to ensure the photo will be in the orientation. I added 3D foam tape on the back of the frame and adhered it over the ribbon onto the card front. Ensure that the photo is still aligned then adhere the square inside the frame. 

Below:  I chose a card that coordinated with the photo.   The ribbon was taped to the inside of the card and pull across the card.  It was taped in place where the square would cover later. It was cut short and the end was flagged. 

Versatile design which easily allowed tall or wide orientations.


Monday, April 18, 2016

Card Club - April - Square Frame Photo

I'm holding another Card Club class today.

I started with a 4" photo featuring a beautiful butterfly. I cut it with the Die-namics Stitched Square Frame thin dies which gives me the frame and the inner square. I trimmed the inner square with the paper cutter to make it a bit smaller than the opening of the frame. I chose a turquoise card which matched the butterly very well.  I adhered the stitched frame to the card front.  The center square is adhered with 3D foam tape to raise it a bit.  Now the border of blue shows through the frame.  The greeting was color printed onto the card stock before I adhered my layers.

Love it!


I see that on this one I forgot to trim the center square so there is only a shadow on the center vs the frame.

Tuesday, April 12, 2016

Garden Week - Card

I made this card for the Home Page Card Challenge at CST.  The challenge is to choose a holiday in April and make a card to go with it.  I chose Week 2 which is Garden Week.
I chose one of my 4 inch photos featuring a beautiful pink tulip. I cut it with the Die-namics Stitched Square Frame thin dies which gives me the frame and the inner square. I trimmed the inner square with the paper cutter to make it a bit smaller than the opening of the frame. I chose a pink card which matched the tulips very well.  I adhered the stitched frame to the card front.  The center square is adhered with 3D foam tape to raise it a bit.  Now the border of pink shows through the frame.  I embossed the bottom edge of the card with the Cuttlebug Nathaniel`s Penwork border embossing folder.  I will have to work out how to get it centered on the card but it is the perfect width so I will work it.

Monday, February 22, 2016

Card Club - Feb - Photo Frame

We are meeting for card club today. I teach at 2 locations - Senior Centre in the afternoon and the church in the evening.

This card features one of my photos which has been trimmed to 3.75 inches square. The white card stock frame is cut with the Stitched Square Frame die by Die-Namics. The photo is adhered to the frame then that layer is adhered to the card front.  The greeting was trimmed to the banner edge with scissors then adhered to the card front with 3D foam tape.


I have a variety of photos and card colors in the kits prepared for this class.  With a collection of photos I can make a card with a gal with flowers and I had airplanes and hoodoos for guy cards.

Friday, June 12, 2015

Christmas Wreath

I started with a light green card fold in the tall orientation.  I cut the frame from deep red card stock with the Die-namics Stitched Square Frames.  It's 4" square.  I backed it with a piece of painted brown paper which repeats the brown in the pine cones.  I stamped the greeting on white with brown ink and a clear stamp.  I layered that onto the same red card stock as the frame. These were layered together then I punched a 1/8" hole in the corner and added an olive thread to it.  I then tied the tag onto the frame with the thread.  The frame accent was then adhered to the top of the card front.  I added some double sided tape to the back of the tag to keep it in place on the card front below the frame.  I then adhered the wreath accent (brand unknown) over the frame with 3D foam tape.

Submitting to the following challenges:
Holly Jolly Christmas Challenges - Frame It.
City Crafter Challenge - tic TAG toe

Monday, May 4, 2015

Card - Simple Butterflies

I was out shopping on National Scrapbooking Day where many stores were having specials.  I found the Stitched Square Frames by Die-namics designed by My Favorite Things. I've admired these for quite a while and they were on sale so I said Sold!  

I printed a square background of my design in blue and the sentiment in the same color.  I cut the largest frame of the set of three from heavy white card stock.  I mounted it with 3D foam tape.  The butterflies were cut from alcohol ink backgrounds I made a while ago. The dies are the Sizzix Winged Beauties thinlits. They were mounted within the inside of the frame with 3D foam tape. 

Submitting to the following challenges:
Less is More - Colors opposite on color wheel  Orange & blue
Cute Card Thursday - Use a sentiment