Showing posts with label fabric. Show all posts

Friday, May 23, 2025

Slow Stitching project - May - Tiny Fabric Book

I wanted to add a small fabric book to my slow stitching project in which I would write my favorite authors.

I started with a dark blue piece of fabric paired with a bit thin blue fabric. I handstitched the outer edge and turned it right side out. I top stitched the outer edge to close the slot used for turning.

I cut a piece of white cotton for the pages on the inside. Finished it measures 2.75" x 2.25 inches.

I spent quite a bit of time thinking about how to get the words in the book.  I knew I was not stitching them.  I investigated adding sizing to the fabric allow me to hand write the words. Finally, I decide to use freezer paper on the back and a Micron black marker. That worked really well. I then hot ironed the white cotton to set the ink.

I added a small elastic closure on the right hand side and a tiny blue button on the front cover to hold the book closed. 

This book was stitched onto my books square for the May slow stitching project I am working on. 

Tuesday, December 17, 2024

Slow Stitching - No. 051 - Grid Journal Slow Stitching Style

K3N Cloth Tales Slow Stitching Challnege 2024

Week 51 - Grid Journaling Slow Stitch Style. 

I stitched my 4 squares onto a piece of blue cotton with a foundation layer with stem stitch.  Four different colors.

I then cut a few snippets of fabric to stitch at random in these squares.

It turned out quite bright and I was happy with it.


Tuesday, October 1, 2024

Card - Inktense Painting

I made a card with my Inktense "Sunrise" painting.

I stitched the black outliner lines with a single embroidery floss. This is tightly woven cotton and was not fun to stitch. 

I chose a SU Garden Green A2 card base.

I ripped the painting to the edges of the color.  I tacked it down with stitches in the corner to a piece of white card stock that was trimmed to leave a wide border.

I glue the white layer to the front of the card base in the landscape orientation.

Added a white insert on the inside with a envelope.

It is ready to give!

Friday, September 27, 2024

Inktense Fabric Painting - Sunrise

I decided to invest in Derwent Inktense ink colors for coloring fabric. My sister and nieces have had them for a while.

The come in different formats - pan, pencil and blocks.

I chose the pans since I do  some watercolor and they were the least investment should it not work out.  I also went to Delta Art and bought the Inktense 2400 Outliner which is a black drawing pencil not is non soluble so it will not run when you paint over it

My sister and niece have experienced the color seeping into other areas of their embroidery when painting with water.  Several videos I watched suggested using aloe vera gel instead of water to activate the ink. 

I drew my composition on a piece of cotton with the Outliner then painted. I had some pure aloe vera gel in my fridge so I decided to give it a try.  It works very well. 

I just a small brush for my edges and concentrated ink.  I used my regular watercolor ceramic palette and blended colors as I wanted with the gel. You do have to rinse your brush in water when changing colors.  The seeping you see on the roof of the house was a result of my not drying my brush after using water to rinse so it was too fluid and so it ran.  

I set the painting with my hot steam iron.  I ran it in water after the setting and the color did not run at all. 

Yes, this is a winner.

Oil Diffusers - Travel Case - Set 1

Blue Bird of Happiness - This diffuser features a bluebird sitting on a branch applique with stitched flower in the upper left corner. The back is a light blue denim with a blue felt drop, a loop and hanger. 

Blanket stitched all the way around to kept both layers together.  All fits in a clear plastic travel case.


Embrace Life - This diffuser features layered felt flowers with a dark center which would work well for a spot to place the essential oil.  The flowers were appliqued to green felt using running stitch and long stitches. The leaf was stitched in place first with the flowers overlapping it.  The back on this one is light mustard linen fabric with a brown drop, green loop and a hanger.

Again, blanket stitch all the way around. All fits in a clear plastic travel case.


Be Happy - A happy face is always fun and uplifting. I used a white felt background for good contrast. I cut the yellow circle then used a hole lunch to create the eyes then filled them with black felt circles. These were stitched in place. The smile was stitched in stem stitch then a satin stitch on the outer edge.  That took a long time.  I used a piece of quilting cotton in coordination colors for the back.  The edge of the cotton is folded over before stitching to provide a finished edge. The back has a yellow loop and felt drop and a hanger.

Blanket stitched all the way around the perimeter with yellow embroidery cotton. All fits in a clear plastic travel case.


Wine O'Clock - I  hope that I have conveyed the message clearly enough with the clock in a wine glass. I chose a bright red felt for the background then cut a white circle for the clock. Black French Knots do for the numbers and then I stitched the hands.  I then stitched the wine glass in grey thread to represent glass but maybe black would have been better.   The back is a grey fabric to coordinate with the grey on the front.  A black loop,a red felt drop and a hanger on the back. 

Again, blanket stitched all the way around with red thread. All fits in a clear plastic travel case.

For overall information you can check  Oil Diffusers - Hand Stitched Original Designs with Travel Case.

Oil Diffusers - Hand Stitched Original Designs


I have been working on these diffusers all week.  These are all hand stitched with my original designs. They measure approximately 3.75" square. The fronts are felt with fabric as the backer.

I came up with this design to provide diffusers in a travel case. These cases are nice because they are transparent. 

The diffuser can rest in the slot and stand in your personal space to provide a relaxing scent based on the essential oil you have chosen.  The oil can be placed any where on the felt but depending on the ingredients of the oil it may discolor so I have provided a drop on the back for that situation.

I have added a loop above the drop with a small hanger so it can be hung in your personal space of horizontal space is at a premium.

They are very cute and appealing.

Friday, July 26, 2024

Slow Stitching - No. 030 - Cloth Folding

This week's prompt for K3N Cloth Tale's slow stitching challenge is cloth folding.

I took a much different approach.  I found a rayon garment at the thrift store for a very good price.  It was soft and draped very nicely.  Now to the ReUse center for a piece of cotton.  I found a peachy piece of cotton.  Yes!

All washed up, I kept the hem on the piece of fabric and just cut it down to create a lovely draped piece. Think a curtain, a shirt, a skirt and much more.

I hemmed the piece of cotton first. I then placed my draped fabric and stitched it down.  I used a piece of black felt as a finish for the top raw edge of the drape. I stitched all the way around with black thread, now for decoration I added some daisy stitches in the deep burgundy and seed stitches in the aqua. 

It is a very different piece for me.  I am caught up and look forward to Monday's video.

Saturday, June 15, 2024

Sylvia's Simple Shots

A visit to the St. Albert Botanic Park yielded some great shot. The is Jacob's Ladder and it will likely make the calendar at the end of the year.

Gorgeous color and wonderful delicate flower.

There were a few roses open, the peonies were on the verge of opening.

With a few more days of sun the gardens will be looking really good!


Attic Treasures by four authors who have written romances into each story.

This book was 4 short stories about Lydia Dunmore, a grandmother getting ready to sell her large home to move to a seniors residence.

She has invited her 4 granddaughters to visit her attic and pick the one item which was their favorite.

Sheila is looking for her grandmother's doll but it has been sold.  With the help of a local antique store owner she searches for the doll.  
Kimber chooses an old fishing tackle box and through the help of a local fisherman discovers that some of the lures therein are quite valuable.
Lauren cherishes a christening gown her great grandmother wore.  She has chosen career over motherhood.  Her husband buys a farm and they leave the city. She did survive the transition and the gown came in handy.
Jessica takes an antique dress from Grandma's attic. Inside she finds old papers and photographs.  There was an adoption and the identity of her father is in question. Lydia shares what she knows. It is all very mysterious and there's a photojournalist chasing a story. It all turns out well in the end.

There was a large stash of fabric yardage which appeared at one of the thrift stores. 

The price was unbelievable.

Did I need another piece of fabric? No but I could not help myself.  Will I have a chance to sew this summer with the renovations planned.  Unlikely. Still I brought home 5 pieces for less than $10.  Averaging about .75 of a meter. Some less some more.

Beautiful blue purple watercolor, a denim blue vintage geometric, rainbow with gold dots, a yellow blender and a turquoise batik.

Just the right size for a book cover, a placemat, or a wine bag.   We shall see.

I had lunch with a dear friend.  Vietnamese noodle bowl is always delicious and this was no exception.

Meeting at 1:00pm after the lunch time rush we had great conversation and caught up on our lives and what we have been up to.

She is headed on a big vacation.


I was invited to celebrate a birthday this week.

The birthday girl hosted lunch at her house.

It was very delicious and I was able to catch up with extended family.

Dessert was an upside down cake with blueberries with whipped cream on top.  A good cup of tea and good company.  It was a lovely afternoon.


Thursday, April 25, 2024

Slow Stitching - Embellishments to Book Bags

I went back and revisited my book bags and chose embellishments for some of the earlier ones. 

1. I added a dragonfly charm on a peice of blue felt

2. An orange cloth flower on a blue bag.

3. A yellow and green circle accent for the masculine striped one.

4. Just a bit of a strip of turquoise fabric with stitching for the first one I made.

You will see that I have added a "My Bag" tag to each of them as well.


Wednesday, March 6, 2024

Sewing Project - Pojagi Fabric Bags

I added to the piece of Pojagi fabric I made the other day.  I added some on the length and width.

I then had enough fabric to make 2 reusable bags. They both measure about 12x12 square.  I added handles from scrap fabric. 

For this bag I added handles in grey polycotton blend fabric which will wear well.  It came in the box of fabric I was given so bonus. The strip was cut 2 inches resulting in approximately 5/8 inch wide strip.

I sewed the handles right to the bottom to distribute the weight in the bag along a better distance. In this case I sewed the strip and then turned it inside out which was a challenge being so narrow.

Top stitched it on both sides of the strip on both handles on both sides of the bag.

This one again measures approximately 12x12 inches square.

For this bag I decided to cut down on the work.  I ironed the 40 inch handle strip of navy microfiber in half then ironed in both edges then just stitched it from the top. Folded in the raw edges at both ends before I sewed the seam. 

Then I just used a decorative stitch on my sewing machine to sew the handles all the way down the front and back of the bag. Back stitched where the handle meets the top of the bag and at the bottom of the bag.

This took much less time.

These are being donated.

Saturday, March 2, 2024

Sylvia's Simple Shots

We had a snow storm this week.  

It was blowing and snowing pretty hard.

I can barely see the building one street over  through the snow.


I did purchase a fabric marker from Walmart because I wanted one to create designs for embroidery which will wash out after the stitching is done.

Then just after I bought at retail I found this set of markers at Restore.  

I have plenty for my needs now for my slow stitching.

I found this Clover Kanzashi Flower Maker Pointed Petal small at Goodwill this week.

I was wanting to make flowers to decorate my bags and thought this would work well.

It does work well but the flowers are quite small.

Once I understood the concept I could make a large one with out the gadget.


At the same time my sister was looking for something similar.

You can check out the method and flower she made in this post.

I have made flowers both ways and it works quite well.  The pentagon flower requires quite light fabric as it needs to bunch a lot to make the petals.

Wednesday, January 17, 2024

Slow Stitching - No. 003 - Diversity

I finished my 3rd piece of slow stitching.

I am following Kathyrn at K3NClothTales on You Tube and Instagram.

The prompt for this week is Diversity.

After some thinking about it I came up with the amount of different fabrics I have used in my sewing projects. I have been sewing for 50 years.  My Mom was a seamstress - she sewed all our clothes, quilts, blankets, and many more projects. 

I have gathered several fabrics I have used - left to right. Denim, fleece, quilt cotton, heavy cotton, linen, corduroy, microfiber and flannel.  My sewing projects included bags, aprons, garments, quilts, placemats, linen, coasters, and unpapertowels, etc.

Saturday, January 6, 2024

Sylvia's Simple Shots


 This tealight candle holder is likely the replacement for my Advent Wreath which is broken parts.

I bought it for $5 at a Thrift Store between Christmas and New Years. I like the lines, the fact that it holds 5 candles, and that there is space below to add decor for occasions throughout the year.  It will stay out all year long.  At a thrift store on Tuesday I found these beautiful tealight holders in green, red and amber glass.  Gorgeous blown glass holders. They are Christmas colors.

I have a year to find other candle holders.  I would like to have crackle glass ones again, crystal would be nice, cut glass as well.  What I want is the shadows on the wall which I had with the other one.  I recognize that my lifestyle is going for downsizing so this will be smaller than the other one. 

I bought this Stampin Up punch recently.  I think I will be making watercolor ornaments for Christmas cards and this was a good price.

It is from the Gleaming Ornaments Punch pack which included 2 punches and a stamp set.

I will be designing my own images to trace onto the watercolor punchies. 

You can see I was working of the lines for the hanger on the right hand one.


I was looking for a small scissor sharpener for my embroidery scissors.  I visited a couple of fabric stores and found this one.

I would say it is not the top quality but it has improved the sharpness of the blades so I can cut embroidery thread reliably.

The price was not as high as the Fiskars one I was looking for but the same basic design.

It has improved my experience so for that I am grateful.

It is dangerous to go into a fabric store.

I did come out with 3 small remnant pieces for about $1 each. Check out those flowers on the lace! I hope I can dye them, we will have to see.

The other two pieces are 100 cotton so they will dye nicely. Gauzy fabric to create texture easily on my big embroidery project.

I did buy heat and bond hemming for quick basting of my embroidery projects.


Another World War II story.  The Lost Girls of Paris by Pam Jenoff.

I love strong female leads and Eleanor Trigg is no exception. This story runs in 2 time lines - 1944 London and Paris during the war and 1946 New York just after the war.

She works for the Special Operations Executive in London for the British Forces. Their male agents are being captured. There is the language and they don't fit in as well as needed. Eleanor is "just a secretary" but she proposes using women which would be less visible. Once the project is approved, she recruits female agents who will be working in occupied France assisting the resistance forces. Radio operators, couriers, and as it turns out much more dangerous tasks. 

Marie and Josie are 2 of these women.  They are sent to Scotland to train in the highlands. Combat, firing a gun, repairing radios, endurance training, learning cyphers to code messages being transmitted and received. 

Grace finds a suitcase at Grand Central Station one day and inside finds photos of 12 young women.  She is compelled to take the photos and she is not sure why.  She eventually learns the suitcase belonged to Eleanor who was killed that day just outside the station. When she returns to the station to put the photos back the suitcase is gone. 

She does eventually learn the names of the girls most of which perished in France just before the D-Day battle.  She learned who Eleanor Trigg was and her purpose for being in New York that day.

Very good book.

Wednesday, December 13, 2023

Sewing Project - TV Chair Outfit - Cushion and Headrest Cover

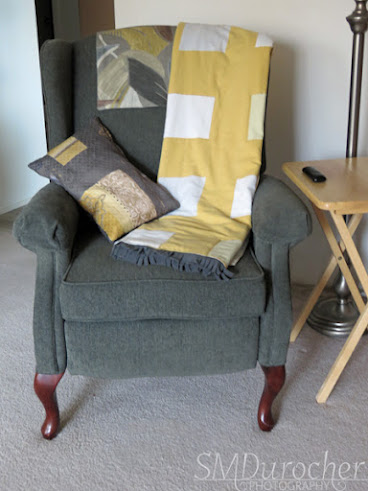
This is my TV chair with its new outfit.

I received this chair from my aunt as a gift this summer and it reclines to bring a footstool.  I loved it.

I have been using the fleece blanket I had on the couch but it is too big and get caught in footstool when I get up and close it.

I wanted a new blanket, a new cover for the cushion I have been using and an updated head rest cover.

There is still a remote control holder to come but I have not decided and designed it.
 

This is the Cushion Cover.

I used the fabric I purchased this summer which matched all the chairs in the living room.  You can see the fabric in this post.

I found a yellow zipper in my stash that would be long enough for a side opening.

This fabric frays very easily so I had to serge all the edges as I went along.

I cut 2 pieces of this fabric 21 inches x 15 inches. This would allow 1 inch seam allowances. 

I followed this tutorial to put the zipper in. It worked perfectly.  I used the selvage edge of the fabric and folded it in 1 inch on both pieces. I sewed the ends about 3.5 inches leaving the center open where the zipper will show.  

The zipper is 14 inches on the 18 inch side. I then pinned the zipper to the opening making sure to mark where the metal bits were to make sure I sewed on the far side of those.

Once the zipper was in I could just sew up the other 3 sides. Make sure you move the zipper pull down before you sew up the sides as that is the opening you will use to turn it inside out.

I did have a large seam allowance (2.25 inches) across from the zipper but it was better to have too much than find I was short.

I had pinned loosely to figure out where the seam should be.  

Sewed it the other sides together and turned it inside out, used my chopstick to push out the corners. My little cushion fit perfectly inside.

I used the grey thread to sew this project.

Headrest Cover
The research and gathering of fabrics I did this summer paid off because the piece of 100% cotton upholstery fabric was in the bucket.

That will work for the headrest cover.  I paired it with a piece of microfiber fabric from the stash as well. 

I laid the cotton over the microfiber and then used my long quilting ruler to mark a rectangle with square corners. 

I then sewed those together leaving a small area to turn it around.

I then turned it inside out and ironed it flat.

I stitched a seam very close to edge to close the opening I used to turn it around and it finishes off the edges nicely.

I had gone a while back to purchase twist pins to keep the arm rest covers in place.

I dug out 2 of them and tacked the head rest cover in place.


I am very happy with the final results of this several day and 3 piece project.

I have 3 pieces that can easily be washed and kept clean.  This will keep my chair clean as well.


I will be working on the remote control holder.  I think it will be over the arm rest


I will keep you posted.


Sewing Project - TV Chair Outfit - Blanket

This is my TV chair with its new outfit.

I received this chair from my aunt as a gift this summer and it reclines to bring a footstool.  I loved it.

I have been using the fleece blanket I had on the couch but it is too big and get caught in footstool when I get up and close it.

I wanted a new blanket, a new cover for the cushion I have been using and an updated head rest cover.

There is still a remote control holder to come but I have not decided and designed it.

I was grateful for the work I had done this summer when I found the great fabric. You can check out this post

I went shopping for fabric last week.  I found an large IKEA duvet cover in 100% cotton for a steal of a deal in mustard yellow, white and warm yellow. Then, a warm grey small fleece blanket in a good color.

I decided that the blanket had to be shorter and narrower than the one I had been using.  I spread the grey fleece blanket (50 x 50 inches) and decided I could cut some off the side (10 inches) to make it narrower.  The chair is 33 inches wide so 40 inches wide would be good. 

This was perfect because I had decided that I wanted a footwell on the back side where I could tuck my feet so the blanket would not let my feet get cold.

I first lined my yellow front with some white 100% cotton fabric. The final size is 61 inches tall by 42 inches wide. I created an envelope, turned it inside out and top stitched all the way around.


I stitched the grey fleece blanket to the back of the yellow one with a wavy stitch along the top and bottom edge leaving the fringe hang off the bottom.  

You can see here that the fringe is hidden on the back of the blanket. 


I used the bit left over of the fleece to create a grey fold over at the top where my hands are going to be touching a lot.  This will keep the white and yellow edge cleaner.


I then pinned the 10 inches x 40 inch piece of grey fleece at the bottom and sewed it on the back white side of the blanket. I sewed 2 additional seams to create a narrower footwell in the center of the blanket.


Now that I had the bottom and top edges stitched together I needed to work on the middle.  I decided that I would quilt around the squares on the front of the blanket in the top, middle and bottom rows.

I used yellow thread on the top and grey thread on the bottom so it would neaten up the look of the blanket on both side.

I sewed around the squares on the outside of the square so I was always sewing on the yellow fabric with the yellow thead.

Once I was done,  I later realized that I had sewed over my footwell on the quilting of the squares on the bottom row.  I did have to unravel some and redo it making sure that my footwell was free.


I have tried it out for several days and it works really well. Nice to have a bespoke blanket just the way I wanted it.

Tuesday, October 3, 2023

Card - Watercolor and Ink - Fall Colors

The original ink drawing was done on 90lb watercolor paper measuring 4.00 X 5.25 inches.  I used a fine tip permanent black marker.

I was inspired to start ink pieces by the Inktober Challenge

I drew it then applied watercolor to it in fall colors. Yellow, oranges and browns.

I rubbed a black marker around the edge to finish off the lines in the drawing.

I added a fabric accent "City Express Post" 2 cent stamp.  Unfortunately, I was not express enough and this card is a few days late. 

I added 2 deep yellow mini brads at the top and bottom of the stamp. The watercolor drawing was then adhered to the front of a Tangerine Tango card.  

I will hand deliver the card tomorrow.


I have been working on art pieces for the upcoming Value of Color show at the art gallery.  Turned out to take more time than I thought.  Keep an eye out for those coming at the end of October.

Friday, September 15, 2023

Fabric Coasters - Set 2

Another set of coasters done today.

The turquoise set in the corner is fabric I dyed in the microwave with Rit dye.  It worked pretty well.  I had cut the pieces to a bit larger than what I needed so if it shrank or the edges got messy I would still have enough to cut my 5" squares.  

It is interesting the different weights and tightness of weave in linen.  The loosest weave was the blue denim and the rust colored ones. The olive linen was tightly woven. 

Mostly I put in the scraps of flannel I had.  The yellow ones needed white flannel as they were quite thin and the pattern showed through.

This is 22 sets of two coasters.

I am really happy this effort.

The changing of thread for each color took some time but was absolutely necessary.

These measure 4.25 inches square.

I was very fortunate to have a 5 inch and a 4 inch quilting ruler so that made cutter a lot easier.  

The rotary cutter and large cutting mat was the foundational. 

The chop stick for pushing out the corners was the perfect tool for the job. Not too sharp to ensure that the corners were not pushed through.  

The large fabric scissors went well to trim the excess fabric off the corners in one stroke in each direction.

I did have to purchase thread for the wheat colored and the olive colored ones.  That was expensive but worthwhile.

I have started using golf tees to keep my bobbins with their parent spool of thread.  The connectors I spent a lot of money on just broke after a couple uses.

The flannel squares were easy to cut and quickly make as stack so I could just pull them off as needed.

Wednesday, September 13, 2023

Fabric Coasters - Set 1

I've decided to make fabric coasters for sale.

I've chosen to use linen/cotton fabric.  Generally, the outer layers are linen and I have put cotton flannel in the center.

The outer layer is cut to 5 inches square and the flannel layer is cut at 4 inches square.

I sew the flannel to the front piece with a wide seam then sew the 2 outer layers together with a narrower seam leaving a space to turn them out.  

I trim the corners to remove fabric bulk in the corners. I turn them right side out.  Press them flat making sure that the opening slot is well pressed.

I sew a seam really close to the edge all the way around closing the slot at the same time.

This is 11 sets of 2.  I am halfway to where I wanted to be. I have several other colors to make up yet.

Really happy with this day's work.

I am also working on packaging and how I will display them for sale.

Thursday, June 22, 2023

Dyeing Linen from ReUse

During my visit with  my sister in March I purchased the fixative recommended for keeping the color once dyed.  It meant a trip to town so we did not have time to actually dye the fabric then.

I was back this week so we went ahead with the dyeing of the oatmeal linen.  This was a large piece of oatmeal colored linen that I had picked up from ReUse earlier this year.  I was thinking of  making a table runner.  I wanted the fabric to be navy.

We followed this process which is documented with the dye bottle.   Rit Dyeing Process

The first thing is to mix your dye in enough water to allow the fabric to float easily in the water.  We added salt because this was a natural fiber and some dish soap.  I believe we left the fabric in the dye bath 30 minutes agitating constantly so we took turn with the wooden spoon.

Then the fabric needs to be rinsed until it runs clear.

Then put back into the pot with the fixative.

The last photo there is a couple of sheets that my sister dyed with what was left in the pot.  She did not care how dark the color was just that it was not pure white.

A very successful project.

I appreciate my sister's help and she has the large metal pots, etc which I don't have.

I have the embroidered and the now navy linen.

The 2 sheets that my sister dyed in the left over color bath.

Saturday, March 4, 2023

Sylvia's Simple Shots

With my machine in a desk and not really portable I choose to take other tasks for my time with the ladies at quilting. 

I  took cutting to quilting on Monday since I just need my cutting mat, my rotary cutter, measuring tape, my long quilting ruler and some scissors.   I cut 16 UnPaperTowels - 6 sets of 2 in the grey flannel and 2 sets of 2 in the red flannel.

You can see that I have trimmed the corners on the top 2 sets making them ready for the serger.

I have quite a bit of flannel to cut and serge.  I think I will just put all of them in a pile then assemble sets of 10 somewhere along the line so I can put together nice looking colors.

When I picked up the serger I realized that I would need 2 cones of serger thread for the needle threads as they had been cut off.

I checked Michaels - they carry Coats and Clark but only in black and white on the 3000m spools.  Price is pretty good with a coupon.

I checked Fabricland which carries the Tailor brand and the price was pretty good.  I checked on the fuzziness of the thread and it was not as smooth as a sample I had from home so I moved on. They carry high end brand at a very high price.

I headed to Walmart where the price was about the same as Fabricland with the same manufacturer as Michaels and there was some grey.  Upon checking, the thread was smooth and very comparable to the the one I had with  me.

At quilting, Linda had brought fabric from one of our prolific quilter's stash.  This lady has experience health issues and has given up her hobby.

We were told all the pieces had to go.  There was a nice collection of fat quarters in beautiful colors and 100% cotton.

I took a stack of these fat quarters for my sister who is making different kind of sewing projects for the Grandma Africa chapter in Red Deer.

She has made casserole carriers, pot holders, aprons, and bunch more.  

She is working on getting rid of her stash but this will help a bit in offering different colors for her projects.

You know what they say - be careful what you wish for.  I had been wondering how to find flannel for my UnPaperTowels at a reasonable price since they will be donated or given as gifts.

Well, there were some pieces in the stash that Linda brought on Monday.

Here's the pieces I found.  There are a few darker pieces for the Make Up Remover pads projects.

I washed all the fabric and ironed them all so that they lie nice and flat and I can see what I have.

I will cut UnPaperTowels first then use the leftovers for the pads as they need pieces about 4 inches square.

Thanks so much for the donation of fabric.

I had a friend over for tea on Thursday.  I had not seen her since early December.  Of course, my life has been turned upside down since then.

We had a great visit. 

I used my Signature Turquoise and Yellow tea set which was a nice springy color.


I was invited to my aunt's new place for lunch on Saturday.  They sold their house and bought a condo much closer to me.  I am very happy to have her and her husband closer.

I decided to make Saskatoon and Rhubarb crisp in small pie size.  I used honey for a bit of sweetener in the fruit and brown sugar in the crumble topping.

I made 4 - 2 for my aunt, another for my other aunt who was invited to lunch as we were dropping off our art in the Juried Member show that morning.  One for me.

I ate mine for supper on Saturday.


Another book this week - J is for Judgement by Sue Grafton.

The story is about Wendell Jaffe who was recently declared dead after being missing for the last 5 years.  His widow Dana has collected the insurance money and has spent a lot of it clearing debts incurred while raising her 2 sons alone.

Kinsey Millhone has been hired to investigate a reported sighting of Wendell in Mexico.  Off she goes to spend a few days south of the border.  Based on her sighting it does seem that Wendell is alive. 

He has a new partner Renata and they just packed up in the middle of night.  Where are they headed. Kinsey heads back to California and starts tracking leads. One of his sons has been arrested so the speculation Wendell is headed north.

Life is always exciting with Kinsey.  We find a bit more about her personal life this week.  Some of her extended family reach out and she as always thought she had no family because the aunt who raised her never mentioned others.  There was a reason and it was hard to accept by Kinsey.