

Showing posts with label Card Club 2011. Show all posts
Showing posts with label Card Club 2011. Show all posts
Monday, November 28, 2011
Card Club - Gold Glitter Star
Card Club - Snowman

Card Club - Glitter Ornament

Card Club - Christmas - Joy

Tuesday, October 25, 2011
Card Club - Bliss

Card Club - Cricut Tree

Card Club - Window & Flower Box

Card Club - Prima Flowers
 We had a good group of ladies out for Card Club last night. I started with a brown card. I cut a Tim Holtz Ornamental die cut from designer paper. I wanted the ribbon to the side so I tack it down to the card with a bit of double sided tape. I was then able to glue down the die to the card front. Then I tied the ribbon in a loose square knot. I placed the small silk flower, then the medium silk flower and then finally the Prima Flower onto the brad. I made a hole in the DP and card with a push pin then placed the brad through which holds the flowers securely. Placed the insert and it's done. I made cards with peach, white and hot pink flowers.
Monday, September 26, 2011
Card Club - Purple/Chocolate

Card Club - Flocked border

Card Club - Felt Flowers

Card Club - Fall Leaves

I started with a dark brown card. I embossed a Summer Sun layer with the Cuttlebug Polka Dots folder and trimmed to 5.5x4.00" and glued to the card front. The ribbon slider was cut with a Spellbinder thin die once I had color printed my greeting. See this post for how I did this. I slipped the slider onto the ribbon and taped the ends of the ribbon to the inside of the card. The felt leaves were stickers then I used a brown marker to add some dimension to the leaves.
Tuesday, May 31, 2011
Card Club - Blue Bird

 I started with this great blue bird. It's really a post it note I bought a Michaels a while ago. I selected a white card with designer paper that coordinated with the tone of the blue in the bird. I trimmed that and glued it to the card front. I cut the leaves and the branch with the Cricut - Straight from the Nest p.42. It allows you to cut the branch then you can cut the leaves seperately in a different color and then glue them over the ones cut with the branch. Very cool! I placed my bird over the 3rd leaf on the branch. Some of the girls turned the branch around and placed the bird in the dip on that same end of the branch. Works well. I cut the wing with the Cricut - Create a Critter p.45. Once cut I embossed it with the Cuttlebug Devine Swirl folder. I glued the wing to mirror the sweep of the bird's tail. A beak defined with a white gel marker. A white brad for the eye. I used this in my All Occasion Class in April with a different sketch. Check it out. The Cricut Create machine allowed me to Auto-fill a full 6x12 page of wings. Cut 23 in one shot. That comes in handy with classes.
Card Club - Jumbo Flower

 I started with an off white card to coordinate with the dots in my polka dot paper. I trimmed my paper and glued it to my card. I cut the flower with a QuicKutz die. It cuts all three pieces in 3 different colors. In the end I chose blue, white and yellow because the red in the flower did not match well with the background paper. I embossed the large flower with large polka dots and the centre with the small Swiss Dots folder. The leaf was cut with the Cricut - Create a Critter p.61. I taped all my flower pieces together on the back before I adhered it to my card. One could put double-sided tape on the card then lay the pieces one at a time onto it starting with the centre. Some girls added white gel marker detail to the leaf. I've added a sample with the white card and white gel marker.
Card Club - Damask Button
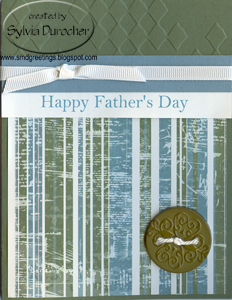
 This one was the Father's Day option. I started with always artichoke card and embossed the top 1/4 with an Cuttlebug embossing folder. I cut my designer paper to 4x4" and glue it to the bottom half of the card. I layered my greeting and the blue accent strip together then glued these both to the card between the embossing and the DP. I placed a slit in the card fold with an Exacto knife just wide enough to allow the ribbon to be pulled through. I placed the ribbon across the card, leaving enough ribbon to tape the ends to the inside card I cut the leftover off (about 2"). Once the secured on the card just tie a knot with the same piece onto the long piece and it makes a quick bow very easily. I put white cotton yarn through the holes in the button then applied a Zot to the back and mounted it in the bottom right hand corner. I offered a Happy Birthday greeting with this set.
I also made a kit with cranberry cardstock with floral paper for those that did not want a Father's Day card.
Card Club - Lady Bug

 We had our last Card Club of the season last night. We had good discussion and got our cards made.
I started with the lady bug accent I purchased a while back. It combines dark pink, light pink, kraft and an oatmeal color. So the kits reflected those colors in it's various parts. Some kits had light pink cards, some dark pink like this one, some kraft.
I cut a piece of light pink cardstock to 51/4x 2 1/8" and embossed it with the Sizzix Tropical Paisley folder. I then cut a scallop border with a border punch. The glued the scallop border to the embossed layer so I could position it where I wanted then glued it to the card front. I then folded my ribbon in half and placed the fold over the place where the light pink, kraft border met and I stapled it. Fold the ribbon in half then trim the ends you will get this nice v effect. I then mounted my lady bug accent with 3D foam dots to raise it above the staple. Glued my insert to the inside card front.
Monday, March 28, 2011
Card Club - March - Leaf Trio
 I designed and color printed my greeting which was printed to match the card on a neutral cardstock. I then punched three 13/8" circles in the card color and three 1.25" circles in the neutral color. I then used the Sizzlet Little Leaves die in the card color. I trimmed the neutral piece to leave a small border all the way around. Glued to card front. I then glued my three colored circles above the greeting. Then the three neutral circles. I then cut the little leaves branch into 3 different leaves and adhered those in the centre of my neutral circles. This design is so versatile. I made some in blue with white, brown with cream, purple with white. I designed 4 different greetings as well. Great card!
Card Club - March - Felt Flower
 I really like the punchy color of these flowers. I found them at a local craft store. I chose my card to match the flower color. Then I embossed a layer with a Cuttlebug embossing folder, which was trimmed and glued to the card. I used hot glue to adhere the flower and leaves to the card. I added a short orange ribbon to the wire stem. Tah Dah! Easy!
I had pink ones, turquoise ones and white ones. For the white ones I left the white embossed layer with the orange ribbon worked quite well.
Card Club - March - Button Flowers
 I designed the three flowers in Corel Draw. I printed the greeting and flowers on one quarter sheet of white cardstock. I cut the blue scallop border with my Die-namics die. I trimmed both to leave a small border of card. I trimmed the greeting from the remaining piece and glued it left of the blue border. I added my white ribbon across the stems of the flowers. I adhered my 3/8" pink buttons with small Zots to the centres of my flowers.
Again, a lot of color combinations. Red flowers with blue centres, yellow flowers with purple centres, and blue flowers with red centres.
Card Club - March - Tulip
 I decided to make tulips for Card Club this month. A few girls will want Easter cards so I started with two designer coordinated sheets of paper. I selected a card that worked with the DP. I cut the flower with my Cricut from green card stock. I traced the tulip onto another paper and cut it out and glued it over the flower. I cut the greeting from the other sheet paper. I glued a contrasting strip of paper under the greeting strip and used a couple of brads to highlight the words.
 The non-Easter ones feature the same layout except I replaced the greeting with a coordinating ribbon. I have torn the top edge of the purple strip then tied the white ribbon around the card front and knotted it just off centre.
Subscribe to:
Posts (Atom)