Showing posts with label Watercolor Wonder Crayons. Show all posts

Saturday, December 2, 2023

Christmas Cards - Watercolor - Siblings

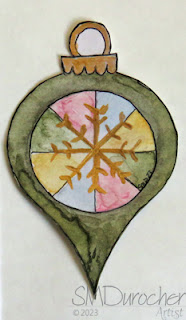
I made some special watercolor ornaments to put on my siblings Christmas cards this year.  This is the first year that Mom and Dad are both gone. We are getting together early December for a get together which is close to what would be Dad's birthday. 

This is an ornament I designed myself.  You can read more about the process here.  The ornaments were cut out by hand.

All the designs were hand drawn then I used a permanent black marker for all the outlining.  

I used my Stampin Up Watercolor Wonder Crayons for all the painting. The background is watercolor paper with a mixture of Always Artichoke and Garden Green.  I painted a wash on a couple of 9x12 sheets of wc paper.  I made it a bit darker at the top and lighter at the bottom. I did put salt on but it was not wet enough to produce much of an effect. When dry I added a spatter of Always Artichoke.  Once cut to the 4.00 x 5.25 inches I pained the branch and I spattered the pieces with Always Artichoke. 


The ornament has a Bethlehem Star in the night sky colored with More Mustard.  Some Elegant Eggplant and Night of Navy for the sky. On the snow banks in the foreground I used Marina Mist for the wash and Night of Navy for the contours.  Always Artichoke for the tree.

The card base is Elegant Eggplant.


A full moon in the night sky.  The moon is colored with Daffodil Delight with a light wash of Night of Navy for the sky.  I drew a house on the hills with was colored with Ruby Red and More Mustard for the windows.  Elegant Eggplant for the hills.  

The card base is Ruby Red.


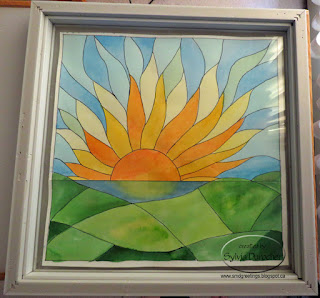
This one features a sunrise which I had experience drawing when I did my glass art piece for the window a couple of years ago.

The sky is a light wash of Tempting Turquoise with the sunrise rays being first wash of Daffodil Delight, then More Mustard closer to the center then Tango Tangerine at the center. The hills are a combination of Garden Green, Always Artichoke. 

The card base is More Mustard.


I decided on a water theme for this one and drew a light house.  The sky is a light wash of Tempting Turquoise.  The lighthouse and rocks are done with a light wash of black gouache. The sea is Night of Navy.

The card base is Basic Grey.


This one here is a Christmas flower but I would not go so far as saying a poinsettia.  It turned out like a sunflower in the shape.  The ornament is Tango Tangerine wash.  The flower is a mix of Ruby Red, Bravo Burgundy and Cherry Cobbler.

The card base is Ruby Red.


This one features another Bethlehem Star in the night sky.  The star is More Mustard with a light wash of Marina Mist for the sky.  The mountains are 3 gradient washes of Elegant Eggplant.  Tiny black marker dots in the sky with a touch of More Mustard.

The card base is Elegant Eggplant.


This one features a large star in the center of the ornament.  I did trace the shape from the Stampin Up Star thinlit set, using the smallest one.

The star was washed in Daffodil Delight all over then one half of the points was painted with More Mustard. The ornament is a dark wash of Night of Navy.

The card base is Night of Navy. 

Friday, November 24, 2023

Christmas Cards - Watercolor Ornaments - Process

I decided I wanted to make some special cards for my family.  I wanted to use watercolor and ink. What to make? I considered using die cuts so that I would have a framework to work within.  I did get rid of quite a few so I had to investigate what I had left.

Gingerbread - nice size but not enough artistic options

Snowman - too big and limited artistic options

I have quite a few ornament dies.  

Some too big.  These don't leave any room for a branch or other thing to have the ornament hang.


Others too small.  Not enough to stand alone, then I could make 3 three but that is 3 times the painting and design.  Are they all the same color and design? 

This one is one of the Stampin Up Keepsakes Ornaments as are the 2 small ones above. 

I could have used the three different ones but again a lot of decisions to make and designs to come up with.  

It was very cute.

I decided to use a permanent marker instead of the dip pen because I had watercolor containers, several brushes and several palettes out so I could have easily dip the wrong tool into the wrong liquid.


This is the Sizzix Ornament #2 die which was the right size. It had a nice hanger. 

It had this bump below the round part and here was my first attempt.  I did not like to highlight it by tracing it with the marker. Then it should be shaded to make it look nice.


I could cut the bump off as you can see in this photo.  Yes, that was better.  I was inclined to create the main part of the ornament as a circle which would limit my options.


Then, I remembered that I had designed a digital ornament quite a few years ago. You can see it in this post.   I decided to pursue this option.      Pros: Using my own design was a great idea.  It meant I could size it exactly the height I wanted. It had a hanger. Cons: I would have to cut them out myself.  I decided that would add to the handmade original feel.
I traced the shape onto my nice mixed media paper with a pencil.  I then cut them out and then added the black line with the marker. Eventually, I learned it was better to do the line first then erase the pencil lines and then cut out the shape.  Here is one of my rejects.  I was not happy with the green watercolor on the outside, the circle limited my designs, then I used acrylic gold to try and save this one and I was not happy to mix mediums.
After a lot of trial and error I finally found a process that worked for me. I wanted to put these ornaments on a green watercolor background then onto a card base.   I had problems with the green watercolor layer as well.  I used salt to create texture but it must not have been wet enough so I got very little of it. This is one of my cards.  I'm not sure about just having it stuck there.  It should have a connection but I don't what it will be. Should it be a bow? a ribbon?  Would have been better to think of that before I adhered it.  We shall see what I come up with. 
Friday, November 3, 2023

Card - Birthday Balloons

A balloon birthday card for a boy having a celebration this week.

I watercolored a square of mixed media card stock with Not Quite Navy from the Stampin Up Watercolor Wonder Crayons.  Let that dry and pressed flat.

I cut the balloons with a thinlet die which has not brand name on it.  

The paper is paste paper with glitter that my sister and I made years ago. Love the bright colors.

I adhered these to the watercolor with 3D foam tape. I added bright green strings and a SU Artisan Label punchie greeting the same color as the card base.

I added a quarter sheet insert and a quite envelope. 

Love how the sun through the lace curtains adds something to the photograph.

Wednesday, August 9, 2023

Card - Watercolor - Barn

I made this card for an aunt who celebrates her birthday in August.

I cut a piece of 90lb watercolor paper to 4.25 x 6.25 inches and taped it to my hard board.

I found a couple of graphics on line with elements I wanted to use. Specifically, the barn and the fence.

I used my Stampin Up Watercolor Wonder Crayons.  I started with a light wash of blue in the top third and a light green wash on the bottom.

I drew the composition by hand with a pencil adding the elements from several inspiration images. I had to dry it several times between layers of color. I did use a fine black marker to add some definition to most of the objects.

The card base is A7 (5x7) in Stampin Up Barely Banana which worked well with the colors in the painting. I just adhered the watercolor layer with double sided tape. A white insert was added to the bottom half of the card with a white envelope.

Note to self: Lighten your pencil marks before painting.  The barn is not wide enough. Remember to use your grey marker instead of black. 

Thursday, July 6, 2023

Cards - July Birthdays

 This is a birthday card for my sister who celebrates a birthday this month.

I chose a piece of watercolor paper I colored up a while back with playing with my Stampin Up Watercolor Wonder Crayons.  It was 9x12 inches.  I chose to cut it with the Tim Holtz Vintage Cabinet Card.  I mounted a layer of silk flowers filling in the top half circle of the die cut. I chose a large oen with warm toned ends, then a pink organza one and then a small ivory one all held in place with a gold mini brad.

I added a pink Modern Label punchie topped with a Word Window punchie with the greeting.  This was adhered below the flower on the diecut with 3D foam tape.

The diecut was adhered to the Lucky Limeade green A2 card base.

A white quarter sheet insert was added to the inside.

With the other half of the watercolor sheet I cut a Tim Holtz Cameo Frame. 

I chose to highlight the bit of yellow towards the bottom of the diecut and so cut big H and B with the Stampin Up Typeset Alphebet dies in Crushed Curry.

I traced the rest of the words with a More Mustard marker.

I added 2 gold glitter star brads to the left of the B.  The diecut was then adhered to the Lucky Limeade card front of with 3D foam tape.

A white quarter sheet insert was added.

This is for my nephew whose birthday has already passed but that's okay I was in touch by email.

Tuesday, January 24, 2023

Thank You Cards

I made some Thank You cards for the folks who gave me Christmas Gifts.

I was blessed with many less formal things this year such as tourtiere making with my aunt, a wonderful Christmas dinner with family, a Facetime session with Mom when she was in hospital.  Tea with my friends which gave us a chance to catch up.

I used a 9x12 inch sheet of water color paper from the pad I received from my sister. I taped it to a stiff plastic and used my Stampin Up Wonder Watercolor crayons to just smush it with color.  Once it was dried then I cut it into 3 inch squares.  

I selected my card based on the primary colors on that particular piece of watercolor.  In the top card I chose Perfect Plum as the base and printed some flag greetings to match.  I fussy cut the greeting. I adhered the piece of watercolor to the card, added the stitching and trees with a small brush, adhered the greeting with 3D foam tape then spattered the whole card with some of the watercolor I had used.

This card is has the same parts as the one above but I chose Really Rust as the card base, I use a marker to add a flower on the watercolor square, and the square was adhered on a diagonal. 

It's great to put together one large sheet of water color and get a bunch of different colored and oriented cards from it.

These could also have been placed in the tall or portrait orientation. 

Maybe the next set.

Tuesday, November 1, 2022

Christmas Card Challenge - Watercolor - Doves

I created watercolor backgrounds with the intention of using these dove brads for this set of cards. The watercolor has a bit of salt technique.

The doves come in right and left facing styles. I used a Sakura GellyRoll Stardust - Clear Star gel marker for the olive branch.

The circle behind the dove is a 13/8 inch circle punchie.

The greeting is a color printed double flag end banner I designed.

This card is Stampin Up Elegant Eggplant which is a deep rich purple color.  This card is in the landscape orientation.

On this card I used Stampin Up Primose Petal for the card base as I did not have any Rose Red card stock.

The circle is Rose Red.

The greeting is also Rose Red and I chose Peace on Earth in various fonts.

You can see the Sakura Gelly Roll Stardust - Clear Star gel marker on the image on the right. 

It just adds mostly sparkle with little colors so it works well in many situations.


These watercolor backgrounds were created with the Stampin Up Watercolor Wonder Crayons which makes it easy to match to the card stock.  

This card had lots of salt action on the color.

The card base, the circle punchie and greeting are all Marina Mist on the left and Always Artichoke on the right.

Saturday, October 1, 2022

Christmas Card Challenge - Watercolor - Ornaments

Another set of watercolor Christmas Cards. 

I wanted a branch with an ornament.  I put a wash of Old Olive green in the top right hand corner blended softly to the center and left hand side to suggested more tree.  

Once that was completely dry I drew my line for the branch with a pencil.  I worked with Always Artichoke, Old Olive and More Mustard. It was really hard to be loose and let the needles go willy nilly but it worked. 

Then, when the branch was dry I drew the ornament by hand with a pencil. I filled the ornament with Tempting Turquoise and Night of Navy. Card is Marina Mist. I added another layer of wash on the right hand side to suggest light from the left. 

I did the hanger with a very thin brush and Payne's Gray also lining the outside of the ornament.

On this card I used Elegant Eggplant purple color on the ornament with the same general steps for the branch.

I ended up with a harder high light spot on the left hand side which works better.  The darker side on the right hand side does not seem to be as dark as I intended.  Watercolor is sometimes hard to judge as it dries lighter.

I have used the color of the ornament to add spatter to the layer.

The card stock used for these ornaments is the back side of the Foil Joy cards I did last month.  It was a textured linen card stock.  I think it worked with the watercolor pretty well.


On this card I used Rich Razzleberry pinky purple for the ornament.

The pieces of card stock were trimmed to 3.75 x 5 inches before I started painting. They warped a little so needed to be steamed and pressed to flatten.

The ornament layer was adhered to the card front with 3D foam tape in the corners and a bit in the center.

I did add my signature on the original art after I photographed them for blogging.

Seasonal inserts and white envelopes have been added to the mix and they are sitting in the box for December 1st.

The color is Stampin Up Watercolor Wonder crayons and coordinating SU card stock.

Sunday, September 11, 2022

Fall Leaves Birthday Card

Another watercolor card.  This lady is a warm colors lovers so I decided on fall leaves for the image on the card.

I found several fall leaves line drawings on line then created an image which I drew in pencil.

I then used my Stampin Up Watercolor Wonder Crayons to produce some colors for these leaves. Bravo Burgundy, More Mustard, Cajun Craze, Always Artichoke featured in the colors.

I placed a wash of color from the reds to greens to yellows on the 140lb watercolor paper.

The leaves are red with a mixture of some of the other colors.

I mixed some Payne's Gray and some left over color to do the lines in the leaves and tracing the outline of the leaves.

Once the watercolor was dry, I chose a Soft Suede card base in A7 size (5x7) and adhered it to the card front with 3D foam tape.

The greeting is SU Artisan Label punchie color printed and backed with a More Mustard punchie cut in half and glued offset on the back.  It was then adhered to the card front with 3D foam tape.

Thursday, September 1, 2022

Christmas Card Challenge - Watercolor - Silver Foil Joy

I had some small Christmas note cards featuring a wreath and Joy in silver foil on white card.

I decided to trim the card front off and water color the background with the Stampin Up Watercolor Wonder crayons.  I left the center of the wreath white.

On this card I used Tempting Turquoise with salt.  Once it was dry I trimmed it a wee bit. I added the TT Thread with a large round silver brad to hold it in place aligned the left hand side.

I adhered it to the Tempting Turquoise card base with double side tape.

This card features the same silver foil wreath with the Old Olive watercolor. 

This one was just a basic wash on the background again leaving the inside of the wreath white.

I found some coordinating round sequins in my stash and mounted them with tiny silver brads.  I chose some green and some silver.

The watercolor layer was adhered to the Old Olive card base with 3D foam tape.

A seasonal insert with a white envelope completes the card.

For this card I used the Brave Burgundy watercolor and created a gradient wash with it being light at the top and darker at the bottom.  I actually painted this upside because it works better to start dark and add water as you get lighter.

I chose 4 large silver star brads for this card.  I put them in the four corners.

I adhered the greeting layer to the card front with 3D foam tape.

I made 2 of each color so I have 6 more cards in the Christmas card box.

Friday, July 1, 2022

Christmas Card Challenge - Watercolor - July - Holy Family

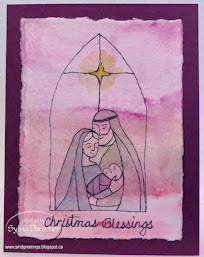
I chose the Holy Family for my July Christmas cards.

I selected certain elements from the Gentle Peace digital stamp set.  The set is stained glass but I just used the arch background, the star and the family. 

I first trimmed the 140lb watercolor paper to 3.5 wide and just applied watercolor from the Stampin Up Watercolor Wonder Crayons.

I let that dry overnight so that it would remain flat.  I trimmed the long strip into pieces 4.75 inches tall.

I placed the watercolor paper over the black printed image and traced the pieces I wanted.  Let the black ink dry then watercolored the pieces I wanted.  Mary, Joseph and baby Jesus with the star. The background changed some of the colors but that is okay.

I traced the greeting as well which I printed in black.  Card one is Not Quite Navy card base, card two is Baked Brown Sugar base, card three is Always Artichoke and card four is Rich Razzleberry. I mixed and matched greens for Joseph`s garment, blues for Mary`s and purple for royal Jesus.


I adhered the watercolor accent to the card front with double sided tape and pressed them under a stack of books over night.

I added a quarter sheet insert with a seasonal appropriate sentiment and a white A2 envelope.

 
I  have lost count of the number but I am happy with my progres

Friday, June 17, 2022

Watercolor Cards - All Occasion

I needed a  few cards for upcoming birthdays so I decided to follow the trend of my Christmas cards and make them with watercolor.

I searched the internet for simple floral images - bouquets so that I could see how the stems interacted, etc.

I trimmed my 140lb water color paper to 3.5 x 3.5 inch squares.  Loosely following the compositions I found on line I drew flowers with a pencil.  Once I was happy with it I traced the pencil lines with black permanent marker again making adjustments if needed.

Once the ink was allowed to dry a bit I erased the pencil lines and was left with the black lines.  I used my Stampin Up Watercolor Wonder Crayons to match my card bases.

I chose flowers which were non specific so I could paint them any color, rather than recognizing the flower and saying that must be pink or whatever.  I also added some spatter of each color to tone down the white of the paper.

For the first card the flowers are a pale version of Rich Razzleberry and Garden Green for the leaves on a Pixie Pink card base.

Card number 2 is Elegant Eggplant card base with Old Olive for the stems.

Card number 3 is Marina Mist card base with Always Artichoke leaves and foliage.

I chose Mellow Moss grosgrain ribbon wrapped around the front of the card with the ends taped under the watercolor accent.

The floral watercolor is adhered to the card front with 3D foam tape. 

I decided to go with no greeting so I can use it for any occasion. 

Quarter sheet insert on the inside with A2 white envelope and 3 more cards ready to give.  One for my aunt, one for my sister and one for Mom.  I still have a couple of sisters who have birthdays this summer.  Another session to follow soon.

Friday, April 1, 2022

Christmas Card Challenge - Watercolor - Dot Wreath

I chose to use my Stampin Up Watercolor Wonder Crayons for this month's Christmas Cards as that is the card stock that has not been packed.

I used Arches Watercolor Cold Press Paper.

I started with a light pencil circle mark.  I sprayed my crayons. I mixed Always Artichoke and Garden Green for the green dots, Cherry Cobbler and Real Red for the red ones and Not Quite Navy and Night of Navy for the blue ones.  I applied the dots with the end of a cotton swab which I wet then dabbed into the colors. 

I drew a bow towards the bottom of the wreath with a Micron black permanent marker then filled it in with a bit of the red paint.

The greeting was traced with the black marker using the window as a light box.  I just printed several greetings on a quarter sheet of white paper.


I added a few stars with the black marker to balance out the shape.

The piece was then spattered with colors used in the card front but somewhat diluted.

I chose a Not Quite Navy card base.  I adhered the wreath watercolor to the card with double sided tape, added a quarter sheet insert and pressed them to ensure all the pieces stick together.

I am taking advantage of some down time now to get ahead  with this project so when the move comes I don't have to worry as these will be scheduled to arrive on time.

Wednesday, October 27, 2021

Stained Glass - Sunrise

I've always wanted a stained glass piece for my window and thought it would be a nice retirement gift but it did not happen.  So I decided that I would pursue the idea and see where it led.  In my mind I see a colorful image casting beautiful colors on the wall and ceiling, almost sparkly.

First, I had to decide what image did I want?  Sunflowers are a favorite but I chose a sunrise as it represents a new beginning, hope, and a look to the future.

Second, research as to what a piece would cost, which window would work best, and would it do what I wanted.

Third, a trial run - how? I found a site that provided a video on how to create a piece of faux stained glass art and a few steps with easily found supplies. At Art Emporium the Faux Stained Glass video used basic school glue and acrylic color to make an art piece.  

Frame-  I found a white frame in my stash that did not have a mat and was quite large measuring  16.5 inches square so it likely would not be used in my photography.  It also had words on the glass that I removed with a razor blade.  Cleaned the glass thoroughly.

I needed some original art now so I browsed online sites with stained glass sunrise projects and after looking at hundreds I started to have an idea what mine would look like.  I did not want the pieces to be too bulky or too simple.  Remember I want lots of color.  


I drew the first sketch - sun off center, water and hills in the foreground.  I did not want straight lines like in the little one drawn below the sketch. 

This one was drawn at 7 inches square.


I traced it onto not the best watercolor paper and used my Stampin Up Watercolor  Wonder Crayons to color it.  I loved the colors but I stumbled with getting a variety of shades of green in the hills.  Of course, a real stained glass piece will not be a shaded as this one.

I asked a few folks for some feedback. 

I recognized that I had a hard time drawing the secondary rays on the left hand side.  Someone suggested that I copy the image and put then flip it so I could roughly follow what I did on the right on the left.

The hills were too similar and did not have enough pieces.

Ok, I can work with that.


So with that feedback I started on the second sketch.  This one was also at 7 inches.  

I now had light yellow pieces on the left hand side as well and more pieces in the hills.

I marked out the which rays would be Orange, Yellow and Light Yellow.  I wanted green blue and blue in the sky pieces.

Happy with that so lets move on.


Now it had to be enlarged to fit the frame I described above.  The glass could not be removed from the frame so I would have to be painted and leaded in place.  Because of that I chose to keep the design from going all the way to the frame.  That meant I did not have to touch the frame with the leading.

I enlarged it to 14 inches square and decided to put a frame around the edge which would leave about 1/2 inch between the wood frame and the lead frame on the glass.  Excellent.

Another suggestion was made that I paint it in the colors I was planning on using in the final piece just to be sure I was happy with it and still had a chance to adjust if needed.

So I traced the 14" piece onto some Bristol Vellum heavy card stock which was leftover from an art class I took years ago.  It had to be pieced together just like the sketch was earlier, to be large enough.

I sampled the liquid acrylic colors I had and made some selections.

The colors chosen are listed below:

Nick Bantock - Chrome Yellow, Deep Turquoise, Prussian Blue, Sap Moss Green, Chartreuse

Daler-Rowney FW Acrylic Inks - Flame Orange, Rowney Blue


Here's the Bristol Vellum piece all colored in. The yellows in the first row of rays are not all the same color.  I was just enjoying the process.  

I will be able to mix colors in the final product as well.

Of course, it will be more watercolor in tone than a glass piece will be.

I am happy with the hills this time in shape and color.

I used a Sharpie black marker with a fine tip to do the black leading on this piece.


Now I can get ready to transfer the image to the glass in the frame.

I placed the frame over the painted piece of Bristol Vellum and taped it carefully in place.  I will be putting the black leading on the glass surface on the inside of the frame. 


I chose Pure Black by Folk Art for the acrylic paint.

I reused at glitter paint bottle with a fine tip.  The black leading is mixed 1 part black acrylic paint and 4 parts white glue.  Test it to be sure it flows nicely so you can easily draw your lines.

I traced the black lines on the glass following the  drawing above.


You will see from the photo on the left that I put the art on my light table so that I kept the composition in the same direction as the original so when I flipped the frame back to the front it would be same as the original art.

Once the black leading was applied it needs to dry completely before you paint your color.  The video recommended overnight.  I painted my lines in the early morning and by the late afternoon they were dry and I could move on to the color.  The fun part was beginning.


I used some condiment cups to mix up my clear glue and acrylic color.  A cup for each color.

I applied the glue with a small wide craft brush and made sure I rinsed thoroughly before moving to the next color.

Then I followed my color chart from earlier and painted the sun and up then from the horizon line down to keep my hand and fingers away from my finished work.  

I let that dry over night.   


I discovered that I missed the top right most space when I was painting.  I did paint that several days after it was hung.


The next morning all was dry so I put the eye screws in the top middle of the width of the frame.  I chose wire to ensure it could carry the weight.  I have a second curtain rail so I slid a hanger onto the rail and screwed it tight. I then placed a carabiner between the wire and the hanger.  

I hung it in the window and waited for the sun to shine.  It took 3 days to have the sun shine and for the colors to be on the walls of the living room.

I was not anticipating it being so random as to when I would see the colors sparkling.

Of course, looking out it looks really nice but when the sun shines it is great. 


Another down side is that the sunshine only shines for a limited time through the window and the stained glass.  So I have to be around and paying attention to see the sparkle for the 10 minutes it is on the wall before it moves off the the book case.

In this photo the image is half on the wall and half on the side of the book case.

It took over a month from start to finish.  

The costs in materials was minimal. School glue on sale in early September. Liquid acrylic I already had. And my time.

Thanks to the artists who provided feedback and support during the process.

This was a great learning experience. Drawing, mixing colors, and sticking with it.   The biggest thing I learned is that I want sparkle all the time or when I need it not just when the sun shines in the window.  I am so glad I did not invest hundreds of dollars to learn this lesson.  I will enjoy it when the sun shines.

So, I have started another project to get the sparkle all the time or at least when I want it!  More to come on that project in days to come.