Showing posts with label royal blue. Show all posts

Friday, May 23, 2025

Slow Stitching project - May - Tiny Fabric Book

I wanted to add a small fabric book to my slow stitching project in which I would write my favorite authors.

I started with a dark blue piece of fabric paired with a bit thin blue fabric. I handstitched the outer edge and turned it right side out. I top stitched the outer edge to close the slot used for turning.

I cut a piece of white cotton for the pages on the inside. Finished it measures 2.75" x 2.25 inches.

I spent quite a bit of time thinking about how to get the words in the book.  I knew I was not stitching them.  I investigated adding sizing to the fabric allow me to hand write the words. Finally, I decide to use freezer paper on the back and a Micron black marker. That worked really well. I then hot ironed the white cotton to set the ink.

I added a small elastic closure on the right hand side and a tiny blue button on the front cover to hold the book closed. 

This book was stitched onto my books square for the May slow stitching project I am working on. 

Tuesday, October 17, 2023

1 of a Kind - Tree Scent Oranments - Set 3

Another set of these very cute Tree Scent Ornaments.  These can be used to give your artificial tree a scent.  Choose your favorite Christmas essential oil and apply 1 or 2 drops and enjoy.  

Here I have grey felted wool to which I have added royal blue blanket stitch on the top and bottom edge.

I had stitched white snowflakes around the middle.

The top features white felt circle and a grey button.

The hanger is the royal blue thread in 6 ply.


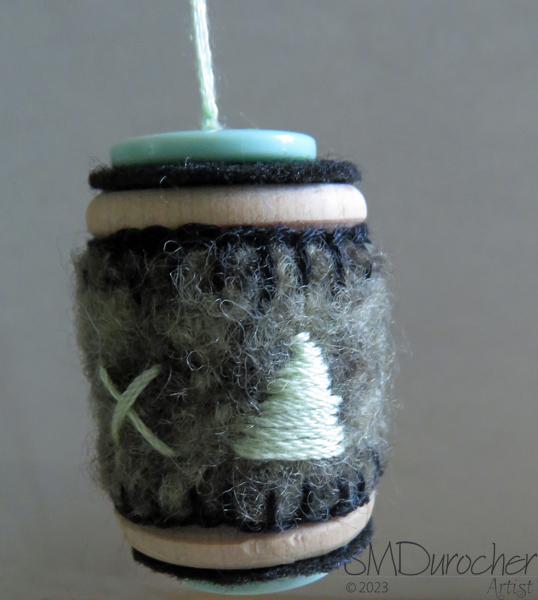
This felted wool makes me think of woodsy so I put small triangular trees on the middle panel of this ornament.

I chose black embroidery thread for the blanket stitch around the top and bottom edges.

The top features a black felt circle and a medium sized button.

The hanger is 6 ply embroidery thread in the same color as the tree on the wool panel.


A Bumble Bee colored ornament.

It features the ivory and black felted wool panel around the middle of the ornament. 

I use golden yellow embroidery thread for the embellishments.  The blanket stitch on the bottom and top edges.

I followed the fabric pattern with cross and dash stitches.

The top features a black felt circle with a golden yellow button.

Embroidery thread in 6 ply for the hanger.


I put white snowflakes on this woodsy felted wool panel.

I used chocolate brown thread for the blanket stitching along the top and bottom edges.

The top has an ivory felt circle cut the the SB Nestabilties smooth circle die - the smallest in the large set.

Topped with a brown button and brown embroidery thread hanger.


Another daisy on this grey houndstooth wool fabric panel.  

I did triple fold this fabric and stitched the ends to ensure no unraveling of the ends.

I chose pink thread for the daisy and the dashes in the middle.  Same for the blanket stitching along the top and bottom edges.

Charcoal grey felt circle at the top cut the the nestabilities die.

Topped with a pink medium sized button.

Pink 6 ply embroidery hanger.

This is the last set for this year.  I learned a lot in the process.  I got some feedback that they could be a popular item.  Let's hope so.

Sunday, October 8, 2023

Calendar - Countdown - Simple Bethlehem


Frames: I used discontinued Tolsby 4x6 frames from IKEA for this calendar.  It the past I have packed these in plastic and decided not to this year.  That created some issues to overcome - mainly how to store the marker and ensure it does not disappear while on the craft table.  I created a clear plastic loop which I adhered to a piece of white 4x6 card stock with clear tape.  I then used silver glitter washi tape to make it pretty and visible. I also used a piece of clear tape to hold the marker to the frame until it is purchased. I had thought of using bubble tea straws for the loop but I mislaid them so I had to just move ahead. With the new by-law these may become a thing of the past.

Markers: The first set of markers I purchased did not have erasers included.  I spent a day spinning ideas about making dry erase board erasers and just decided to buy markers with felt erasers attached. Having to do it again I would have searched for all black markers. Maybe that is not so much fun for the kids which is the whole point.

Images:  I have designed quite a few digital Christmas cards in the past so that was pretty easy to mine my archives to find images.  Also did a photo shoot of Christmas images you can see here. Birthday is a completely different story so I just resorted to using scrapbook designer paper with banners for that side.

Tags:  I made up 2x2.75 inch tags that document the way to use the calendar. I attached the tag to the base of the frame since I decided not to enclose these in plastic.

The Bethlehem image used here is one I created digitally a while ago.  It has been created with a light blue oval background. I have used it in several projects over the years.  Here I designed a 4x6 photo with the digital Bethlehem add the words "Days until Christmas" then had the photo printed.  The challenge is to have a place light enough that the numbers will show up. The birthday side is bright designer paper in red with royal blue balloon punchies with black strings. 

Tuesday, September 25, 2018

Shirt - Craft Cover or Apron

Upcycled another men's shirt into a garment that would work as a craft cover, a smock apron, or a extra layer for any reason.  It provides excellent protection for your clothes.

This was a navy 100% cotton Eddie Bauer shirt in XL.

I cut the neckline into a V this time as this is a bigger size and a larger person may need a big more room.

I cut the sleeves off leaving the seam intact with the garment.

I used the one long sleeve to make the waist ties and the other for the large patch pockets. 

I chose royal blue double wide bias tape which I added to the neck line, the arm holes and the slant edge on the patch pockets.

I attached the ties at the waist on the sides of the garments. They are 40 inches long each.  It allows the ties to knot in the front or the back.

The patch pockets were placed on the front either side of the button front about waist high and top stitched.

The back is left plain with the hanging loop added just below the bias tape.


All my aprons have hanging loop which allows it to be stored on a hook or peg. All the stress points are reinforced and the tie can be tied at the front or the back.
Another one done for the sale.

Saturday, September 22, 2018

Potholders - Flat

This is my standard 8.5 inch flat potholder with a 1 1/8 inch borders which have been stitched to the center 7.5 inch square. 

It has a center loop with top stitching very close to the edge to seal the gap where I turned it over.  I then added another close to the other edge.

To create my center stitching I used my 1 inch border chip board pattern piece and placed it along the edge had my sewing machine foot follow the other edge.

I chose some manly fish fabric for this set of flat 8.5 inch potholders. 

I paired it with an aqua 100% cotton for the back.  They had the 1 1/8 inch border.

Center hanging loop.

I changed up the center stitching and created a quarter circle from paper which I followed with my machine. I love that they intersect at the edges.  I'm glad it did not overlap the main fish too much.


I loved this bright church fabric with silver metallic lines and wanted to maximize it's use so I cut the center square smaller so I could get 3 sets of potholders.  With the wonderful colors in this fabric I will be able to pair it with several different colors.
This time I chose the royal blue but I had to widen the border to accommodate the smaller center. The borders 2 inches wide and I was able to get away with top stitching on the close edge and the far edge also did the center stitching. Excellent.

This fabric as really fabulous so I wanted to see a lot of it so I decided to make the whole in stars.  I paired it with the same royal blue from the previous pair. 

It needed a bit of a focal point on the front so I created a silver rick rack onto a royal blue strip which I stitched on before I assembled the potholder. 

The center stitching was just triangles below the accent strip. 

Less fuss on this set of potholders.

Tuesday, November 28, 2017

Thank You Cards

I made thank you cards for the ladies who made it possible for me to have this opportunity to facilitate this card making session.

I started with a red foil flower cut with the same set as used in the large cards - Sizzix Flower #2 combo die and embossing folder. 

I mounted my flower onto a pea green card base.  I added the gold fabric snowflake in the center and held these in place with a tiny gold star brad. 

The greeting was color printed on vellum and embossed with gold powder.  The edges were ripped top and bottom and it is held in place with the same gold star brads. 


This card is using the more traditional colors of a deep green card base with the same red foil poinsettia flower.

The brads are mini brads in shiny gold.

Same thank you on vellum embossed with gold.

I chose the star for this one and cut it from non shed gold glitter card stock and embossed as in previous postings. 

It is held in place with a royal blue star sequin and a tiny gold star brad.

The greeting has only the top ripped and the bottom straight edge was aligned with the bottom of the card.  Gold embossed vellum.

I really appreciated this opportunity exposed some folks to card making and allow them time to spend time together keeping their hands busy.


Thursday, June 23, 2016

Graduation Card - Sunburst

I made this card for my niece who is graduating from high school this year.

I started with a royal blue card. I then cut 2 pieces of card stock to 4.00 x 5.25 inches, one white and one yellow.  I cut the yellow one with the Stampin Up Sunburt Thin Die and layered it onto the white one.  Once adhered together this layer was adhered to the card front. I created a graduation cap by punching 2 squares 1.50 and 1.25 inches with my Creative Memories Double Square punch.  I layered the blue onto the larger black.  I created a tassel with yellow crochet cotton. I held in place on the hat with  a tiny white star brad.  I punched a SU decorative label the royal blue card color and added a SU Word Window greeting in yellow.  These were adhered together then adhered to the card front with 3D foam tape.

Monday, June 6, 2016

House Cards

I created these cards for a monthly card exchange group.
I had cut a couple when I made this card so I chose to use the second one here.   The front layer was cut from white cardstock with the Folk Art Festival cartridge and the Cricut.  I cut the shadow from royal blue card stock.  I then layered a piece of red behind the heart and yellow behind the windows.  I created a hill with some green card stock which I just cut free hand.  I punched the sun from yellow using a circle punch and placing only a corner of the piece in the punch.  It needed something and I considered spattering but could not decide on a color so I chose pencil crayons instead.  I added some depth to the green hill and pulled some grass growing from it.  I created subtle clouds in the sky with grey and blue.  Pulled some sun rays from the yellow sun in the corner.  I added a bird in the sky with a black fine tip marker.

For this card I had printed this crooked house clip art which is available for free on several websites. I colored it digitally then printed it. I fussy cut around the edge leaving a narrow white border.  I create a grass layer with some ripped card stock which I glued down and trimmed to the card edge. I punched a sin with a circle punch and adhered it in the top left hand corner.  I created a sidewalk to the front door with a piece of white card stock cut by hand.  I adhered the house over the sidewalk. I pulled out the pencil crayons and added some depth.  Yellow sun rays from the sun, smoke from the chimney in grey, cloud was grey and blue, green grass growing up and a subtle image of a tree on the right hand side with green and brown. The embellished white layer was adhered to a navy card base which matched the house roof.

These cards are headed to their new homes today.

Saturday, June 4, 2016

New Home Card

I'm visiting my aunt's new home today so I made a card for her.  Things are getting unpacked and sorted out.  She says she feels at home in the house and the province which is very good.

I started with the Folk Art Festival cartridge and the Cricut.  I cut the fancy house at 3 inches in white and the shadow in royal blue.  I cut the greeting layer 3.75" x 5" from white textured card stock and I printed it with the colors I had chosen in mind.  I adhered a bit of red card stock behind the heart and then adhered the white house to the blue shadow.  This accent was then glued to the card front with 3D foam tape.  The full layer was then adhered to the card front. 

Wednesday, June 1, 2016

Decorative Paper - Set 2

For this card I used heavy decorative paper made with alcohol inks and Future floor wax. I cut the quarter sheet with the Creative Memories circle cutter using the largest circle and the red cutter.  I rubbed the edge with a blue ink pad to get rid of the white edge.  I adhered it along the left folded edge of the blue card and trimmed the top and bottom to the card edge.  I created a slit in the fold to pull through a length of white 1/4 grosgrain ribbon.  The ends were taped down on the inside of the card. I then cut a shorter piece which I tied onto the first piece and trimmed the ends with scissors. I added silk flowers one white, one blue on the bottom third of the card just inside the curve. These are held in place with a tiny white brad to which I added a small flower sequin.  A card ready for any occasion.


This card is shares the same layout as the first one.  This time the colors a quieter. Mauve and turquoise onto a white background. This one was photo paper so was much easier to cut.  The same white grosgrain ribbon across the top.  A white then a purple silk flower on the accent with the same flower sequin and tiny white brad. The card is turquoise.


This card again is set up in the landscape/wide orientation.  I used my large greeting layout with Rose Red for the printing.  I punched the Stampin Up 1.25" circles from the ink background paper and the larger 1 3/8" circles from a deep rose solid card stock which matched the greeting. I selected a light blue card with coordinated with the blue in the decorative paper circles.  I generally  adhere the right then left then just place the center one leaving even spacing.

Monday, March 21, 2016

Card Club - March - Pick Up Truck

I wanted a card for guys.  I chose this striped designer paper in some great colors.  I chose cards in green as show, royal blue and a deep orange. I adhered the striped paper to the card front. I created the banner with the Stampin Up Triple Banner punch.  The white strip is 1" and the blue one is 1.5 inches.  Once they were adhered together I placed it on the card front and trimmed the top end to the card edge. I then adhered the pick up truck image to the navy blue layer. This was then adhered over the banner. I placed 3 sticky embellishments on the right hand side. 

Card Club - March - Sunburst Birthday


I started with a royal blue card.  I cut the background red checkered gingham designer paper at 4.00 x 5.5 inches leaving the small border.  I adhered it to the card front. I cut the warm yellow sunburst with the Stampin Up Sunburst thin die and adhered it to the card front and trimmed the rays to the edge of the card.  The greeting is a combination of a scalloped circle in the same color cut with the Spellbinder Nestabilities Large Circle set - No.2 from the centre.  The greeting is color printed the punched with the 1 3/8 inch Stampin Up punch.  These are glued together then the greeting is adhered to the card front with 3D foam tape.

Tuesday, February 24, 2015

Beauty & The Beast - Thank Yous

I made a couple of these cards to thank my sister and the lady responsible for the tickets for The Beauty and The Beast.  I'm grateful for the opportunity to see live theater and it was a great performance. Check my original posting here.

I started with a royal blue card which I stamped with one of the Stampin Up Itty Bitty Backgrounds in a royal blue ink.  I photographed the rose which everyone in the audience received.  I applied a couple of photo filters and printed and cut it out with one of the smooth round SB Nestabilities.  I cut a piece of white in the corresponding scalloped circle nestie.  I rubbed the edges of the smooth circle with the same royal ink pad. Once glued together I adhered the element to the card front with 3D foam tape.  I added a red cotton ribbon across the bottom 3rd of the card.  I put a slit in the fold so I could pull the ribbon through and tape both ends to the inside of the card. I used a printed sentiment from my stash and rubbed the edges of the SU Decorative Label punchie.  It is also mounted with 3D foam tape.