Showing posts with label Swiss Dots. Show all posts

Wednesday, April 16, 2025

Cards - I Win - Glitter Butterflies

I continued with the glitter butterflies today.

I chose a Stampin Up Glorious Green A2 card base.

I added 3 blocks of striped glitter designer paper and adhered them with double sided tape.

I added ribbon antennae and mounted it with 3D foam tape. 

I mounted the circle greeting just below the butterfly creating a cohesive focal element.

Added a white quarter sheet insert.


I created this card with similar supplies as the card above.

I adhered a strip of glitter striped designer paper to the top of the landscape (wide) orientated A2 card.

The glitter butterfly received its antennae of satin ribbon then was mounted with 3D foam tape along the bottom edge of the striped paper.

I punched a Stamping Up Decorative Label punchie from the striped paper then cut it in half to mounted the halves offset on the left and right.  Those were glued to the greeting punchie then the full element was mounted to the card front with 3D foam tape.

A white insert was added.

I chose SU Island Indigo as the card base for this set of cards.  Cut to A2 sized card.

I mounted a SU designer paper from the Adventure Bound DSP pad.  Trimmed to leave a small border and mounted to the card front.

I put a strip of Whisper White card stock through the Big Shot with the Swiss Dots folder and mounted that to the DSP.

The butterfly got white cotton thread antennae and was mounted with 3D foam tape.

The SU Small Oval punchie greeting was adhered with DS tape.

A white insert was added.
Another Island Indigo card base with the Adventure Bound designer paper in beautiful blue tones.

I used a SU script folder with the writing going horizontally for this card as it was in the landscape (wide) orientation.

I glitter butterfly has white cotton thread antennae and is mounted with 3D foam tape.

The SU Small Oval punchie greeting coordinating color was adhered with double sided tape.  A white insert was added.

This will be headed to my sister's this weekend and will be in then next batch of cards for IWin charity.

Monday, January 22, 2018

Card Club Kit - Set 3 - Card 3

We may need a baby card sometime during the year.  I create a gender neutral card by using green. 

I started with a stack of handmade paper flowers in a mint green color. I chose a card in same color to keep the color scheme monochromatic. I cut leaves with the Sizzix Leaf Stem medium die from card stock with is slightly greyer in tone to provide a bit of contrast. 

I embossed a white piece of card stock with the Cuttlebug Swiss Dots folder.  I adhered it to the card front which leaves a small border.

I placed the largest flower on the left hand side of a wide card and used a push pin the create the hole in the card front for the brad.  I stacked the white sequin, white flower, then 4 handmade paper flowers from smallest to biggest onto the mint green tiny brad then put the prongs through the hole. Inside the card I pressed the prongs apart. 

I added length of white grosgrain ribbon on the right hand side.  I cut a slit in the card fold and pushed one end of the ribbon through and taped it down the inside. I pulled it down the card front and wrapped the other end to the inside of the card and taped that one down. 

The greeting was color printed in the same color as the leaves on white card stock and was punched out with the Stampin Up Curly Label punch.  I applied some 3D foam tape pieces to the back and adhered it over the white ribbon to the right of the flower.

Tuesday, October 17, 2017

Decorative Paper Cards to the Gallery

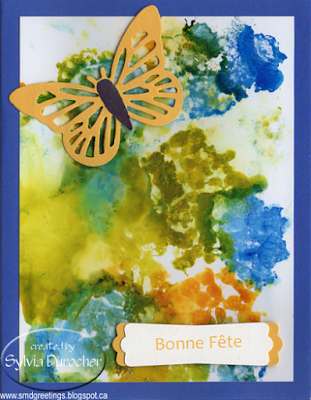
I love the colors on this decorative paper too.  It's so much fun to make and each piece is unique so not easily replicated when it turns out so well.

I trimmed the decorative paper to leave a large border on the royal blue card base.

I die cut a yellow butterfly with the Sizzix Winged Beauties framelit set.  I used a navy marker to color in his body.  It was adhered to the card front with 3D foam tape.  I turned up it's wings a big to add more dimension.

I chose a french greeting for this one the same yellow.  It was printed and punched with the Stampin Up Modern Label punch.  I punched another from the same card stock as the butterfly. I cut it in half crosswise and glued each half offset to the right and left sides.  It was adhered with 3D foam tape as well.

Another card which would do nicely for a male recipient.  I chose a pea green card.

I cut the decorative paper to leave a small border on the card.

I adhered with quick dry adhesive the 3 gears. The are layered with the largest first and the others over the first.  It nice to have them related to each other.  These were cut with the Tim Holtz Gadget Gears die in 3 colors - rust, pea green and true blue.

I added 3 gold square brads in the bottom right hand corner to add some dimension.


My wedding cards sell well at the gallery so I chose to make another.

I selected a white card and adhered to the front a piece of bubble paper featuring teal, purple and green.

I punched a white heart with the Stampin Up Sweetheart punch and embossed it with a Cuttlebug Juli's Garden.  It was adhered to the card front with a white brad to which I added an iridescent flower sequin.

I punched birds with the Stampin Up Bird Builder punch. One teal one purple. I added white wings embossed with the Cuttlebug Swiss Dots folder. The birds were adhered with 3D foam tape. I added white branches to ground the birds.

The card has 2 "Congratulations" greetings included one in each French and English. They were punched with the Modern Label punch and will fit nicely between the ends of the branches below the birds.

Wednesday, October 11, 2017

Exchange Cards - October

I took this card kit from Card Club and adjusted it.

My sister made a similar card here which is my inspiration.

I embossed white rectangles with the Cuttlebug Swiss Dots and the Devine Swirl embossing folders. I glued them in opposite corners onto the bright green card.

I glued the postage to a piece of vellum then this accent was adhered to the card front with 3D foam tape.


Another card kit from Card Club.

I ripped the vellum to separate the vellum greetings.

I attached the vellum to the black card front.  I then adhered the gold foil stickers to a teal card stock then punched them out. 

These were adhered over the edges of the vellum strips.

These cards are headed to my card exchange partners.

Monday, November 23, 2015

Card Club - November - Cute Snowman

I started with the felt snowman sticker.  I chose the royal blue card to match his scarf.  I cut a piece of white to 4.00 x 5.25 inches and embossed it with the Cuttlebug Swiss Dots folder.  I created the greeting tag in the red and royal blue colors and colored printed it.  I trimmed it with scissors to the border and punched a hole at the top to hang it.  I wrapped a piece of red string around the embossed layer several times and knotted it.  I then added the tag and tied a bow.  I removed the release paper from the snowman sticker and adhered it to the card front in the bottom left hand corner.

He sure is cute!!

Sunday, April 12, 2015

R2G Card Kit - SU For You Scallop

Another couple of kits for tomorrow.
I started with a Stampin Up Night of Navy card.  I cut a piece of Prints Designer Paper in the same color to 3"T x 4" W.  I cut a piece of white card stock to 2.25"T x 4" W.  I embossed this piece with the Cuttlebug Swiss Dots folder.  I then tape these together and trimmed as needed to create a layer which leaves a small border.  I created a strip of olive paper .75"T x 4"W, which I adhered over the join of the embossed/DSP layer. I then assembled my greeting by adhering the greeting to the olive circle then that to the scallop circle.  I cut a piece of 3D foam tape in half lengthwise and placed behind the scallop.  Removing the release paper I attached the greeting over the olive strip on the left hand side as shown. 
The other color in the kit is Rose Red.

Tuesday, July 9, 2013

Challenge - Color Combo - Green Black Peach

I created this card for the challenge at CST which is a color combo.  I chose Peach, Green, Black from the 6 options.
I started with a green card onto which I added a black layer leaving a small border.  I chose a peach colored layer which I embossed with the Cuttlebug Swiss Dots folder. I found a piece of warm colored leaves designer paper which I cut down to 2.5" wide and then I flagged the bottom end.  This was glued to the embossed layer.  I cut a CB oval ribbon slider in the same card stock as the card.  I added a 1" circle greeting which was stamped with Versafine Onyx ink with a small clear stamp then punched out.  I ran the slider onto a piece of 3/8" black grosgrain ribbon which I wrapped around the peach layer and taped the ends to the back. 

Sunday, July 7, 2013

Upcycled - Peach Roses

I created a set of 4 cards by upcycling a large card.  I die cut the flowers with a Spellbinder smooth oval die and then cut a scallop oval to match from the coordinating green card stock.  I selected some peach card stock and embossed it with the Big Shot and the Cuttlebug Swiss Dots folder.  I added a piece of white seam binding across the centre and taped both ends to the back, leaving a bit of slack to allow me to tie the short piece on with a knot.  I mounted the oval rose accent with 3D foam tape.

Friday, April 5, 2013

Card - Epoxy Sticker - Happy Birthday

I made this card for a friend's birthday today. 
I started with a Baja Breeze card.  I added a piece of gold glossy card stock which I embossed with the Cuttlebug Swiss Dots folder.  I adhered it to the left hand side of the card. I cut flowers from white mulberry paper and I layered 2 of the large ones from Sizzix Flower Layers #2.  I mounted an epoxy sticker in a coordinating color in the centre of the flower.  I added a color printed greeting which was punched with the SU! Decorative Label.

Saturday, March 16, 2013

R2G Card Kit - Felt Reindeer

Here's another Ready 2 Go Card kit.  This time a sparkly reindeer.  I matched the card to the reindeer then added a white embossed layer done with the Cuttlebug Swiss Dots folder.  I added a glitter paper snowbank.  The centre star holds the reindeer onto the card with a tiny silver brad.  The other stars were spread into the sky. A push pin to make a hole through the card front then the brad is inserted and the prongs are spread on the inside of the card.  The set includes black, green, white and red reindeer. 

Monday, October 22, 2012

Card Club - October - Pinwheel

Tonight is Card Club and we are making another set of occasion cards.
I selected my papers for the pinwheel then decided on a black card.  I used a pattern created by my sister for the pinwheel. You will find the pattern here. I punched my squares with a punch which made them 1 3/8". I printed the pattern ensuring that the squares were that size.  This pattern works very well! Thanks Therese.  Once I had the pinwheel assembled I embossed a white layer with the Cuttlebug Swiss Dots embossing folder. I then glued the pinwheel to the top and I wrapped a piece of 1/4" black gross grain ribbon around below it.  I glued this assembled piece to the card front.  I added the button to the centre of the pinwheel with a Zot.  I glued the Word Window greeting to the Modern Label then adhered it over the ribbon with 3D foam tape.r

Tuesday, October 27, 2009

Card Club - Oct - Embossed Foil

I bet you would not guess that the accent on this card is recycled foil. I had the girls at work saving the foil from applesauce and yogurt containers for my class. They were wondering what I was up to. I cut the foil with my Sizzix circle die and the cardstsock circle with my Creative Memories circle cutter. They were glued together. Then the circles were embossed in a small Cuttlebug embossing folder. Works very well and looks great. The greeting was stamped below the accent. The strip was embossed with the Swiss Dots folder.