Showing posts with label DSP. Show all posts

Tuesday, September 9, 2025

Card Making - Card Sets Continue

Still working with the Friends and Flowers Simply Scrapping Kit. 

The card base color is Certainly Celery. I added a layer of vellum from the SU Botanical Garden Vellum 6 inch pack. Using the large orange flower stickers in the kit I was able to add double sided tape to the back of the vellum to ensure it stayed in place. The photo corners are stickers from the scrapping kit.  Left Tempting Turquoise and right Only Orange.  I added small leaf stickers to both cards. Again, I am alternating the orientation to ensure variety. 

There is a lot of stuff in these scrapping kits. 
Here the card base is A2 and the color is So Saffron. Left is turquoise floral desinger paper with yellow scallop stickers above and bellow the square sticker. I added the same DSP over the square and then a yellow flower sticker onto the DSP.  The other has a turquoise square sticker and the same floral DSP. Another smmal flower sticker.

White quarter sheet inserts and white envelopes. 

Monday, February 24, 2025

Cards - Charity

Three more cards for IWin.

The designer paper is Stampin Up Painted Blooms. Nice watercolor design.

I chose SU Lucky Limeade A2 card base for this card.  I added a piece of DSP trimmed to leave a small border.

I adhered the glitter butterfly to 100lb card stock then cut the oval with the Creative Memories cutter.  I added a border of Thalo Blue watercolor pencil then brushed it with water brush.

I created a greeting accent with a Modern Label in blue and taped a Word Window greeting to it.  

I adhered the oval accent to the card front then added the greeting with 3D foam tape.

This card base is SU Summer Sun in the A2 size.

A layer of floral designer paper adhered to the card front.

I adhered the silver glitter butterfly sticker to a piece of vellum trimmed to leave a large border.

I added a Not Quite Navy card stock strip along the top attached with 3 silver brads. 

I added the round greeting in the top right hand corner with 3D foam tape.


On this card the A2 card base is Always Artichoke.

Trimmed another piece of designer paper to leave a small border.

I adhered the butterfly sticker to a piece of Regal Rose card stock then trimmed it with the CM oval cutter.

I added an Always Artichoke mini brad to the head of the butterfly.

The greeting is a combination of a Modern Label Punchie and a Wordl Window greeting.


Friday, September 20, 2024

Cards - Christmas SC Botanical

I thought I would use my SU Window Frame thinlits.  I was able to use the largest one!

A piece of Soft Sky as background with a strip of Chocolate Chip just off center.

The WeR Wildflower - Botanical DSP was cut and adhered with points instead of square. I added a Chocolate Chip smaller one with a gold square on that.  

The central element is from the SU Keepsake Ornaments digital set which I colored with Chocolate Chip and Soft Sky. It was color printed onto ivory card stock then punched out with the 2" circle punch. Adhered with 3D foam tape.

White insert and dstape with carrier on the flap.

I got carried away on this one.
The Botanical DSP as the background, then the largest Window Frame from Soft Sky card stock, then a gold square measuring 3 inches adhered with 3D foam tape.

Then I cut a green frame by placing 2 dies on my magnetic mat and adhered that to the gold.

Then another square this time in Soft Sky adhered with 3D foam tape then finally the 2" focal element adhered to the square with double sided tape.

A white insert and a ds tape with carrier on the flap.


The botanical DSP as a background again.

I cut the Chocolate Chip with the TH Vintage Cabinet die and adhered it to the DSP.

I cut the Soft Sky with the TH Mini Cabinet Card which I wrapped with Chocolate Chip ribbon onto which I had sewn a Soft Sky button.  It was adhered with 3D foam tape

I added an Old Olive paper clip with bow onto the right hand side.

White insert and ds tape with carrier on the flap.


Saturday, October 14, 2023

Sticky Note Holders - Photos

I decided to make Sticky Note Holders as small gifts this year.  I wanted to use photos if at all possible.  I did some brainstorming with my sister and came up with this idea.

Square photos I have!

I had sticky notes in blue, green and pink so I selected my photos based on those colors.  I choose flowers but also other stuff from my previous nature photo calendars. 

I chose designer card stock in smooth colors so that it would not clash with the photos.

I designed my photos with a black border all the way around wider than I need it.  I printed two 3x3 photos on a 4x6 with Christmas greetings in the extra inch.  This will allow me to trim the photos as I see fit and not worry too much about whether the border is same on each photo.

I decided to go with a pocket design so the front would be clear of any closure.  This makes the most of the photo on the front.

I did end up adding a tab to the back sheet cause in some cases it was a bit hard to pull the sticky note out of the pocket.  

This also ensures that the sticky note is always put into the pocket sealed side first which is the tightest.  Once a few sheets are taken it will be easy to pull the pad from the pocket.

I used my Stampin Up Round Tab punch.  Punched the shape from the scraps, scored it down the middle, tape on both sides, aligned to the edge and press down. 


Turns out the tab should be in the center which makes pulling the pad out even and therefore easier.  Some are not quite in the center.

It looks very nice.

When the sticky notes are gone you can just add another pad onto the last sheet and start all over again.

This holder makes having notes handy in your purse or briefcase.  It keeps the note corners square, the notes stuck to the pad, and easy to find.


It looks nice on your desk by providing a pretty something to look at instead of boring notes.

It took a couple of tries to get the box right.  The bottom tabs need to fold from side to bottom.  If the tabs are folded bottom to top they interfere with the sliding of the pad of notes in the holder.  I had to sleep on that problem but woke up in the morning with the best way to make them.

Having a score tool was essential for this project. The bottom tab is 3/8" as that is the width of the pad. I used quick dry adhesive to glue all the tabs.
It took a bit to find a way to add just a bit of looseness.  I added a smidge on the side scores which allows just enough space.  I glued the box with the pad inside to that I could adjust a very bit when I glued the side tab.

I used double sided tape to adhere the trimmed photo to the holder front.

Saturday, January 7, 2023

Set of Cards and Greetings

I made a set of cards for my niece as a gift.  I chose designer paper and coordinating card bases.

The first 2 are the paisley paper with Kiwi Kiss, Soft Sky and Chocolate Chip bases with strips of Early Espresso and Choc Chip.

The bottom left and right are Basic Gray card bases with a coordinating designer papers. Featuring punched white card stock panels.  The punch is the Martha Steward Arche Lattice.


The top right is Old Olive card base with a coordinating designer paper with a ripped white card stock panel.  

The right is Groovy Guava card base with designer paper in soft warm blues and a ripped panel matching the card.

The bottom left took a while to figure out but found the card base needed to be Summer Starfruit. The designer paper is the same with the left strip turned to the other side. 

Middle right is a burgundy card base with a coordinating designer paper with a ripped white card stock panel.

The bottom right is Old Olive card base with striped designer paper with a ripped navy card stock panel.

The greetings included birthday, thinking of you in the colors of the cards I had made.

I added a pack of 3D foam tape to adhere them where ever on the card front she decided to use them.

The shapes included tags, circles and banners.

I hope she and her family will enjoy giving these cards throughout the year when special occasions arise and time is short.

This allows for a handmade card on a quick turn around.


Saturday, July 2, 2022

Exchange Cards - July - Chrome Circles

I had these chrome circles with flowers inside in my stash.  I believe they are old earrings (when big earrings were a thing).   I have clipped off the hanger with my wire snips.

I punched a 2 inch circle from coordinating card stock which in this case is Garden Green.  I placed it behind and pushed holes through for the mini brads. 

I chose a card base of Bashful Blue and scored it to create a tall card standing with fold at the top.

I wrapped Early Espresso seam binding around the card front and taped ends on the left hand side.  I adhered the metal circle with 3D foam tape over the place where the ends were taped.

I added strip of designer paper along the bottom edge of the card.  

I chose an oval color printed greeting to match the card color and adhered that with 3D foam tape.

This card is just a swap of the Bashful Blue to the Garden green for the card base.

Bashful Blue 2" circle behind the chrome accent with mini brads in Bashful Blue, Garden Green and Early Espresso.

They are finished off with a blank quarter sheet insert on the inside with a white envelope.


Wednesday, September 1, 2021

Exchange Cards - Blue Wash

I am using up supplies from old kits.  I had the blue card base, the white silk flower, the metal flower, the brad and silver ribbon.  

I needed a new background and some sort of greeting.

I found a couple of pieces of the Blue Wash designer paper which matched the Brilliant Blue card base so that was trimmed to leave a small border.

I taped the ribbon to the back and across the front and again to the back. I found the greeting in my Stampin Up box.  I aligned the flowers to the left of the greeting and adhered these layers together.  I then adhered this layer to the card front.   I then trimmed the greeting to the card edges with scissors.


I used similar supplies for this card. 

I needed a flower diecut which had 6 petals. After perusing my stash of dies, I used largest flower from the Sizzix Flower Layers and Leaves die and some heavy card stock.   I colored it with a bit of Brilliant Blue reinker in watered down and brushed on.

I added the ribbon across the designer paper and then adhered the three flowers with the tiny brad over the ribbon. 

I stamped the greeting on the same heavy card stock, ripped the top edge and soften it with a bit of water. Adhered with double sided tape.

These are headed out to my exchange partners.


Friday, August 7, 2020

How To: 12x12 Splattered Decorated Paper

I'm finding it harder to use scrapbooking 12x12 paper for my card making.  I want original and unique paper.  I have so many sheets of designer paper so why wouldn't I use some of that to make something new rather than using plain white card stock to start with?  I went into my stash and chose patterns that I have lots of or that I am not too thrilled about. 

I chose the tools of the trade which are a collection of various paint brushes and tooth brushes.  

Some acrylic paint with a couple of plates to use as palettes.  A spray bottle to thin the acrylic paint.

I chose several sheets of designer paper.  I covered my kitchen area with a blue plastic sheet to prevent splattering the nearby surfaces.   You can see the before and after pictures below.  I just loaded my paint brushes with color and flicked the brushes toward the paper.


To the left are the 4 sheets that I decorated.  I think the light sheets have been very effective.  The orange and yellow ones I am not sure they are as effective. 


This new interface for blogger - I had to make sure that I chose a placement then I could have my text go beside my images.

Resizing is better and more adjustable.

Labels are a nightmare!  It is very slow and eventually it did not find labels which I know are there.


Thursday, March 19, 2020

Farewell Card - Painted Blooms

A card for the lady who started the Welcome to my Kitchen fellowship group.  Nine of us met at her house in the fall of 2015 and brain stormed the mission, the activities, and division of responsibilities. It has been a huge success.

We have been going strong for nearly 5 years which means it is meeting a need.  I took charge of the group in 2016 when she needed more time to spend with her elderly mother.

This card is half sheet size so there is enough room for all the sentiments our ladies want to share.

I started with a 8.5 x 11 sheet of Stampin Up Soft Sky card stock which was folded in half.

I chose a sheet of the SU Painted Blooms designer paper - cut to 5.25 x 8.25 inches and adhered to the card front.

I placed a white paper doily in the bottom left hand corner, glued it down and trimmed it to the edge of the card.

I added a grosgrain ribbon in Rose Red wrapped around the card front along the fold and knotted.  Trimmed the ends.    I placed a circle of the same card stock over the doily and trimmed it again to the card edges.   I printed a sentiment banner in Wild Wasabi and Rose Red which I fussy cut to the border.  It was adhered to the card front tucking the left hand end under the ribbon.

Monday, July 30, 2018

Gift Box of All Occasion Cards - Donation

I made a gift box of all occasion cards for an upcoming charity event.

I included 12 cards with white envelopes with blank inserts.  A few have greetings but most can be used for any occasion.

I started with a black card base.  I cut a 6 inch circle with my Creative Memories Cutter.  I then cut the circle in half.  I aligned the straight edge to the right hand side of the card and adhered it to the card front.  I trimmed the top and bottom of the half circle to the card edge.  I used the wonderful music designer paper.

I added a black die cut flower and then a metallic Prima and a small black die cut one.  These are held in place with a mini gold brad.


This is a similar card with the straight edge on the left hand side this time.

I aligned 9 handmade paper flowers by Prima in warm tones along the curved edge.  I alternated the colors from tan, ivory and a rosy taupe color.

They are held in place with a tiny copper brad with a small black sequin in the center.

This card features polka dot designer paper by Fancy Pants Designs - Like Father Like Son - Stud Muffin.
I ripped the right hand side of the designer paper then adhered the straight side to the left hand side of a forest green card.  I added a piece of celery grosgrain ribbon wrapped around the card front and knotted it.

I created the greeting accent with a warm green scalloped circle, topped with a 1.25 circle of the same color as the card, then a 1" circle stamped greeting in chocolate brown.


With the wonderful colors in this designer paper several options were possible for the car color.  Here I have selected a terra cotta colored card base.  I ripped both edges then adhered it to the card front.  I wrapped a piece of celery grosgrain ribbon across the front of the card and taped the ends on the inside of the card.

I created an accent with a scallop circle, then a blue smooth circle then 2 layered butterflies.  I held these pieces together with a white tiny brad. The accent was adhered to the card front with 3D foam tape.

Very similar cards with the half circles on the left edge then the right hand side.

An accent was created with silk and handmade paper flowers.  This is  held in place with a green mini brad.

I added a grey knitting ribbon wrapped around the card front and knotted on the front.  I added a few more from my stash to make a total of 12.

Monday, May 29, 2017

Card Club - May - Stars for Dad

This was the Father`s Day card in this card club.
I started with a black card. I cut a piece of designer paper by Rusty Pickle - Game Time - Run It.  This is the back side which looks like wood grain. This was cut 4.00 x 5.25 and adhered to the card front leaving a small border. 
The sun burst is a thin die from Stampin Up.  I love this one.  It was cut from bronze heavy text weight paper which was larger than the A2 card front.  I used Scotch Quick Dry adhesive for this task. Once adhered to the card front the rays were trimmed to the edge of the card.  
The stars were cut from taupe card stock and the same heavy text weight bronze paper with the Sizzix Star 2 die which has 4 different sized of stars.  The large taupe star was adhered to the center of the start burst.  The greeting had the right hand end flagged then adhered to the center.  The bronze medium and the taupe small stars were adhered together.  This accent was then adhered over the large star with 3D foam tape.  The greeting can easily be left out or adhered on the right hand corner.

Friday, October 14, 2016

Christmas Cards - Peace On Earth

I added some cards to my Christmas box this week. 
I created this Peace on Earth graphic from several elements.  The large greeting I found on a free vector image site.  I modified it to my needs.  I added a earth to the bottom edge of the vellum. It is a map of North America which I found at Brian Jones Design.  As you can see I`m just using the very top of the image. 
This design was printed on a quarter sheet of vellum in a light grey color which was them embossed with silver powder. It was then trimmed to 3.75x5.00 inches.  
I chose a designer paper with a forest theme with pine trees which was cut to 4.00x5.25 inches.  I picked a pea green textured card.  The designer was adhered to the card front then the vellum was aligned and 2 tiny brads were placed in the bottom corners. 
Then the dove brad was placed above the word of Peace. 

I now have 103 Christmas cards.

Wednesday, August 24, 2016

Snowflakes - Winter's Butterflies

I put these cards together the other day.  I need to add cards to the box so 2 more is good thing.  I have 93 card in the Christmas box.

Light blue textured card stock.  A four inch square of designer paper featuring a winter blue design.
I printed the snowflake greeting on vellum and ripped the top and bottom edges. Trimmed it to the width of 4 inches like the DSP.
It is held in place at the top of the card with a star brad with a snowflake confetti on the left and a tiny round white brad on the right.

Monday, August 1, 2016

Christmas Card Challenge - Aug - Light Blue / Winter

I chose designer paper - Snowflakes by Recollections purchased at Michaels. I cut 2 sheets of the paper into 4 x 5.25 inch pieces.  I chose the one with dark snowflakes for this set of cards and coordinated it with card teal card stock.  I adhered it to the card front leaving a small border.  I then printed the greeting on vellum and clear embossed it.  It was cut to 1.25 inches tall and 5.25 inches wide.  I placed a white snowflake confetti to the left and held it, the vellum to card front with a tiny white star brad. I added a tiny white round brad on the right hand side to keep it from shifting.
This is a great card to make in volume.  I made six of these for my card box.

Sharing with Christmas Card Challenges - #34 - Anything Goes

Monday, June 20, 2016

Card Club - June - Polka Dots Birthday

I chose a kraft card.  I matched it with polka dot designer paper which was cut to leave a small border.  I cut an ivory greeting label with the Stampin Up Apothecary label.  I then stamped the greeting from the For a Friend stamp set with a warm green ink pad.  I pulled the caramel seam binding ribbon through the holes of the label and wrapped around the DSP layer.  I placed 3D foam tape behind the label and attached to the DSP layer leaving enough ribbon on the right to make a bow.  I adhered the DSP layer to the card front. I tied the bow and trimmed the ends with scissors.
Saturday, December 19, 2015

Challenge Card - Paper Garden

I made this card for a challenge at Paper Garden. They are running a 2015 Holiday Card challenge.

For my card I started with an olive green card.  I chose the BoBunny Blitzen Sentiment paper which coordinated well with it's vintage feel.  I chose to repeat the word idea and decided to cut a word for the accent. I wanted to highlight the warm blue color in the DSP so I chose Stampin Up Blue Bayou card stock. I cut an oval with the SU Sizzix Ovals die (retired). I then aligned it with the Tim Holtz WISH Mover Shaper magentic die and cut the word from it.  I then cut an identical oval from ivory to back it.  I adhered these together with quick dry adhesive.  I then cut a scallop oval from warm red card stock with the Spellbinder Nestabilities - #4 from the small oval set.  The wish accent was glued to this layer.  I applied 3D foam tape to the back.  I cut a piece of the same card stock as the card to 4.25 x .75 inches.  I placed 3 lengths of ivory cotton thread across it and taped the ends to the back.  I then adhered it to the card front. I adhered my WISH accent over the strip aligned to the left.  I tied a trio of short lengths of ivory cotton in the space I had left next to the red scallop oval. I trimmed the thread ends even. 

Check out the cards submitted and vote for your favorite.

Friday, December 18, 2015

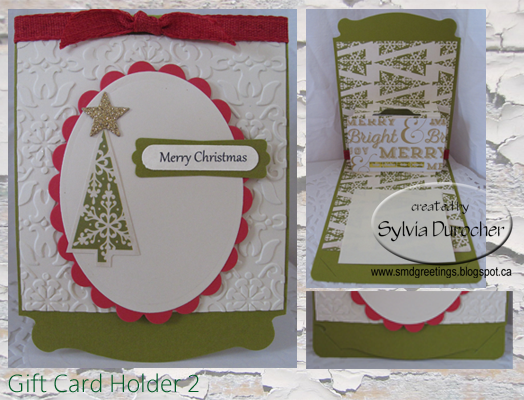
Gift Card Holder - Version 2

Another Gift Card Holder still using the Stampin Up Card Base Pop'nCuts die.  I cut this one from a Dill card stock. This time I used the Sizzix Pop 'n Cuts Magnetic Insert Die - Suitcase, 3-D (Pop-Up) for the inside.  I cut a piece of designer paper with triangle trees on it.  It was trimmed to 9 inches tall and 4 inches wide.  I trimmed the suitcase handle off with scissors. I chose this insert die because it was so close to the size of a gift card. The gift card is held in place with a Zot.I've added a sticky note for my sentiment which will allow it to be reused.
The front has a piece of ivory card stock embossed with the Stampin Up Vintage Wallpaper folder.  I adhered that to the card front then added a red cotton ribbon along the fold.  I cut a red scallop oval with Spellbinder Nestabilities then a smooth oval with the corresponding die.  I cut a triangle tree from the scrap of the designer paper.  Added a gold glitter star cut with the Sizzix Star die.   A SU Modern Label punchie with the Word Window greeting punchie. Not sure the straight edge of the embossed layer is the best but I will continue to tweek the design.
Again, the fact that the card keeps itself closed with the tab/slot is great.

Friday, November 6, 2015

Ready2Go Card Kits - SU - Good Cheer Tree

This card kit features paper from the Stampin Up Be of Good Cheer Designer Paper which includes Cherry Cobbler and Gumball Green.  Using a CC red card base I added a Distressed Dots background to the card front.  I layered a piece of 2 x 5.5 inch designer paper across the center of the landscape card.  I layered my Festival of Trees in Gumball Green stamp with it's accent dots in Cherry Cobbler done on Very Vanilla onto a layer of green leaving a small border.  I cut a piece of Satin Stitched ribbon in the color to match the card, placed it behind the accent then adhered it to the card front as shown. 
 

Thursday, September 3, 2015

Gift Card Holder - DSP 12 inches

I'm working on tri-fold Gift Card Holders.  I started with 12 x 5.5 inch piece of double sided card stock.  I scored at 4.25" then flipped it and scored just shy of 3.5".  This allows the front to be just a bit wider than the second panel.  I chose a pretty paper and added a square of teal, a Stampin Up Window Frame diecut in purple and a greeting from Stampin Up Just Thinking set.  I chose a ribbon that pulled another color from the paper and added the ribbon to match.  The ribbon holds the card closed.  I placed a quarter sheet insert on the center panel for the personal message.  I then added a white envelope on the last smaller panel to hold the gift card.  The variations of this card is limitless!!

Wednesday, July 29, 2015

Majestic Tree

I created this card for someone celebrating a birthday this week.  I started with a Stampin Up Crumb Cake card stock piece.  I selected a piece of DSP from the Adventure Bound  Paper Stack and cut it to 3" square.  I stamped onto it a tree from the Lovely as a Tree stamp set in black. I added a layer of Basic Black card stock cut to 3.25" square.  I stamped the greeting from the Itty Bitty Banner stamp set in black on the same colored card stock. I then die cut it with the corresponding framelit.  I cut another one from black, cut it in half crosswise and adhered it to the back offset on both ends. I stamped a bit of washi tape from the Tape It stamp set in black on the card front before I adhered the tree layer.
I think I was too tentative with my stamping and they should have stuck out more but such is life.  I adhered the greeting to the card front below the tree layer with 3D foam tape.

Submitting this card to the following challenges:
CAS Colours & Sketches #134
City Crafters Challenge - Masculine Card