Showing posts with label exchange. Show all posts

Friday, November 8, 2024

Needle Case for Floss Organizer

I made a needle case for one of my sisters.

We had supper on Thursday night as we both headed to meetings in the evening.

We had talked about organizers for embroidery floss a while back and she found one in her de-stashing. 

I exchanged 10 applique pins. I bought a box of 150 so I could easily let a few go.

I needed to transport them safely so why not make a quick needle case. I included a needle as well.

The alcohol ink is packed so it had to go as it was.


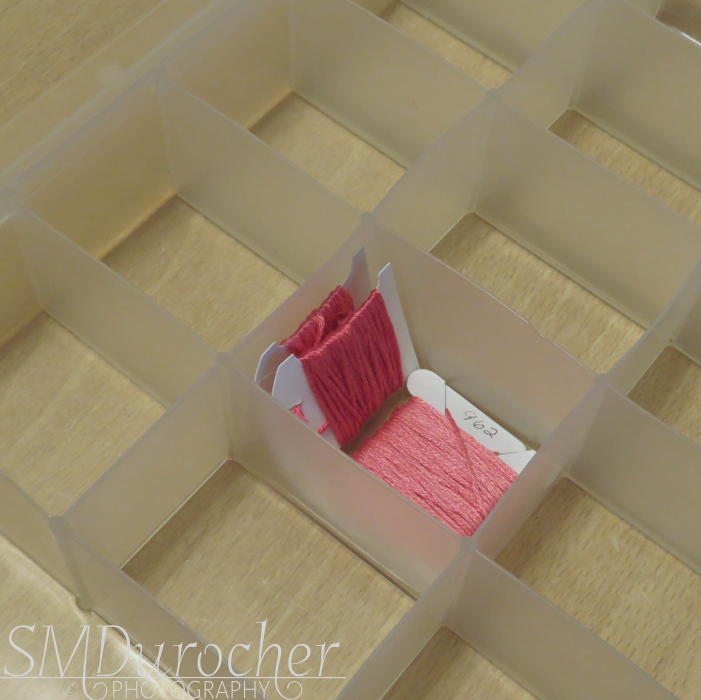
This organizer has fixed dividers which has it's advantages and it does hold the commercial floss bobbins as well as my DIY ones.

I dropped the needle case off this afternoon.

Nice not to have go shopping for what we need and we each get what we want.


Friday, August 4, 2023

Cards - Exchange

My August exchange cards are ready!

Again, I am using 4x4 inch photos from my 4x6 photo calendars.

I believe this is a strawberry flower with morning dew.  I would have taken it at the Community Garden.

I chose a Handsome Hunter card base.  

I cut a Stampin Up Lattice die in white.  I adhered it behind the flower photo allowing only a portion of it to show on the bottom.  

I added small yellow handmade paper flowers, white flower sequins and black tiny brads on the intersections of the die cut.

I then adhered this layer to the front of the card base, added a quarter sheet insert on the right hand panel and a white envelope.

Excellent.


My next card features a Queen Anne Lace flower which I would have taken in Ontario when visiting my sister.

The colors on this one were warmer so I chose a white card base.

I cut the SU Lattice die from a warm green textured card stock.  I split the diecut in two and placed one half on top and bottom of the photo.  The diecut was taped to the back of the photo then the layer was adhered to the card front.

The photo needed a bit of something so I used my fine black marker and added a dash frame all the way around the photo.

The photo has been trimmed to about 3.5 inches square.

I added a white quarter sheet insert and a white envelope and it is ready!

Sunday, August 1, 2021

Card Exchange Cards - Tangerine Tango & Baja Breeze

I started with an orange card base which I think is Tangerine Tango.

I added a layer of Baja Breeze polka dot designer paper from the Palette o' Prints collection.  I ripped the right hand edge and aligned it along the fold. 

I added a length of Tangerine Tango Scallop Polka Dot ribbon to the designer paper layer and taped the ends to the back.  I adhered it to the card front.

I cut one of the labels from the Apothecary Framelits set from Baja Breeze card stock. I added a greeting from the Teeny Tiny Wishes set color printed on white card stock punched with the Large Oval.  I added tiny orange brads on either side of the greeting then adhered it to the card front with 3D foam tape.

I added 2 small buttons in coordinating color on the bottom right hand corner with small Zots.

The same basic supplies for this card but I switched up the orientation to landscape.

I turned the Baja Breeze designer paper over to the other side to show the floral design.

I put quarter sheet inserts on the inside and added a white envelope.

These are headed out to my card buddies. 


Friday, July 2, 2021

Cards - Exchange - July

A blue and yellow theme for my July exchange cards.

I chose a golden yellow card stock and ran it through the Big Shot with the Cuttlebug Script Texture folder.

I adhered it to the a white card base.

I wrapped and knotted the blue organza ribbon around the card front and placed it along the fold on the left.

I added a focal element created from punchie flowers made with the Stampin Up Five Petal punchie from yellow and blue card stock.  I managed to find scraps of blue that matched the ribbon really well.  I added a half inch circle and a yellow mini brad in the center to hold these all together. 

The accent was adhered to the card front with 3D foam tape.


For this card all the same elements but switched orientation to a wide card.  

On hind sight maybe I should have selected a different folder for this one because the script is sideways.  It's mostly texture so I think its still works.

For the focal element I used a white flower brad for the center which brings in the white of the card base.

These will be off to my exchange partners shortly.


Tuesday, October 22, 2019

Exchange Cards

I started with a warm mustard yellow card base.

A piece of Serendipity paper in warm earth tones was aligned along the left hand side. 

I layer 2 oval die cuts in graduated sized to create an accent layer.  I added a brown Tim Holtz Tattered Leaves die cut in the center.

The greeting was color printed onto bright yellow card stock.  I trimmed and flagged the right hand side end.  It was adhered to the card front with 3D foam tape.

I applied some brown chalk as need to blend the elements together.


I chose a deep warm blue card base.

I added one of my large greeting layers trimmed to 4.00 x 5.25 inches.

I added teal handmade paper flowers by Prima held in place with silver sequins and silver tiny brads.  I placed around the card front as I wanted.  This layer was adhered to the card front with 3D foam tape.

These are off to my partners.


Wednesday, June 5, 2019

Exchange Cards - May - Late

I am late with my Exchange Cards for May. 

I used supplies from the card order I delivered today to whip up cards so they can be mailed this afternoon.

A warm green (Pear Pizzaz) card base in the landscape orientation. 

I cut designer paper from K&C Company - K Classic - McKenna 12x12 pad.  I taped the piece together then ripped the bottom edge.  I wrapped a piece of ivory & gold metallic organza ribbon across the join and taped the ends to the back. This layer was adhered to the card front. 

I created the greeting layer with another sheet of the designer paper cut to 2.5 inches.  I stamped the greeting in Always Artichoke with the Stampin Up Sincere Salutations stamp set.  These were layered together and then adhered to the card front over the ribbon with 3D foam tape.

The second card is an ivory card base with the dusty blue and ivory designer paper from Frances Meyers - Suzanne Nicoll. Trimmed to leave a small border and adhered to the card front.

Wrapped a piece of organza ribbon across and taped the ends to the back.  It was adhered to the card front. 

I added a pink balloon card stock punchie (MS) adhered with 3D foam tape.  I tied a warm blue string to it and cut to the length of the card.

The greeting is a large oval in navy blue layered with a ivory and blue greeting.  These were layered together then adhered to the card front with 3D foam tape.

They are addressed and going in the mail right away!

Thursday, November 9, 2017

Art Exchange Submission - Barn Swallow

The gallery is holding a Miniatures show starting December 01, 2017.  Part of the show is an exchange with artists in Winnipeg.  We are sending fifteen pieces.

I chose my barn swallow photo printed in 5x7 inches. It was mounted on a white card.  I signed it with a black marker in the left bottom corner.  I added a navy mat.  It was framed in a matte silver metal frame with glass.

I am looking forward to what the Winnipeg artists are sending our way.


Wednesday, March 22, 2017

Floating Balloons Card

I made this accent for photography project earlier this week.  You can check my Flickr photo stream for more info.  It reminded me of the movie UP.

Now, I could make a card out of it.

The original element was created with 10 balloons made with the Martha Stewart punch.  I chose red, yellow and blue.  I attached them to a quarter sheet of vellum.  The central yellow balloon has red spatters on it.  The first 7 balloons were attached directly to the vellum and the last 3 were adhered with 3D foam tape.  I attached white thread strings to several of them. 

For the card I trimmed the vellum down to about 3 inches wide to allow more of the sky card stock to show.  I placed adhesive behind the balloons.  I chose a Stampin Up Decorative Label greeting in a blue matching the balloons.  This was adhered with 3D foam tape to the card front with the middle points aligned along the edge of the vellum.  I placed some adhesive for the vellum where it would be hidden by the greeting.   This is off to one of my card exchange buddies.

Thursday, August 4, 2016

Friends - Exchange Cards

I made these 2 cards for my card exchange this month.  I managed to purchase the Elizabeth Crafts Designs Friends thin die on sale.  I love the calligraphy style of lettering. This is a A Word with Words collection by Suzanne Cannon - Quietfire Design - a Canadian.

I chose the designer paper which I ripped and removed a section and adhered the 2 pieces at each end of the warm light blue card. I cut the word from the green and the ivory card stocks and layered them onto each other.  I punched flowers from the same colors on the word.  These were layered and held in place on the card front with ivory brads. 

I chose a turquoise card.  I ripped the designer paper as the first card except I switched the orientation to tall.  The word was cut from cherry red and brown card stock. They were layered again using quick dry adhesive.  I punched daisies from turquoise and brown.  They are held in place with taupe brown brads.

I am sharing these cards with my friends on the card exchange list for August.

Thursday, August 21, 2014

Card - Butterfly Birthdays

I made these cards for my monthly card exchange.  I was working on a concept for a background.  I cut stripes of double sided paper on my paper cutter then reverse every other one and reassembled the piece.  The math did not quite work out so I ended up with only 6 strips instead of 7 which is an odd number and would have worked better.  I will have to work on it some more.  I cut down the piece to get proportion I needed for the card.  Layered it onto a coordinating piece of card stock and then added to the orange card front.  I added a Martha Stewart butterfly punchie in the top left hand corner and a stamped greeting in the bottom right. I used a corner punch to add a bit of something to the rectangular greeting.

Thursday, August 2, 2012

Card - Exchange - Clown Fish Scallop

I made a couple of these for my card exchange group.  I had a couple of these left over from card kits so I decide to use them as they are sitting on my work space.
I used Green Galore for the card and stamped it Basic Black with one of my SU! Itty Bitty Backgrounds.  I cut the fish with a round SB Nestabilities then cut the orange with the corresponding scallop circle. I mounted the scallop circle onto the card with 3D foam tape.  I cut the greeting with QuicKutz oval then stamped the greeting with a clear stamp.  I mounted the oval greeting with 2 brads. I added a bit of orange ribbon in the second hole to create a bit of a fin effect to go with the fish theme.

Wednesday, February 29, 2012

Card - Cricut Tree

I made a couple of these for my on-line exchange group.  I started with a black card.  I added a textured card stock layer in a color which coordinates with the leaves on the tree.  I added a TM Ornamental Die cut in golden rod text paper stamped with spatter background in black ink.  The tree is cut with the Cricut and the Straight from the Nest cartridge (4").  I added a circle greeting which has been mounted with 3D foam tape.

Wednesday, February 8, 2012

Card - Felt Flowers

I made a couple of these for my card exchange group.  I started with the flower and searched to find matching cardstock.  I finally found Brilliant Blue worked well.  I cut a piece of white to card front size then put it in my Creative Memories wavy cutter.  It was then embossed with the Sizzix Diamonds folder.  I cut a leaf with a Sizzix die from green flocked ribbon. I held the flower in place with a tiny white brad. I added a small stamped circle greeting on the bottom right hand corner stamped in the same Brilliant Blue punched with the .75 inch.