Showing posts with label microfiber cloth. Show all posts

Sunday, March 24, 2024

Sewing Project - ReUsable Bag - Quilted Swirl


I made another ReUsable Shopping Bag today.  

I started with the 12.5 inch quilted square I picked up at the ReUse Center this week.   I backed the square with a 14" square of white 100% cotton. I chose to do this because the yellow fabric was thin and showed the pattern of the turquoise fabric through and with a finished layer I could create a pocket. I top stitched the swirl to the white cotton by following 2 of the diamond shapes in the quilting.  I then, used the technique of self binding to finish the edges.  That means bringing the white to the front and folding over and again and top stitching down. I mitered the corner with a technique I research a while back for napkins. Perfect Mitered Corners Tutorial

I then chose a turquoise microfiber cloth which matched well and created it with finished seams on the inside to a final width of fourteen inches. I sewed the quilted swirl to the front of the bag (should have done it before the sides).  I left a piece of the top edge open and created a pocket by top stitching are tall rectangle following the quilted pieces.

I created the handles by hemming the ends, pressing in half then in half again and top stitching the ope and folded sides. They were 19" long by .75" wide. I folded the top edge of the bag 1" then again another inch and sewed it down with the wavy decorative stitch. I placed the handles 4" from the edges and sewed them down the 2 inches they overlapped the bag. 

I created a skirt for the top of the bag with a double layer of white cotton and a double layer of turquoise microfiber. I serged the cut edges.  I folded over the serged edge about 1" along the finished top edge of the bag and top stitched in on.  I then folded in the serged short ends in and top stitched the 2 of them together on the side seam of each bag. 

I used white thread for this project.

Saturday, March 9, 2024

Sewing Project - ReUsable Bag - Navy and Taupe Squares

This is the last of the 7 inch cotton poly squares in the Navy and Taupe which I received for free.  I paired it with some navy microfiber cloth to have enough fabric to complete the project. I created two 6 square panels then serged all the seam edges. I then sewed the 2 panels together with a French Seam hiding all the raw edges which created the bottom of the bag.

Realizing that it was not tall enough and I needed handles as well I dipped into my good microfiber fabric and chose this navy.  Works well with the pattern in the squares. I cut the navy panel 12 inches wide and ironed it half to 6 inches tall.  I then measured the width of my bag and sewed the strip to be exactly the same width then serged that seam.  Now I sewed the  navy panel to the top of the squares bag with the serger then top stitched fabric to the serged edge from the top on the squares piece.

I then changed my thread to navy for the rest of the project.

I ripped my handles to 3 inches wide and 41" inches long.  I sewed them and turned them inside out.  I fold the raw edges of each end to the inside leaving me a 40" handle.  I pinned the bottom of the handle to the bottom on the first rows of squares 5" inches in from the right and left side.  I created my reinforced squares on the bottom and the spot where the handle meets the top of the bag.  The handle is top stitched on both edges for both handles.

I added a decorative stitch along the top of the bag to keep that fold in place and to add my elastic to the inside of the bag which I can use to roll up if I want it to take less space.


This bag will replace my shopping bag.  This one I made a year ago. It is polyester and is very thin but I just loved the color so I just enjoyed for as long as it was going to last.  

For information on the "My Bag" Line

Tuesday, January 23, 2024

Sewing Project - ReUsable Bags


I made 3 ReUsable Bags to donate to the ReUse Center this week.  I had some polyester fabric in great colors which does not work as well as microfiber.  I bought these because I was looking for a variety of colors.  They are very pretty.

Polyester fabric frays like crazy so these needed french seams to enclose all the edges. 

I folded the tops over double at 2.5 inches to provide a reinforced edge where the handles were going to be attached.

I did not have much for handle material.  I used grosgrain ribbon on the 2 striped ones.  I made handles with white microfiber fabric left overs for the purple one.   

These measure about 20 inches tall by 16 inches wide.  

The center provides a bin of bags and a table of boxes for customers so these will be used for sure.

Friday, December 15, 2023

Sewing Project - TV Chair Outfit - Chair Caddy

Today, I worked on the caddy for my chair that at minimum would hold my TV remote so I can always find it.

Here's the overall photo.  It is sitting over the arm of the chair on my right.

It has 2 pockets - a small for the remote and another larger for who knows what.

I started again with the stash of fabric that I had assembled for this project.

I realized that the caddy had to have some stiffness as it was not going to sit flush against the side of the chair.

I had a piece of 100% cotton upholstery fabric which I thought would do the job.  The color was within the family of colors but I decided I preferred to have the caddy blend in as much as possible. I checked on the size and it was not too big so I just keep it the size it was. 

I did have enough of the warm grey microfiber fabric I had used behind the headrest cover.  Excellent.

I cut the warm grey fabric to be about 1.5 inches larger than the cotton piece in all directions.  I then folded .75 inches then again to bring that hem over the edge of the cotton.  Once I had ironed, pinned and mitered the corners I sewed a seam very close to the edge all the way around. The cotton would be on the under side of the caddy. 

The pocket was the same warm grey microfiber.  I cut the pocket about 7 inches tall and 2 inches wider than the base to allow for some ease in the pocket(s).

I then used a small leftover piece of the fabric I had used on the cushion cover to edge the top of the pocket.  It was the perfect size.  I serged the cut edges of this piece before I sewed it to the top of the pocket piece.  I top stitched along the seam as well as along the top edge.

I folded the side edges and the bottom edge and ironed those flat.  It was then pinned to the edges first.  I marked the center to make sure ease was evenly distributed. I make a pleat in each pocket and then sewed all three sides of the pocket to the main piece.  I did have to shorten the small pocket for the remote because it fell too deep and it was hard to get out.

With the final project nicely ironed, all the stray threads trimmed, it was time to install it on the chair.

It is long enough that flap that sits on the inside of the chair goes deep between the cushion and the side of the chair.  There is not need for any other mechanism to keep it in place.

I now have an extra pocket which I don't know what it will hold but it's ready for use whenever inspiration hits.

This has been a very satisfying project.

All the pieces are bespoke, just the right color and size, with all the colors and patterns coordinating.

Love IT!

Wednesday, December 13, 2023

Sewing Project - TV Chair Outfit - Cushion and Headrest Cover

This is my TV chair with its new outfit.

I received this chair from my aunt as a gift this summer and it reclines to bring a footstool.  I loved it.

I have been using the fleece blanket I had on the couch but it is too big and get caught in footstool when I get up and close it.

I wanted a new blanket, a new cover for the cushion I have been using and an updated head rest cover.

There is still a remote control holder to come but I have not decided and designed it.
 

This is the Cushion Cover.

I used the fabric I purchased this summer which matched all the chairs in the living room.  You can see the fabric in this post.

I found a yellow zipper in my stash that would be long enough for a side opening.

This fabric frays very easily so I had to serge all the edges as I went along.

I cut 2 pieces of this fabric 21 inches x 15 inches. This would allow 1 inch seam allowances. 

I followed this tutorial to put the zipper in. It worked perfectly.  I used the selvage edge of the fabric and folded it in 1 inch on both pieces. I sewed the ends about 3.5 inches leaving the center open where the zipper will show.  

The zipper is 14 inches on the 18 inch side. I then pinned the zipper to the opening making sure to mark where the metal bits were to make sure I sewed on the far side of those.

Once the zipper was in I could just sew up the other 3 sides. Make sure you move the zipper pull down before you sew up the sides as that is the opening you will use to turn it inside out.

I did have a large seam allowance (2.25 inches) across from the zipper but it was better to have too much than find I was short.

I had pinned loosely to figure out where the seam should be.  

Sewed it the other sides together and turned it inside out, used my chopstick to push out the corners. My little cushion fit perfectly inside.

I used the grey thread to sew this project.

Headrest Cover
The research and gathering of fabrics I did this summer paid off because the piece of 100% cotton upholstery fabric was in the bucket.

That will work for the headrest cover.  I paired it with a piece of microfiber fabric from the stash as well. 

I laid the cotton over the microfiber and then used my long quilting ruler to mark a rectangle with square corners. 

I then sewed those together leaving a small area to turn it around.

I then turned it inside out and ironed it flat.

I stitched a seam very close to edge to close the opening I used to turn it around and it finishes off the edges nicely.

I had gone a while back to purchase twist pins to keep the arm rest covers in place.

I dug out 2 of them and tacked the head rest cover in place.


I am very happy with the final results of this several day and 3 piece project.

I have 3 pieces that can easily be washed and kept clean.  This will keep my chair clean as well.


I will be working on the remote control holder.  I think it will be over the arm rest


I will keep you posted.


Monday, October 30, 2023

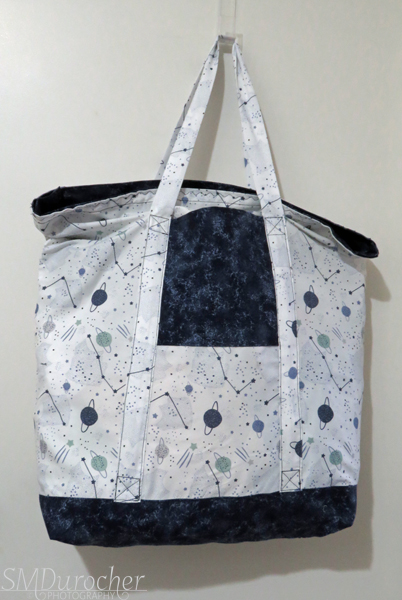
Sewing Project - Large Tote Bag - Stars and Planets

My sister and I had a conversation the other day about projects which we could make to give back. 

I still have quite a few microfiber fabric which can be used for another project.  Originally, they were collected to make Re-Useable shopping bags.

Those were donated and have not sold really well.  I think presentation is the problem. I am moving on.

Morning Star is an organization which supports women in crisis.

There is no dignity in carrying all you own in a plastic garbage bag so large bags can be used to give these women some self worth.

I chose the Stars and Planets pillowcase which is made of deluxe microfiber fabric. 

I paired it with some cotton fabric in deep navy small pattern which was donated to me when a quilter in our group retired and de-stashed her supplies.

I decided to put a piece of navy on the bottom since the fabric is white the bottom of the bag will likely get dirty fast and being a dark color will help.

I layered the cotton over the microfiber which will add strength.

I wanted the bottom to be boxed. I created the corners at 5 inches across then folded the  triangles onto the bottom of the bag and sewed them down.  That will add layers on the bottom and help to add structure to the bottom corners.

I chose a navy thread so it does not show on the cotton fabric.  It is more evident on the microfiber pieces.


I created the zipper insert the same what I made it for my own tote bag.  I used the method explained in this video Tutorial by Crafty Gemini.

This produces a completely finished edges with no open fabric ends.  Tabs are added to the 2 ends of the zipper so it is easy to pull open and shut.

I hemmed the top edge of the bag after I cut off about 10 inches off the top of the pillow case once I had undone the seam that created the top hem.  I used that fabric to make the handles. Microfiber more durable than cotton being handled all the time.  Handles are 1.25 inches wide finished with the seam place in the back center. They are 53 inches long. I tied the bottom of the handles in the cotton bottom for sturdiness. They were sewn 7 inches from the sides. 
 

It is important to have reinforce the stress points to ensure there is some strength is distributed to take the wear and tear.

The zipper insert is the same width as the opening of the bag. It is about 6 inches deep which is slightly more than the bottom but we have to account for the seam to put it in.


Now it is just a matter of pinning it very carefully and sewing the insert into the top of the bag.

I chose this decorative stitch on my sewing machine which produces this wavy seam which adds a bit of pretty to the bag.

Once the zipper insert is sewn in the zipper end tabs can easily be accessed when opening or tucked in when on your shoulder. 

It does allow an addition amount of space for hold stuff when the bag is full.

With the zipper insert the same width it makes the bag well sealed to ensure there are no holes where one could lose items from inside the bag.

The color of the zipper provides some contrast in the dark fabric so it is easy to see.  The tabs also help the find the zipper slider.

I will be making a few more of these to be donated in early December.


Saturday, August 19, 2023

Take Out / Take Away Bag

In my city, the Single-use Item Reduction bylaw came into effect on July 1, 2023. That means when I order take out food at a restaurant - some single use items would only be provided when requested and some would be offered at a cost. Plastic bags for take out were banned and paper bags would come at a cost of $.15.  I am okay with that but I still need a bag to bring my food home in so that it does not end up spilling in my car.

I set out to make such a bag.  I generally would need a small bag when I hit Tim Horton's or Wendy's but I got Vietnamese food the other day and that container was much larger.  I determined that I needed a bag around 9 inches square, the sides not too high and a way to close that would keep the food inside. Would be nice if it folded flat when I stored it in my car.

Here's is the result.


The floral fabric is a couple of strips of heavy cotton fabric I found for free at the ReUse Center last week.  The weight was a good start to having a sturdy bag. The strips were only 8 inches wide so I had to piece the bottom and I made it double layer so the inside would be nice with no seams showing.

I cut 2  pieces of 9.5 inch wide and 8 inches tall. Then I cut 2 strips of 9.5 inch wide and 2 inches tall to supplement the other pieces to end up a bottom that was 9" square finished.

I sewed the narrow strips to the large pieces on the 9.5 inch side.  I then ironed them and top stitched the seam.

Once both were done and put right sides together and sewed all the way around leaving a space to turn it right side out. Then I ironed that flat.  

The side piece was cut 8" tall and 38 inches long. Once layer was floral and the back was teal microfiber fabric which will be on the inside. Stitch all the way around and turned it right side out.

I pinned it to the bottom with lining on top of the bottom.  Once I identified the corners every 9 inches and sewed a seam from top to bottom of the eight inch length on all four corners. This will help stiffen the sides.  Then I went ahead and sewed the sides to the bottom matching the corner seams with the corners on the bottom piece.  The ends were overlapped on the front of the bag, again to help stiffen the front of the bag. 

The inside of the bag is floral on the bottom and teal on the sides.  The take out container fits perfectly on the bottom of the bag.

The handles are asymmetrical in the front loop is short and the bag loop is long.  They are made of teal microfiber.  The strip was 6 inches tall and about 38 inches long.  I folded the strip in half and iron it flat.  I then opened it and iron each half to the center.  I top stitched along both the open side and the folded side which helps to provide some stiffness to the handles.

To close the bag the long back loop is pulled through the short front loop and the bag is closed.  The join is above the center of the bag so it stays level.


I had to make it pretty as well.  I cut a large scallop circle from the floral fabric and sewed it over the ends of the front handles with a zigzag stitch

I hand sewed a teal button in the center of the flower for a final touch.

I am very happy at how this bag turned out.  
  • It is large enough to handle any take out order I will make, 
  • It will hold the contents securely inside the bag, and
  • I have a loop handle to carry it along with anything else that is in my hands
  • It folds flat and I can tuck it into a pocket in the car so it will always ready at hand when I need it.

Friday, July 28, 2023

Sewing Project - Pinafore Jumper

I had a desire to make a summer jumper.  This is very unusual for me but I said to myself - okay.

The pattern was based on Cross Back Apron I made a few years ago.  

It hangs on your body from the shoulders and is easy to sew and easy to wear.  It just slips over your head and it adjusts to size very nicely.

I still had this apron so I chose that as the basis of my new project.

I had some purple fabric that I was going to use for the outer layer.

After some thought and discussion I decided to use microfiber for the lining.  It would be slippery, dark and make the garment not see through.

It was a deep purple color so fortunately it would be okay with the fabric I had chosen.

I decided to make the lining  my pattern since I had lots of that fabric and could cut another if I needed to.


Since the apron did not meet in the back I knew I would have to add some including a seam allowance for the back seam.

Top Left - I added a wedge in the front by leaving the top on the fold and added a good amount in the front and some to the length too.

Back - I added several inches - this would fall about mid back for me.

Back - I then kept the angle down to the bottom hem area and added length.

Front Bib - Added just a bit for a seam allowance.

I sewed the back seam and then "tried it on" to see if it was going to be big enough and not too tight.  It seemed pretty good.  I did cut a piece of brown paper as a pattern.

I had to change my mind about the outer fabric because the width of the first fabric was not wide enough.  I chose a tie dyed white cotton from a duvet cover I bought for the fabric.  That was plenty wide enough to cut the piece.  I tried to keep the colors to the purple and turquoises in this fabric.  You can see some pink/coral on the straps and some at the very back.  It would be okay with the purple lining fabric, too.

I then sewed the back seam.  I then placed the 2 layers right sides together and sewed the top seam around the bib and across the back and back up the side of the bib.  I then turned the garment right side out and ironed it and top stitched. 

The straps were cut 3 inches wide, sewn and then ironed with the seam down the middle of the back side of the strap.  I top stitched both side of those.  I then sewed one end of each strap to the corners of the bib. 

Then I started figuring out where the straps should cross and where the other ends of the straps should be sewn to the back to hang properly.  Once pinned I sewed those in place with a square with back stitching.  I then folded it in half front wise and evened out the bottom edge and then folded it the other way and did a bit more adjustment. The bottom hem is .5 fold over then 1" hem sewn by machine.

It turned out nice but I felt it was a bit on the light color for me so I had a discussion with my sister about dying it.  I had purchased Rit Dye in Teal which is a hot water process.  I did not have what I needed to do hot water so I took the Dylon fabric dye she had in Sea Green.

With the cold water process the dye gets dissolved in hot tap water and the same with the salt. These are then added to the water in the plastic pail which is enough to cover the garment. 

The garment is wet before putting it into the dye bath and then it has to be stirred constantly for 30 minutes and then regularly for the next hour. I did it every 15 minutes.  Then the garment is rinsed until the water runs clear.  I did this in the white bathtub and that took 5 times.  I did dye some of my white flannel for unPaperTowels with the left over dye.  Once that was rinsed as well I just ran a small  regular load of laundry.

Here's the final pics.  It did even out the background so that is a good thing.  I was expecting to get more color than I got with this process.  I expect that a cold process may produce lighter results, maybe the color was supposed to this light but the water still had color in it.

Pockets - I am glad to have added the narrow strip on the slant of the pockets.  I did have to move them up about 3 inches and I forced myself to do right away otherwise it would have been frustrating to use them.

It was a great project.

It will go faster the next time as this was a learning process for making the pattern and the dyeing process.


Wednesday, April 5, 2023

Tactile Weaving - My First Attempt

I first found the 12" bamboo embroidery hoop at the ReUse Ctr along with sunshine yellow wool roving for free.

That is when I decided Okay I guess I'm going to give this project a try.

The yellow cotton thread is what I used for the warp thread which is where the yarn and interesting fiber will be woven into.

With the ring being bamboo I did not feel it would take paint well so I decided to stick with the warm honey tone.

I started gathering coordinating supplies.

Wrapping the warp thread around the hoop went pretty well. 

There is math involved to figure out how much thread you need so I found that on the web somewhere.  I believe and odd number is best.  I had a few issues with 38.

I tied all the threads together and I wanted the focal point not to be in the center.  At this stage it is quite movable so I just moved it to the right a bit.

Here the warp thread is not tied.


I pulled together yellow, blue and white supplies together.

Some acrylic yarn, cotton thread, wool roving, wooden beads, wooden rings, some fancy yarn and long needles/crochet hooks to help me pull the weft through the weaving.

You will notice that I had not put the outer hoop onto this inside one which made it very difficult to keep my warp threads evenly spaced.

Things went a lot better once the warp thread had been evenly spaced and  the outside hoop was screwed tight.

Here are my first weft threads.  I chose to put some yellow cotton at the focal point.  It helps to make the warp thread disappear when it is the same thread in the weft.

I then started adding color in the navy yarn on the right hand side.


After that it was adding texture, color and resisting just wrapping all my weft fibers around the focal point.

The sparkly white yarn added texture and hid the warp threads nicely.

The yellow wool roving was luxurious and smooth which added a different texture to the weaving.

Loved that the wavy yarn was the same color as the roving.

I added beads in the weaving as well as on the hanger to add texture and color.


The wonderful grosgrain ribbon has recently been acquired as a leftover from some project - maybe from my niece.

I really wanted to hide the screw tighthener at the top of the outer hoop.

The ribbon was over 1" wide and with a bit of planning the solution presented itself.

The hanger adds color and height to the final piece.

All the pieces came together so nicely.


The piece I decided would hang so that required a bit of something at the end of the ribbon.

The large wooden ring was oiled to bring out the wood grain.

This added texture and color to the overall presentation of the weaving.

The white bead repeated the shapes and colors in the weaving itself.

It was sewn in place with some of the yarn in the piece which added to the cohesion of the elements.

I created a back for the piece to hide the knots and transitions between fibers.

I cut a piece of navy microfiber fabric just a wee bit smaller than the outside hoop.  I serged the edge to finish it off nicely.  I then hot glued it in place on each warp thread which will help those stay in place.

I have attached a credit label printed on fabric which has been hand sewn to this backing fabric.

I pinned the gallery's information tag with a safety pin.

The final piece will be revealed when the show opens next week.

Thursday, March 30, 2023

Sewing Project - Frame Bag

I am so grateful to be bringing art to the gallery again.

But with my other frame bags are packed so I decided to make another one. 

I had this piece of blue pattern fabric which was just about the right size.  I decided to pair it with some of the left over navy microfiber fabric.  I cut the navy about 3 inches bigger than the patterned.  I hemmed the patterned piece all the way around. I then sewed hems to the back and front ends of the navy. I stitched the patterned to the navy.

The fleece piece are an old pair of fleece pants that had worn out spots.  I used the bottom of the legs and quilted the pieces together, then cut it to fit in the navy piece.

I folded the navy piece right side together then layered the fleece layer on top.  Pinned the right and left hand edges very well and sewed a narrow seam.  I turned right side out and topped stitched the side seams to enclosed the raw fabric edges.

The finished bag measures 20.5 inches wide by 17 inches tall with the fleece divider sandwiched in the middle.  The divider is just a bit shorter than the front and is only captured in the sides seams and loose at the folded bottom.

The handles are white 1" wide grosgrain ribbon and extend about 8 inches above the top edge of the bag.  Enough room to put it over your arm comfortably.

They are well secured to both layers of fabric with double stitched rectangles in 2 places.


By placing the frames facing the fleece divider the glass is protected from hits from the sides of the bag.

The frames are protected from dings and scratches as they are completed enclosed in fabric.

I really like to enclose my seams which finishes the seams nice on the inside as well.

I am only considering 11x14 frames at the moment for art at the gallery so this works really well.


Wednesday, February 22, 2023

Sewing Project - ReUsable Bags - 2 more shorter ones

These are a very similar size to the California King ones I made earlier. Overall height 20" T x 19.5W - bag  is 13" D.

I brought home some taupe microfiber fabric home from my sister's on Saturday that had been in my Mom's stash.  There was enough to make to 2 bags I thought.

It was very nice weight and I just had to assess the size of the piece and figure out what I needed.

There are some left overs which I have no idea what I will do with it.  The cut outs from all these bags are starting to pile up.
These bags do fold up to a reasonable size.  They would not fit in my purse but they would work for a lot of places.

I hope to find a few nice patterned microfiber fabric.  Doing these plain ones is getting boring.   I likely have enough bias tape to about 5-7 more.


I have started tacking the elastic to the front of the bag with a bit of stitching before I add the bias tape.  It helps to keep in place.

Means that I don't have to manage 2 things at once.

The button hides the overlap of the bias tape which works well.  Hand sewing the button can  be challenging because there are 2 layers of bias tape and the elastic in that spot.

It is working out alright.


This bag is another short and wide one.  

I used dark brown bias tape, black elastic and a brown button on this bag.

The bias tape makes this go really fast. I don't need to pin or anything.  Just open the tape, slip the edge of the bag inside and top stitch the edge. Works really fast but just quite costly.


This is the package of double fold bias tape in dark brown which I used on the bag above.\

Check out the price! It is $1.00 when the current price is now $3.30.  I wonder how old that package is?  70's?   Who knows!


I am starting to have a little basket full of these bags.

Right now the plan is to donate them.

I will bring them to show the girls at quilting on Monday.