Showing posts with label vases. Show all posts

Monday, June 7, 2021

Major Clean Up, De-clutter, Storage and Organize - Craft space & Photo Studio

I did decided I needed to do some major clean up and de-cluttering with the goal of having ALL card making supplies in the craft space.  This necessitated getting rid of a lot of supplies.  I have been mulling this over for several months.  
 
Finally, I decided to keep my Stamping Up supplies and cull the unrelated stuff for this reason. I have card stock, designer paper, ink, watercolor, chalks, ribbon, brads, and some stamps that all coordinate.  I have enough to last me the rest of my card making career.  I am keeping 110lb for photo cards too.

I started by removing all the non SU designer paper from my 8 color coded drawers.

Then, I took the 4 drawers of SU designer paper which were crammed to overflowing and sorted them into the 8 color coded drawers. It was a bit tough because SU paper comes in sets which are organized by color collections - Brights, Subtles, Regals, and Neutrals rather than colors.

Now, I had 4 empty drawers.

I then looked at the Iris cases in the bedroom that held 12x12 designer paper.  I kept the special papers like metallic, no shed glitter, and vellum pieces which translate well to Stampin Up.  That is what is in that bottom drawers.   Look 3 empty drawers!

I have a large box overflowing of designer paper to get rid of.  I will hold onto it for a couple of weeks in case I remember a few pieces I want to pull back.
 
 
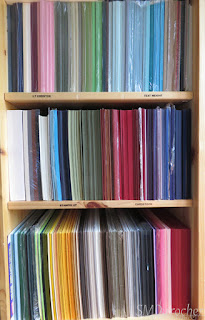
The card stock cupboard needed to be addressed as well.  A while ago I had moved 8.5x11 Stampin Up card stock to this cupboard but now the 12x12 card stock had to be moved as well.

It was being stored in the dining room secretary along with table linens so it was time it moved.

The left is 8.5x11 card stock and the right is neutrals and 12x12 card stock on the bottom.

The middle shelf holds the boxes for my 2 projects - Compassion House and Cards for Seniors.

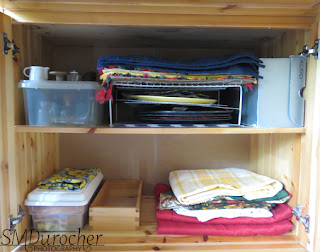
Here's the bottom shelves of the secretary in the dining room.  

I have added a few plastic containers to organize. The top shelf holds small vases, small bottles, charger plates, place mats, and a grey box of table runners and doilies.

The bottom shelf is a container of napkins and table cloths on the right hand side.

There is room for a few pieces if I decide something new in the future.

I now have 7 Iris cases that are EMPTY!

This is the photo studio area and you can see in the right hand photo that I have filled some of them with Macro Monday props. Clear cases which are well labels so I can quickly find what I need.  

I don't know what I will use the empty ones for just yet.  I can live with them empty for a while and get used to the space.  Having spend the time to empty them I will be sure to fill them with plenty of thought!   SO HAPPY!

Tuesday, November 17, 2020

How To: Photographing Bottled Light

My aunt shared with me a You Tube video a while back by one of her favorite photographers - Harold Davis.  It was how to Photographing Bottle Light.  I just loved it!  Check out his videos if you are interested.

I am offering my experience with the process.

Materials needed: Colored bottles, color for water in clear bottles, sunshine, a camera with a macro lens or at least a good macro setting and a very clean white surface.  I will cover some options in each area.

Colored Bottles or containers - wine bottles, vinegar bottles, olive oil bottles, condiment bottles, etc.  Check the kitchen and cleaning supplies.  I found the dark green olive oil bottle did not light a lot of light through so great job for oil maybe less effective for this process. But use whatever you find and see what happens. Think of colored vases as well.

Clear Glass - bottles or vases of clear glass can be used with colored water.  

Glass texture and pattern - some texture or pattern in the glass adds to the refraction of the light.  I had a small etched vase where the etched areas became almost black.  Not what I wanted.

Color for Water - I have lots of liquid acrylic so that is what I used. Harold used food coloring.  It needs to concentrated and transparent.

White surface - It must be CLEAN and smooth.  The material should not absorb the light.  I used foam core board which worked well.   It needs to large enough for the light to be refracted beside the containers. 

Light - I found bright sunshine the best.  Any artificial light I used did not produce results I was happy with.

My experience with stemware was not very successful.   

Setup is entirely up to you.  Does the light go through one bottle to the next creating new color? Do you want the shape of the glass to play a part? Compose your art as you wish based on light, shape and color.

Very Important - You are photographing the light on the white not the light through the containers. 


Here are some examples of the photos I took over 2 photo sessions.

Post Processing: I had to trim all of my images because I could not isolate the light from the container.  All of these have been brighten and had some adjustment in the color saturation.  Rotate the image as you may see something you could see from the other direction.

Now, I don't have the imagination that Harold has to see objects within the abstract shapes.  Maybe that will come in time.

How about photographing the light through the glass?  Anything goes really.

This one has the large blue bottle in front of the olive bottle with an artificial light behind the olive bottle.  The bottles are overlapping creating the bright green color in the center.  It was nice to have the 2 small dots in the bottom right hand corner to provide a git of a focal element.

I would encourage you to experiment!  All you have to lose is a bit of time and colored water.

I am so glad I tried this technique!


Saturday, June 14, 2014

June Photo a Day Challenge - Week 2

Here are this week's photos for this challenge hosted by Kati at Kati's Little Corner.  We could post every day or once a week.

Day 8 - Childhood

I chose a coloring book and Laurentien Pencil Crayons.  I filled many coloring books in my childhood.  I loved staying inside the lines and making it look really nice according to me.  I had my name on each of my crayons so I would not lose them to siblings. When there is lots of kids things can get territorial at times.  I loved coloring because it was an individual activity and quiet time.


Day 9 - Macro

This is a yellow dragonfly and you can see her looking at me and my camera wondering what is going on!  I loved the focus I was able to get on the nearly invisible wings.  I took tons of shots to get this one.


Day 10 - Upside Down

I staged this photo because I wanted similar shapes in different colors and one was upside down.  I wanted a shape that it was obvious that it was different. Not sure I was all together successful in that aspect. These vases are complementary in their shape so it accommodated the closeness better. I chose to put the metallic on in the center because the others were more solid.  The fact that it has a reflection adds interest.  The black was has some reflection as well.


Day 11 - Jewellery

I chose the jewellery I wear most every day because I don't often change it.  On a special occasion I may wear something different but on average this is it.  I like pieces in silver.  A Timex watch, a brooch that I hang my reading glasses on when I don't need them, a magnetic bracelet, a white gold cross, and a set of Stella Dot Hammered Ball stud earrings.

Day 12 - Flower

I chose this Alberta Rose photo. They are blooming right now. I try each year to get a few good photo of this great pink flower. They can range from very deep pink to almost white.  I will keep an eye out for them on the back country roads.


Day 13 - Shadow


This is a picture I took of my sister and I.  We had been out on photo shoot for a few hours capturing all the cool things in nature around where she lives. There had been birds, flowers, ponds, cattails, dragonflies, and much more. At one point, I saw this shot and I'm glad I did not miss it.


Day 14 - Red White and Blue

I'm working on a stash of decorative paper using a variety of techniques.  Today, I chose these colors so I could include it in this challenge.  I rubbed the with wax candle to create a bit of a resist.  Then, I painted the paper with Tim Holtz Distress Stain in Faded Jeans and Aged Mahogny which I had dabbed onto a palette and then spritz with water. I applied it to the paper with a foam brush.  It was feeling a little blah so I decided to take a piece of acetate and brush some blue onto it with the dauber end.  It create these light brush strokes.  I then placed the acetate paint side down onto the paper and they squished and became much more visible.  I really like the way it turned out.