Showing posts with label dove. Show all posts

Wednesday, October 23, 2024

Tree Scent Ornaments - Glass and Metal

I created a few unique Tree Scent ornaments but they can be used as oil diffusers in your personal space as well.

The first is a reindeer glass ornament to which I added a couple of glass beads and a grey felt ball.

The next is a snowflake ball to which I added a grey felt ball and a white bead.

The third one is a glass with gold accents snowflake.  I added a black felt ball with gold filligree accents.

The last is a fused glass star with a turquoise felt ball in the middle. Hung with metal wire.


This beautiful glass pine cone with iridescent sheen was paired with a pink felt ball and glass beads.

The metal dove carrying a peace tag was paired with a green felt ball with a green ribbon.

The cute glass snowman was paired with a turquoise felt ball and clear beads.

The white walnut was paired with a black felt ball and black beads.

Monday, August 1, 2022

Christmas Card Challenge - Watercolor - Aug - Salt Backgrounds

I created a watercolor background for my large Christmas greetings for this month's challenge.

I started with 140lb Arches watercolor paper I purchased from my sister. It had been rolled up so I spritzed it with water and let it relax itself to flatish.

I cut a strip about 6 inches tall and the width of the sheet.  I taped that down to my waterproof work surface.  I used my small watercolor palette I created the other day.  You can follow this link to the post which contains the details. 

I soaked the paper with my spray bottle then I just worked with the greens and blues in my palette. As I moved across I switched from the blues to adding red to create purples. Once I was happy with the colors I misted it again to ensure the whole surface was wet then just added some table salt to the surface.  It then dried for several hours.

I believe this is rough water color paper but is softer than the sheets have I have been using. I was very happy with the pattern produced by the salt.  Once completely dry, I cut it into 4.00 x 5.25 inch sheets.  These will leave a small border of the card base showing.  Since I was not using Stampin Up watercolors it took a bit of evaluation to see which card colors to use.

While the paper dried and searched the internet for some free large greetings I could use. The card above features the one I liked best.  The greetings were sized to be smaller than the watercolor background and printed grey on vellum.  They were then heat embossed with gold powder.  I ripped the edges to provide a more natural edge.

On the right I created some portrait (tall) cards with vellum greetings which also included images. This one is a Christmas tree. For most of  these cards, the vellum is adhered to the watercolor background with tiny gold brads. Then the watercolor layer is adhered to the card base with 3D foam tape squares.

The greeting on the card on the left has been around for a very long time.  It is very classic fonts and makes a great greeting.

The card base on this card is Marina Mist. The brads used on this one are larger sparkly gold star brads. 

I added some vellum adhesive in the opposite corners to keep the vellum close to the watercolor.

 The watercolor background features the transition from green to blue in my original painting.

This watercolor background was the toughest to match to card stock.  I tried Chocolate Chip, Perfect Plum, Sahara Sand and eventually settled on Soft Suede. 

That is the challenge - when I was painting I did not measure the width of the colors so this piece ended up with some muddier colors with the n bright blue on the right hand side.  

This is the other portrait (tall) card where I combined an image and a greeting.

Again, I was not thinking of images at all when I was painting.  I had to trust I could work it out once the watercolor background was dry.

I think this worked out well.


This card features Bermuda Bay for the card base.  Another landscape (wide) layout.

This time tiny gold star brads in all four corners.

I will be adding quarter sheet inserts with a seasonal sentiment to each of these and pairing them with a white A2 envelope.

Another great set of cards for my box.  Ready to give come December st!

These worked out well and the background is worth considering again.

Saturday, November 20, 2021

2021 Photo Card

I try to make at least one Christmas photo card every year.

I was given this dove ornament a couple of years ago by one of my sisters.  I decided this year to use it for my photo card.

I wanted Peace on Earth so I needed to create myself an earth. I set the dove up in my photo studio so assess what size the earth should be.  I determined it needed to be about 8 inches in diameter.

I found a dish in the kitchen and traced that onto a piece of bristol vellum card stock.  I found a tutorial on line on how to draw an earth.  Using the instructions I drew an earth in pencil so I could erase until I had it right. I then painted it in watercolor ensuring that I had enough texture in the land and water.  I then added the borders in black Sharpie marker. 

Once it was dry, I installed it in the studio adhered to a blue material background I have for the studio.  I used several Zots to hold where I wanted it.

Then I found many shots with different lighting and angles.   I reviewed my shots and took some more and repeated the process one more time.

I was finally happy with one of the shots.  

I added the greeting and the olive branch in post processing.  I printed the card at 4x6 inches.  Once those were back from the developer, I got ready to create the cards.  I was glad that I had used black borders and black shadow on the greeting which worked really well with a black 110lb card base.  I adhered the photos to the card front of a 5x7 (A7) card base.  I printed a sentiment in keeping with Peace on Earth on letter paper and trimmed those to fit inside.  I adhered those with glue stick. 

Just like that I have 15 photo cards to add to my stash.  Very happy with these.  The ornament is headed to my other sisters house for Christmas because she loved it.  I am sure the earth will come in handy in the photo studio again.  Win Win!

Thursday, June 3, 2021

Christmas Card Challenge - June - Dove

The challenge for June is Dove. These card feature a die cut white dove.

The watercolor background is one I did earlier.  I cropped it to square and applied a fade to blur the right hand side edge. 

I drew the olive branch and added it to the digital background. Added the sentiment below and printed this on white card base.

I die cut the dove from heavy card stock with the Sizzix Green Dove die.  It was then mounted to the card front aligning it on the olive branch.

The 2 cards below are using copies of this card which I had messed up when printing. I trimmed them to leave a small border and mounted them to coordinating blue card bases.

Added the die cut dove.

A few more cards for the Christmas card box.

Friday, January 10, 2020

Old Card Finds - Christmas Cards

I found a stash of very old cards which were made prior to my having a blog. 

This card features a wood mounted stamp that has gone to the thrift shop.  I stamped in black ink and trimmed it square.  I adhered it to a layer of blue card stock.  That layer is held by black photo corners.  I black grosgrain ribbon was wrapped around a piece of white card stock and knotted to the right hand side. The dove layer was adhered over the black ribbon.  This layer was then adhered to a card base of the same color as previous blue layer.


This a very simple card.

It has a greeting color printed in warm blue and I ripped the left hand side.

It is layered onto beautiful damask foil paper which the scan does not do it justice.

I added a warm blue card stock layer behind the damask paper which leaves a small border.

These layers were then adhered onto a textured white card. 

It has a seasonal insert.

Very interesting to see that type of card I was making over 10 years ago.  When stored properly they are still usable.  Great!

Saturday, October 26, 2019

Ready 2 Go Christmas Stack Kit - Set 13

I started with a light blue card base.

I adhered a lavender card stock layer leaving a small border.

I recycled a card with an angel announcing the birth of Jesus.  I added a gold star brad over the one on this layer.  It was adhered to the card front.

The greeting was color printed on blue card stock and fussy cut to the border. It was adhered to the card front with 3D foam tape.

A quarter sheet insert with a seasonal sentiment was added to the inside of the card.


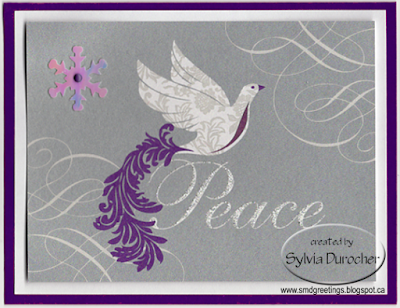
More purple for this card in a deep colored card stock which works with the tail feathers.

I added a white layer leaving a small border.

I added the iridescent purple snowflake with a purple small brad onto the silver greeting layer.  It was then adhered to the card front with 3D foam tape.

A quarter sheet insert with a seasonal sentiment was added to the inside of the card.


Another shade of purple for this card.  I chose a grape color textured card base.

I then layered a warm green layer to the card front leaving a small border.

I added the small gold star brad to the Holy Family layer then it was adhered to the card front.

The greeting was color printed on warm white card stock and fussy cut to the border. It was adhered to the card front with 3D foam tape.

A quarter sheet insert with a seasonal sentiment was added to the inside of the card.

Tuesday, March 19, 2019

Ready2Go Christmas Stack Kit - Blue & Cream Dove and Peace on Earth

I worked on a Christmas Stack kit in case someone wants to get a head start on those cards.

The image is a recycled Christmas card featuring navy, light blue and cream.

I added a light blue layer of card stock to repeat that color which was cut to 4 x 5.25 inches leaving a small border.

I chose a cream card in the tall orientation.

These layers were all adhered to the card front with the light blue first and the dove next.

I created a greeting with the Stampin Up Artisan Label punch.  I used the navy and light blue in teh greeting, color printed it and then punched it out.

It was adhered to the card front with 3D foram tape aligned on the dark/light line on the dove layer. 


This is another recycled Christmas card layer. 

I cut the black layer to 4 x 5.25 inches leaving a small border of card base showing.

I chose Kraft card stock to repeat the kraft colored swirls on the right hand side.

The Peace on Earth layer was adhered to the black layer then I used 3 round tiny brads in the top left, bottom left and bottom right corners.  A push pin was used to make the holes before the brad was inserted.  I selected 3 of the dots in the design for the star brads.

The 3D foam tape was cut in 4 pieces and placed on the 4 corners of the black layer.  It was then adhered to the front of the card.

A quarter sheet insert was used in these cards.

Loving how this one came together.

Monday, October 29, 2018

R2Go Christmas Stack - Turquoise Dove & Copper Ribbon

I started with the Turquoise Dove Die cuts created with the Stampin Up Deco Label thinlits.

I added a metallic copper circle behind the diecut.  Two pieces of 3D foam tape was added to the back.

The decorative black copper layer was created with Antique Copper Mist by Maya Mist applied with a toothbrush rubbed across a metal butter knife. It was left to dry over night.

Lay the copper ribbon across the decorative layer and determine the placement of the turquoise cord.  Tie the turquoise cord onto the copper ribbon then tape the ends to the back layer.  Adhere the layer to the front of the white card base.

Remove the release paper from the 3D foam tape and adhere the dove element over the ribbon on the right hand side of the card.

Pull the star & Bling Zot from the release paper and adhere to the card front as per the sample.

R2Go Christmas Stack - Soft Sky Dove & Holy Family

I started with a beautiful dove glittered large card. I cut it down to leave me with this dove glitter image with warm blues, cool purples and glittered snowflakes.

I chose a soft sky card base onto which this layer was adhered in the tall or portrait orientation.

I printed the greeting in deep purple blue and punched it out with the Stampin Up Modern Label punch.  It was adhered to the card front with 3D foam tape.
 
I added 3 iridescent sequins with Bling Zots.

I added a quarter sheet insert for the sentiment inside.


This card is a similar sketch with the wide or landscape orientation.

I had just enough of these to complete the kit.

I cut down the card and added a strip to the right hand side to complete the card layer leaving a small border.

I added a silver foil SU Modern Label punch with a SU Word Window punchie adhered to the card front with 3D foam tape.

This time 3 silver stars were adhered to the card front.

Tuesday, October 2, 2018

Christmas Card Challenge - October - White Dove

The challenge for Christmas Cards this month is White Dove. I made several of these.

I chose designer paper from a 12x12 glitter pad by My Mind`s Eye - Sweet Dreams - Holiday Avenue. I cut it to 4 inches tall and 5.25 inches wide and ripped the bottom edge. 

I printed the greeting on white and ripped the bottom edge.

These were layered then adhered to the front of a deep warm blue card.

The dove was cut with the Dee's Distinctively - Dies - Dove Right.  The extra wing was glued to the back of the dove.  Then adhered to the card front on the designer paper.  I added a few sequins to finish off the card.

Thursday, May 18, 2017

R2Go Christmas Kit - Peace on Earth Dove

I created some Distress Stain backgrounds with Faded Jeans and Pine Needles.  Once dry, I die cut the greeting with the Sizzix Peace Phrase #2 die.

I designed the background by adding an earth clip art on the bottom left hand side which contain similar colors.  It was adhered to the green card front.

The PEACE die cut was adhered to the top center of the card.

The "in Earth" banner was color printed on white card stock then the end was flagged.  It was adhered just below the die cut.

I cut the dove with the Sizzix Dove die from white card stock.  It was adhered to the card front with 3D foam tape.

Friday, October 14, 2016

Christmas Cards - Peace On Earth

I added some cards to my Christmas box this week. 
I created this Peace on Earth graphic from several elements.  The large greeting I found on a free vector image site.  I modified it to my needs.  I added a earth to the bottom edge of the vellum. It is a map of North America which I found at Brian Jones Design.  As you can see I`m just using the very top of the image. 
This design was printed on a quarter sheet of vellum in a light grey color which was them embossed with silver powder. It was then trimmed to 3.75x5.00 inches.  
I chose a designer paper with a forest theme with pine trees which was cut to 4.00x5.25 inches.  I picked a pea green textured card.  The designer was adhered to the card front then the vellum was aligned and 2 tiny brads were placed in the bottom corners. 
Then the dove brad was placed above the word of Peace. 

I now have 103 Christmas cards.

Sunday, May 31, 2015

R2G Christmas Stack Kit - Holiday Poinsettias

For this Ready 2 Go Card Kit I chose the OSW3 template which makes 4 cards per 6x6 inch of DSP.  I chose the poinsettias paper from the Stampin Up Holiday Thyme collection.  The card colors are Cranberry Crisp and Bravo Burgundy and Old Olive for the accent layer.  The greetings were put on Whisper White.  The greetings are from the Joyful Christmas, Lovely as a Tree, Keepsake Ornaments, Calm Christmas stamp sets. The red in the greeting matches the card and the green is Old Olive.  The greetings were cut with the Window Frame framelit and the accent square is 2.5 inches.  The accent layer is adhered to the card front with 3D foam tape.  The accent strip is half an inch wide and trimmed at the card edge.
The one sheet wonder technique allows one to make a lot of cards quickly.  This kit is available for my SU Christmas Stack class on June 8th.

Sunday, March 22, 2015

Card - Christmas Dove

I started with a dove cut with the Cricut and the Folk Art Cartridge.  I cut the shadow in pearl paper and the filigree top layer from blue patterned paper. It was cut at 3.25 inches. I adhered the blue layer onto the pearl layer.  I found a coordinating blue card and some Recollections snowflake paper which was cut to leave a small border and adhered to the card front.  I added some white seam binding tied across the card front in the bottom third.  I added a small 1 inch circle greeting tied to the knot in the seam binding.  I mounted the dove layer to the card front with 3D foam tape.

I'm submitting this card to the following challenges:
Come and Get It Card Challenges - Winging It

Fantabulous Cricut Challenges - Bye Bye Birdie

Sparkles Christmas Card Challenges - Anything Goes

Sunday, October 26, 2014

Peace Card Set

I made another set of cards for a donation to a fundraiser.

I found green backgrounds from the web then created the word PEACE with digital images from Aria Sparkle.  I created an oval with a gradient fill with a dark border.  I layered the word on top of it. I found the sprig of olive branch on CLKER.  The bottom one is a gradient background with darker edges.


Once the card was printed I added a pearl white card stock die cut of a dove on the top and a star on the bottom one. These are Sizzix dies.

Saturday, August 2, 2014

R2G Card Kit - Peace on Earth Dove

This card kit is designed with double sided designer paper called "Peace" by Authentique.  It has a great felt finish and nice weight.
I cut the DSP to 4 x 5.5" landscape and cut it again at 2.5" from the top so the dove piece was larger.  I turned over the smaller piece and tape them back together on the back.  I cut a strip of card stock which matched the card 5/8" and adhered it over the join and trimmed the ends. I glued this layer to the card front.  I cut the dove with thin die by Dee's Distinctively Dove Right from ivory card stock. Assembled the dove as the back wing is cut separately. I glued the dove over the card stock strip. I assembled the greeting which was a color printed greeting punched with the Stampin Up Word Window Always Artichoke and the Modern Label punch from the same card stock as the card.

Submitted to Christmas Card Challenge - Sparkles Creations.

Friday, June 8, 2012

Christmas Card Stack - Doves

 I had a Christmas Stack class today.  These dove cards were the first ones.  I have selected 2 different textured card stock - pale blue and plum.  I have mounted the doves in opposite directions. 
The doves were cut with the Stampin Up! Elegant Bird die.  I trimmed the wings by hand then I embossed them.  The left card with the Cuttlebug Victorian and the right one with the Cuttlebug Tropical Paisley. I ran a length of ribbon across the bottom of the card and taped the ends to the inside of the card. I glued the dove then the wing matching the curve of the wing with the curve of the body. I used a push pin to create a hole for the black brad representing the eye. I color printed the greetings and punched them out with 1 1/4" punch and glued them to the larger circle punched at 1 3/8" and it is mounted with 3D foam tape.

Monday, June 13, 2011

Christmas Stack Class - Embossed Dove

This is the first card in the Christmas Stack Class. I selected blue and purple card stock. I cut a square of white card stock and put it through the 2" Cuttlebug Dove embossing folder. This layer is trimmed close to the embossed border around the dove. This is glued to a colored square about 1/8" larger. Trim the greeting layer and glue to the card front. Glue the dove accent above the greeting in the top 2/3 of the card. I added Stickles Frosted Lace glitter to the dove.