Showing posts with label My Bag. Show all posts

Sunday, March 9, 2025

Sewing Project - Bread Bags

I decided to make myself some bread bags to bring home my Country Grain loaves from COBS because the plastic bags are stacking up.

I chose 100% cotton fabric in yellows, greys and white. This was a large piece of fabric that I have used for many projects.

I used the COBS plastic bag as a template - 18.5 inches tall x 11.5 inches W.

I wanted the seams finished on the inside and a generous gusset at the top so the measures were generous.

The first one I did was put together with out too much attention to measures of the beginning piece of fabric.

The second one was too large and had to be reduced to match the first one.  

The measurements of the fabric would be 26.00 wide to be folded in half and 20.00 inches tall with 1.5 inches for the gusset at the top.

I chose cotton twill tape for the string in the gusset.  

I added a buttonhole on the front of the gusset on the front of the back before I sewed down the gusset. 

A large safety pin to pull the twill tape through.

I added a tab of yellow cotton to the ends of the tape to give me purchase to pull the bag closed.
I then boiled them in tea for about 10 minutes to even out  the colors.   Once rinsed they were dried.

I added a "My Bag" tag to these bags and they are included in on my "My Bag Line" page.

I then chose to add some slow stitching to the front of the bags onto the light square.  There are 5 circles in different colors where the top was outline stitch and the bottom was the running stitch.

I don't know what the staff at COBS will think of the idea but we shall see.

For information on the line. 

Monday, April 29, 2024

Sewing Project - Wine Bottle Bag - Celery and Red

I cleaned up this morning after this frenzy of sewing.

I found this celery textured fabric that I had set aside a while back and forgot about.  It had all its elements so I just decided to make it up. 

I will be keeping a few of these for the Christmas Market and the others will go to Grandma Africa merchandise sale in June.

I found this scrap of red patterned fabric which worked well.  There was just enough for 2 stripes so I just crossed them.

This fabric is not cotton and a bit tricksy.  It is heavier than the cotton I have been using so I skipped the flannel but added a thin layer of poly cotton to stabilize it and keep it square. 

The lining is a pale yellow polycotton fabric. The thread was a pretty good match to the celery color.

I did add a small square of flannel in the very bottom which I sewed between the layers and sewed to the lining bottom.  Just some cushion for a glass bottle as it is placed on a hard surface.

The button was a great match.  I am very grateful for things to be falling into place for all of these sewing projects.


For information on the "My Bag" Line


Sunday, April 28, 2024

Sewing Project - Wine Bottle Bag - Bright and White

A bright and cheery bag today.

I had a limited amount of this punchy colored 100% fabric so I decide to split it down the center and put the leaf green ribbon in between.

The outer fabric is navy cotton poly so it is a bit on the light side.

The lining is some of the yellow cotton/tencel fabric. The thread is navy.

I add this bold white buckle which worked out well I think.  With the navy button to keep the twill ribbon in place it works.

I wished that I had offset the ribbon a bit so you would see more of the fabric on the front.  It is what it is! 


For information about "My Bag" line.


Saturday, April 27, 2024

Sewing Project - Wine Bottle Bag - Warm Florals

Here is the latest wine bag.

I loved the warm flowers on this part of the fabric so I cut it to make them the focus of the front.

I found a warm brown grosgrain ribbon in my stash that worked well which I placed at the top edge.  I layered a cotton twill tape on top of that to tone down the shine.

I decided to create an accent element with the same ribbon.  I cut it, sealed the ends with heat then I just folded it back and forth this it was wide enough.

I bought a couple of bags of buttons recently and this shell button was in there.  I stitched this whole element to the top left hand corner of the bag.  Done another one!

For information on "My Bag" Line: 


Friday, April 26, 2024

Sewing Project - Wine Bottle Bag - Blue Floral with Lace

I pulled the fabric out last night so I could sew first thing this morning.

I just love this blue watercolor floral fabric.  The flower is very large so I just centered it on the front.

I chose a length of cotton lace which I placed below the top edge. I found a scrap of blue bias tape which echoed some of the colors in the print beautifully.

I used the wavy decorating stitch again on the bias tape and evenly spaced from the back seam to quilt the outer fabric to the flannel. This means I don't have a seam directly in front across the flower.

The lining is a white microfiber fabric which works well. Navy thread and a solid flannel so it would work with the white areas in the outer fabric.   I have attached my "My Bag" tag.

For information on the line. 

Thursday, April 25, 2024

Sewing Project - Wine Bottle Bag - Batik Phoenix

Another wine bag today. 

This is batik fabric from a shirt. I used one of the sleeves which featured a phoenix bird motif so I cut the fabric to ensure the birds were on the front.

I was short on the length so I added a strip of black on the bottom. I also added a twill tape accent at the top edge.

It was quilted to the flannel with the same wavy stitch as before.

The lining is beautifully soft yellow cotton fabric.

The handle is double sided with black on top and yellow lining fabric on the underside.

I had decided to place the "My Bag" tag along the top of these wine bags just left of the handle.

This is my current model of tag and stitching them with white thread is working well.

Looking forward to making a few more of these bags. I am finally able to sew them with out mistakes but designing accents is taking time out of the sewing process.


For information on "My Bag" line:


Slow Stitching - Embellishments to Book Bags

I went back and revisited my book bags and chose embellishments for some of the earlier ones. 

1. I added a dragonfly charm on a peice of blue felt

2. An orange cloth flower on a blue bag.

3. A yellow and green circle accent for the masculine striped one.

4. Just a bit of a strip of turquoise fabric with stitching for the first one I made.

You will see that I have added a "My Bag" tag to each of them as well.


Tuesday, April 23, 2024

Art Show - AAC - Redux Show 2024 - Upcycled Every Day Carry Bag

This my second piece in the Spruce Grove Gallery - Form Redux Show which opens today.

It is an Every Day Carry Bag which was made with upcycled fabrics from a box of fabric given to me by Michelle at ReImagined Fabrics. You can find her on Instagram #reimaginedfabrics  Other bits were chosen from my thrifted/reclaimed stash as well as pieces collected from the ReUse Center.

I made myself one of these bags several years ago.

Title: Upcycled Every Day Carry Bag

Size: 15.00 T x 13.00 W inches

Medium: Fabric Bag with embellishments


I started with the beige cotton fabric for the main part of the bag.  All the seams are finished inside so no raw edges anywhere.  I added a zipper insert made from a beautiful leaf patterned fabric from this box of scraps and squares with a teal zipper chosen from my stash of reclaimed zippers.

I chose a taupe microfiber for the handles which means they will last a long time.

The bag features 3 pockets. The front pocket was made with the accent fabric and I added a coordinating blue button that I found in my stash. The back pocket is a reused Carhartt pant pocket with a velcro closure. I sewed the pocket to the back of the bag which creates a pocket and added an accent fabric tag to the help with the opening the Velcro on the ginger colored pocket. I added some teal slow stitching to the flap of the pocket.

The ginger heavy weight fabric was added to the bottom to show less dirt and will wear much better than the beige cotton fabric. 

A few pieces of tomato red bias tape was added as an accent color which was again pulled from my thrifted supply.

I added a little bling on the zipper pull which was brought from a ReUse Center donation.  

Inside I added a clip for your keys which again was found at the ReUse Center.

It is on display at the gallery and is for sale.  The reception is Saturday April 27th at 1-3pm.


Information on "My Bag" line:

Monday, April 22, 2024

Sewing Project - Wine Bottle Bag - Japanese 1

 I found a couple small pieces of this Japanese print fabric by Schwartz Liebmen Textiles Inc. in my stash. I believe it to be 100% cotton.

I chose to make the front of the bag be a panel of the gorgeous fabric.  I found some red that my sister gave to supplement to the size I needed. I sewed a piece to the one side but that made it tricky to figure out where to place the the handles.

I placed a row of brown twill tape along the top edge aligned so it would be centered for the purple accent. That was stitched with the wavy decorative stitch then several lines down vertically to quilt the flannel to the outer layer.

Now I would not have a back seam. I did manage the handles correctly but totally forgot about it for the box corners.  I did have to undo the box corners on the outer and lining pieces and then iron the piece well so I would know what was the front.  It had to be done.

With the bottom seams and the box corners now in the right place I could do my 2 rows top stitching at the top of the bag.  

I hand stitched the purple crochet element at the top of panel on twill then added a red button in the center.

I chose red thread and an off white polycotton lining.

Information on "My Bag" Line 

Wednesday, April 17, 2024

Sewing Project - Wine Bottle Bag - Beau Chateau

This fabric was designed and sold through Stampin Up years ago.  This design is called Beau Chateau and the colors are Very Vanilla and Marina Mist.

This time I decided my accent ahead of time. I dug through my Stampin Up card making supplies and found some scallop edge ribbon in Maria Mist.  The wide grosgrain ribbon is ivory and was in my stash.

I laid the narrow blue ribbon on top of the ivory and ran a line of wavy decorative stitching across the width of the fabric with ivory thread.  This was my first line of stitching to quilt the flannel to the outer fabric. Then added 2 more lines of the same stitch above the ribbon running width wise.  I then ran 4 lines of the same stitching vertically going from the ivory ribbon to the base of the fabric. With that I had quilted the outer fabric.

I chose a thin ivory polyester fabric for the lining of this bag. Had to take it easy with the hot iron.

While the slit was still open in the lining I added the white button.  I tried to find a blue one that would match with no luck.


For information on "My Bag" line:

Sewing Project - Wine Bottle Bag - Gold Accents

I made a few more bags today.  This fabric came from my sister and we paired it with a pink cotton poly for the lining.

I was able to figure out how to sew this bag with the slit in the lining and still have the regular box corners. I will post a How To when I have it ready.

This fabric has some gold accents in it so that informed my accents.

I had not decided what my accent would be so I had to hand stitch the gold ribbon on afterward making sure that I did not go to deep.  I used gold thread which worked really well.  With my slow stitching experience I am more confident to pick up a needle and thread.

I found a green cloth button in my stash which worked out very well in size and color.


Here's the other bag from the same fabric but it was the other half and this one read blue instead of green.  That is a bonus.

I am learning that I should be deciding on my accent before I start sewing because accents machine sewn seams are better.

For this one, I stitched the blue grosgrain ribbon in the 2 top stitch seams then added a gold metal button.

I am happy with these as I could customized the color and make 2 different looking bags.


For information of "My Bag" Line:


Monday, April 15, 2024

Sewing Project - Wine Bottle Bag - Polka Dots

I made my third Wine Bottle Carry Bag yesterday.

I used some pale blue fabric with red dots which I believe was part of Stampin Up's fabric line when that was a thing.

It is lined with a solid red cotton poly fabric.

I used circles in white thread as my quilting pattern to attach the flannel to the outer fabric.

I chose to assemble the bag differently this time with starting with the top seam instead of that being the last seam.

It was easy to align the handles and the decorative ribbon along the edge and sew the top seam. Then the long side seam of the outer and lining is made leaving a hole to turn it right side out.

Then the box corners are achieved by tucking in the fabric into the center.  Check out this video for the full details.  I made sure that I alternated the corners so they would sit opposite each other on the bottom. Then you turn it right side out and sew up the hole in the lining.  Two top stitch seams and it was done.

I added the 2 different sized white buttons on the deep red ribbon by hand.

It seems to be as stable as the other method.

Here's how they look side by side.  The left is neater.  I really appreciated not having to fight to get handles straight in that small top seam at the end in the first design.


For information on the "My Bag" Line

Sunday, March 17, 2024

Sewing Project - Book Bag - Navy Calico

I made another book bag/sleeve.  This time I chose a navy calico fabric from my stash.  I believe I was given this piece from a quilter that was de-stashing. 

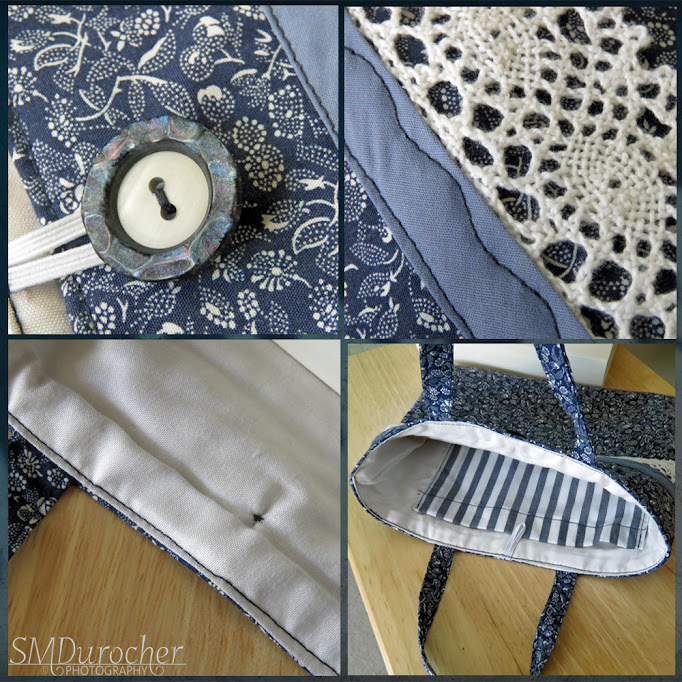
I found the beautiful cotton lace at the ReUse Center in the last couple of weeks.  The blue bias tape is a leftover from making these ReUsable Bags

This was a smaller piece of fabric so I had to stick to the 12x19 inches to get handles as well.  I cut my flannel padding layer the same.  I then used the stitching of the bias tape then the lace for my first 2 quilting seams.  I then made them every 3 inches with the wavy decorative stitch width wise across the bag.

I used a piece of white microfiber cloth to make the lining.  I added a large inside pocket using a piece of striped cotton poly as I had no calico big enough.

The handles were cut 2x12 inches then just a 1/4 fold over on each side and then down the middle again making them 1/2 inch wide.  I would like more but it is what it is.

I found a beautiful vintage button and used white flat elastic for the closure.


For information on the "My Bag" Line

Saturday, March 16, 2024

Sewing Project - Book Sleeve - Perfect Pear


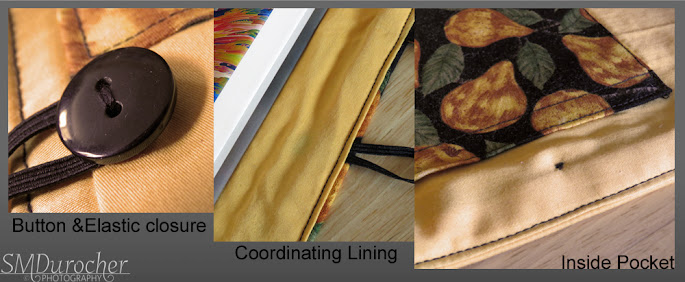
 I am using up my smallish pieces of fabric.  Here I have a book sleeve/bag made with some nice cotton pear fabric in yellow and black.  I have made a banded front with yellow, black and pear fabric.  The bottom is black which works well for keeping dirt from showing.  The back is a full piece of pear fabric.

I chose a cotton/Tencel (fabric made from wood fiber) blend fabric for the lining.  It is also the panel on the front and the band at the top. Feels wonderful. 

I stitched the front to the flannel padding layer with top stitching along the black and pear pieces.  The handles are made of the pear fabric and are 3/4 inches wide and about 11 inches long.

The bag has an elastic and button closure. 

I did put a pocket on the inside which will accommodate something extra. 


For information on the "My Bag" Line

Friday, March 15, 2024

Sewing Project - Book Sleeve - Blue Abstract


I found this cotton poly fabric at the thrift store and thought that would make a great bag. I liked the blue abstract pattern at the top which was different than the rest.

Cut the outer fabric, flannel padding and the ivory lining cotton poly fabric to 9 x 12 inches. Quilted the outer fabric to the padding with a wavy decorative stitch. Sewed both side seams on both pieces.  Managed to cut handles 3 x 12 inches with similar pattern.  Folded both edges in then again in half to make .75 inch wide handles. Top stitched left and right edges with ivory thread.

Placed the handles 3 inches from the edge and pinned, added the elastic on the back piece and tacked those down with a bit of stitching and checked their orientation o make sure I got it right.  Then pinned the two pieces together and sewing the top seam leaving a gap to turn out the piece. Back to flat elastic. 

Top stitched the top edge to close the gap and finish the edge.  

Added a vintage button just the right color.


For information on the "My Bag" Line


Thursday, March 14, 2024

Sewing Project - Book Sleeve - Red Batik


I started with the red piece of batik fabric.  I did not have enough to make the whole sleeve so I pulled a few fabric from my stash to complete the colors in the fabric.  I added some black, red and taupe.

I wanted most of the front to feature the batik fabric.  I added black on either side then a piece of taupe on the right hand side.  The back features 2 pieces of batik and black and taupe.  The taupe was on the opposite side so they would not be together when I sewed the bag. I added a strip of red along the top front to finish off the piece of fabric.  Piecing together the fabric took much longer than using a single piece of fabric. There were more choices to make coordinating the colors and the fabrics.

I then laid it onto my flannel padding piece and top stitched the red pieces with red thread and the black the matching thread. Now those pieces were one.

I used some red cotton poly as the liner.  Again, cut the the same size at the main fabric which is 12 inches wide by 19 inches tall.

I wanted the handles both to be black as it was sturdy fabric and a dark color. I just had one piece so I made the back handle out of all red fabric.  The handles were cut to 12 inches long with top stitching.

I used a hair elastic for the loop but I would not do it again.  The center is very hard and the elastic is very dimensional which made it harder to sew into the seam.

I chose a vintage cream button for the front of the sleeve.


For information on the "My Bag" Line


Tuesday, March 12, 2024

Sewing Project - Book Sleeve - Pin Stripe


I chose 100% cotton fabric from a men's shirt for the outside of this bag/sleeve.  Really nice crisp fabric.  I chose black thread for this project.

I created some cotton poly fabric from some of squares I got from the box of fabric donated to me.  I used 4 squares and sewed them together staggering the seams and then trim the excess and added it back to the length to get what I needed.  

I cut all my layers the same size 12 inches wide and 19 inches tall.  Pin Stripe outer fabric, flannel, and black taupe patterned fabric I made. The stitching I did to attached the flannel to the outer fabric was a rectangle on the front and back about 2 inches away from the edge.

I created my handles from the cotton poly fabric squares of the patterned fabric.  I cut a stripe then folded the edges into the center then ironed it half again.  I placed 4 lines of stitching both outer edges and then 2 in the middle. The handles measure 1.25 inches wide and were cut to 12 inches long.

Tacked the handles and black elastic in place then placed the bags one inside the other and sewed the top edges together leaving a gap to turn it inside out. Turned right sides out and ironed flat then pushed the lining into the bag.  I top stitched the top very close to the edge then added another line of stiching 1/2 inch from the top.

I chose a beige button but I would have preferred a gold one.


For information on the "My Bag" Line

Monday, March 11, 2024

Sewing Project - Book Sleeve - Blue Mottled

 
I made another book sleeve but with a different process - where we make the outer layer and the lining layer and then insert one into the other. I chose light grey thread for this project.

I cut my blue outer fabric, the flannel padding then the grey lining fabric all the same size - 12 inches wide and 19 inches tall. 

I quilted the padding to the wrong side of the outer blue fabric with a pretty stitch.  This one though is too thread intensive and very slow. 

I prepare my handles which measured 12 inches long and 3 inches wide and I folded in the edges then ironed it in half and sewed both edges.

I then sewed the side seams on the outer blue fabric. I decided to add a tiny pocket on the inside for a pen so I prepared that piece then pinned it into the seam and sewed the side seams of the lining fabric. I made sure that it stood the right side up this time.

I then tacked my handles in place on the outer fabric along with the small elastic just to give me a last chance to make sure they are not twisted. 

I inserted one into the other with right sides together and pinned it very well. I sewed them together leaving a small opening to turn them inside out. I then turned them right side out, ironed them, and pushed the lining into the bag. I top stitched the edge very close to the edge all the way around closing the gap in the same process.

I chose a button which matched very well.  This process is working well. It fits my large paper back book which is my guide.


For information on the "My Bag" Line

Saturday, March 9, 2024

Sewing Project - ReUsable Bag - Navy and Taupe Squares

This is the last of the 7 inch cotton poly squares in the Navy and Taupe which I received for free.  I paired it with some navy microfiber cloth to have enough fabric to complete the project. I created two 6 square panels then serged all the seam edges. I then sewed the 2 panels together with a French Seam hiding all the raw edges which created the bottom of the bag.

Realizing that it was not tall enough and I needed handles as well I dipped into my good microfiber fabric and chose this navy.  Works well with the pattern in the squares. I cut the navy panel 12 inches wide and ironed it half to 6 inches tall.  I then measured the width of my bag and sewed the strip to be exactly the same width then serged that seam.  Now I sewed the  navy panel to the top of the squares bag with the serger then top stitched fabric to the serged edge from the top on the squares piece.

I then changed my thread to navy for the rest of the project.

I ripped my handles to 3 inches wide and 41" inches long.  I sewed them and turned them inside out.  I fold the raw edges of each end to the inside leaving me a 40" handle.  I pinned the bottom of the handle to the bottom on the first rows of squares 5" inches in from the right and left side.  I created my reinforced squares on the bottom and the spot where the handle meets the top of the bag.  The handle is top stitched on both edges for both handles.

I added a decorative stitch along the top of the bag to keep that fold in place and to add my elastic to the inside of the bag which I can use to roll up if I want it to take less space.


This bag will replace my shopping bag.  This one I made a year ago. It is polyester and is very thin but I just loved the color so I just enjoyed for as long as it was going to last.  

For information on the "My Bag" Line