Showing posts with label bold. Show all posts

Sunday, March 16, 2025

Cards - Watercolor Abstract

I wanted to add some cards to my stash so I chose to reuse the bright watercolors I created in this post.

I cut the watercolor art into pieces.  In this card 4x5.25 inches.  I then used a Micron fine black marker and outlined the shapes in the watercolor.

I followed the idea of neurographic art and rounded the intersections of the black lines.  I added a border all the way around. Added circles to some of the white dots.

I used a black marker to darken the edge of the watercolor paper.

Mounted on Stampin Up Island Indigo card stock with a quarter sheet insert on the inside paired with a white envelopee.

For this card I cut the watercolor art to 3.5 inches square.

Again, added black marker lines around the shapes in the watercolor.  Soften the intersections and circled some of the dots in the art.

Added a black border all the way around.

I mounted it leaving even edges around 2 side onto a SU Gumball Green A2 card base.

Added a white insert and envelope.


This one had a good variety of colors so there was a good choice of colors for card base.

In this card, I chose SU Pacific Point in the A2 size.  These I did mount all in the portrait orientation but they could be landscape (wide) as well.

I love the bright spot of pink in this piece of watercolor. 

Again, black marker to outline the shapes in the watercolor with a border all the way around.

A white quarter sheet insert and envelope.


The card base on this card is an A2 in the SU Kiwi Kiss color.

The watercolor was cut to 3.5 inches square.

Mounted to the card front with double sided tape.  I added white quarter sheet insert and an envelope.

Pressed under books over night and is now sitting in the box.

These were fun to do and allowed my art to shine again.


Friday, February 7, 2025

Thank You Cards and Gifts - Renovation

I managed to get my small gifts and thank you cards for folks who were involved with the renovation project at my house that started back in September and finished up a couple of weeks ago.

I am still unpacking and will be for the next few weeks.  

I had some great people working and helping during this stressful time of my life and I wanted to let them know how much I appreciated it.

I was up early this morning in my kitchen and I made some caramel popcorn.  I did not get the opportunity to do that this Christmas as I was living in temporary accommodations.  

I check off the things I needed.

  1. Recipe
  2. Margarine
  3. Nuts
  4. Popcorn
  5. Corn Syrup
  6. Brown Sugar
  7. Stainless Steel sauce pan
  8. Large yellow bowls
  9. Popcorn maker and Ultra21
  10. Measuring Cups
  11. Stirring spoon
  12. Brown Sugar
Where's the brown sugar.  After checking my packing list most of my food Tupperware had not been unpacked.  After unloading 3 boxes I found the brown sugar.  I am good to go.

I made 3 bags of caramel popcorn and 6 cards.

It was great to be back in my kitchen doing what I have done for years at Christmas time.  Well, this year there was a 6 week delay but I enjoyed do it.  I expect the recipients will enjoy the popcorn.


Next the thank you cards. 

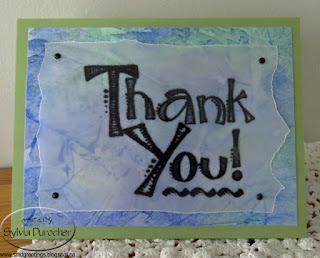
I decided to use watercolor paper I made a long while ago with a clear embossed black greetings.

The greeting is printed on vellum then heat embossed with clear powder.

I downloaded some free graphics from online.

The card stock is coordinated with the piece of watercolor paper then the vellum is trimmed and held in place with brads

The card stock is Pear Pizzaz in the A2 size.

The card stock is Brilliant Blue with the watercolor paper trimmed to leave a small border.

The greeting is cut to 3.5 inches square and aligned along the right hand side.  Held in place with pink mini brads.

The cards are for the tradesmen that worked on the project, the managers that were involved, the staff at the temporary accommodation, and my insurance agent.

The gifts were delivered and were graciously received.

The card stock is Stampin Up Island Indigo.

The greeting is placed along the bottom edge to soften the pink in the watercolor paper.

Held in place with silver tiny brads.
The card stock is SU Soft Suede.

The greeting was just designed with fonts on my computer.

Ripped the top and bottom edge of the vellum.

Held in place with brown mini brads.
The card stock is SU True Thyme.

The greeting was aligned with the bottom edge and held in place with tiny black brads.
The card stock is SU Elegant Eggplant.

The greeting was aligned with the top edge and held in place with deep purple mini brads. 


Friday, March 1, 2019

Exchange Cards - Bright and Bold

I managed to get my February Exchange cards made.

This is alcohol ink backgrounds.  I added some black ink markings to this one with Nick Bantock ink in Lamp Black. It took a long while to dry so I need to dilute it a bit before doing my marks.  I used a bottle lid to make the circle.

This one was cut to just under 4" square.  I then layered it onto a piece of warm lavendar card stock to coordinate with the warm tones in the top left hand corner.

Then layered onto Tangerine card base.  I added some stitching with a black marker. 

The greeting was color printed and punched with the Stampin Up Artisan punch. 


Left:  A bold piece of alcohol ink paper.  I hand drew the daisy with silver marker then retraced with black as I did not feel the silver stood out enough.  I added stitching around the edge with the same black marker.

It was adhered to a medium blue card base.

I added a silver daisy punchie, a small back sequin and all held in place with a pewter tiny brad.

These are in the mail.  With the plumbing issues here over the last month it has been quite distracting.