Showing posts with label Garden Green. Show all posts

Tuesday, October 1, 2024

Card - Inktense Painting

I made a card with my Inktense "Sunrise" painting.

I stitched the black outliner lines with a single embroidery floss. This is tightly woven cotton and was not fun to stitch. 

I chose a SU Garden Green A2 card base.

I ripped the painting to the edges of the color.  I tacked it down with stitches in the corner to a piece of white card stock that was trimmed to leave a wide border.

I glue the white layer to the front of the card base in the landscape orientation.

Added a white insert on the inside with a envelope.

It is ready to give!

Wednesday, November 8, 2023

Christmas Cards - Joyeux Noel - Green

 Another set of Christmas Cards. 

In this set of cards I used Stampin Up Garden Green as the card base.  Cut one sheet in half, scored and folded each in half to make two A2 cards.

I cut a layer of Whisper White cut to 4.00 x 5.25 inches to leave a small border all the way around.

I chose green paste paper my sister made many years ago.  I cut a piece 3.50 inches wide and 4.75 inches tall. I aligned the top of the thinlit die along the top of the paper making sure it was right end up. The die is the Grand Joyeux Noel by Memory Box. Once cut I adhered the diecut to the white layer with tape and quick dry adhesive around the noel letters to make sure they were stuck to the paper. I then had to find the cutouts that matched and glue the middle of the O and the middle of the E.  I used my QuicKutz - The Quicker-Poker-Picker-Upper tool to hold the tiny piece of paper while I put a dab of glue on it and then carefully put in place. 

The accents are the Martha Stewart Large Snowflake punch and the Hampton Art Tree die from the set. I cut the tree from a warm green card stock and added decorations to it with my white opaque marker. Tiny gold sequins on the top of the J held with Bling Zots. The sequins are gold. A large one on the snowflake and a star on top of the tree.

Sunday, November 5, 2023

Simple Sentiments - Photo - Set 5

I chose to add a banner to this fifth set of Simple Sentiment cards.

I started with a Stampin Up Lucky Limeade card base, cut, scored and folded.

I chose a SU Pale Plum card stock banner which was 2" wide and banner cut with the Banner Triple Punch by Stampin Up.  I added 2 mini brads to the banner placing them just below the photo. 

I adhered the banner to the card aligning it to the focal point on the flower. The flower is a White Geranium which is a 4x4 photo taken at the St. Albert Botanic Park.

I added a quarter sheet insert and a white envelope.


I started with  this small crab apple 4x4 inch photo.

The card base for this card is Ruby Red card stock.  Cut 8.5 W x 5.5 T inches, scored and folded in half.

I chose More Mustard for the banner which was cut with the Banner Triple punch.

I added 3 warm red mini brads aligned on the center of the banner.  It was then adhered to the card front.

The photo was then adhered on top of the banner. Nice to have the banner reach the edge of the card so the color repeats at the top.

Added an ivory envelope and a quarter sheet insert.


The photo on this card is a close up shot of the plant Mother of Thousands as each of the plantlets along the edge of the leaf can produce a new plant. Took this one at the Muttart Conservtory.

The card base is Glorious Grape.

The Banner is Green Galore. It was cut to 2 inches wide, the end cut into a banner with the Banner Triple punch.  I aligned the banner alogn the focal point of the photo.

I added 3 purple eyelets to the banner which I mounted with the Crop-a-Dile tool.  I did mark the spaces on the back to ensure they were even.

The banner and the photo were adhered to the card front.

A white quarter sheet insert and a white A2 envelope were added.

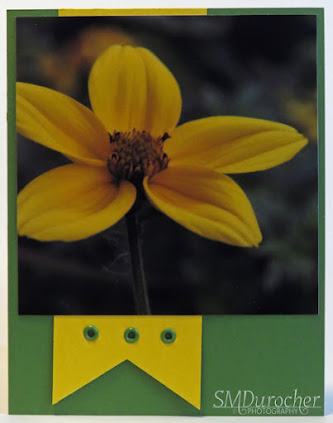
This flower is a False Sunflower.  It is a gorgeous bloom in any garden.

I chose Garden Green card stock for the card base. Considering that most of the flowers are taken in gardens makes sense. I may need to source out some more of this color.

I aligned the banner with it's green eyelets along the focal point of the 4x4 inch flower photo.

These were both adhered to the card front.

I added an A2 envelope and a quarter sheet insert.

Super pleased with these cards.

I will pair them in sets of two - one flower and the other a nature one.

Friday, November 3, 2023

Simple Sentiments - Photo - Set 1

I made some cards with my 4x4 photos.

These are Aspen Leaves taken at Elk Island Park in the fall.

I chose a Stampin Up Summer Sun A2 card base, scored in half and folded.

I then cut a 1/4 sheet of Brocade Blue with the Tim Holtz Cameo Frame die.

I had to trim the photo to 3.5 W x 3.75 T to fit within the score line on the die cut.  I adhered the photo with double sided tape.

I added caplets in warm gold yellow at the top and bottom. This layer was then adhered to the card front.

I added a quarter sheet insert and a white envelope.


This card features a Dandelion Seedhead with tiny water droplets from a misty morning.

I chose Winter Wisteria as the card base and Lovely Lilac as the frame layer.

I added iridescent snowflakes embellishments held in place with purple mini brads on the right and left hand side.

A quarter sheet insert and white envelope.


This card is a photo of a Palm Leaf I took at the Muttart Conservatory.  The sunshine through the lace curtains when I photographed this card makes it extra cool.

The A2 card base is SU Garden Green.

The frame layer is Gable Green.

I added leaf green star brads on either side of the frame diecut and adhered it to the card base.

A quarter sheet insert and a white envelope.


This is the very textural center of an orange Dahlia taken at the St. Albert Botanic Park.  Love the water drop in the right hand corner.

The card base is SU Ruby Red and the frame layer is Dusty Durango.

I added red caplets on the top and bottom of the frame layer.  These are easily installed with my Crop-a-dile.  The layer was adhered to the card front.

I quarter sheet insert and an ivory envelope and it is ready to go.

Note: I had to replace the photo on the card because it end up with double side tape on it.  I replaced the photo with tulips which works just fine.

Saturday, August 5, 2023

Photo Cards

I made another couple of cards from my photos. A lovely Dahlia taken at the Botanic Park.

I cut a piece of Garden Green card stock with the Tim Holtz Brackets border die.  I glued it behind the 4x4 photo and taped it down. 

I added a length of Elegant Eggplant grosgrain ribbon on the join and taped the ends to the back.

I added a silver flower sequin with a white tiny star brad at the point of the green diecut.

This layer was then adhered to the front of the Elegant Eggplant card base. 

I added a quarter sheet white insert on the right han panel. 

A greeting can be added centered just above the sequin.

On this card is the Astrantia Major Alba. 

I used the same border die on a piece of Elegant Eggplant card stock.  Taped it to the back of the photo.

I added a strip of silver glitter card stock over the join.

I added silver flower sequins held in place with white star brads on the 3 bumps in the die cut.

I adhered this layer to the front of a hot pink card base.  Added a quarter sheet insert.

Saturday, July 2, 2022

Exchange Cards - July - Chrome Circles

I had these chrome circles with flowers inside in my stash.  I believe they are old earrings (when big earrings were a thing).   I have clipped off the hanger with my wire snips.

I punched a 2 inch circle from coordinating card stock which in this case is Garden Green.  I placed it behind and pushed holes through for the mini brads. 

I chose a card base of Bashful Blue and scored it to create a tall card standing with fold at the top.

I wrapped Early Espresso seam binding around the card front and taped ends on the left hand side.  I adhered the metal circle with 3D foam tape over the place where the ends were taped.

I added strip of designer paper along the bottom edge of the card.  

I chose an oval color printed greeting to match the card color and adhered that with 3D foam tape.

This card is just a swap of the Bashful Blue to the Garden green for the card base.

Bashful Blue 2" circle behind the chrome accent with mini brads in Bashful Blue, Garden Green and Early Espresso.

They are finished off with a blank quarter sheet insert on the inside with a white envelope.


Friday, June 17, 2022

Watercolor Cards - All Occasion

I needed a  few cards for upcoming birthdays so I decided to follow the trend of my Christmas cards and make them with watercolor.

I searched the internet for simple floral images - bouquets so that I could see how the stems interacted, etc.

I trimmed my 140lb water color paper to 3.5 x 3.5 inch squares.  Loosely following the compositions I found on line I drew flowers with a pencil.  Once I was happy with it I traced the pencil lines with black permanent marker again making adjustments if needed.

Once the ink was allowed to dry a bit I erased the pencil lines and was left with the black lines.  I used my Stampin Up Watercolor Wonder Crayons to match my card bases.

I chose flowers which were non specific so I could paint them any color, rather than recognizing the flower and saying that must be pink or whatever.  I also added some spatter of each color to tone down the white of the paper.

For the first card the flowers are a pale version of Rich Razzleberry and Garden Green for the leaves on a Pixie Pink card base.

Card number 2 is Elegant Eggplant card base with Old Olive for the stems.

Card number 3 is Marina Mist card base with Always Artichoke leaves and foliage.

I chose Mellow Moss grosgrain ribbon wrapped around the front of the card with the ends taped under the watercolor accent.

The floral watercolor is adhered to the card front with 3D foam tape. 

I decided to go with no greeting so I can use it for any occasion. 

Quarter sheet insert on the inside with A2 white envelope and 3 more cards ready to give.  One for my aunt, one for my sister and one for Mom.  I still have a couple of sisters who have birthdays this summer.  Another session to follow soon.

Monday, August 16, 2021

Miniature Watercolors into Cards

I was inspired by a photography challenge to produce some art and I chose watercolor.  

I opened a pad of water color paper bought at a scrapbook store. There is no indication of the weight of the paper so I was not getting my hopes up.  

I cut down a sheet about letter sized into 4 smaller pieces.  Some square and others not.  I pulled out my Stampin Up Watercolor Wonder Crayons so I can match it will card stock later.

This one is a bit of a landscape with a tree, flowers, the sun and a few birds flying in the sky.  The paper worked really well in this small size.

I paired it with a piece of Bashful Blue leaving a tiny border and ripped the bottom edge.  I mounted that onto a piece of Passion Pink card base.  Stamped a greeting with Old Olive with a set of small clear stamps. I spattered the card once it was finished.

This next card features just a little watercolor using the wet in wet technique.  I sprayed the entire paper with clean water.  I then dropped spots of color - Rich Razzleberry, Regal Rose, Marina Mist and Old Olive. You can see where the colors mixed in place to produce a purple.  

I was going to define the pinks as flowers but I was happy with the composition so chose to stop.  I dried it with my heat gun and signed the bottom.  It was spattered with a bit of green.

I cut a banner of Bashful Blue and mounted it across an Elegant Eggplant card base.  Stamped the greeting again in the Old Olive color.  The watercolor was adhered to the card front with 3D foam tape.

I started the composition with flowers in mind. I dropped the Regal Rose pink with a bit of Daffodil Yellow and the soft green of Old Olive in the background.  It was dried with the heat gun.

I then used a black Micron Permanent Black Marker and drew my flower petals and leaves.  I chose to add a bit more color to the leaves and petals.

I mounted it to a piece of Regal Rose and ripped the left hand edge.  I stamped a several butterflies on the left hand side.

This layer was adhered to a Garden Green card base.
Each card has a white quarter sheet insert on the inside.


Sunflowers are in full bloom around here these days.  I love them. 

This is my attempt on a sunflower against a pale blue sky.  I used some More Mustard and Daffodil Delight in the flower and Always Artichoke with Old Olive in the leaves. I mixed the brown for the center.

It was spattered with much watered down Old Olive once it has been dried with the heat gun.

Again layered on a piece of Bashful Blue ripped on the right hand side. Stamped the greeting in Old Olive. 

The thank you ones will be donated to Compassion House and the others will be added to my card box. 

It was a lot of fun!

Tuesday, June 18, 2019

2019 Cardmaking - CH - Class 6

I have decided to stick to one layout which allows one to make a wide variety of cards.  Because I never know how many ladies will show up it makes it hard to plan the number of card kits I need. This way I can just add card kits to my box at any time and be ready for the class. The remaining kits will just go to the next class.  The ladies attending turns over regularly as they finish their treatment and others take their place.

These kits are based on the DSP Split layout where the designer paper layer is cut to 5.25x4 inches then cut again at 3.5 inches. One of the pieces is turned over and the pieces are taped together on the back.  A ribbon is laid across the join and the ends are taped to the back of the DSP layer.  This layer is then adhered to the card front.  This is a versatile layout as you can see it can work tall or wide with the narrow piece on the left or right. With alternating the combo on the double sided paper each card can be different.

The Stampin Up Artisan Label was used on this set.  The greeting was printed on white card with Kiwi Kiss and Early Espresso and punched with the coordinating punch.

The designer paper used on the card shown is by BoBunny - Little Miss - Little Miss Dorothy.  The other I selected is Basic Grey - True Love - Giddy.

The grosgrain ribbon is pink.

The greeting is adhered over the ribbon with 3D foam tape.

I chose this set of cards to have no greeting which allows it to be used for any occasion.  The designer paper for this set is by Simple Stories - Snap Color Vibe - Dot/Stripe in Green and Yellow.

The ribbon is white grosgrain ribbon.

The textured card bases coordinate with the color of the DSP in green and mustard.

It label was cut with one of the Stampin Up Apothecary Framelits.

The accent has a white silk flower in the center held in place with a coordinating mini brad.  The 2 white buttons on either side are held in place with Bling Zots.

 It is adhered to the card front over the ribbon with 3D foam tape pieces.

This is supplies from last month's class which I have converted into the DSP split style card kit.

I chose Stampin Up Print Pattern in Garden Green with the Early Espresso card stock. Some kits have the Garden Green card base.

I added a length of white grosgrain ribbon for across the split.

The star accent was assembled by layering all three and adding the tiny star brad in the center.  This was adhered over the ribbon with 3D foam tape.

I create the greetings in Early Espresso with the Teeny Tiny Wishes set and punched them with the Decorative Label Punch.  I cut the label in half along the points.  It is adhered aligned along the bottom of the card.

Wednesday, March 22, 2017

Watercolor Flora Card

This card is for one of my card exchange buddies.

I started with a left over from making samples for my Art Card Stack Class which is coming up soon.
I decided to watercolor this card with the Stampin Up Watercolor Wonder Crayons.  I used a water brush to apply the color.  I used Garden Green, Always Artichoke, Bravo Burgundy, Cherry Cobbler and Not Quite Navy. I used Not Quite Navy to add spatters to the element.  It was cut to 3 7/8 inches square.

I added a length of Spring Moss grosgrain ribbon on the left hand side of the card front and taped the ends to the inside.

I stamped the greeting in Cherry Cobbler with the Itty Bitty Banner Stamp set the die cut it with the Bitty Banner Framelit set.  I mounted it to the right of the ribbon with 3D foam tape.


I used a water brush to paint the color onto my card element.  I applied a bit of color to a clear stamp mount with the crayon then painted from there.  In my opinion, this is the best way of doing.  You can You can collect the color directly from the crayon onto the brush which works okay if you want a bit more intense color. Applying the color directly with the crayon to your paper puts too much color, makes it too dark and it has very fat end for coloring. 
I bought the crayons second hand and I see that I got some colors from the Rich Regals set and some from the Earth Elements set.  I am very happy with the color selection.  These will last me my life time. 

Tuesday, April 12, 2016

Card Exchange Group Cards

I started with the ink background. This is done with by placing a variety of ink onto an acrylic plate and pressing a piece of card stock onto it to capture the ink. The ink can be stamp pad re-inkers, liquid acrylic, or any other dye based ink. I stamped the SU Print Pattern Background stamp onto it with Ballet Blue craft ink in hopes to be able to emboss it.  The powder did not stick well. I chose a Stampin Up Apricot Appeal card which coordinated well.  I cut a set of flowers with the Flower Fair Thinlit set. The large flower is Marina Mist as I did not have Ballet Blue which was embossed with the Polka Dot Folder, then the medium is a repeat of Apricot Appeal, then the center is Starfruit card stock. The leaves were cut from Starfruit as well. The greeting is stamped with the Little Birthday Cheer Stamp set with Kiwi Kiss ink onto Apricot Appeal and punched with the Modern Label punch. It is adhered to the card front with 3D foam tape.

 I chose my ink background to coordinate with Stampin Up Apricot Appeal again. This time I stamped the Triple Treat Flower Stamp Set onto the vellum with Garden Green craft ink and clear embossed it.  The greeting from the Sweet Essentials Stamp set is handled the same way.  I stamped the flower again on Apricot Appeal and punched it out with the Five Petal punch.  It is adhered over the vellum flower with 3D foam tape.  I ripped the edges of the vellum with a deckle edge ruler but it was not as effective as I had hoped.  The vellum ends are folded to the inside of the card and taped down. 
These cards are headed to the girls in my Card Exchange Group.

Thursday, January 21, 2016

HB - Pink and Blue

I made this card for a friend who celebrated a birthday recently and I'm seeing her today. 

I started with the Stampin Up Winter Bright DSP, which I chose the strips.  I then cut a layer of Bashful Blue textured and adhered it to the card front.  I then adhered the 3.25" square piece of DSP to the top half of the layer.  I cut a flower from Pretty in Pink with the Blossom Party die.  I cut a butterfly from Bashful Blue and layered it onto the flower.  I stamped the sentiment from the Perfect Punches stamp set in Garden Green on Whisper White.  I cut it out by hand because my extra large oval punch has stopped punching.  I mounted it to the card front with 3D foam tape.


Monday, November 9, 2015

Ready2Go Card Kits - SU - Candy Cane Buttons

Another set of R2G card kits.
This set features the Candy Cane Designer Paper.  I cut the DSP into 4" squares.  I selected Not Quite Navy card bases.  The greeting is from the Teeny Tiny Wishes stamp set in Real Red on Whisper White.  I taped the greeting to the DSP square to create a full piece for the card front.  I wrapped a piece of RR grosgrain ribbon over the join and taped the ends to the back.  This layer was then adhered to the card front.  I chose buttons from the Candy Cane set which came in Garden Green, Real Red, Blushing Bride and Baja Breeze. I put red/green thread through the button then adhered the buttons to the right side of the greeting.