Showing posts with label Certainly Celery. Show all posts

Tuesday, September 9, 2025

Card Making - Card Sets Continue

Still working with the Friends and Flowers Simply Scrapping Kit. 

The card base color is Certainly Celery. I added a layer of vellum from the SU Botanical Garden Vellum 6 inch pack. Using the large orange flower stickers in the kit I was able to add double sided tape to the back of the vellum to ensure it stayed in place. The photo corners are stickers from the scrapping kit.  Left Tempting Turquoise and right Only Orange.  I added small leaf stickers to both cards. Again, I am alternating the orientation to ensure variety. 

There is a lot of stuff in these scrapping kits. 
Here the card base is A2 and the color is So Saffron. Left is turquoise floral desinger paper with yellow scallop stickers above and bellow the square sticker. I added the same DSP over the square and then a yellow flower sticker onto the DSP.  The other has a turquoise square sticker and the same floral DSP. Another smmal flower sticker.

White quarter sheet inserts and white envelopes. 

Monday, April 29, 2024

Sewing Project - Wine Bottle Bag - Celery and Red

I cleaned up this morning after this frenzy of sewing.

I found this celery textured fabric that I had set aside a while back and forgot about.  It had all its elements so I just decided to make it up. 

I will be keeping a few of these for the Christmas Market and the others will go to Grandma Africa merchandise sale in June.

I found this scrap of red patterned fabric which worked well.  There was just enough for 2 stripes so I just crossed them.

This fabric is not cotton and a bit tricksy.  It is heavier than the cotton I have been using so I skipped the flannel but added a thin layer of poly cotton to stabilize it and keep it square. 

The lining is a pale yellow polycotton fabric. The thread was a pretty good match to the celery color.

I did add a small square of flannel in the very bottom which I sewed between the layers and sewed to the lining bottom.  Just some cushion for a glass bottle as it is placed on a hard surface.

The button was a great match.  I am very grateful for things to be falling into place for all of these sewing projects.


For information on the "My Bag" Line


Wednesday, June 16, 2021

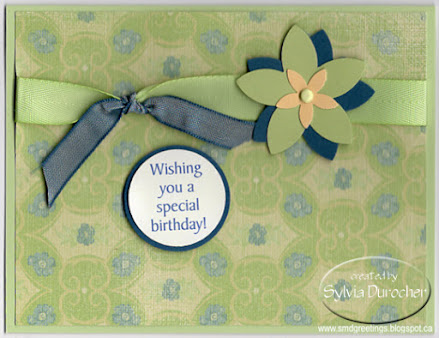
Special Birthday Card

My first card made with Stampin Up supplies since the major clear out of card making supplies in my craft space.

The card stock is Certainly Celery topped with a piece of Porcelain Prints DSP. 

I added twill ribbon in the same shade.  I added a short piece of Not Quite Navy tied in a knot.

I punched a couple of Five Petals punchies in those 2 colors. I added a small So Saffron flower in the center all held in place with a mini brad.  I adhered the flower to card front with 3D foam tape.  

The greeting is a color printed circle punchie with a NQN backer.

Thursday, April 18, 2019

Card Making Session - OSW Cards - Fundraiser

I have been making cards with a friend once a month.

This is a One Sheet Wonder card kit.  I brought the kit to Compassion House and these are the left overs.  The ladies there wanted the Thank Yous so I have birthday greeting in this set.

These cards are designed with the One Sheet Wonder design which makes efficient use of designer paper.  This my OSW1 layout design for 6x6 inch paper.

The greeting is from the So Happy For You stamp set in the same color as the card was trimmed with scissors to the frame. The greeting is cut to 3 inches. It was then layered onto a square of white card stock.  This layer is adhered to the card front with 3D foam tape centered on the card front.

The greetings are for these 2 card are designed with Stampin Up So Happy For You, Owl Occasions and Blooming Marvelous stamp sets.

The designer paper is from the Patterns Print III pack.


These will be in a Greeting Card Gift Set in our fundraising event at Welcome to my Kitchen.  This effort was unsuccessful as only 2 of us brought contributions.

Sunday, November 20, 2016

Sympathy - Vintage Floral Frame

I made cards for the family who lost a daughter, sister, wife and mother this week.

I chose a vintage window frame with floral branches from the Old Design Shop.

I filled the frame with the sentiment.  I colored the frame with several Stampin Up colors. I chose Certainly Celery, Perfect Plum, Bashful Blue, and So Saffron.

Once printed I fussy cut the frame then mounted it to the front of a card matching the color in the frame with 3D foam tape.

Monday, July 11, 2016

Night of Navy Background - HB Card

Add caption
I used a background I created when working on this card
I smooshed Stampin Up Night of Navy ink onto a piece of photo paper with a wet sponge.  Once dry, I cut the paper down to 4 x 5.25 inches.  I adhered it to the Night of Navy card front.  I cut the greeting with the Memory Box Jumbled Happy Birthday thin die.  I chose Tangerine Tango for Happy and Certainly Celery for Birthday.  I adhered those to the card front with tape runner adhesive so I could easily rub off the excess.  I then above the greeting I added some handmade paper flowers in an aqua color topped with small flower sequins and held in place with tiny white brads.

Sharing at Come and Get It Challenges - Make your own background.

Monday, April 11, 2016

Sympathy - One Layer Geometric

After checking the challenge at Less is More a little more closely it suggested that the card should include geometric or pattern. 
I designed a new card which meets the challenge more closely.
I chose several Stampin Up digital images.
Classic Dad - Diamond background
Wonderful Wings - Butterfly 2
Teeny Tiny Wishes - With Sympathy
Punch Shapes - Modern Label Punch
I chose Certainly Celery for the diamond pattern background and Night of Navy for the butterfly, sentiment and Modern Label punch.  I put the diamond layer on the bottom half of the Whisper White card. I placed the butterfly above the diamond layer and the sentiment onto the label punch shape onto the diamond pattern.  I placed texture with a scored line around the card edge.

Submitting to the Less Is More - 271 - One Layer Card Challenge

Thursday, December 3, 2015

R2G Card Kits - SU - Festival of Trees

Another Ready2Go Card kit for a kid's Christmas Party!

This kit has a Ruby Red card base.  I cut the greeting layer to 4.00W x 5.25T and created it with the Festival of Trees Stamp Set.  The tree outline is included on this layer.  I provided a white triangle tree cut to 2 7/8 W X 3 7/8 T onto which strips of Certainly Celery card stack was adhered.  Once I was happy with I just trimmed the green to the edge of the white triangle with scissors.  I adhered the strip tree onto the card front using the outline printed on it for alignment. The gold glitter stars were cut with the Sizzix Stars#2 die. I trimmed the pot with scissors leaving a small border all the way around. I adhered sequins on my tree then added the gold glitter star and the red pot with 3D foam tape.

I provided plenty of green strips and sequins to meet any kid's desire.

Wednesday, July 29, 2015

Blue Bird HB

I started with a Stampin Up Marina Mist card.  I stamped the You're Amazing - Happy Birthday stamp in the same color on a piece of white.  I then stamped the bird from the Punch Potpourri in MM and punched it out with the coordinating punch.  I punched a wing from the same blue. I punched the branch from Certainly Celery card stock.  I glued the branch above the greeting then adhered the bird sitting on the branch with 3D foam tape.  The white layer was then adhered to the card front.


Submitting this card to the following challenge(s):
TGIF Challenge 13 - Clean and Simple

Sunday, April 26, 2015

R2G Christmas Stack Kit - Winter Green

Here's another Ready 2 Go Christmas Stack Kit made with the 6x6 One Sheet Wonder cutting plan and card layouts
This time I used a retired Stampin Up DSP called Winter Green.
I chose the stripes as well as this bold floral pattern. I pulled 4 sheets of 12 x 12 which I cut into 6 x 6 pieces.  I decided to not use the set with the Stampin Up credit in the corner and besides I needed a some paper to make my card samples so it was a win win.
I picked Always Artichoke, Soft Sky and Certainly Celery for the card bases.
I chose the Owl Occasions Stamp Set.  The greetings are put on white card stock and cut to 2.75" square.  The greetings are mounted to the card front with 3D foam tape.
I chose Sage Shadow for layers on 2 of the kits and Certainly Celery for the other kit as I did not have enough of the Sage Shadow.  Good to have options.  The layers are 3.00" square.  The card stock strips are .5 inch by 5.5 or 4.25 inches.

The cards can be oriented in either wide or tall orientation.  The inserts provided allow the maker to choose.

This kit puts me in good shape for my June Christmas Stack Class.

Thursday, May 30, 2013

Card - Sympathy - Bird

I made this card for a friend whose father-in-law passed away this week.  I started with a deep grey card and added a Stampin Up! Top Note in Certainly Celery.  I stamped the sentiment ink a grey with a Stampendous stamp.  I added a Tim Holtz bird from the Caged Bird die in the same grey card stock anchored on a piece of white grosgrain ribbon.  I added an eye and beak to the bird with black marker.

Wednesday, January 23, 2013

Cards - Birthday in Greens

I created these cards for a friend who has a family member who celebrates a birthday on March 17 - St. Patrick's Day.   I made some for her a while back. Check it out.
Left: The card is Certainly Celery with double sided designer paper by Stampin Up!  It was cut 1/3 to 2/3 and the top piece was flipped over.  I color printed the greeting in CC on Very Vanilla and cut it with a Spellbinder Ribbon Slider thin die.  I placed it onto a piece of CC ribbon which was placed over the join of the 2 piece of DSP.  The ribbon is pulled through a slit in the card fold and taped to the inside.  I added a large silk flower and dyed a smaller one with Tim Holtz Peeled Paint Distress Ink. They are held in place with a vanilla brad.
Right: I selected a dark green textured card stock.  I selected some green DP by Basic Grey - porcelain arabella.  I color printed the greeting and punched it out with the SU! Decorative Label punch.  I punched another from the green cardstock. I cut it in half and mounted the halves top and bottom of the punchie. I added a coordinating gross grain ribbon.