Showing posts with label Sizzix. Show all posts

Wednesday, July 5, 2023

Die - Decluttering and New Work Station

 All my die cutting stuff has been in storage for a year and half.  I knew that I wanted to get rid of a lot of them so I decided to unpack the 10 boxes and make the hard decisions.

My sister helped me as she was going to chose from what was left and was willing to liquidate the rest.

I brought 4 boxes home out of 10 which was really good.  I had worked out how I was going to set up the station when I got home.  I set up the shelving unit on July 1st. 

We had scoped out some clear containers at Dollarama while I was at her house. Once I looked at what I had brought home and purchased a few more.  These were all original thick dies so they are really heavy for plastic containers.

The containers had feet and the shelving has gaps between the boards so I needed something to on the shelf to allow the containers to slide.  

I dug into my plastic placemat stash which were just the right depth so I needed 2 to make it wide enough for the shelf.  I used clear packing tape to join them and that solved that situation.  The placemats sometimes have textured surfaces so I had to turn them upside down so the smooth side was facing up.


I had to do the same thing for the diecutting shelf where I was putting my Big Kick machine.  I used some wonderful yellow striped ones and again taped them together. The machine has feet which may be a problem with the gaps and I don't what to lose small pieces of paper in the gaps.

There is lots of room on the shelf for my work light, a small garbage can, and a wooden box that holds my spacers and cutting plates.  These need to be close at hand everything I cut something.

I love the yellow stripes on the work surface.


Generally, the thick dies in either original or Bigz size fit in old style CD storage containers.  I had these wooden storage boxes from IKEA and the dies fit in perfectly. Luckily most of them were empty so that was a win.

I have not labeled all the drawers yet but I will. One drawer contains the amount of embossing folders I kept.

The wood boxes are much sturdier than plastic but I still have to be careful  I used to store dies in plastic pop crates which were very sturdy.


The red drawers will hold thin dies which are stored in CD cases.  Those have not been unpacked yet.

The black case was designed for the Sizzix original dies so that is where they are stored.  I have a really hard time using stuff I can't see so I may have to put die cuts on card board and hang them in the space to at least remind me what I have.

The second shelf has the small yellow and green dies and sizzlets, and movers and shaper dies in clear containers.

I am using this translucent corrugated plastic sheet from IKEA on my die cutting work shelf to provide a neutral background for taking photos of my cards for my blog.

The plastic is stored on the top shelf above the red wicker baskets when not in use.

Here you can see my grey IKEA lamp in it's super heavy white base which sits on the left.  The shelf is by a window but there will be times that I need a light to work.

The wood shelf is from IKEA as well is was called STEN when I bought it 20 years ago.  The shelves are 11 inches deep and about 33 inches wide.  With the cross brace on the back it make for a very stable work surface.  Strong enough to hold the weight involved with storing these dies.
Here's my die cutting work station.  There is still some space on the bottom shelf which I am not planning on filling.

It works really well and I am so happy to have it back.  It may have to be dismantled if I move this year but at least is way more manageable.  Now it lives in the craft space which is wonderful.

The dies I did not keep were gone through by my sister, then my niece and the rest will go to my sister who runs a daycare.  There are about 30 dies going to her.

They will have good homes and I have just so much less to manage.  Many dies I had purchased when I was running card  making classes and card club.  Many suited that situation but I no longer need them as I don't do classes anymore.  I am retired.


Friday, December 18, 2015

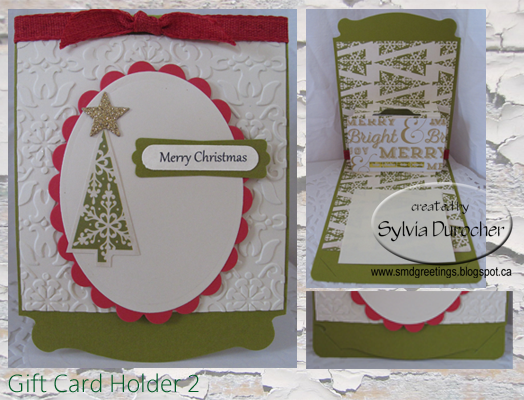
Gift Card Holder - Version 2

Another Gift Card Holder still using the Stampin Up Card Base Pop'nCuts die.  I cut this one from a Dill card stock. This time I used the Sizzix Pop 'n Cuts Magnetic Insert Die - Suitcase, 3-D (Pop-Up) for the inside.  I cut a piece of designer paper with triangle trees on it.  It was trimmed to 9 inches tall and 4 inches wide.  I trimmed the suitcase handle off with scissors. I chose this insert die because it was so close to the size of a gift card. The gift card is held in place with a Zot.I've added a sticky note for my sentiment which will allow it to be reused.
The front has a piece of ivory card stock embossed with the Stampin Up Vintage Wallpaper folder.  I adhered that to the card front then added a red cotton ribbon along the fold.  I cut a red scallop oval with Spellbinder Nestabilities then a smooth oval with the corresponding die.  I cut a triangle tree from the scrap of the designer paper.  Added a gold glitter star cut with the Sizzix Star die.   A SU Modern Label punchie with the Word Window greeting punchie. Not sure the straight edge of the embossed layer is the best but I will continue to tweek the design.
Again, the fact that the card keeps itself closed with the tab/slot is great.

Thursday, July 2, 2015

Some More Cards from Decorative Paper

Some more cards from Decorative Paper I have made recently.  This is an alcohol ink background in reds, oranges and purples. 
I cut the greeting with Stampin Up Little Letters framelits from white card stock layer.  I then cut tropical flowers with the SU Flower Fair framelit set.  They remind me of hibiscus flowers.  I used the larger die to create the 2 holes in the white layer then cut the resulting positive shape with a smaller framelit.  I used a deep red marker with a fine nib to create a dot shadow around the hole.  Once the colored layer was adhered to the magenta purple card front, I adhered the white layer to the colored one.  I then adhered the 2nd white flowers in the center of the holes cut.


Another alcohol ink background. I sure love these vibrant colors.  I stamped the white layer with a SU Itty Bitty Background stamp in deep blue.  I cut the greeting with the Memory Box Grand Happy Birthday die from the decorative paper. I aligned the bottoms edges leaving a small border.  I cut the butterfly with the Sizzix Winged Beauties Thinlits set from the same paper. 

I cut the Acrylic Paint Decorative Paper with the Cricut and the Just Because Cards cartridge.  It was cut at 6".  It was adhered to the card front.  I tucked a color printed oval greeting in the lower crescent.  I layered several silk flowers starting with a large white with yellow ends, then a white medium then a blue purple one which repeats the colors in the DP.  I added some green silk leaves and held all these layers in place with a tiny white brad. 


This decorative paper was created with spritzing re-inker ink with a small mister spray bottle.  I selected two warm orange silk flowers, then a green handmade paper flower then then a white silk smaller flower all held in place with a blue mini brad.  I added a strip of coordinating strip of card stock across the bottom third of the card.  I then added a bright greeting coordinating with the colors in the DP.  I added a color printed oval greeting cut with the CM oval cutter.


This is the same decorative paper as the previous card. I cut it with the Sizzix Tim Holtz Vintage Cabinet Card die.  This layer was adhered to a golden yellow card.  I layered a large silk flower, then 3 from the Sizzix Flower Layers and Leaves die in warm green and golden yellow. I selected a golden yellow mini brad and placed a white sequin then the card stock flowers then the silk then onto the card front.  I designed the greeting, color printed in black on vellum then clear embossed it.


This is a layer of Acrylic Paint decorative paper in blues and purples.  I cut a flower from vellum to match the greeting.  The white felt flower was cut with the SU Blossom Party original die as well as the purple slim petal one.  I added a tiny iridescent sequin onto a tiny white sequin then layered the flowers.  This was adhered to the card front once the decorative paper had been glued to the card front of a purple card.  I designed the greetings and printed them on vellum. I adhered the vellum greeting to the card front with vellum adhesive.  It was printed in black and clear embossed.  They look great!

These cards are a line of cards I've designed with unique  decorative paper I design regularly.  I've named the line Unique Cards. These are for sale in a gallery.  Check the tab at the top of the blog.

Saturday, June 6, 2015

Card - Butterfly Thank you

This is a card made with Stampin Up product. I started with a Soft Suede card.  I added a layer of Delicate Dots DSP cut to leave a small border.  I punched top right and bottom left corners with a corner rounder.  I cut a piece of Rose Red card stock with one of the flowers from the Flower Fair framelits.  I ran it through the Pretty Print embossing folder.  I brushed the embossing with ink pad. I stamped the greeting from an unknown stamp set with Soft Suede on Whisper White and embossed with clear powder. I brushed the edges with the ink.  I cut the butterfly with the Sizzix Winged Beauties thinlit from So Saffron card stock.  I used an Aqua Painter to add the body of the butterfly with Soft Suede ink.  The greeting is adhered to the card front with 3D foam tape.
Submitting to the following challenges:
Pals Paper Arts - 254 Color Challenge

Sunday, May 17, 2015

Card - Simple Birthday

I started with a pink card which I believe is Stampin Up Pink Passion.  I cut 2 small squares and 1 larger square with my new Sizzix nesting framelits.  The squares are cut from Tempting Turquoise Patterns Pack DSP and the larger from Rainbow Sherbert DSP.  I stamped the sentiment with a stamp from the A Little Birthday Cheer Stamp set.  I then adhered the 2 squares based on a sketch for a challenge.  I cut the butterfly from Daffodil Delight card stock with the Sizzix Winged Beauties framelit set.  I added some definition with a black marker as well as a flight path.

Submitting this card to the following challenges:


Paper Pals Arts 251 - Color 

I've put Pink Passion for Melon Mambo

Saturday, May 9, 2015

1.25" Framelit - SU Four Square

The framelits I ordered for the Stampin Up Four Square stamp set arrived yesterday!  The set was designed for the1.25" punch which they no longer sell.  I set about finding a used punch or something else that would cut this set.  Eventually, after much web searching I found the Sizzix square framelits start at 1.25".  I ordered it 2 months ago and it finally arrived.  Here's how it does the job!  Diecutting is not as quick as punching but I got 7 other framelits which will help with the square layered greetings I have been using lately.  Better than that it takes way less room to store!

Saturday, December 6, 2014

Happy Phrase - Birthday

I made this card for my Dad's birthday. I started with a panel of card leftover from these cards.  I thought with his birthday this close to Christmas red and green would be appropriate.  I cut the plaid card stock with the Sizzix Happy Phrase die.  I cut the dark green at the same time.  I made use I collected the holes for the A PP so I could glue them in place.  I layered the plaid layer onto white then glued the green word into the hole then added the plaid pieces I collected earlier. I glued the white layer to to a red card.  I printed the birthday on white and flagged each end.  I mounted it to the card front with 3D foam tape.

Thursday, October 23, 2014

R2G Christmas Card Stack Kit - Joy Star

Here's the second card in this kit.  I chose a purple diamond designer paper which could be used with a few shades of purple card stock.  I chose a deep purple card and matched it with pearl white card stock for the JOY layer.  I paired the copper metallic paper with a lighter card stock. The metallic layer was cut to the 4"x 5.25"inches then the JOY was punched with a Martha Stewart border punch. The punching was pretty easy because I punched the centre one first then just aligned the other two.  The stars are cut with a Sizzix star die with the largest in the metallic card stock and the smaller one in glitter card stock. The designer paper was cut to 3" x 4.75" and layered onto the metallic JOY layer. The metallic star was adhered directly to the designer paper and the glitter star was adhered with 3D foam tape making sure to align the horizontal rays.

Update: When I did the class with this kit the participants discovered that the sentiment insert I had included was portrait but the card was landscape.  As they worked on the other cards my brain was desperately trying to find a way to make the best of the situation.  Here's the solution:

Wednesday, October 1, 2014

Christmas Card Challenge - Oct - Tools Dies

The challenge for October is Tools - Dies.  This could include: Thick Dies from Sizzix or other companies, Electronic Cutters such as Cricut or Silhouette, or Sizzlets, or thin dies such as Spellbinders Nestabilities, Framelits, Thinlits,  Wow hasn't the world of diecutting grown!!


I selected a Flip Card and used the Sizzix Framelits Die Set 11PK Card Circle Flip-its #2. I selected the circle to repeat the circles in the DSP. I cut the card base from a bright green card stock.  Then I cut the layers from Basic Grey Fruitcake Berry Branch DSP. I cut a scallop circle to place on the circle flip.  I added white Martha Stewart snowflake punchie with a glue dot to hold it in place.  I added a piece of cotton ribbon in deep red to the left hand side and knotted it and trimmed the ends.  This is really nice ribbon and was bought at my local arts and crafts store in the Christmas ribbon section.

The picture on the right is of the card open.

Thursday, September 25, 2014

Snow Angel Card Set

Another set of Christmas cards for the auction.  I started with a photo I took of a vintage snow angel Christmas decoration.  I added a night sky in warm tones then layered over it a texture background of falling snow that I designed. I added a snowbank on the bottom of the card with the "Peaceful Wishes" greeting layered over it.  I printed this onto ivory card stock.  I then added a matte gold star die cut with the Sizzix die.  This was added to the card front with a glue dot to add just a wee bit of dimension. Super happy with this one!


I then packaged the set of 20 cards in a clear square box.  I added a spacer just like the retail industry does which worked out really well. The box was purchased from a packaging store.

This looks great.

Monday, September 22, 2014

Card Club - Sept - Flip Card

A flip card this time, cut with the Sizzix Royal Flip-It Card Thinlits.  I started with a yellow card and then cut the layers in blue floral designer paper.  For the central accent I cut the next layer in a orange card stock. Then the greeting was stamped in the center oval of the next layer.  It is automatically embossed when cut.

For the class I printed the greetings then cut them because the oval in the die allows for perfect placement.


Sunday, May 25, 2014

How To: Magnetic Platform for Big Shot

Here's how I made myself a magnetic platform for my Big Shot that keeps my Frame-lits exactly where I want them. I had removed the screws from my Tab 2 of my Big Shot a long time ago. I added it to the sandwich when I needed it.  So I needed to find something magnetic which would replace the thickness of the Tab 2. During a visit to a scrap book store the other day I found Art Bin Magnetic Sheets which are designed for thin die storage.
They are just a bit bigger than the Big Shot platform so I trimmed off the tabs which left a piece just the size of my platform.  The magnetic sheet is quite thick but it just needed a bit more.  I went looking for something to add just a bit more and found that my metal cutting adapter plate was just right.
Now I can place my framelit exactly where I want it, cut as many times I want without it moving on me and my having to adjust after every cut.  It's solid magnet so there is no jumping around of the small framelits.
Works great!!

I've had some questions so here's what sandwich looks like:

  1. Acrylic Clear Cutting Pad 1
  2. Big Shot Multi Purpose Platform with Tab 1
  3. Metal Cutting Plate Adapter
  4. ArtBin White Magnetic Sheet
  5. Frame Lit
  6. Card Stock
  7. Acrylic Clear Cutting Pad 2

Happy Cutting!

Wednesday, April 30, 2014

Card Challenge - Birthday Card

The challenge was a Birthday or Anniversary card.  I chose a male birthday card.  I used the Sizzix Framelits Die Set 10PK - Card, Triple Square Flip-its which cuts the card base, the piece for the left hand and right hand designer papers, the layer for the small squares.  I placed squares on the flip side as well. I chose masculine designer paper with grids on the back side which I used for the backgrounds squares for the stars.  I punched the stars.  I added a Stampin Up Word Window greeting is a corresponding card stock.  The picture below shows the card open showing the back side of the squares.  It makes for a lot of small pieces to manage but it turned out well.

Monday, February 24, 2014

Card Club - Feb - Dragonfly Trio

This card was made with the Sizzix Framelits Die Set 10PK - Card, Triple Square Flip-its.  I chose double sided designer paper.  I chose to highlight the red and cut squares to put in each of the flips.  I punched white dragonflies and adhered in each of the red squares.  I then cut white squares for the back of the trio flips and neutral layers for the back of the card to allow the person giving to have a place to write their sentiments.  That meant 12 pieces for each card.  Needless to say that was a lot of work. I ended up finding a square on my Cricut Cartridges - Wrap it Up  which I allowed me to cut the white back side squares way quicker.

 I made several color options with this card which added to the time needed to make those selections.
I wished I had single square flip-it. Lesson learned.

Thursday, January 23, 2014

Card - One Layer

I made this card for a One Layer challenge.  I rubbed green ink on the bumpy side of the Sizzix ornament folder then ran the front of my card through the Big Shot.  I then added red chalk to some of the areas to add a bit more interest.  I stamped the greeting in the bottom right hand corner with a small clear stamp.  I added a satin ribbon bow on the ornament hanger.   It still needed something so I chose a dark green marker and ran it along the edge of the the card. 

Submitting it to Sparkles Christmas Card Challenges - One Layer.

Monday, December 23, 2013

Card - Christmas Cards for Girls

I made these cards as a result of a request from one of the girls at work for Christmas cards for her girlfriends and Mom.  I chose the Christmas Magic designer paper by Fancy Pants Designs. It was cut with the Sizzix Tim Holtz Cabinet die.  I added a Baja Breeze card and layered a piece of embossed vellum in between.  The embossing folder is Sizzix Textured Impressions Sugar & Starry Night By Basic Grey.  I wrapped white narrow organza ribbon around the die cut and tied it in a knot on the left hand side.  I punched the Cherry Cobbler color printed greeting with the Stampin Up! Artisan Label punch.  I punched another one from Cherry Cobbler and cut it in half width wise and then layered them behind the greeting.  I added a small bling rhinestone above the Merry.  This greeting is adhered to the card front with 3D foam tape.  I placed 2 white silk poinsettias and a deep wine flower in the centre and pushed a hole through all the layers and held them all in place with a coordinating large brad.  The card on the right is punched with the SU Decorative Label punch.

Tuesday, December 10, 2013

Tag - Poinsettia

I generally do something small for each of my sisters for Christmas.  This year there was a great special with Tupperware so each of them is getting a bowl filled with home made snacks.

I cut the tag from designer paper and added a second light colored one I could write on!  Added a organza bow and a Stampin Up! five petal poinsettia in red and green.  All held in place with a gold brad and a blingy flower for the centre.

Monday, October 28, 2013

Card Club - October - Flip It

I had to use my Sizzix Flip - Its framelits again.  I just love them because you can create a card fast.
I cut the card base in dark brown.  I cut the left and right hand layers from designer paper.  I cut the circle from mustard card stock.  I cut a pear from the designer paper and glued it on.  I have added a white layer on the back to allow a person to provide a greeting to the person receiving the card. 
For card kits I cut the scallop circle from the designer paper and added daisies and 5 petal punches with small circles for the centres.

From this sample I've learned to avoid striped paper.  I punched large daisies in ivory and green with a green .5 inch circle.

Wednesday, October 9, 2013

Card - Flip Card Cherry Damask

I made this card for one of my on-line card exchanges.  I'm loving this Sizzix Flip Its Framelit set a lot.  It allows me to quickly make cards. I cut the flip card base in a cherry card stock.  I then cut the 2 side layers from a damask designer paper.  I cut a scallop circle in damask and layered 2 large punched daisies onto it, cut in ivory and cherry.  I added a red sequin under the brad to just cut down the size of the ivory centre on the flower.  All held in place with an ivory brad.I put a smaller damask circle on the back of the central element to hide the brad.

The Sizzix Flip Its framelits sets are well thought out and better compared to others being offered on the market.

Sunday, September 29, 2013

Card - Flip Card - 1st try

I bought a cool tool last week.  The new Sizzix Flip Card Framelit set of 11 dies.  I bought the circle one set with scallop sides. The card is cut with one framelit and it scores the fold lines.  Then the pieces to coordinate on both sides are the next 2 framelits you use to easily cut decorative paper with an even border.  Then you have all kinds of  options for your central element.  I then cut a piece from the same designer paper with the scallop circle, then a piece of deep purple card stock with circle and it created the small holes around the edge.  I stamped a flower in purple and punched it out with a 13/8 circle punch.  The set has many different layers you can choose to create a wonderful central image.

This is the back.  I added a piece of white bond for the person to write their sentiment since there is not much room in the fold. 


Here's the card open and standing.  This design does limit you to portrait orientation but it quick and easy. Check out your local scrap book store and see if they have these in stock.  I'm really happy with my investment.