Showing posts with label tea card. Show all posts

Friday, March 26, 2021

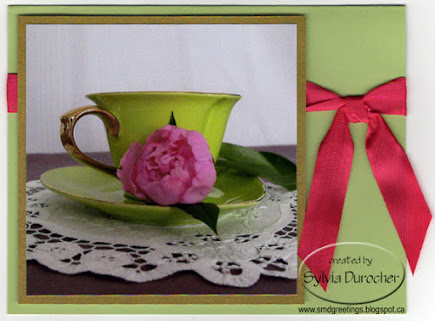
Card - Heart Tea Cup


Another card for the Coffee Loving Cardmaker Spring and Summer Blog Hop.

I chose a 4x4 photograph from my 2018 photo tea calendar.  I trimmed it to 3.75 inches square.  

I added a piece of gold metallic card stock behind the photo.

I chose a bright green card to match the tea cup in the photo. 

I wrapped a piece of deep pink seam binding around the front of the wide card and knotted and trimmed the ends. 

The tea layer was adhered to the card front with 3D foam tape.

Thursday, March 25, 2021

Card - Coffee To Go Cup

I was seeing so many of these wonderful cups on the Coffee Loving Cardmakers Spring and Summer Blog Hop that I wanted to make one.

I tried several ideas but this one worked the best. I found a cup graphic on line and printed it several times on different papers.  I then fussy cut the cup, the wrapper and the lid into separate pieces.  I printed a circle coffee graphic.  I then chalked these pieces with deep blue.

I then assembled the cup pieces and adhered the circle onto the wrapper with 3D foam tape. 

I chose a pea green card base.  I found a piece of deep blue textured card stock and wrapped a piece of blue seam binding around it.  It was then adhered to the front of the card.  I adhered the cup focal point to the blue layer with 3D foam tape. 

I am really happy with this card. 


Card - Library Tea Break

Another card for the Coffee Loving Cardmaker Spring and Summer Blog Hop.
 

I printed the Tea and Book graphic on white card stock.  I trimmed it to 3.75x5.00 inches.

I chose a blue purple card base in the A2 size in the portrait orientation.

I chose a piece of warm caramel card stock to accent the main element.  I placed 2 pieces  - one in the top left and one in the bottom right corner leaving a small border. They were adhered with double sided tape.

The tea cup layer was adhered to the card front with 3D foam tape leaving a small border.

I added a photo corner punchie in the top right hand corner made from the same warm caramel card stock.

I spattered the front with a bit of denim blue watercolor. 


Wednesday, March 24, 2021

Card - Japanese Tea

I made this card for the Coffee Loving Cardmakers Spring and Summer Blog Hop.

I started with the Japanese Tea Set graphic in gorgeous grey and deep red colors.

I trimmed it to 3.75" x 5".   I found a deep red A2 card base and a coordinating grey layer to go with the tea image.

I adhered the grey layer to the card front.

I added 3 red mini brads in the upper left hand corner and the kanji for TEA in the right hand upper corner.

This layer was adhered to the card front with 3D foam tape.

I am happy with this card.

This was a prize winner in the blog hop! #794
 

Sunday, March 21, 2021

Card - Coffee Time

I made this card for the 2021 Spring and Summer Coffee Loving Card Makers Blog Hop.

I started with a digi of a hand drawn pastel image of a beautiful coffee pot and cup.

I just love the soft muted tones of this image.

 I printed the image on a quarter sheet of white card stock and trimmed it to 3.75 x 5 inches.

I added a warm caramel piece of card stock layered behind it and adhered these layers to the front of a pea green card base.

I added a greeting above the image with a ripped layer of the same caramel card stock and the greeting printed on a taupe card stock.

I added 3 mini brads to the left of the greeting.

This greeting layer was adhered with 3D foam tape. 


Saturday, September 23, 2017

Coffee Loving Cardmakers - Fall Blog Hop

I made this card for the last day of the Coffee Loving Cardmakers Fall Blog Hop.

I won a gift certificate from Paper Sweeties in the Summer Blog Hop.  I decided on the Tea for Two stamp and die set. 

I have stamped the tea pot onto double sided designer paper from a 12x12 pad from KC Company.  I chose the polka dot side for teapot and the floral on the back side for the background. 

I embossed my table top from white card stock with a Sizzix Textured Impressions Plus - Field of Diamonds Embossing Folder.  I ripped the top edge and made it the same width of the designer paper.

I chose the mauve color from the DP and used it in the card base.   I stamped the teapot in black and die cut it.  I added several silk flowers in the bottom right hand side of the tea pot. 

I added a greeting stamped in a warm green on a Stampin Up Modern Label punch.  It was adhered to card front with 3D foam tape.

Submitting to the challenge for the hop which is to make a tea, coffee or cocoa related card.

Friday, March 31, 2017

Rise and Shine Tea

I started with a bright turquoise card.

I cut the sun with the Stampin Up Sunburst Thinlit from yellow Bazzil Textured card stock.  Trimmed to the edge of the card.

I created the sentiment with the words from the Verve Stamps Rise and Shine Digital Set free download during this blog hop.  I colored it with Night of Navy and punched it with the SU 1 3/8 inch circle punch.  I cut a turquoise circle with the 1.75 inch punch from SU. I cut the navy scallop circle with a Nestabilities Scallop Circle thin die.These were adhered as shown and adhered to the card front with 3D foam tape.

I added a tea cup from the Stampin Up Tea Shoppe Stamp set in Night of Navy.  It was printed then I fussy cut around the edge and used an exacto for the handle. This was also adhered with 3D foam tape.


Submitting to the Coffee Loving Cardmakers Spring Blog Hop

Tea for Two

I started with the sentiment which I had printed and embossed when I made my other tea card.

I chose to make it a Stampin Up card so I decided on Night of Navy, Old Olive as a color scheme. The sentiment is printed in Old Olive and is from the Tea Shoppe Stamp Set. It was clear embossed on the vellum.
I created a piece of background paper with the Tim Holtz Distress Stain - Crushed Olive mostly and a bit of Mustard Seed.
I cut a piece of Kiwi Kiss card stock into a large banner and adhered that to the front of a Night of Navy card. Then I trimmed the back ground paper and the vellum to leave small even borders on each of those.
I printed a cup from the Tea Shoppe Stamp set on Whisper White and fussy cut around the image with scissors and an exacto knife.  I adhered it above the sentiment with 3D foam tape.  I then placed double sided tape behind the cup and adhered the vellum to the background paper.  Now, I adhered the background layer to the Kiwi Kiss banner.
I measured the center and a point on each side which I punched out the side ones with a 1/8 inch hole punch. I cut a length of Night of Navy Tafetta Ribbon and tied it in a knot above the cup.

Submitting to the Coffee Loving Cardmakers Spring Blog Hop

Wednesday, March 29, 2017

Cup of Thanks

I started with the cup.  I cut it with the Cricut and the Joy of the Season cartridge.  I chose some bright spring paper and cut the cup at 2.25 inches.  I added a narrow strip of blue card stock along the top and bottom of the cup.  I added 3 tiny yellow handmade paper flowers along the blue held in place with 2 tiny brads. The sentiment layer was created with a greeting from the Stampin up Tea Shoppe digital set.  Printed in Island Indigo and clear embossed.  The banner is 2.75 wide and 4.25 tall.  The tail was cut by hand.  The cup was adhered to the vellum with 3D foam tape.  The watercolor background was created by smooshing 3 colors of Tim Holtz Distress stains onto a waterproof mat. I used Crushed Olive, Mustard Seed, and Peacock Feathers.  I spritz the ink and then laid my glossy white card stock into it to capture the color.  Once dry, the layer was cut to 3.75 wide by 5 inches tall.  It is adhered to a card of Bazzil textured card stock in a bright warm yellow.
Submitting to the Coffee Loving Cardmakers 2017 Spring Blog Hop.
This card is number 885.

Sunday, February 5, 2017

Rose Tea Pot

I chose a small rose background paper from Granny Enchanted free digital papers.  I printed it onto white card stock then trimmed the piece to leave a small border.

The rose tea pot is from Free Dearie Dolls Digi Stamps.  I added a sentiment then printed on white card stock.  I used water color pencils to add color to the roses and the blue on the foot, lid and handle.  I heated it with heat tool and the ink did not run.  I did not use much water on my brush.

I chose a warm green card which matched the background very well.  It was more challenging to get my water coloring right with a limited number of pencils.

I had hoped to have the solid layer behind the teapot be blue but could not find a piece of card stock in my stash that would be right so I went with another piece the same as the card. I trimmed it to leave a tiny border and ripped the right hand edge.

I created this card for a challenge at Coffee Loving Card Makers - CASEing DT#10.

Friday, December 16, 2016

Winter Coffee Lovers Blog Hop - Warm Coffee Pot

Another card for the 2016 Coffee Lovers Cardmaker's Winter Blog Hop.

I found this great image of a coffee pot with a hot steaming cup of Java.  I love the colors in this card - burgundy, espresso brown, and caramel.  Once printed, I cut the coffee image with the Sizzix Squares frame-lits.
I then chose an espresso piece of card stock and cut a layer just a small bit larger. 
This burgundy card complemented the image nicely. 
I chose a piece of caramel seam binding and taped a piece just left of center and taped the ends to the inside of the card.  I cut a shorter piece of the ribbon and tied it onto the piece on the card.  I trimmed the ends with scissors. 
I created my greeting with a banner, printed and then fussy cut around the border.  The coffee and the sentiment were adhered to the card front with 3D foam tape. 

Submitting to the Coffee Loving Cardmakers Winter Blog Hop

2016 Winter Coffee Lovers Blog Hop

I'm back into joining challenges now that I am done with craft sales for this season.

I lost the link to this challenge when Blogger made their changes in September.  It's been a challenge to say the least to try and remember what I had save over the years.  I found it just in time.

I found this image on Vintage Cup blog.  I love it so I downloaded it, added a copper border and I printed it onto photo paper.  I trimmed it close to the border.
I then selected card stock in a coordinating copper color.  I trimmed that to leave a small border and  embossed it with the Sizzix D'vine Swirl embossing folder. I adhered it to the front of a coordinating purple card.
I chose a greeting I designed myself and colored with the purple and copper.  Once printed, I punched it out with the 2" oval punch.  The greeting was adhered to the card front with 3D foam tape.  I mounted it below the negative space in the tea image.

Submitting to Coffee Loving Cardmakers - Winter Blog Hop

Friday, February 12, 2016

Tea Inspired Cards

I have been talking tea this week and was inspired to make tea related cards. I made two of these for my card exchange this month.

The tea pot was cut with the Cricut and the Folk Art Festival cartridge. I chose a teal card stock.  I designed the lime green greeting layer and color printed it on white card stock.  I then trimmed that layer and adhered it to a coordinating green card.  I'm happy with the way they worked out.

Check here to see previous my tea inspired cards.  These are a bit more elegant.

Friday, August 29, 2014

Work Space Clean Up - Cards

I've been working on excavating my desk from left overs from projects in the last few months.  I found these leftovers from this project.  The teapot was cut with the Cricut - Folk Art Festival cartridge.  Then I added a layer of card stock to which I added a punched border with a Martha Stewart punch.  The blue card stock matched the blue in the DSP very nicely. I need to get back to it.


Tuesday, June 3, 2014

Nifty Notes - New Images

I made some more Nifty Notes for a co-worker who is leaving.  She going to a job where blank note cards will come in handy.  She thought the tea pot was particularly cool.  I agree.

This cards are produced by overlaying a white clip art in white onto a decorative paper which I created. These images are from Clker. Some I've changed and added features.  The background images range from alcohol ink, watercolor and stenciled. Because these are wide on the card I was able to use different images that I used in the past.

Here's a couple links to the ones I made a while ago. Images with Words and just images.

Wednesday, November 27, 2013

Cards - Tea Party Thank Yous


The teal bags arrived yesterday!!! It was like Christmas. I made these cards for the folks who placed orders at my Steeped Tea Party. 


I started with the deep yellow cards and found designer paper that coordinated. I cut the tea pots with the Cricut and the Folk Art Festival cartridge.  I then found solid card stock to place between.  I see the darker layers would better than the lighter.  I ripped the bottom edge of the layer and glued it to the card.  Then the teapot was added on top.  I had quite a few to make so that worked well.