Showing posts with label Sizzix Daisy #4. Show all posts

Sunday, March 30, 2025

Cards - A7 - Die Cuts

Another few cards today.  Again, A7 (5.25x7.25 inch) envelopes.

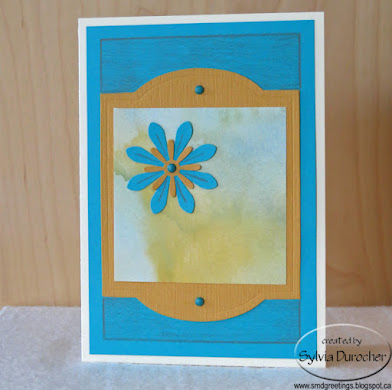
I started with an ivory card base.  I cut a piece of textured turquoise card stock to leave a small border.  

I cut a Tim Holtz Cameo Frame die cut from left over Stampin Up More Mustard card stock from yesterday's session. Trimmed a piece of watercolor designer paper to fit the middle of the die cut. 

The floral accent is a large daisy punchie in turquoise, topped with a small More Mustard one held in place with a turquoise mini brad. 

The cabinet die cut was then adhered to the turquoise layer with 2 more blue mini brads top and bottom.

I added the finishing border with a warm grey colored pencil and also added lines on the large daisy die cut.  A white insert and an ivory envelope to finish it off.

For this card the base is SU Tempting Turquoise card stock in 12x12. 

I used the negative piece from the Cameo Frame die cut to layer onto the card front leaving a tiny border. 

I placed a piece of the watercolor designer paper behind the More Mustard layer. 

I cut a Sizzix Leaf Stem die cut from warm green card stock then embellished it would pencil crayons. I cut a couple more leaves and added them below the opening.

I added a pencil crayon line along the inside of the die cut in a warm grey.

A white insert and an ivory envelope were added.

For this card, I chose a warm green card base. 

I ripped left over card stock in the More Mustard and the Tempting Turquoise and layered them with a piece of the watercolor designer paper.

I cut a flower with the Sizzix Flower Daisy #4 die from turquoise card stock.  I glued it to the front of the card with Scotch Quick Dry adhesive.

I added some texture to the flower with colored pencils. 

I mounted a tiny button in the center of the flower with a Bling Zot.

A white insert and an ivory envelope completes the card.

Tuesday, February 19, 2019

2019 Cardmaking - CH - Class 2

I taught my card making session at CH tonight.  I had few ladies participate.

This card features bright yellow striped designer paper cut to leave a small border on an golden yellow card.

The flower was cut with the Sizzix Flower, Leaves & Stem #4 from black card stock.  The stem was cut to fit the length of the card.

I poked a hole in the center of the flower with a push pin. I placed the gold sequin and Prima paper flower onto the tiny black brad and inserted into the hole I made.  I pressed the prongs apart on the inside of the card.

With no greeting it makes a great card for any occasion for a music lover.

This card makes a great one for a birthday or thinking of you.


I chose a white card and cut the bold graphic designer paper to leave a small margin and adhered it to the card front.

I wrapped the black ribbon around the card front and tied in a square knot on the front left.

The black label was cut with the Stampin Up Deco Label framelit. I printed the house and punched with 2" circle punch.  It was adhered over the ribbon with 3D foam tape.


 I started with a deep teal card.  I cut the textured  designer paper to leave a small border and adhered it to the card front.

I cut the flower from copper card stock with the Sizzix Daisy #4 die.  It was adhered to the card front.

With a push pin I made a hole through the card front for the brad which holds the two handmade paper flowers (teal and terracotta) in the center of the flower.

The greeting was printed in a warm blue then punched with the Stampin Up Artisan Label Punch.

It was adhered to the card front with 3D foam tape.

The weather was more seasonal this evening which was much appreciated.

Tuesday, January 22, 2019

2019 Cardmaking - CH - Class 1

I taught my card making session at CH tonight.  I had some enthusiastic ladies participate.

This card features music paper cut to leave a small border on an ivory card. 

The flower was cut with the Sizzix Flower, Leaves & Stem #4 from black card stock.  The stem was cut to fit the length of the card. 

I poked a hole in the center of the flower with a push pin. I placed the gold sequin and Prima paper flower onto the tiny black brad and inserted into the hole I made.  I pressed the prongs apart on the inside of the card.

With no greeting it makes a great card for any occasion for a music lover.


This card makes a great one for the guys in your life.


I chose a grey card and cut the designer paper to leave a small margin and adhered it to the card front.

I wrapped the black ribbon around the card front and tied in a square knot on the front left. 

The black label was cut with the Stampin Up Deco Label framelit. I printed the pelican and punched with 2" circle punch.  It was adhered over the ribbon with 3D foam tape.

I started with a deep teal card.  I cut the polka dot designer paper to leave a small border and adhered it to the card front.

I cut the flower from copper card stock with the Sizzix Daisy #4 die.  It was adhered to the card front.

With a push pin I made a hole through the card front for the brad which holds the two handmade paper flowers (teal and terracotta) in the center of the flower.

The greeting was printed in a warm blue then punched with the Stampin Up Artisan Label Punch. 

It was adhered to the card front with 3D foam tape.

Tuesday, July 31, 2018

Cards to Gallery - Decorative Paper

This decorative paper which I made a while back was so bold I chose to use a small amount of it.

I punched squares with my Creative Memories Double Square Punch with the smaller one.  I punched black squares with the larger one. Coordinated size punches makes this design easy to make. I used a corner rounder punch on 2 of the corners then placed one of the square corners in the center.

I printed the white layer with the guidelines for the squares and the french greeting on the right.  Once the squares were adhered I glued it to the front of a blue card.

I added small brads in the bottom right hand square.

 I chose a piece of decorative paper with minimal color.  I coordinated the flower die cut in purple tones.  It was cut with the Sizzix Daisy #4 die. 

I adhered the decorative paper to a deep purple card base.  I tacked down the daisy with the stem framing this bright splatter on the right.

I made a hole in the center of the daisy with a push pin. I stacked the flowers starting with the silver flower sequin and ending with the large white on then placed them on the tiny white brad. I placed the prongs of the brad through and spread the prongs apart on the inside of the card.


Great all occasion card.


I started with this great decorative paper in yellow and green tones. 

I chose a bright yellow card. I trimmed the paper to leave a small border, wrapped a piece of celery green grosgrain ribbon across the top and taped the ends to the back.
I then glued it to the card front.

I added 3 yellow brads on the ribbon on the left hand side. I added a yellow bee accent on the right and used a black marker to create a trail across the card.


Saturday, July 28, 2018

R2Go All Occasion Stack Kit - Set 05

I cut the flowers from black card stock.

I selected designer paper and coordinating card stock for the base.  It was cut to leave a small border.  I adhered the DSP to the card front.

I then aligned the flower and and stem onto the card front. Once happy, I adhered the flower then the stem and trimmed it to the edge of the card.

I made a hole in the center of the flower with a push pin.  I placed the flower sequin then the handmade flower by Prima onto the tiny black brad and placed the prongs through the hole and press them apart on the inside of the card.


 This set features black and white printed elements.  The images were downloaded from Pixabay. They were printed onto white card stock then they were punched with a 2" circle punch.

I chose designer paper which would coordinated with the elements and then cards in black, white or kraft.

Once the desinger paper was adhered to the card front I wrapped a piece of black knitting ribbon around the card front and knotted it.

The element is created when the white circle is adhered to the black Stampin Up Deco Label die cut.  The label is then adhered over the ribbon with 3D foam tape.


 This card features a large metallic copper diecut daisy done with the Sizzix Daisy #4 die.

I chose designer paper and card stock combinations that worked well together.  The DSP is cut to leave a small border then adhered to the card front.

I tack the copper daisy lightly with adhesive.  This time because I have no greeting I swung the stem to the center.  I used a push pin to create a hole in the center of the flower.  I placed the teal and copper flowers onto the tiny copper brad and pressed it through the hole I made. Spread the prongs on the inside.

Check the kit tab for availability.

R2Go All Occasion Stack Kit - Set 04

I cut the flowers from black card stock.

I selected designer paper and coordinating card stock for the base.  It was cut to leave a small border.  I adhered the DSP to the card front.

I then aligned the flower and and stem onto the card front. Once happy, I adhered the flower then the stem and trimmed it to the edge of the card.

I made a hole in the center of the flower with a push pin.  I placed the flower sequin then the handmade flower by Prima onto the tiny black brad and placed the prongs through the hole and press them apart on the inside of the card.


This set features black and white printed elements.  The images were downloaded from Pixabay. They were printed onto white card stock then they were punched with a 2" circle punch.

I chose designer paper which would coordinated with the elements and then cards in black, white or kraft.

Once the desinger paper was adhered to the card front I wrapped a piece of black knitting ribbon around the card front and knotted it.

The element is created when the white circle is adhered to the black Stampin Up Deco Label die cut.  The label is then adhered over the ribbon with 3D foam tape.

This card features a large metallic copper diecut daisy done with the Sizzix Daisy #4 die.

I chose designer paper and card stock combinations that worked well together.  The DSP is cut to leave a small border then adhered to the card front.

I tack the copper daisy lightly with adhesive.  This time because I have a greeting I swung the stem to the right.  I used a push pin to create a hole in the center of the flower.  I placed the teal and copper flowers onto the tiny copper brad and pressed it through the hole I made. Spread the prongs on the inside.

The greeting was printed in teal on ivory card stock and punched out with the Stampin Up Artisan label.
Check the kit tab for availability.

Wednesday, July 23, 2014

Birthday Flower

I made this card for Mom who is celebrating a milestone birthday this month.

I started with a neutral taupe card.  I adhered a piece of pink mulberry paper with gold accents with snail adhesive so it would not show through the thin paper.  I cut the Sizzix Daisy #4 flower twice to show both sides of the paper. It has flowers on one side and green pattern on the other.  I added a gold Prima flower and a deep pink flower onto the pink brad and placed in the center of the flower.  I stamped the birthday greeting in the right hand corner with Tea Green ink.  I added a tiny brad in the same color as the flower in the "i" of birthday.