Showing posts with label holly. Show all posts

Thursday, June 27, 2024

Cards - Christmas - Red and Green Holly

I took time to make a few more Christmas cards before the craft room gets packed up to replace the flooring.

This paper is from the Season of Cheer collection.

I chose a Cherry Cobbler A2 card base and wrapped a length of Always Artichoke wide grosgrain ribbon across the paper widthwise.  Taped the ends to the back.

Adhered the DSP to the card front in the portrait orientation then mounted an oval greeting punchie over the ribbon with 3D foam tape.

A seasonal quarter sheet insert and white envelope.

My photo taking space was already put away so I had to improvise hence the lacy curtain.  Plants are usually on this space but they were temporarily displaced.

This is a DSP Split card with the same Cherry Cobbler card base.  I cut the DSP layer at 3.5 inches and flipped the bottom piece and taped them back together. I placed a red band of card stock over the join and taped it to the card front.

I added a scallop circle and color printed greeting over the ribbon with 3D foam tape.

A season sentiment on a quarter sheet insert and a white envelope.


The green color in this collection is Mossy Meadow but since I don't have card stock in that color I substituted Always Artichoke which worked well.

I wrapped the dark green grosgrain ribbon across the designer paper and taped the ends to the back.  It was then adhered to the card front with double sided tape.

I created a poinsettia accent using the 5 Petal Punch with Real Red card stock, a non shed gold glitter punchie, a red sequin all held with a gold tiny brad.

It was adhered to the card front with 3D foam tape.  Seasonal quarter sheet insert and an envelope.  Pressing over night and they are done!

Thursday, January 13, 2022

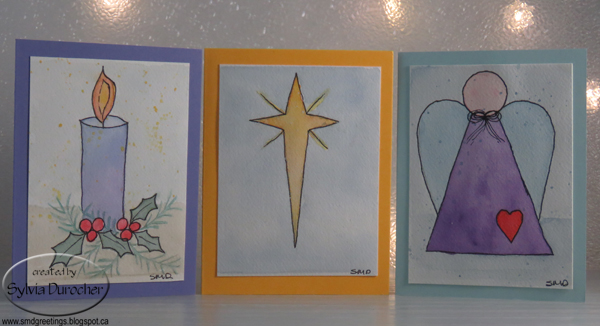
Christmas Card Challenge - Watercolor - January


I made these three watercolor cards for my Christmas Card Challenge - Watercolor for January.  I chose 140lb cold press watercolor paper.  I cut a piece of paper and taped to a piece of glass.  I drew my images by hand then painted them.  I traced the images with a black permanent marker after they were dry.  I them spattered them with watercolor.  I trimmed the images and I had cut it too short so on some of them you can see the line from the tape.  Live and learn.

The first is a candle and I used a gradient wash from blue to purple on the body of the candle. I added holly leaves and berries then added some different foliage. I added yellow, orange and red to the flame.  I left the foliage not touched by the black marker. I added a background to the bottom and the top.

The  middle is just a Bethlehem Star.  I tried to add spatter with bleach thinking it would remove the color but it did not.  Maybe I should have added yellow. 

The angel is a design I create years ago for a custom ornament.  A background was added to this one also with a spatter of blue.  I think I made the bow too small.  Still happy with it.

Thursday, December 16, 2021

Bespoke Shelf Art

I wanted a piece of Christmas art for the shelf above my wall tree.

It's snowy and cold outside so not too interested in heading outside and shop.

I use the frame with the JOY word in the previous photo.  I cut a piece of paper to fit inside the frame (8x16 inches) approximately. 

I printed a few words with fonts that I liked and adjusted the size to suit the composition.

I traced the words onto the white paper then painted them with black acrylic paint. 

I added the holly in the corner for a bit of color. It was a quick solution for this year.  I really like it!

Wednesday, October 23, 2019

Ready 2 Go Christmas Card Kit - Set 10

Working on card kits for my stack card class on November 4th.

I started with a red card in the landscape orientation.

I added a piece of red plaid metallic paper which was cut to 4.00 x 5.25 inches and adhered to the front

I added the Christmas green tree brad to the gold foil NOEL label cut with the Stampin Up Apothecary Framelits. I made a hole with a push pin, inserted the brad and pressed the prongs apart at the back. I added 2 pieces of 3D foam tape and adhered it to the card front.

The gold fabric snowflake was adhered in the top left hand corner with a Bling Zot.

I started with a red card in the portrait orientation.

I cut a layer of green card stock to 4.00 x 5.25 inches.  I added a length of red cotton ribbon aligned left of center and taped the ends to the back. The layer was then adhered to the card front.

The musical holly accent square as adhered to the card front over the ribbon with 4 pieces of 3D foam tape.

I added a greeting in the bottom right hand corner.  It was color printed and punched out with the Stampin Up Modern Label punch.

It was adhered to the card front with 3D foam tape.

You can check out my R2G card kits on the tab above.

Monday, August 6, 2018

My Walk - Water Drops

I found lots of water drops on my walk yesterday morning.  Beside the fact that the grounds are on automatic sprinkler system it had rained the night before.

The pink Impatiens flower had lovely sprinkling of water drops on it.

The grass had water drops clinging to them as the sun was warming them and soon they would be no more.

The holly plant had its points out and large drops had accumulated on their leaves.

The hibiscus looked a little soaked and not necessarily so happy about it.  The blooms are so fragile.

The plastic bag in the garbage can had condensation drops on it.

Another Impatiens bloom with lovely drops!

Sharing with these for Mosaic Monday #95 hosted by Maggie at Normandy Life.

Monday, November 27, 2017

Card Club - November - Kraft Tag

I started with the kraft and red glitter tag.  I added a red satin ribbon.

I chose a dark brown card base and added an embossed layer.  The white card stock layer was created with the Stampin Up Petals a Plenty folder and leaves a small border of the card showing.  The embossed layer is adhered to the card front.

The tag was adhered to the embossed layer then a tiny red brad was placed through a hole made with a push pin. The prongs were spread apart on the inside of the card.

I created the greeting by printing it on white card stock and punching them out with the SU Modern Label punch.  I added a red glitter label which was cut in half crosswise and adhered behind the greeting offset on the left and right.  The greeting is adhered to the card front with 3D foam tape.

Sunday, May 31, 2015

R2G Christmas Stack Kit - Christmas Cocoa

Here's my next set of Ready 2 Go Card Stack kit.  In this one I chose the OSW1 Template which produces 3 card layouts per 6x6 DSP. 
The Stampin Up DSP is called Christmas Cocoa and has Real Red, Soft Suede and Whisper White as it's colors.
The greetings stamp set I chose is Owl Occasions in those colors.  The accent layers are the opposite from the card color so Soft Suede on the Real Red the other way around on the Soft Suede card.  Each of the accents have both colors included.  The greetings were cut to 2.75" with an accent layer of 3 inches.

The card layout presents 2 wide cards and 1 tall card. Of course, the pieces can all be changed in orientation to make cards the as you prefer. The kit makes 12 cards.

Wednesday, May 21, 2014

Challenge - Christmas Tea Cup Box

I decided to play along with a couple of challenges this week.

I made a tea cup box. Because one of the challenges is Christmas I choose this BoBunny Christmas Ornament double sided paper.  I used the Cricut and the Joy of the Season cartridge and I cut 2 tea cups then cut a strip of the same card stock to make the box which I adhered between the tea cups. I added 2 velvet silk flowers and some holly leaves all held in place with a gold tiny brad and a gold sequin in the centre. Since it's a box and gift giving is the idea I placed individually wrapped tea bags in the box.  Ready to give!

I'm submitting this to
Holly Jolly - Anything but a Card
Cricut - Bitten by the Bug - Gift Packaging

Friday, February 1, 2013

Christmas Card Challenge - February - Buttons

The theme for February's Christmas Card Challenge is buttons.  I selected River Rock for the card and mounted some mottled dark green designer paper.  Designer Paper.  I cut the holly from 3Bugs in a Rug - Butterfly Kisses - Soft Petals paper with the Cricut - Joy of Season cartridge and adhered it to the card front.  I color printed the greeting and punched it with the SU! Decorative Label punch.  I selected 3 red buttons for the holly berries.  They are held in place with Zots.

Saturday, November 5, 2011

Christmas Card Stack - Glitter Joy

 I used a Wild Wasabi green card onto which I mounted a frame cut with the Sizzix Frame die from a holly decorative paper.  The glitter is Wine Red bought at a local scrapbook store.  It's really nice stuff.  The "Joy" die cut was created with a Sizzix die.  I punched three 1/4" circles from the glitter scraps to put on the right hand side of the frame which repeats the red circles in the decorative paper.  The exclamation mark was hand cut from the scraps.

Bottom:  On this card I used ivory cardstock and applied Always Artichoke around the edges of the frame to help define the edges against the light card stock.  On this one I just punched another three 1/4" circles.

Wednesday, June 1, 2011

Card - Christmas Sample

This is another idea that hit the cutting room floor during my prep for Christmas Card Stack Classes.
I started with a dark green card. I used a Crafts-Too holly embossing folder which leaves a nice blank rectangle in the top 1/3 of the card. I repeated the holly pattern with the MS holly punchies from the same cardstock as the card. I punched 3 red circles to add to the holly. I glued these together in the embossed rectangle.