Tuesday, January 11, 2022
2021 Christmas Cards Received
Saturday, December 25, 2021
Peace on Earth 2021
Wishing all my blog friends
a very Merry Christmas, Peace on Earth,
or Happy Holidays
however you celebrate!
Sunday, December 12, 2021
Wall Christmas Tree - 2021
Thanks to my niece who came to visit this weekend for the help to installing the photo shelf at the top which holds the ring to hang the tree from.
I sprayed the star at the top with Brilliant Gold paint. Very happy with that!
I was surprised to see that I had liquidated all the large ornaments last year so only the small mostly clear glass ornaments remained. It seems it was quite clear to me that this idea of a wall tree was going to materialize! It did just as I imagined it.
The Nativity has been set up on the old trunk next to the tree. A soft light on the right lights the scene and the tree area for nice shadows.
I have put my JOY alphabet photo letter art on top of the shelf for now. I did some searching on the web and did not really find anything I liked. I will create a bespoke one for later this year or next. I am loving the tree!
Saturday, November 20, 2021
2021 Photo Card
I was given this dove ornament a couple of years ago by one of my sisters. I decided this year to use it for my photo card.
I wanted Peace on Earth so I needed to create myself an earth. I set the dove up in my photo studio so assess what size the earth should be. I determined it needed to be about 8 inches in diameter.
I found a dish in the kitchen and traced that onto a piece of bristol vellum card stock. I found a tutorial on line on how to draw an earth. Using the instructions I drew an earth in pencil so I could erase until I had it right. I then painted it in watercolor ensuring that I had enough texture in the land and water. I then added the borders in black Sharpie marker.
Once it was dry, I installed it in the studio adhered to a blue material background I have for the studio. I used several Zots to hold where I wanted it.Sunday, April 4, 2021
Friday, March 26, 2021
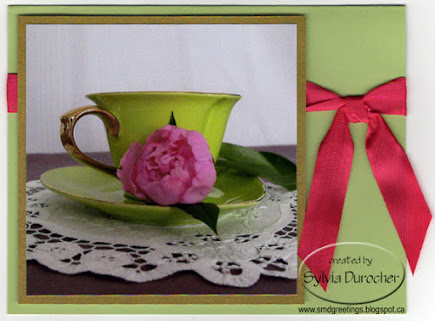
Card - Heart Tea Cup
 Another card for the Coffee Loving Cardmaker Spring and Summer Blog Hop.
I chose a 4x4 photograph from my 2018 photo tea calendar. I trimmed it to 3.75 inches square.
I added a piece of gold metallic card stock behind the photo.
I chose a bright green card to match the tea cup in the photo.
I wrapped a piece of deep pink seam binding around the front of the wide card and knotted and trimmed the ends.
The tea layer was adhered to the card front with 3D foam tape.
Thursday, March 25, 2021
Card - Library Tea Break
 Another card for the Coffee Loving Cardmaker Spring and Summer Blog Hop.
I printed the Tea and Book graphic on white card stock. I trimmed it to 3.75x5.00 inches.
I chose a blue purple card base in the A2 size in the portrait orientation.
I chose a piece of warm caramel card stock to accent the main element. I placed 2 pieces - one in the top left and one in the bottom right corner leaving a small border. They were adhered with double sided tape.
The tea cup layer was adhered to the card front with 3D foam tape leaving a small border.
I spattered the front with a bit of denim blue watercolor.
Wednesday, March 24, 2021
Card - Japanese Tea
 I made this card for the Coffee Loving Cardmakers Spring and Summer Blog Hop.
I started with the Japanese Tea Set graphic in gorgeous grey and deep red colors.
I trimmed it to 3.75" x 5". I found a deep red A2 card base and a coordinating grey layer to go with the tea image.
I adhered the grey layer to the card front.
I added 3 red mini brads in the upper left hand corner and the kanji for TEA in the right hand upper corner.
 This layer was adhered to the card front with 3D foam tape.
I am happy with this card.
This was a prize winner in the blog hop! #794
Sunday, March 21, 2021
Card - Coffee Time
 I made this card for the 2021 Spring and Summer Coffee Loving Card Makers Blog Hop.
I started with a digi of a hand drawn pastel image of a beautiful coffee pot and cup.
I just love the soft muted tones of this image.
I printed the image on a quarter sheet of white card stock and trimmed it to 3.75 x 5 inches.
I added a warm caramel piece of card stock layered behind it and adhered these layers to the front of a pea green card base.
I added a greeting above the image with a ripped layer of the same caramel card stock and the greeting printed on a taupe card stock.
I added 3 mini brads to the left of the greeting.
This greeting layer was adhered with 3D foam tape.


