Showing posts with label Christmas card. Show all posts

Thursday, September 19, 2024

Cards - SC Christmas - Nativity

Another set of Christmas cards for the box. Again, self closing cards measuring 6x5.5 inches.

I did take one to the post office Monday and it was mailed with regular postage.

A dark green linen textured card stock base.  With a gold metallic Stampin Up Sunburst diecut adhered over a paste paper background.  This layer was adhered to the card with d/s tape.

I punched a red 2" circle and cut the Penny Black Manger die from ivory pearl card stock.  These were layered with QuickDry adhesive.  It was then adhered to the sunburst with 3D foam tape.

A white insert and some d/s tape with carrier on the flap and it's done.

For this card I used a navy linen card stock cut to 6 x12 inches which was scored at 5.5 and just less than 1" for the flap.

I chose a piece of blue paste paper and cut the SU Sunburst die in silver metallic paper. These were adhered together with QuickDry glue then adhered to the card with d/s tape.

The manger scene was cut from ivory pearl cardstock and mounted onto a 2" circle punchie then mounted to the sunburst with 3D foam tape.

A white insert and a d/s tape with carrier on the flap.


A monochromatic theme for this one.  I olive green linen card base with a coordinating paste paper. 

A 2 inch circle punchie from the same card stock to back the ivory pearl manger die cut.  Once adhered to each other this layer was adhered to the card over the center of the sunburst with 3D foam tape.

A white insert and a strip of d/s tape with carrier on the flap.

I have about 55 cards ready which is close to what I need.


Wednesday, September 18, 2024

Cards - SC Christmas - Colored Pencil

I worked on more Christmas cards this morning.

I chose to use images I have drawn digitally.  This is my Bethlehem which I had to resize to accommodate this card size but that was easy. It was printed on ivory 65lb card stock.

I used colored pencils and colored the sky, the sand dunes and the windows. 

I cut the large star with the Sizzix Star & Starbursts die in silver card stock. I then punched the others with a CM Star Border punch. Large star adhered with 3D foam and the littles with QuickDry Adhesive.

The image was then adhered to the card with double sided tape, the white insert adhered with glue stick and a strip of d/s tape with carrier on the flap.  This is a self closing card made with 1/2 sheet of 12x12 navy card stock.

I really love how this one came out.

This is an angel a drew digitally based on a wicker angel I saw in a garden center at Christmas many years ago.

Subtle blue background, metallic halo, green metallic on the wings, a red dress with a green and gold border at the bottom.

A bit of flesh color on the face.

A self closing card from a 6x12 inch piece of card stock.  I adhered the drawing onto the card with a white insert opposite.  A length of double sided tape with carrier on the the flap.


A nativity I drew a few years ago. 

A subtle night sky, a yellow star with a wooden stable. 

The figures were colored with traditional blue for Mary and brown for Joseph. Just a wee head for Jesus.

Subtle blue sky, green and tan for the ground background.

Drawing adhered to the card, a blank white insert (not sure if I will regret this later when I have to handwrite the sentiment), carrier tape on the flap. 

Card is 6x12 navy blue linen card stock.


Friday, September 13, 2024

Cards - Christmas - Self Closing

 I am carrying on making Christmas cards.  Again, these are the self closing kind which require no envelope and use up some of the 12x12 card stock I have in my stash.

For this card I used a warm green for the card base.  Cut 6 inches high and left 12 inches wide.  I then scored it at 5.5 inches then just short of 1" on the other edge for the flap.

I used the Tim Holtz Tattered Poinsettia die with heavy red card stock.  I used scrap green card stock to cut 3 leaves. 

I adhered a strip of the same red as the flower along the right hand side. Then a piece of gold gift wrap paper on the left hand side with a ripped edge overlapping the red strip. 

A white insert and some double sided tape with carrier on the flap and it's ready to go.  

I used a teal card stock for the base of this card. 

The decorative paper is from Stampin Up. I trimmed a bit off the bottom and top to have the pattern evenly placed on the card.

I spattered a strip of red with pearl metallic watercolor from my recent purchase. it was adhered on the right hand side.

I cut a star with the Sizzix Primitive #2 die and embossed it with it's folder.

I wrapped a length of red cotton ribbon over the DSP, taped the ends to the back, and adhered it to the left hand side.

The embossed star is adhered with 3D foam tape.  A white insert on the right with double sided tape with carrier on the flap.

This is the second piece of warm green card stock.

I added a piece of gold gift wrap on the left hand side an then added a strip of Soft Sky card stock with ripped edge to the right hand side.

I punched a branch with a border punch by Martha Stewart.  It was adhered with QuickDry glue carefully placed along the stem and leaves.

I cut an ornament with the largest of the 2011 Nestabilities Ornaments from a winter botanical DSP. I cut the hanger from warm green scrap and adhered with QuickDry glue. I punched a snowflake in the center from the same light blue card stock and held it in place with a tiny gold star brad. After punching a hole in the top of the hanger I added a length of Baja Breeze seam binding to it.  The ornament is adhered with several pieces of 3D foam tape.  A white insert and a bit of double sided tape with carrier on the flap and it is ready to go.

Thursday, August 29, 2024

Cards - Self Closing Card - No need for envelopes

I'm working on a new card design. 

It is a self closing card where the card closes onto itself and seals for mailing all in one go.

For this one I used a 1/2 sheet of 12x12 designer paper and cut it in half.  I chose to put the plain side out and the patterned inside.  I added a TH Cameo Frame die in red to coordinate then adhered one of my 4x4 photos from past calendars in the center trimmed to fit.  Then came the bling of gold star sequins on the top and bottom held in place with red tiny brads.

An ivory insert on the right hand side with a stamped sentiment.  These cards provide a good amount of room to include a few lines of greetings to the recipient. 

Once it is ready to go the card is closed and the double sided tape on the small flap seals the card.  Turn it over and address it, add a stamp and a return address and you are ready to mail.

I will cello them so the card front and sentiment are visible.  This allows the one to choose the one that fits the occasion the best.

Each will be an original and unique design.


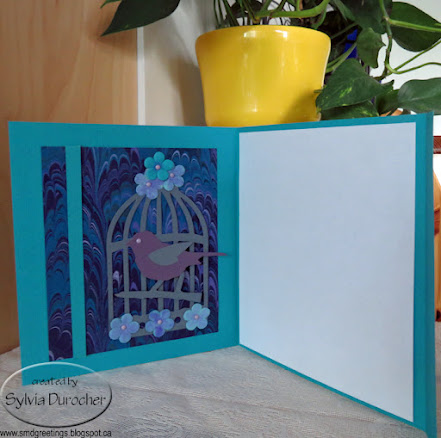
I used the TH Caged Bird die for this card.

My background is a piece of marbled paper. I chose my colors based on it, so grey for the cage and branch and dusty purple for the bird. I then watercolored some handmade paper flowers to coordinate and place them at the top and bottom of the cage. They are held in place with tiny lavender brads. 

I added a strip of the card base card stock along the left hand side of the layout. Taped the ends to the back.  Adhere the element to the card with double sided tape. 

A white insert on the right hand side.

I thought I would try a landscape orientation and watercolor.  

The wide does not work so well because you can't see the art and the sentiment at the same time.  

A quick watercolor which worked out pretty well.

I spent most of the day making these cards then trying to decide if they are a viable product for the Christmas Store.

I go through this every year and I will just do what I like and not worry about who else might like it.

I need quite a few more Christmas cards so that works.

I love Bethlehem cards and I have not included a palm tree before.

The stamp is from a Stampin Up set in royal blue ink.

Sunday, January 7, 2024

Christmas Card - January 07

I made a card for a friend who celebrates Christmas on January 7th based on the Julian calendar.

I decided to make her a special card for her Christmas day.  I searched the internet for Christmas cards and downloaded one which I thought worked well.

I needed to add a bit of width to the image so I added navy bits on each side then I was able to print it on 4x6 photo paper. It had white borders which I did not want to keep. Before I trimmed it, I used the photo to create the embossed frame for the photo onto the 5x7 card base in SU Groovy Guava.

Once trimmed I adhered the photo into the frame and it was perfectly even.  That worked well.  I used to make these embossed frames a lot earlier in my card making.

I added a full insert on the inside to cover the embossed frame and that was it.

She really liked it.

Saturday, December 2, 2023

Christmas Cards - Watercolor - Siblings

I made some special watercolor ornaments to put on my siblings Christmas cards this year.  This is the first year that Mom and Dad are both gone. We are getting together early December for a get together which is close to what would be Dad's birthday. 

This is an ornament I designed myself.  You can read more about the process here.  The ornaments were cut out by hand.

All the designs were hand drawn then I used a permanent black marker for all the outlining.  

I used my Stampin Up Watercolor Wonder Crayons for all the painting. The background is watercolor paper with a mixture of Always Artichoke and Garden Green.  I painted a wash on a couple of 9x12 sheets of wc paper.  I made it a bit darker at the top and lighter at the bottom. I did put salt on but it was not wet enough to produce much of an effect. When dry I added a spatter of Always Artichoke.  Once cut to the 4.00 x 5.25 inches I pained the branch and I spattered the pieces with Always Artichoke. 


The ornament has a Bethlehem Star in the night sky colored with More Mustard.  Some Elegant Eggplant and Night of Navy for the sky. On the snow banks in the foreground I used Marina Mist for the wash and Night of Navy for the contours.  Always Artichoke for the tree.

The card base is Elegant Eggplant.


A full moon in the night sky.  The moon is colored with Daffodil Delight with a light wash of Night of Navy for the sky.  I drew a house on the hills with was colored with Ruby Red and More Mustard for the windows.  Elegant Eggplant for the hills.  

The card base is Ruby Red.


This one features a sunrise which I had experience drawing when I did my glass art piece for the window a couple of years ago.

The sky is a light wash of Tempting Turquoise with the sunrise rays being first wash of Daffodil Delight, then More Mustard closer to the center then Tango Tangerine at the center. The hills are a combination of Garden Green, Always Artichoke. 

The card base is More Mustard.


I decided on a water theme for this one and drew a light house.  The sky is a light wash of Tempting Turquoise.  The lighthouse and rocks are done with a light wash of black gouache. The sea is Night of Navy.

The card base is Basic Grey.


This one here is a Christmas flower but I would not go so far as saying a poinsettia.  It turned out like a sunflower in the shape.  The ornament is Tango Tangerine wash.  The flower is a mix of Ruby Red, Bravo Burgundy and Cherry Cobbler.

The card base is Ruby Red.


This one features another Bethlehem Star in the night sky.  The star is More Mustard with a light wash of Marina Mist for the sky.  The mountains are 3 gradient washes of Elegant Eggplant.  Tiny black marker dots in the sky with a touch of More Mustard.

The card base is Elegant Eggplant.


This one features a large star in the center of the ornament.  I did trace the shape from the Stampin Up Star thinlit set, using the smallest one.

The star was washed in Daffodil Delight all over then one half of the points was painted with More Mustard. The ornament is a dark wash of Night of Navy.

The card base is Night of Navy. 

Tuesday, November 7, 2023

Christmas Cards - Teddy Bears

I found 2 Teddy Bear pages in my stash of old calendar pages. Here's the original post to the calendar. 

Here's Teddy with the small Nativity set.  A gorgeous mercury glass tree in the background.

To create the card I chose Stampin Up Midnight Muse card stock for the base.

I cut a piece of Bashful Blue card stock with the Tim Holtz Cameo Frame die.  I trimmed the photo to 3 5/8 inches wide and 3 3/4 inches tall. I just love how well this works.

I added iridescent snowflakes with small white sequins held in place with navy star tiny brads at the top and bottom of the photo.

This was adhered to the card front.

I added a blank quarter sheet insert which should have had a sentiment.  I will stamp something.  A white envelope and it's done.

Here's the other Teddy photo.  Same mercury glass tree and a beautiful wire ball box which is meant to gift a memento.

The card base on this card is textured paper in a navy blue.

The layer is again Bashful Blue which was trimmed to leave a small border once the photo was trimmed to 3.75 inches square.

This layer was adhered to the front of the card.

I added an oval greeting adhered with 3D foam tape.

A quarter sheet insert and a white envelope.

Another couple added to the Christmas card box.


Tuesday, October 24, 2023

Christmas Cards - Gold Foil Manger

I made another set of Christmas cards for by card box.

These are A2 sized at 4.25 x 5.5 inches. 

I used the free gold foil card stock I received recently.  I cut the letter sized card stock into quarters. I placed it on the  Stampin Up Sunburst thinlit aligning the top left hand corner and ran it through the Big Shot.

The designer paper I selected is Crate Paper - Holly Collection - Garland  with a beautiful felt finish.  Love the soft colors. This piece was trimmed to 4.00 x 5.25 inches.

Based on this DSP I chose SU Pool Party as my card base. I used an extra half sheet of the same to punch my 2 inch circles.

I used the Penny Black Manger die on the gold foil card stock to coordinate.  I adhered the manger die to the 2 inch circle of Pool Party with a gold star tiny brad through the star in the die cut. I also added double sided tape behind the crib.

I applied double sided tape to the back of each of the rays in the sunburst. It was then aligned along the top left hand corner and press down.  I then trimmed the sunburst to the edge of the designer paper layer.  It was then adhered to the Pool Party card base.  I then adhered the circle manger accent to the middle of the sunburst with 3D foam tape.  I added a quarter sheet insert and an ivory envelope and they are ready to go.  Super happy with this set.

Thursday, December 1, 2022

Card Exchange - Dec - Triangle Trees

These are my December exchange cards.  I used the beautiful screen printed decorative paper again because the colors where Christmasy.

I selected a beige card base.

I cut some triangle trees from solid card stock. For this card it was a warm green then I cut the decorative paper a bit smaller leaving a border all the way around.

I used pencil crayons in browns and greens to create a soft background and for the tree trunk at the bottom. I then adhered the Christmas Tree over top.

I added a red star sequin at the top of the tree and gold ones around the rest of the card.  These are adhered with Bling Zot glue dots.


For this card on the right a very similar layout to the top one.  This time I used a Very Vanilla card base.

Same warm green solid card stock for the tree.  

Again, a color pencil background and tree trunk.  A red star sequin at the top of the tree.

The small stars were punched from gold card stock with my Creative Memories star border punch. This is the largest of the one in the border.  I adhered them with Scotch Quick Dry liquid glue as it has a very fine point on the bottle.

I used the green pencil crayons to add some rays to the stars.

A seasonal insert was added as well as a white envelope and they are ready to go.

Saturday, February 12, 2022

Christmas Card Challenge - Watercolor - NOEL Resist

 
While clearing out card making supplies I found these three small note cards.   You can see how I have used them in a previous post.  With watercolor being my theme this year I decided to give it a go.  I trimmed the note card to make NOEL more of a focus. I like the way the gold foiling works as a resist to the watercolor.  These were the last three so I am just moving on. 

I painted a purple ornament with the O and outlined it in permanent marker.  Not sure my bough works really well.   I added a gold star brad in the center of the ornament after adhering the gold layer.  

The snow and tree scene on the left is not bad.  

I just added a wash of blues on the last one.

Each watercolor was adhered to a layer of gold metallic card stock to repeat the gold in the accent layer.  This layer was then adhered to a coordinating card base.  Three more for the box.  I used about 50 cards this year due to not seeing my church family so who knows what next Christmas is going to look like.

Thursday, January 6, 2022

2022 Christmas Card Challenge - Watercolor

I have decided that I so enjoyed making the few watercolors Christmas cards I made in 2021 that I will concentrate on watercolor for my 2022 ones.  Of course, the medium allows for simple to complex compositions. My drawing skills are not great but there are tons of videos available on every skill level that I will manage to produce ones I am happy with.

Dig out the Crayola Box, the watercolor pencils, the watercolor pans, or the professional grade, whatever you have and put it onto paper.  I would recommend good paper though, a 140 lb paper would be great. Use watercolor however you choose and add whatever other elements you are led to use. If you are following feel free to mix and match as you feel inspired.

The only goal is to get our Christmas cards made by December 1st.


If you are inspired to make Christmas Cards, please leave a comment below with a link to your cards.  I look forward to sharing this creative journey with you.

Saturday, November 20, 2021

2021 Photo Card

I try to make at least one Christmas photo card every year.

I was given this dove ornament a couple of years ago by one of my sisters.  I decided this year to use it for my photo card.

I wanted Peace on Earth so I needed to create myself an earth. I set the dove up in my photo studio so assess what size the earth should be.  I determined it needed to be about 8 inches in diameter.

I found a dish in the kitchen and traced that onto a piece of bristol vellum card stock.  I found a tutorial on line on how to draw an earth.  Using the instructions I drew an earth in pencil so I could erase until I had it right. I then painted it in watercolor ensuring that I had enough texture in the land and water.  I then added the borders in black Sharpie marker. 

Once it was dry, I installed it in the studio adhered to a blue material background I have for the studio.  I used several Zots to hold where I wanted it.

Then I found many shots with different lighting and angles.   I reviewed my shots and took some more and repeated the process one more time.

I was finally happy with one of the shots.  

I added the greeting and the olive branch in post processing.  I printed the card at 4x6 inches.  Once those were back from the developer, I got ready to create the cards.  I was glad that I had used black borders and black shadow on the greeting which worked really well with a black 110lb card base.  I adhered the photos to the card front of a 5x7 (A7) card base.  I printed a sentiment in keeping with Peace on Earth on letter paper and trimmed those to fit inside.  I adhered those with glue stick. 

Just like that I have 15 photo cards to add to my stash.  Very happy with these.  The ornament is headed to my other sisters house for Christmas because she loved it.  I am sure the earth will come in handy in the photo studio again.  Win Win!

Tuesday, April 6, 2021

2021 Christmas Card Challenge - Refurbished Cards

With the power off most of the day I had to keep my hands busy.

I decided to refurbish some commercial Christmas cards.  Use the A2 size is a bit challenging because the commercial cards are so much bigger.  It means finding a focal element and trimming to keep in the center of the element.

Here I chose the star and Rejoice as the focus.  The width was not full so I added a strip of gold on the warm deep teal card base.  The focal element was adhered with 3D foam tape.


This snowman seems to enjoying the Christmas season.  

I chose a card base that matched the twig arms which is a warm taupe color.

I just trimmed the snowman to leave an even border all the way around.  It was adhered with 3D foam tape.


I trimmed the candles then trimmed the scripture verse so that I could overlap these elements.

I chose a warm blue green card base.  This is in the portrait or tall orientation.

The candles were adhered with double sided tape then the scripture was adhered with 3D foam tape.


A sleigh ride is always fun at Christmas time.

I chose a deep red card base.  Once again choosing the focal point of the sleigh and trimmed accordingly. 

Mounted with 3D foam tape leaving a tiny border.


I am imagining headed off the a Christmas Eve service by horse and sleigh.

I chose a lavender card base.

The focal element was adhered with 3D foam tape. 

Each card had a seasonal insert adhered inside and a new envelope was matched to it.

A few more cards for my Christmas Card box!

I had to make do with not electric tools today so a paper cutter and tape worked really well.

Monday, February 8, 2021

Sylvia's Simple Shots

I took this photo at the bird feeder when it was still decent temperatures -12C.   

It is a Downy Woodpecker getting seeds and fat to stay warm.  I have to say I don't know how they do it.

As you can see it is now Crazy Cold and will last for another 2 weeks they predict!


This is a story about Martha Connolly who lives in Liverpool England in Court 5 very near the docks where her husband goes everyday in hopes of getting some work.  It is 1938 and the Great Depression has caused great unemployment and poverty. They live in squalor, cold, with little food and means to earn wages.  Her and Patrick live with 8 of their 9 children in one room.  One of the girls has gained employment in a large house and sends a bit of money each month. Brian, the oldest son works and contributes as well. Martha sells rags at the market. The young ones follow the coal cart and gather the bits that fall off for the range which provided heat and the ability to cook. The photos on the right show the courts.

The other timeline is 1965 where Martha as fallen, was hospitalized and now is placed in a seniors residence where residents are expected to be quiet, not make a fuss, and stay in bed. She is now alone with no husband or children. No one comes to visit and she is lonely and sad. She shares with the staff when they come to the room she shares with 4 other women. They are not very engaged so it is very isolating.

Eventually, Martha is reunited with her youngest referred most often as Number Nine whose real name was Jamie who is now a priest.  She lives with him in the presbytery.

I have been doing a lot of sewing this week.   I have already posted the blanket for the car.

This is a set of bags for the car.  The largest bag in the upper left corner holds my winter or summer gear depending on the season.  The tall skinny and Bento Bags are for other things which need to be stored in the car on a temporary basis.

The small bag on the bottom left holds the other bags until they are needed.  

They are made from black microfiber which is polyester so will last a long time and wear well.

I received this late Christmas card from a friend who moved away a few years ago. They normally don't send cards but since this was not a "normal" year they decided to do this year.  It did my heart good to get it in the mail last few days in January.  

On my day out on Monday I stopped by the hardware store to purchase some C-Clamps.  

I have used them now to secure the lamps on both sides of the photo studio.  The lamps have been known fall and then I have lost a valuable light bulb so they were worth it.  

Eventually I want to make a backdrop holder for the studio which will be secured by clamps as well.

I am happy with the progress I am making with the studio.


Vibrant Minimalism is the challenge at Flickr Macro Monday this week.  This is one of the shots I took for it. You can check out my photo stream (SMDPics) to see the one I submitted.

I am sharing with Angie who hosts Mosaic Monday #117 and Mersad who hosts Through My Lens #278.

Tuesday, December 8, 2020

Christmas Cards - Photo

I worked on Christmas card all day today.  

I decided to work with the supplies I had at home so I put together these gold trifold cards with my tiny nativity photo.  These are A7 5x7 cards.

Looks great.

I bought postage a while back so I have what I need with to trip out of the house.

I can just drop these in the mailbox.

The next card I paired the same gold tri fold cards with my Green Holy Family photo where it fit inside the card.

These will be in the mail tomorrow.

Another task complete.

On to Christmas tree, lights and door decoration.


Tuesday, December 1, 2020

Christmas Card Samples

I have had a client place a large Christmas Cards.  I prepared some samples for them to choose from.  I am posting the two cards which were not chosen.  I will post their selection later once the recipients have seen the card.

This card is a photo of my own Nativity.  It is the Avon porcelain one which is simple and elegant.  I photographed it with a black velvet backdrop.  In post production I added the bokeh in the top left hand corner then added the greeting as well.

It was printed on photo paper at 3.5 x 5 inches.  It was trimmed to 3.5 x 4.75 inches to leave an even border all the way around on an A2 card.  It was mounted on a heavy white card with a customized sentiment on a quarter sheet adhered on the inside.

I am really happy with the way it turned out.

I am working on the order and it will several days to get it done.

This the second card presented. 

It is a photo I took early this year of a friends stained glass Nativity set. I applied a filter to give me the silhouette in black you see on the front.  The silhouette was placed in front of a piece of alcohol ink background which coordinated with the Tempting Turquoise card stock. It was printed on photo paper and trimmed to 3.5 x 4.75 inches. The frame was printed with I did the credits on the back of the card.

Again, a customized insert on a quarter sheet insert. 

Really happy with this one as well.   They may become my Christmas card for this year.

Friday, April 17, 2020

Christmas Card - Magnificient Merry

Another attempt with a large greeting on Christmas cards.  I started with this background that I did a week ago and it did not work out for what I wanted so it was set aside.  Today, I decided that maybe I could work it for my monthly challenge.

I started with a bright green piece of card stock. I ran holes into it with a sewing tracing wheel.  I then used Stampin Up Watercolor Wonder Crayons to highlight the shapes I had created with the dotted lines.

I added an ornament punchie made with the Stampin Up Ornament Punch and warm green designer paper.  I added a warm white hanger (credit unknown) and a warm pearl card stock snowflake punchie.  I added a string which I chalked a bit to make it warm green. I taped the ends to the back of the background layer.   I put a bit of 3D foam tape behind the ornament.  I adhered the background to the front of a Kiwi Kiss card base.

I cut the Magnificient Merry thin lit from deep red card stock. I then adhered the "merry" to the card front and traced the edges with a Sakura Stardust Clear gel marker.  It was adhered to the card front with Scotch quick dry adhesive.  I placed it loosely aligning it with the lines on the background.  I color printed the "Christmas" banner and chalked it with warm green. It was adhered to the card front with 3D foam tape.

I then spattered it with white acrylic paint which had been warmed up with a bit of green watercolor which was used on the original background.  Turned out okay!  Check back on May 1st to see the design I used for the May Christmas Card Challenge.

Sunday, January 26, 2020

UpCycled Christmas Card

My friend gave me a bag of commercial cards she has received and asked me up-cycle the card fronts into new cards.

I just loved this beautiful bird with snow on the branches.  It is a Christmas card. 

I trimmed the right hand side and then reassembled to attach the purple foliage which was adhered to a dark purple layer then onto a light blue card base. 

The insert has a Christmas sentiment.

Saturday, January 4, 2020

Upcycled Cmas Card

I upcycled this Christmas card with a cute puppy on the front. 

My friend wanted it turned into a Granddaughter card. I chose a Garden Green card base and cut it to an A6 size.  I added an ivory strip of card stock and placed it left of center and adhered it to the card front.

I trimmed the commercial card front to leave a small border. It was adhered to the card front over the strip.

I printed the word onto ivory card stock and punched it with the Word Window punch.  It was adhered to the card front with 3D foam tape.

I added a seasonal sentiment on the inside.

Tuesday, December 24, 2019

Up Cycled Cards

A friend asked me to up cycle some commercial cards she received and meant something to her.

This is a sisters' Happy Birthday card.  It was a shaped card so I trimmed the folded edge then trimmed the blue to match the rest of the edges.

I chose a pink card in the half sheet size (5.5 x 8.5 inches) and added a strip of purple textured card stock.  I ripped both sides of the 2 inch strip.  It was adhered to the card front aligned to the left of center.

I then adhered the sisters layer with 3D foam tape aligned along the bottom of the card.

A custom insert was included with purple lettering.


This card is one of my designs which I turned into a wedding card.

I added a light blue card base leaving a small border of color.

I printed a custom insert in light blue lettering to match the card base.

The hearts are Stampin Up Sweet Heart punchies cut from non shed silver glitter. Mounted on a vellum circle.

I added a silver thread across the bottom tied around the embossed layer.


This card is a Christmas card for sending wishes across the miles.  She has received it from family in the Maritimes but next year she will no doubt be mailing back to Alberta with Christmas wishes. 

She is moving to be close to her son in Nova Scotia.

I love the little rabbit reaching to post his card in the mail box.

I trimmed the original card a bit and adhered it to the front of a red card to coordinate with the letters.

I added a custom insert in this card to go with the sentiment started on the front of the card.


This card spoke to me of the Maritimes.  It was in my stash so I up cycled it for my friend.

The gulls are waiting for lunch as the fishermen arrive from the sea with the boats loaded with fish.  Bound to be some tasty bits for them.

I chose a blue layer to place behind the trimmed card.

I chose a kraft colored card and added a narrow grosgrain ribbon across the top.  I then adhered the boat layer to the card front with double sided tape.