Showing posts with label organza ribbon. Show all posts

Friday, July 2, 2021

Cards - Exchange - July

A blue and yellow theme for my July exchange cards.

I chose a golden yellow card stock and ran it through the Big Shot with the Cuttlebug Script Texture folder.

I adhered it to the a white card base.

I wrapped and knotted the blue organza ribbon around the card front and placed it along the fold on the left.

I added a focal element created from punchie flowers made with the Stampin Up Five Petal punchie from yellow and blue card stock.  I managed to find scraps of blue that matched the ribbon really well.  I added a half inch circle and a yellow mini brad in the center to hold these all together. 

The accent was adhered to the card front with 3D foam tape.


For this card all the same elements but switched orientation to a wide card.  

On hind sight maybe I should have selected a different folder for this one because the script is sideways.  It's mostly texture so I think its still works.

For the focal element I used a white flower brad for the center which brings in the white of the card base.

These will be off to my exchange partners shortly.


Friday, January 10, 2020

Old Gift Card Holders - Added to my card box

More cards found during the clean up.  These cards were designed as tri-fold gift card holders.  I was able to cut off the gift card flap and make them into regular cards.

This is Stampin Up supplies.  The textured card stock is Groovy Guava. I have not been able to determine the name of the designer paper.

I created a flower accent by cutting scallop circles in various size with the Spell Binder Nestabilities. All held together with a blue brad in the center.  The leaves were hand cut and placed behind the flower.

I color printed greeting in the bottom right hand corner layered with blue.  Adhered to the card front with 3D foam tape.


This bumble bee card is made with a circle of seed paper.  I made a lot of handmade paper in those days.  Love the deep yellow color which was formed with a round cookie cutter. I added the bands of black with a marker.

I designed the wings in a drawing software package and printed several onto a clear transparency.  They were cut out by hand with scissors and adhered to the body of the bee with 2 black brads.

A 1.25 inch circle punchie in black forms the head and I added the antennae and tail with the same black marker.

I color printed the flower layer and adhered it to a white spattered red card base.  The bee was adhered to the flower layer along with a Stampin Up Word Window punchie greeting in deep yellow in the top right hand corner.


This was designed as a wedding card. 

I started with a Sundance ivory card stock layer for the card base.  It has a felt finish and was my favorite card stock for years! 

I added a layer of ivory card stock which was embossed with the Cuttlebug d'Vine Swirls folder.  It was trimmed to leave a medium border.

I wrapped a length of gold organza ribbon to the layer before adhering it the card front. 

I then pinned a small gold charm to the knot in the ribbon.

It was great to find these cards and add them to my card box.

Wednesday, June 5, 2019

Exchange Cards - May - Late

I am late with my Exchange Cards for May. 

I used supplies from the card order I delivered today to whip up cards so they can be mailed this afternoon.

A warm green (Pear Pizzaz) card base in the landscape orientation. 

I cut designer paper from K&C Company - K Classic - McKenna 12x12 pad.  I taped the piece together then ripped the bottom edge.  I wrapped a piece of ivory & gold metallic organza ribbon across the join and taped the ends to the back. This layer was adhered to the card front. 

I created the greeting layer with another sheet of the designer paper cut to 2.5 inches.  I stamped the greeting in Always Artichoke with the Stampin Up Sincere Salutations stamp set.  These were layered together and then adhered to the card front over the ribbon with 3D foam tape.

The second card is an ivory card base with the dusty blue and ivory designer paper from Frances Meyers - Suzanne Nicoll. Trimmed to leave a small border and adhered to the card front.

Wrapped a piece of organza ribbon across and taped the ends to the back.  It was adhered to the card front. 

I added a pink balloon card stock punchie (MS) adhered with 3D foam tape.  I tied a warm blue string to it and cut to the length of the card.

The greeting is a large oval in navy blue layered with a ivory and blue greeting.  These were layered together then adhered to the card front with 3D foam tape.

They are addressed and going in the mail right away!

Friday, November 16, 2018

R2Go Christmas Stack - Gold, Red, Green

I cut the Merry Christmas layer with one of the thinlets from the Sizzix Square set which is 3.75 inches square.  I cut the Christmas green layer to 4 inches square.  These are adhered together. I used a push pin to create the 2 holes for the brads - Star Glitter and Green Pine tree brads.

I spattered the red card base with gold Gleams acrylic paint and let it sit till it was dry - a couple hours. Once dry I wrapped a piece of ivory and gold metallic organza ribbon around the card front and taped the ends to the card front under where the greeting will cover.

I cut the 3D foam tape square into 4 pieces and placed them in the four corners.  I then adhered the greeting square over the taped ribbon ends leaving even border top and bottom.

Glue the quarter sheet insert inside.


I cut the metallic gold NOEL layer with the Tim Holtz Bracket die.

I used a push pin to create the hole in the middle of the O in NOEL and pushed the brad through and spread the prongs apart on the back. 
Inny Outie Bow - Put one end of the ribbon through the left hand hole then repeat with the other end through the right hand hole. Cross the ends on the back and reinsert the ends through the opposite hole from the back. Pull gently to take up the slack. 

I cut the 3D foam tape square in 4 and put on on each corner.  I then adhered the NOEL layer to the front of the green card.

Trimmed the ends of the ribbon with scissors and glued the quarter sheet insert on the inside of the card.

Monday, February 27, 2017

Card Club - February - Gold Glitter Celebrate

I started with left over invites which featured polka dots in black, a couple of other colors and gold glitter.  I chose to cut it down leaving only the sentiment.  I used my Creative Memories cutter with the medium oval template and the red knife.
I found organza ribbon in ivory and gold which repeated the colors in the glitter layer.  I wrapped it around, knotted it to the front and trimmed the ends.
This was adhered to the black layer which was embossed with the Stampin Up Polka Dot Textured Impressions folder.  This layer leaves a small border on the warm taupe colored card which coordinated with some of the dots in the accent layer.

Monday, November 21, 2016

Christmas Card - Gold Ornaments

I started with a 4 inch square die cut featuring gold Christmas ornaments.  The colors are grey blues, vanilla and gold.


I chose a half inch organza ribbon in gold and vanilla and a blue grey card.

I punched slots in the square 2 at the top and one at the bottom.  I threaded the ribbon through the top bottom behind back to the front at the bottom up the back on the inside of the card, back to the front down into the top slot and tied the ribbon in a square knot.  The ends were trimmed with scissors.

I added a fabric vanilla snowflake in the top right hand corner with a Zot.


Monday, July 11, 2016

Jumbled HB - Teal and Silver

I am working on options for card layouts done with the Memory Box Jumbled Happy Birthday thin die.  I have used flowers, a punch and now I added ribbon. 
The designer card stock layer in a damask pattern has been punched with the Stampin Up Slot punch from both the left and right hand sides.  This creates a half inch slot into which I can pull a length of ribbon. 
I die cut some foil card stock from a chocolate box with the greeting die.  I adhered the dies to the bottom of the background layer. 
I pulled some half inch silver metallic and narrower teal organza ribbon through the slots and knotted them both together.  Trimmed the ends with scissors.  The layer was adhered to the teal card. 

Monday, March 21, 2016

Card Club - March - Peacock Feathers

The card features a nice piece of decorative paper with peacock feathers. I cut a Stampin Up Top Note from this paper then another from gold paper. The gold one was cut in half across then I trimmed the points on the left and right.  These halves are then adhered offset to the top and bottom of the top note.  I repeated the turquoise color when I wrapped a piece of turquoise organza ribbon on the left hand side and taped the ends to the back.  This layer was adhered to the front of an orange card which coordinates with the colors in the paper.  I added a turquoise greeting color printed the punched with the Stampin Up Modern Label punch.  This was adhered to the card front with 3D foam tape.

Monday, January 25, 2016

Card Club - Jan - Prima Flowers

We start another session of Card Club.  I selected several dark card stocks - black, navy, burgundy and purple.  I placed a length of 7/8" wide gold glittered organza ribbon across the card front and taped the ends to the inside of the card.  I layered 2 Prima flowers one gold and one silver together then added a flower sequin in the center.  Using a push pin to make a hole through all layers I held all the layers in place with a tiny brad.  For the kits I used textured card bases which added a little something to the cards elegance.

Sunday, March 1, 2015

Christmas Card Challenge - March - Gingerbread Stitching Plaid

Here's my card for this month's challenge. I chose to use all 3 elements which are gingerbread, stitching, and plaid.  I started with the DSP from My Mind's Eye - Good Day Sunshine - Bold Dots Paper.  This is the back side of the paper. I chose a teal card to coordinate with the paper. I added a piece of turquoise organza ribbon placed just to left of center and the ends were taped to the back.  This layer was adhered to the card front. The gingerbread man was cut with the Sizzix Gingerbread man die in a caramel card stock. I usual like dark brown for this die so I'm stretching my comfort zone.  I added stitching around the man and the hearts on his belly with a dark brown marker. I placed the same teal card stock behind the eyes and the hearts.  I knotted a caramel seam binding around his neck.  I stamped the greeting from Lil Inker Designs with teal ink on the same caramel card stock and placed a piece of the same teal card stock behind leaving a small border. The greeting was adhered to the card front with 3D foam tape. I glued the gingerbread man to the card front.

Saturday, September 27, 2014

Rusty Star Wreath Card Set

This is another set of cards for the auction.

This is a wreath is my own design.  I have printed it in a warm dark green.  I have placed rusty stars onto it.  I added a great greeting in several fonts in the same colors in the wreath.  I added a great organza ribbon bow in a warm copper color.

The stars were diecut with the Sizzix Stars#2 die from copper card stock.

Yet, again in a clear box.

Tuesday, December 10, 2013

Tag - Poinsettia

I generally do something small for each of my sisters for Christmas.  This year there was a great special with Tupperware so each of them is getting a bowl filled with home made snacks.

I cut the tag from designer paper and added a second light colored one I could write on!  Added a organza bow and a Stampin Up! five petal poinsettia in red and green.  All held in place with a gold brad and a blingy flower for the centre.

Thursday, November 21, 2013

Card - Gold and Ivory Poinsettia

Another music card.  I started with gold foil and ivory designer paper.  I added a gold organza ribbon wrapped around the bottom half and taped to the back.  I cut a poinsettia with Marianne Designs thin dies.  I cut a large and small from ivory flocked ribbon and gold textured foil paper. I punched a small Stampin Up five petal punch for the centre.  All held in place with a red tiny brad.  All placed on a red card.

Friday, June 7, 2013

Challenge - Food Tag

I made this tag for the Home Card Challenge on CST which was Food Tag.  I cut to tags with the Sizzix Scallop Tag die.  One black and the other a warm grey.  I cut the word Tea out of the black one with the Sizzix Lollipop Lower Case dies.  I then glued them together to have the letters grey.  I added a bit of a border with a white gel marker but it was too white to I applied some Tim Holtz Antique Linen Distress Stain to bring it down a bit.  Worked great. I added a organza ribbon in the same warm grey color.  This would be great added to a box of tea for a friend in a basket of assorted beverages. 

Monday, May 13, 2013

Card - Challenges - Teal Cream Brown & Gingerbread

I made this card for a couple of challenges, Weekly Christmas Card Challenges - Teal, Cream and Brown and Christmas Cards all Year Round  - Gingerbread
I cut the gingerbread man with a Sizzix original die from dark brown card stock.  I used an opaque marker to add the icing to his arms, legs and smile.  I added a small piece of teal card stock behind his hearts in his middle.  I'm so used to making them red it felt a bit odd to use blue. Stretching myself!  I then embossed a cream layer with the Stampin Up! Northern Flurry folder.  I stamped the greeting in the bottom right hand corner with Stampin Up! Come to Bethlehem set with Taken with Teal ink.  I added and knotted a length of organza ribbon across the top of the cream layer.  This was then added to a teal card. 

Saturday, April 13, 2013

All Occasion Stack Class - Floral with Oval Greeting


I expect to have a good class today despite the snow again today!!!  We had a great class and everyone got all their cards made.  Sweet.
I selected a pad of designer paper called Soft Serenity - Bitty Scrap Pads by Provocraft which provided nicely coordinated patterned paper for this split paper card.  I cut the top piece of DP at 4.00x3.00 and the bottom is 4x2.25 inches. I made card kits in pink, lavender, olive green, and yellow.  I die cut an oval ribbon slider in a coordinating color for the DP used with the Spell Binder oval ribbon slider die.  I printed greetings in coordinating colors and cut the oval with my Creative Memories Oval cutter with #2 and red knife.  I selected a ivory and gold organza ribbon.  I taped the 2 pieces of DS paper together on the back and trimmed as needed to have even edges.  I glued the greeting onto the centre of the ribbon slider.  I pulled the ribbon through the slider as shown.  I placed the ribbon over the join in the papers and taped the ends to the back.  You can move the slider to where you want.  You can add a bit of adhesive carefully to the back if you want it to be stationary.  This layer is now glued to the card front.  Several different greetings are provided for this set of cards in the stack.   Below are a couple examples of the other colors and papers used.

Friday, March 1, 2013

Notecard - Bee with Script

I'm making note cards for a friend who lost her husband. These are the first in a few.  I used the same script background I used on this card printed in black. The bee was cut with a Sizzix Bee #4 sizzlet die.  I printed the background on designer paper and placed it on a dark purple card with the bee in a coordinating card stock.  I wrapped an organza ribbon around the card front and tied it in a knot.  On the right hand card I used a light green card.

Monday, February 25, 2013

Card Club - Feb - Butterfly

I made the decorative paper. See notes below.  This paper was then trimmed and mounted to the turquoise card front.  I added a dark green organza ribbon wrapped around the whole card front and knotted on the front.  Trimmed the ends.  I added a bit of tape on the inside of the card to keep it in place.  I die cut the butterfly with Spellbinder die in dark green card stock.  I just adhered the body to the card front to allow the wings to be elevated from the card front. I did print greetings in case the girls wanted to make this an Easter or birthday card.

Decorative Paper: I created this decorative paper with the paper I used when I dabbed the green on to my doilies for these cards. I added some Nick Bantock turquoise ink to the paper with a foam paint brush. Once dry, I ironed the sheets flat.  I then created a collage of scripts from Graphics Fairy as background.  I did print this onto the decorative paper but ended up with a paper jam and it wrecked my printer which resulted in a new printer. So Be WARNED!

Thursday, September 27, 2012

Card - Invitation Samples

I had a couple approach me to design some invitations for their 60th wedding anniversary which is the diamond anniversary.
Here's the samples they did not select. Check back later for their selection.
I selected a black card.  I embossed a white layer with the SU Elegant Bouquet folder.  I printed a 60 on to bottom right hand corner.  I glued the white layer to the card front then applied several crystal rhinestones.

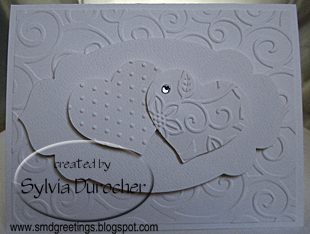
This card was a white on white concept.  I started with a white card and added a layer embossed with the Cuttlebug Devine Swirl folder. The next layer was cut with one of the SU Apothecary Framelits onto which I layered 2 die cut hearts which were embossed with Cuttlebug Swiss Dots on left and Craft Concepts In Bloom on the right.  I added a crystal rhinestone on the left heart.  The framelit die cut and the hearts were raised with 3D foam tape.

I chose ivory card stock for this one.  I printed some SU! Designer Paper from the Beau Chateau series. I slipped a Cuttlebug ribbon slider in Marina Mist onto the ivory organza ribbon and wrapped it around this layer and taped the ends to the back. I added a crystal rhinestone heart onto the centre of the ribbon slider.  I color printed the "invitation" on ivory card stock and cut it with another SU! Apothecary Framelit.  It was mounted to the card front with 3D foam tape.


Here's the one they selected.

I started with a dusty lavender card.  I embossed a white layer with the Cuttlebug Rebecca embossing folder and trimmed it to leave a tiny border.  I cut a lavendar scalloped oval with a Spellbinder nestabilities.  I color printed the information in lavendar onto white card stock then cut it with the corresponding smooth ovals in the SB nestabilities. These were adhered to each other then the element was mounted to the card front with 3D foam tape.

Monday, July 2, 2012

Card - Felt Flowers - Exchange

I made these cards for my July exchange cards.  I selected a card that matched the flower color.  I added a white layer embossed with Cuttlebug Floral Fantasy folder.  I added a wide yellow organza ribbon to anchor the flower between the embossed layer and the card.  The flower is held in place with a green brad to which I added a white confetti daisy. Makes a nice monochromatic card!