Showing posts with label Not Quite Navy. Show all posts

Tuesday, September 9, 2025

Card Making - Sets Continue

I switched the designer paper to Well Worn which gives me masculine cards for variety.

These a DSP Splits which means I cut the designer paper to 4.00 x 5.25 inches then cut again at 3.5 inches.  

This designer paper is double sided so I can just turn the small piece over and tape it on the back scotch tape and I have the same size layer to work with. on the left I add a piece of Crumb Cake card stock and a strip of Not Quite Navy.  I used my square punch to punchout some square to repeat the pattern on the left hand side of the card. I then glued a few of the small punchies on the right hand side with Bling Zots. 

Another set of cards with theWell Worn Designer Paper Set.

I cut the designer paper to leave a small border on the Crumb Cake card base.  On th left I created an accent with the Tim Holtz Bracket die in Cajun Craze, then a strip of Crumb Cake then a strip of Not Quite Navy.  I adhered these the added 3 holes. I strung some shiny cord through them and knotted it at the center front. I added a star brad through the center hole.  This accent was then adhered to the card front. On the right, I created an accent with a piece of So Saffron card stock riipped on the right. Added a strip of Cajun Craze and a narrow strip of Not Quite Navy.  I then poked holes on either side of the navy and using a large needle stitched the criss cross pattern over it with yellow yarn. 

Again, A2 size with white quarter sheet inserts and white envelopes.

Thursday, May 22, 2025

Card - Flowers - Thank You

I made this card for my real estate agent who helped my purchase my next home.

She as been amazing. I paired it with a yellow flower potted plant and dropped it off at her office today.

Card base A7 in Stampin Up Crushed Curry.  I cut a layer of striped designer paper to leave a small border. I used a leftover scrap of card stock to put a band across the top third of the card.  

I used Tim Holtz Tattered Flowers die to cut a Not Quite Navy flower, a Marina Mist medium and a Crushed Curry small one. Adhered together with a blue mini brad then adhered to the card front with double sided tape.

A white single insert and a yellow envelope and it's ready to go.

Saturday, August 3, 2024

Flooring Project - Thank You cards

I made a few Thank You cards for those who helped in this big flooring project. 

This was for the sister and her husband who came to the city to help me remove the carpet from the living room and dining room and expose the cement floor on a very hot and sweaty day.

I chose Stampin Up Rich Razzleberry card base in A2 size. I dipped into my commercially made handmade paper and cut a piece of this wax resist in teals, rich purples with swishes of gold.

I left the beautiful deckle edge on the bottom and taped it to the card front.

I stitched 3 small gold beads in the top right hand corner.

A white insert and envelope.


This card has an Old Olive card base.

I chose an origami paper front layer which was taped on.

I added a gold star sequin in the left hand corner.  To balance I added 2 square brads in the bottom right hand corner with a green one in the middle.

This paper has beautiful gold details.

This card is for the folks from whom I bought the flooring which answered all my questions during the process.


I chose a SU Kraft A2 card base for this card.

The front of the this card is a piece of botanical pressed wax paper.  A nice little flower and a piece of green leaf.  It needed to be mechanically adhered as it resisted taping.  

I wrapped a length of gold thread around the top a few times and then knotted it.  I then place the gold mini brad over the knot and pressed it through the card front. I added a gold bulb pin in the bottom right hand corner which went through the wax paper and card stock front.

A white half sheet insert to hide the metal pieces which have gone through the card stock.

A white envelope to finish it off.

This is for the flooring company which recommended the underlay which saved the project.

This card is for my niece who dropped everything on the Monday morning to pick up the 2 large rolls of underlay and deliver them to my brother in law who was going to install the floor.  Saved me a round trip to the south.

The card base is SU Always Artichoke.  I found this piece of lacy handmade paper in the stash.  Lightly glued to a piece of white card stock.  Trimmed to fit across the card front and taped in place.

I added a coordinating button with gold thread held in place with a Zot. White insert and envelope.
Started with a piece of Not Quite Navy card stock.  

Layered a piece of marbled paper in blue tones with copper accents on the card front.  I added a copper star sequin held in place with a Zot.  Then I added a coordinating bead held in place with a star copper tiny brad.

White insert and envelope. 

This is for my brother in law who installed the floor and my sister who hosted me at her house.  We did a few fun things while he was working at my place. There was a bottle of scotch delivered with the card.


I am loving the lacy curtains casting a wonderful shadow on the vinyl floor!

Tuesday, June 18, 2024

Cards - All Occasion

I wanted to finish a few more cards before cleaning up my space for company as well as use up the rest of this gold speckled paper. 

An Island Indigo card base with a piece of the gold decorative paper adhered with ds tape and glue stick.  

I added a gold fabric ribbon along the left hand edge knotted to the top of the card.

A flower element with leftover flowers from the earlier set. Cut with the Tim Holtz Tattered Flowers die.

Rust, golden yellow and blue to match the card all held in place with a copper mini brad.

White quarter sheet insert and envelope.

A masculine themed card with Not Quite Navy card base with a piece of the gold speckled decorative paper. 

A length of gold fabric ribbon tied along the top edge and knotted.

I cut a Tim Holtz mover and shaper Jalopy truck from same card stock as card and adhered with 3D tape.

A white quarter sheet insert with a white envelope.


For this card I used a SU Handsome Hunter A2 card base.

Adhered a piece of gold speckled decorative paper and trimmed the left hand side to the card edge with scissors.

Added a length of gold fabric ribbon along the fold edge of the card and knotted.

There was a star shaped hole where I had cut a shape earlier.  I cut a yellow star with the same cutter (SU Star Thinlits). It was adhered over the hold with 3D foam tape.

A white quarter sheet insert and white envelope and it is ready to give.


A bit of change of pace in color for this card.

The star was a leftover from earlier cardmaking so I mounted it to a piece of Tempting Turquoise card stock trimmed to leave a border.

I chose a bright green card base - Glorious Green I think.

I tacked the large star in Summer Sun then the small star in the same color as the blue layer. 

Made a hole in these layers and added a yellow star brad.

This layer was then adhered to the green card front.

White quarter sheet insert and envelope.

Friday, March 15, 2024

Sewing Project - Book Sleeve - Blue Abstract


I found this cotton poly fabric at the thrift store and thought that would make a great bag. I liked the blue abstract pattern at the top which was different than the rest.

Cut the outer fabric, flannel padding and the ivory lining cotton poly fabric to 9 x 12 inches. Quilted the outer fabric to the padding with a wavy decorative stitch. Sewed both side seams on both pieces.  Managed to cut handles 3 x 12 inches with similar pattern.  Folded both edges in then again in half to make .75 inch wide handles. Top stitched left and right edges with ivory thread.

Placed the handles 3 inches from the edge and pinned, added the elastic on the back piece and tacked those down with a bit of stitching and checked their orientation o make sure I got it right.  Then pinned the two pieces together and sewing the top seam leaving a gap to turn out the piece. Back to flat elastic. 

Top stitched the top edge to close the gap and finish the edge.  

Added a vintage button just the right color.


For information on the "My Bag" Line


Friday, November 3, 2023

Card - Birthday Balloons

A balloon birthday card for a boy having a celebration this week.

I watercolored a square of mixed media card stock with Not Quite Navy from the Stampin Up Watercolor Wonder Crayons.  Let that dry and pressed flat.

I cut the balloons with a thinlet die which has not brand name on it.  

The paper is paste paper with glitter that my sister and I made years ago. Love the bright colors.

I adhered these to the watercolor with 3D foam tape. I added bright green strings and a SU Artisan Label punchie greeting the same color as the card base.

I added a quarter sheet insert and a quite envelope. 

Love how the sun through the lace curtains adds something to the photograph.

Wednesday, July 12, 2023

Belated Birthday

I made this card for a friend whose birthday was in April but I just lost track of it.  

She is here visiting so I will give it to her at supper tonight.

Card base is A2 in Rich Razzleberry with a top fold.

I cut another piece from my larger watercolor paper piece and chose this blue purple section. I cut a Stampin Up Top Note die.

I added a length of Elegant Eggplant grosgrain ribbon wrapped top to bottom on Top Note die and held it in place with a crystal large brad.

I cut large flower in Elegant Eggplant and smaller one in Not Quite Navy and added a small silk all held with a silver mini brad.  The flowers are Tim Holtz - Tattered Flowers.

White insert quarter sheet on the inside.

Sunday, January 1, 2023

Card Exchange - Jan - Silver Snowflakes

Some snow flake cards for January exchange.

I started with Not Quite Navy card base.

I added a blue snowflake designer paper which coordinated well but I purchased from Michaels years ago.  Cut it down to 4.00 x 5.25 inches.

I pulled out some old Satin Stitched Ribbon in the color Midnight Muse which was an in color at the time.  Works well with the warm dark blue. Wrapped around the designer paper and taped the ends to the back.

I created the accent with a silver fabric snowflake from the dollar store, then a white plastic snowflake sequin held together with a warm navy star tiny brad. Pushed through the DSP.  

The whole layer was adhered to the card front with double sided tape.

The card is in the tall or portrait orientation and the next is in the wide or landscape orientation.

This card is identical to the first one except the orientation is changed.

I added a quarter sheet white insert to the inside and a white A2 card.

These will be out to my partners very soon.


Friday, July 1, 2022

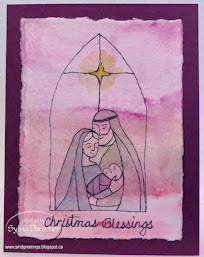
Christmas Card Challenge - Watercolor - July - Holy Family

I chose the Holy Family for my July Christmas cards.

I selected certain elements from the Gentle Peace digital stamp set.  The set is stained glass but I just used the arch background, the star and the family. 

I first trimmed the 140lb watercolor paper to 3.5 wide and just applied watercolor from the Stampin Up Watercolor Wonder Crayons.

I let that dry overnight so that it would remain flat.  I trimmed the long strip into pieces 4.75 inches tall.

I placed the watercolor paper over the black printed image and traced the pieces I wanted.  Let the black ink dry then watercolored the pieces I wanted.  Mary, Joseph and baby Jesus with the star. The background changed some of the colors but that is okay.

I traced the greeting as well which I printed in black.  Card one is Not Quite Navy card base, card two is Baked Brown Sugar base, card three is Always Artichoke and card four is Rich Razzleberry. I mixed and matched greens for Joseph`s garment, blues for Mary`s and purple for royal Jesus.


I adhered the watercolor accent to the card front with double sided tape and pressed them under a stack of books over night.

I added a quarter sheet insert with a seasonal appropriate sentiment and a white A2 envelope.

 
I  have lost count of the number but I am happy with my progres

Sunday, May 8, 2022

Mom's Day Card

I painted a blue daisy flower for my Mom's mother's day card.

Her favorite color is blue.

I used a piece of 140lb rough water color paper measuring approximately 4.25 x 5.5 inches.  I sketched it lightly with a pencil and then painted it with my Stampin Up Wonder Watercolor  Crayons.  Using Marina Mist as the main color with some Night of Navy and some Not Quite Navy.   The leaf colors were Always Artichoke and More Mustard.  The center is More Mustard.

Once completely dry I traced around the flower and leaves with a black permanent marker. 

I mounted the flower onto a half sheet card of Marina Mist card stock.   I added white and medium blue seam binding below the flower by punching a slit in the fold then wrapping them around the card front and knotting in the front.

A white insert was added to the inside.


Friday, April 1, 2022

Christmas Card Challenge - Watercolor - Dot Wreath

I chose to use my Stampin Up Watercolor Wonder Crayons for this month's Christmas Cards as that is the card stock that has not been packed.

I used Arches Watercolor Cold Press Paper.

I started with a light pencil circle mark.  I sprayed my crayons. I mixed Always Artichoke and Garden Green for the green dots, Cherry Cobbler and Real Red for the red ones and Not Quite Navy and Night of Navy for the blue ones.  I applied the dots with the end of a cotton swab which I wet then dabbed into the colors. 

I drew a bow towards the bottom of the wreath with a Micron black permanent marker then filled it in with a bit of the red paint.

The greeting was traced with the black marker using the window as a light box.  I just printed several greetings on a quarter sheet of white paper.


I added a few stars with the black marker to balance out the shape.

The piece was then spattered with colors used in the card front but somewhat diluted.

I chose a Not Quite Navy card base.  I adhered the wreath watercolor to the card with double sided tape, added a quarter sheet insert and pressed them to ensure all the pieces stick together.

I am taking advantage of some down time now to get ahead  with this project so when the move comes I don't have to worry as these will be scheduled to arrive on time.

Sunday, July 18, 2021

Balloon Cards

I painted some balloons with watercolor.  I chose my Watercolor Wonder Crayons from Stampin Up to match the card stock I am using. 

I did draw a slight image to follow in pencil on heavy white card stock.  

I chose Always Artichoke green, More Mustard yellow and Bravo Burgundy with Cherry Cobbler red for the balloons.  

I added strings with a black permanent marker once the piece was completely dry and pressed flat.  I signed the art as well. 

I added a length of Bravo Burgundy grosgrain ribbon across the bottom o the card with ends taped to the back.  

I added a Modern Label punchie color printed greeting with a More Mustard offset to match the card base in the same color.  This was adhered with 3D foam tape.


Another balloon card.  I chose Old Olive, More Mustard, Not Quite Navy and Real Red card stock for the balloons.  

I cut them out of scraps of cardstock with my Create Cricut electronic cutting machine using the Create a Critter cartridge.   I cut them at 3", 2.75" and 2.5" inches.  I tied black thread onto them for strings.  I added white highlight spots on each of them with a white opaque marker.

Added a piece of sky designer paper which I warmed up with some warm yellow chalk pastel applied with a stipple brush and adhered to the front of an Old Olive 5x7 card base.  I then assembled the balloon bouquet with the ones farther back adhered to the sky paper, then the next ones with 1 layer of 3D foam tape then the small red one in front with 2 layers of 3D foam tape.   This adds depth to the composition.

I taped all the string to a central spot.

I added a ripped color printed greeting over the strings with 3D foam tape.

Thursday, July 8, 2021

Birthday Cards

I made a few cards for my upcoming family birthdays.

I started with a card base in Not Quite Navy. 

I printed the sail boat from the Sail Away stamp set on Whisper White in black.  I used the Stampin Up Watercolor Wonder Crayons to color the image.  Night of Navy for the water, Not Quite Navy for the sky and Cherry Cobbler for the sails.  It was trimmed to 4.00 x 5.25 inches.

I printed the greetings in black on white card stock.

I flagged the right hand end of the greeting and mounted on the card front with 3D foam tape.

I chose a Soft Sky card base. I added a layer of Old Olive at 4.00 x 5.25 inches.  

I printed the grove from the Lovely as a Tree stamp set in black on white. 

I watercolored the image with Not Quite Navy for the sky.   A mixture of Always Artichoke and Garden Green for the grass and the trees. 

The image was trimmed to 3.5 x 5.00 inches and adhered to the green layer.

I printed the greetings in black on white card stock.

I trimmed the greeting and mounted on the card front with 3D foam tape.

I chose a Stampin Up Kraft card base.

I printed the Canada Goose from the Wetlands Stamp set in black on white card stock.

I mixed a color to match the Kraft card base which I used for the body of the bird, a lighter version for the breast and some greener version for the grass.

I printed the greetings in black on white card stock.

I chose the same color mixed earlier to shade the edges of the flagged greeting.  It was mounted to the card front with 3D foam tape. 

A couple of these off to those who are celebrating in July.


Wednesday, June 16, 2021

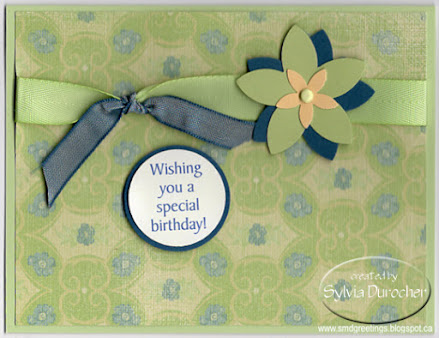
Special Birthday Card

My first card made with Stampin Up supplies since the major clear out of card making supplies in my craft space.

The card stock is Certainly Celery topped with a piece of Porcelain Prints DSP. 

I added twill ribbon in the same shade.  I added a short piece of Not Quite Navy tied in a knot.

I punched a couple of Five Petals punchies in those 2 colors. I added a small So Saffron flower in the center all held in place with a mini brad.  I adhered the flower to card front with 3D foam tape.  

The greeting is a color printed circle punchie with a NQN backer.

Wednesday, March 22, 2017

Watercolor Flora Card

This card is for one of my card exchange buddies.

I started with a left over from making samples for my Art Card Stack Class which is coming up soon.
I decided to watercolor this card with the Stampin Up Watercolor Wonder Crayons.  I used a water brush to apply the color.  I used Garden Green, Always Artichoke, Bravo Burgundy, Cherry Cobbler and Not Quite Navy. I used Not Quite Navy to add spatters to the element.  It was cut to 3 7/8 inches square.

I added a length of Spring Moss grosgrain ribbon on the left hand side of the card front and taped the ends to the inside.

I stamped the greeting in Cherry Cobbler with the Itty Bitty Banner Stamp set the die cut it with the Bitty Banner Framelit set.  I mounted it to the right of the ribbon with 3D foam tape.


I used a water brush to paint the color onto my card element.  I applied a bit of color to a clear stamp mount with the crayon then painted from there.  In my opinion, this is the best way of doing.  You can You can collect the color directly from the crayon onto the brush which works okay if you want a bit more intense color. Applying the color directly with the crayon to your paper puts too much color, makes it too dark and it has very fat end for coloring. 
I bought the crayons second hand and I see that I got some colors from the Rich Regals set and some from the Earth Elements set.  I am very happy with the color selection.  These will last me my life time. 

Tuesday, July 5, 2016

Ready2Go Christmas Stack Kit - Snowflake Blues

Another Christmas Stack kit.

This one based on the Stampin Up Snow Flurry Bigz die.  I decided to create the same layout in 3 different card colors of warm blue from dark to light: Not Quite Navy, Blue Bayou and Baja Breeze.

I cut the label with the Apothecary Label thin die in Pool Party card stock.  I cut the large snowflake from the same color card stock as the card, the next one in Whisper White and added a warm blue confetti snowflake in the center.  These are all held together with a tiny white brad.


The greeting layer was done on Whisper White with the greeting matching the card color.  The greeting is from the Teeny Tiny Wishes stamp set.  It was trimmed to leave a decent border and adhered to the blue card.  The snowflake accent was then adhered to the greeting layer with 3D foam tape.


Please check my R2Go Stack Kits tab for availability.

Monday, November 9, 2015

Ready2Go Card Kits - SU - Candy Cane Buttons

Another set of R2G card kits.
This set features the Candy Cane Designer Paper.  I cut the DSP into 4" squares.  I selected Not Quite Navy card bases.  The greeting is from the Teeny Tiny Wishes stamp set in Real Red on Whisper White.  I taped the greeting to the DSP square to create a full piece for the card front.  I wrapped a piece of RR grosgrain ribbon over the join and taped the ends to the back.  This layer was then adhered to the card front.  I chose buttons from the Candy Cane set which came in Garden Green, Real Red, Blushing Bride and Baja Breeze. I put red/green thread through the button then adhered the buttons to the right side of the greeting. 

Sunday, August 16, 2015

Triple Stars

I selected the Stampin Up Well Worn DSP and a Cajun Craze card.  I followed this tutorial for the sunburst. I cut a piece of DSP to 4.5x6 inches which I cut into 4 pieces of 4.5x1.5 inches which were cut in half on the diagonal.  I cut 2 from Not Quite Navy card stock as well.  I marked the center of the card about 1 inch from the bottom edge. I placed the points on the mark and played around with their placement. Once I was happy, I glued them down.  I trimmed all the DSP pieces to the edge of the card. I cut a narrow strip of NQN card stock and adhered it just below the horizontal edge of the DSP across the card.  I cut 3 stars with the Sizzix Stars#2 die; large in Early Espresso, medium River Rock, smallest Cajun Craze. I trimmed the largest star to the edge of the card.  The greeting is from the Itty Bitty Banners Stamp Set which was stamped NQN on River Rock and cut with the Itty Banner framelits.  It was adhered on the right of the star accent.


Submitting to the following challenges:
TGIF Challenges - TGIFC16 - Sunburst Sketch
SU ColorQ - cQc 303


Monday, June 15, 2015

Snowflake on Trio

I started with a Stampin Up Island Indigo card laid in the portrait orientation.  I added a narrow strip of Whisper White in the left third of the card front.  I cut 2 squares of Winter Frost DSP and layered these on squares of Basic Grey card stock.  I cut a snowflake from non shed silver glitter with the smallest on the Snow Flurry Bigz Die.  I mounted on the middle square.  I mounted the 3 squares with 3D foam tape.  I stamped the greeting with one of the stamps from the Good Greetings set in Not Quite Navy ink.

Submitting to the following challenge:
CAS colors & sketches #128
Sparkles Christmas Card - #28 Anything Goes

Friday, June 12, 2015

Sail Boat on the Sea

I made a masculine card today.  I started with the Stampin Up Sail Away stamp on watercolor in Early Espresso.  I added blue in the sky and water with the Not Quite Navy
Watercolor Wonder crayon and the Aqua Painter.  I added a hint of sun in the top left hand corner with a More Mustard WW crayon.  I trimmed down the watercolor paper to 5 x 3.75" and layered it onto a piece of Marina Mist card stock which just leaves a small border on the Early Espresso card.  I cut a Bitty Banner with the framelit in EE and then stamped the greeting from the Good Greetings stamp set in Baja Breeze cause I have no Marina Mist stamp pad. These were layered and mounted to the car front with 3D foam tape.

Submitting to the following challenges:
Paper Pal Arts - #255 Early Espresso, Maria Mist, Sahara Sand.
Cute Card Thursday - #377 Beside the Seaside