Showing posts with label trio. Show all posts

Saturday, August 16, 2025

Watercolor Card - Congrats on Grad

This card is for my grand neice who graduated from high school.

The ceremony was June 8th which 4 days after I took possession of this place that needed so much work that I could not get away.

We are celebrating this weekend as they are in town.

The card is SU Elegant Eggplant.  The seam binding is SU Marina Mist.  I layered the 3 pieces of watercolor over and below the ribbon which was wrapped around and knotted to the front of the card.  Added a SU Word window greeting.

They are headed to college soon.

Wednesday, October 16, 2024

Inktober 2024 - 16 Floral Trio

Inktober 2024 Challenge

16 - Floral Trio

I used a Micron Black Marker on Canson Fluid Mixed Media 154lb paper. 

I drew the funky flowers by hand with the marker on the 5x7 paper.

I added a couple of swatches of fall colored watercolor.

I spattered orange, brown and yellow onto the flowers.


Tuesday, February 28, 2023

Sewing Project - ReUsable Bag - Bright Big Ones

I bought a piece of polyester fabric on Friday that I thought would make 3 bags. I just loved the bright colors and was quite sure I have bias tape that would work.

Sure enough, I had yellow, orange and green. Brown would have worked too. 

It was a nice change to sew with nice colors rather than the beige, grey, tan ones I have made in recent days.

I decided to maximize the use of the fabric so the bags finished are a bit bigger than the ones I have made so far.

Measurements: Overall height = 24", width = 24 inches and the bag itself is 17 inches tall. 

This fabric was like the other patterned polyester fabric so it frayed easily.  It feels really nice and irons beautifully.


The first one got yellow bias tape with an orange button and a white elastic.

The next one got orange bias tape with a light green button.

And the third got green bias tape with a yellow button and white elastic.

These will perkup the full basket of folded bags I have made this month.

Great to get 3 bags done today!

There they are all folded ready to join the rest in the basket.  It is overflowing with about 15 bags.

I have enough bias tape to make about 12 more then I can get rid of the rick rack that also lives in that box and it will be another empty box to add to the result of de-cluttering.

I have decided to keep the patterned polyester one with turquoise bias tape for myself.

Tuesday, October 30, 2018

Trio of Prism Trees

Shopping at the dollar store can be ineffective.  I was attracted by these shiny reflection pieces several years ago and have struggled on how to use them.

I was inspired yesterday to create this composition.  I am happy with the star tops and the black stems. 

I added silver sequins with Bling Zots. 

I ripped a snow bank and added an extra from my class on Tuesday that I have not blogged yet.


 Here's my first sample.  The snowflakes don't really work for toppers for size or color. 

The iridescent sequins are OK but not the best.

The snowbank and greeting works really well.


Sunday, March 11, 2018

St. Patrick's Day Birthday

I made this card for a friend whose aunt celebrates her birthday on St. Patrick's Day. 

I chose a warm green card base.  I added a few stripes of vellum which were adhere to the inside of the card  then flipped forward to cover the front. I added some double sided tape down the card which will be covered by the greeting.

The greeting was printed on bright warm green card stock and then I ripped the bottom and top edges.  It was adhered aligned to the bottom of the card front.

I punched 3 hearts from plaid green glitter paper with the Stampin Up Sweetheart punch.  I cut a stem by hand with scissors.  I added 3 small hearts over the glitter ones adhered with 3D foam tape.  The shamrock was assembled and glued in place with double sided tape. 

The white narrow ribbon was added just above the greeting. I used a 1/8" circle punch to create a small hole in the fold on the left hand side.  I ran a length of the ribbon twice through and tied a knot on the right hand side of the card.  

I added an Irish Blessing on the inside.

Wednesday, October 11, 2017

Exchange Cards - October

I took this card kit from Card Club and adjusted it.

My sister made a similar card here which is my inspiration.

I embossed white rectangles with the Cuttlebug Swiss Dots and the Devine Swirl embossing folders. I glued them in opposite corners onto the bright green card.

I glued the postage to a piece of vellum then this accent was adhered to the card front with 3D foam tape.


Another card kit from Card Club.

I ripped the vellum to separate the vellum greetings.

I attached the vellum to the black card front.  I then adhered the gold foil stickers to a teal card stock then punched them out. 

These were adhered over the edges of the vellum strips.

These cards are headed to my card exchange partners.

Monday, September 25, 2017

Card Club - Sept - Lily Trio

It's time for Card Club again.  This is a card made from kits from a couple of years back.

I started with the lily stickers then punched a trio of circles in the same color as the large greeting.  The three were layered then adhered above the greeting which was printed on white card stock.

It was trimmed to leave a small border of the black card showing.  These are all birthday greetings.

Monday, June 26, 2017

Card Making with Seniors - Flower Trio

I started with the gold foil flower stickers which are about 1 inch in diameter. I stuck them to turquoise card stock then punched them out with the 1.25 inch circle punch. Easier to align that way and ensure even spacing on the border.

I created a new large greeting which I printed on a quarter sheet of vellum and gold embossed it. 

The trio of circle accents were adhered above the greeting first.  This allowed me to know where to put my adhesive to glue it to the card front.

The vellum was adhered to the front of a black card once I had ripped the bottom edge.

Monday, May 15, 2017

R2Go Christmas Kit - Bethlehem Triptych

I'm working on Ready 2 Go Stack kits for my class on June 5.

It features a Bethlehem Triptych with a gold foil greeting.  It is 3.5 x 4.75 inches.

I chose a navy card.

I trimmed the 12x12 gold metallic card stock to 4.00 x 5.25 inches which leaves a small border.  This layer was adhered to the card front.

I added 3 gold star confetti adhered below the greeting with Bling Zots.  I placed the center one first then evenly space the other two on either side.


Monday, April 24, 2017

Card Making with Seniors - April - Tea Cups

I love cutting these small tea cups. They were cut on the Cricut set at 1" using the Joy of the Season cartridge.  I chose double sided card stock to cut the cups.

I printed the large greeting onto white card stock.  I chose a brown card to match the backside of the left and right teacups.


I placed the colorful one in the center adhered with 3D foam tape. I then evenly adhered the other two on either side.

Choosing different designer papers and therefore greeting and card stock colors produces a quite different card.

This one is off to my card exchange buddy.

Sunday, April 9, 2017

Ornament Trio - Challenge

I designed this card with the challenge at Merry Monday Christmas Card Challenge.  I was very happy to find this challenge blog as a couple of my regular challenges have shut down.

I started with the digital ornament trio which I designed.
I drew the ornaments and then  added some of my own digital paper paste backgrounds into the them.
The branches was designed from an actual pine tree branch photo.
The polka dot - snow background is another of my own elements.
The words are added digitally as well.
Once printed onto white card stock this layer was trimmed to 3.75 x 5 inches.  I then cut a layer of black card stock to repeat the color in the outline of the ornaments.  This was cut to leave a small border.  It was adhered to the card front of a warm medium green card.  I then adhered the ornament layer with 3D foam tape.  
To add a bit of sparkle to the card I spattered it with Iridescent Pearl Mist by Maya Mist.  It's great to create a quick card with my own designs.


Submitting to Merry Monday Christmas Challenge - Branches.

Monday, November 28, 2016

Card Club - November - Gift Trio

I started with the green glitter polka dot square of handmade paper.  These were left over from this Christmas card which was in the centre of the frame.

I designed the greeting layer with 3 gifts on the bottom and a large greeting on the top. I used digital bow image I designed a while ago. This layer was adhered to the front of a Christmas green card.

The red bow was cut with the Lil' Inkers Gift Bow Topper from red card stock.  This is then adhered to the green glitter square and trimmed as needed.

Now adhere the gift to the large square frame on the greeting layer.

Wednesday, July 13, 2016

Thanks - Rounded Squares

I started with a cinnamon colored card onto which I printed the greeting in black open letters at the bottom of the card.
I chose some double sided card stock to coordinate.  I punched 3 large and 3 small squares with the Creative Memories Double Square punch.  I corner rounded 2 opposite corners then layered them onto each other.
I placed a piece of black grosgrain ribbon across the top third of the card and taped the end to the inside of the card. I mounted the 3 squares over the ribbon with 3D foam tape.

Wednesday, June 1, 2016

Decorative Paper - Set 2

For this card I used heavy decorative paper made with alcohol inks and Future floor wax. I cut the quarter sheet with the Creative Memories circle cutter using the largest circle and the red cutter.  I rubbed the edge with a blue ink pad to get rid of the white edge.  I adhered it along the left folded edge of the blue card and trimmed the top and bottom to the card edge.  I created a slit in the fold to pull through a length of white 1/4 grosgrain ribbon.  The ends were taped down on the inside of the card. I then cut a shorter piece which I tied onto the first piece and trimmed the ends with scissors. I added silk flowers one white, one blue on the bottom third of the card just inside the curve. These are held in place with a tiny white brad to which I added a small flower sequin.  A card ready for any occasion.


This card is shares the same layout as the first one.  This time the colors a quieter. Mauve and turquoise onto a white background. This one was photo paper so was much easier to cut.  The same white grosgrain ribbon across the top.  A white then a purple silk flower on the accent with the same flower sequin and tiny white brad. The card is turquoise.


This card again is set up in the landscape/wide orientation.  I used my large greeting layout with Rose Red for the printing.  I punched the Stampin Up 1.25" circles from the ink background paper and the larger 1 3/8" circles from a deep rose solid card stock which matched the greeting. I selected a light blue card with coordinated with the blue in the decorative paper circles.  I generally  adhere the right then left then just place the center one leaving even spacing.

Saturday, May 14, 2016

Friday's Hunt 1.20

I took these shots for the challenge of Friday's Hunt.

The prompts are:
Starts with T
Favorite
Evening

This is a plate of Three potato pancakes for lunch.  I added a dab of sour cream on each pancake topped with a bit of cilantro.  A side of kimchi for a bit of great flavor.


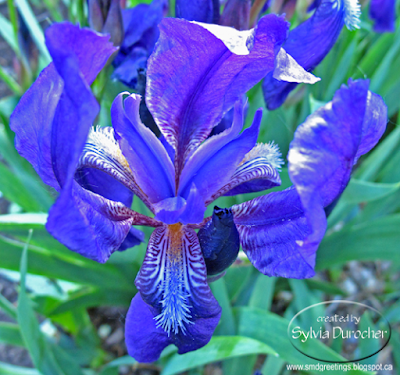
My favorite is a blue iris blooming in one of the flower beds on my walk this morning.  Love the yellow in the centre and the fuzzy on the petal on the right.


The lamp post outside whose lights are on once the sun has set.   I guess there is a trio of lights in this photo as well.

Submitting to Friday's Hunt 1.20 hosted by Teresa at Eden Hills.


Monday, September 28, 2015

Vertical Greeting Tag

I had made this card as a sample for card club and when it came time to make up the kits I decided to not go ahead for these reasons: the die cut alignment, the banner alignment and the juvenile color scheme of the card.  I could have worked with the different papers to improve the scheme but decided to just replace it. 

This card is white with a purple gingham designer paper layer on the front.  I created the tag with the new Stampin Up Triple Banner punch.  I chose a piece of solid card stock in purple which coordinated with the designer paper.  I placed my Tattered Lace Vertical Greeting dies on my magnetic cutting pad.  Placed my card stock and ran it through the Big Shot.  I adhered the greeting layer to the back white banner.  Then I put a hole in the top and ran a piece of white fiber through.  I adhered the banner greeting to the card front with 3D foam tape. I then placed a trio of buttons to the left.  They are held in place with Zots.

Monday, June 15, 2015

Snowflake on Trio

I started with a Stampin Up Island Indigo card laid in the portrait orientation.  I added a narrow strip of Whisper White in the left third of the card front.  I cut 2 squares of Winter Frost DSP and layered these on squares of Basic Grey card stock.  I cut a snowflake from non shed silver glitter with the smallest on the Snow Flurry Bigz Die.  I mounted on the middle square.  I mounted the 3 squares with 3D foam tape.  I stamped the greeting with one of the stamps from the Good Greetings set in Not Quite Navy ink.

Submitting to the following challenge:
CAS colors & sketches #128
Sparkles Christmas Card - #28 Anything Goes

Sunday, April 12, 2015

R2G Card Kit - SU HB Square Trio

Another Ready 2 Go Card kit for my class tomorrow.
I started with the Stampin Up Prestwick Designer Paper which features Night of Navy, Basic Grey and Garden Green.  I chose NofN and BG cards and 2 of the sheets from the DSP set. I chose the HB greeting from the Four Square Stamp Set stamped in NofN ink in WW.  I currently do not have a 1.25" punch so I had to carefully cut them with the paper cutter.  I layered it on a 1 3/8 inch punchie of Garden Green. 
I placed the striped paper on the portrait of NofN and the plaid on the BG landscape card.  I added a .5 inch strip of Whisper White then added the trio of squares.  I swapped the DSP for the additional squares so the plaid on the stripes and the other way around.  All squares got a GG layer.  The HB square is adhered with 3D foam tape to emphasize it. 

Friday, February 27, 2015

Baby Card - Block Letters

I'm cleaning up leftovers from past projects. This was my first attempt at these cards.
It is Stampin Up Ice Cream Parlor designer paper but the letters are not SU. I chose Bazzil Great Lakes card stock which matches SU Pacific Point.  I trimmed the graphic close to the border then layered a couple pieces of lighter blue behind the top and bottom.  Added a trio of coordinating buttons held in place with Zots.

Monday, October 27, 2014

Card Club - Oct - Glitter Circle Trio

I used some card stock with selected flowers glittered as a starting point for this set of cards. I punched the glitter card stock with the Stampin Up 1.25 inch circle punch.  I punched the next layer with the 1 3/8 inch circle punch from deep purple card stock.  I printed my large greeting layer on white card stock in a color to match the card.  The white layer is adhered then the solid circles then the glitter circles.

The other set of card stock was in more muted color tones so I chose an olive card and a lighter purple card stock for the solid circles.