Showing posts with label linen. Show all posts

Tuesday, December 10, 2024

Purple Dove Stitching

I was donated some batik fabric from one of the girls at Sewing Group a couple of weeks ago.

The pieces were large enough to create an accent panel for a bag.

I tucked the 4 triangles in each corner then couched the seams to the foundation layer.

I used a white piece of linen as the background of my focal element.  I cut the bird from a coordinating fabric from my stash. I made the wing from the same purple batik. Some heavy stitching for the eye.

Not sure when it will end up as a bag.  

Tuesday, November 19, 2024

Slow Stitching - No. 047 - Wrinkle Stitching

K3N Cloth Tales Slow Stitching Challenge 2024

Week 47 - Wrinkle Stitching - wrinkling a piece of cloth then stitching along the fold lines creating a random pattern. Filling in the spaces you have created with the stitched lines.

I chose three pieces of pink linen as I needed something perky.

I scrunched it up then basted it to the foundation piece. The stitching in pink the same as the fabric is the original wrinkle stitching. 

Then, I got carried away.  I wanted colorful but I may have filled it in a bit too much.

It is what it is.  It is what I needed today. 

Monday, October 14, 2024

Slow Stitching - No. 042 - From the Same Cloth

K3N Cloth Tales 2024 Slow Stitch challenge.

Week 42 - From the Same Cloth - Pulling Threads and Running Stitch.

This is a piece pale yellow linen.

I pulled thread from the bottom area and stitched them into the cloth above.

Lovely finished piece and a very simple process.


Sunday, September 22, 2024

Cards - SC - All Occasion Flowers

 I was brainstorming ideas of what Celebration paper would look like for art in the December show.

I created some decorative paper by blowing liquid acrylic ink on paper with a straw. I used yellow, purple, red, and orange ink.

It did not work out quite the way I thought so I decided to use the paper for card making instead.

The card base is yellow linen card stock in linen finish. 

I chose a piece of dark green white core card stock, ripped in half and adhered the piece to the right hand side trimming it to the card edge with scissors.

I cut the flowers with the QuicKutz Large Flower die from the decorative paper, red, yellow and purple card stock then just swapped out the pieces. The flowers are held together with scotch tape.

I used the red flower with the decorative paper ring and a purple center.  The stem and leaves were cut from the decorative paper. The leaves are from the Sizzix Flower Layers and Leaves die. Stem is just cut with the paper cutter and adhered with QuickDry Adhesive.

A white insert and ds tape with carrier on the flap.

Here I started with a dark purple linen card base measuring 6x12 inches and scored at 5.5" and just short of 1" for the flap.

This time I chose a light green white core card stock on the left.  This flower is mostly decorative paper and is very punchy in color.


Here we have a solid yellow flower with decorative bits in the center ring and the stem and leaves.

The other half of the light green card stock on the right.


Another mostly decorative paper flower with dark green panel.


Super happy with how these turned out.


Sunday, September 8, 2024

Stitching - Embellishment of Linen Coasters -Sashiko

I decided to do some tone on tone textured stitching on this mustard colored set of coasters.

I used some heavy cotton thread that color matched pretty well.

This is Sashiko stitching which went very well with the needles I bought a few days ago.

It is just basically running stitch trying to keep the stitch very even.

I did my best.

With the overall pattern it does not create bulk in the center of the coaster.  It is stitch that runs through the coaster so the back side is the same.

Another set done.

Saturday, September 7, 2024

Stitching - Embellishment of Linen Coasters

For this set of coasters I decided to use stab stitch in other words just pushing the needle straight up and down in hopes of duplicating the pattern on both sides.

I pulled my knot through the 2 side seams into the middle between the layers. A bit tricky. 

I started with the little red crosses which I positioned based on a 4" stencil.  

Then I chose a round object and aligned as best as I could and then stitched in running stitch all the way around in yellow.

I chose a navy thread for the center star.  It was harder to align perfectly.

Friday, September 6, 2024

Stitching - Embellishment of Linen Coasters

I am working on ideas to embellish the linen coasters I made last year as I did not sell one set.

I found some lace in my stash and the pattern fit nicely on across the coaster.

I used lemon yellow embroidery thread and stitched it along the edge and did French Knots in the center of each flower.  

I added the lace to both in this set. 

Is rick rack too tacky? Double sided might work but again thicker than I would like. Single sided?


Here are a few things I am trying to see if they will work for the embellishing of the coasters.

I just did needling weaving on my slow stitch challenge but that is too much with trying to keep both sides pretty.

The yellow is just doing a bit of embroidery but I need to not pierce through the coaster.  I am investigating simple blackwork stitches.

I am looking at felt but it just does not feel like the same level of material for linen plus it is quite thick and would likely have to be strategically place not to interfere with your drinking vessel on the coaster.

I will post my progress as I go.

Thursday, August 15, 2024

Sewing Project - Chair Pads

 
The wood table chairs are now more comfortable.  I made chair pads for the dining table chairs this morning.

I used some blue mustard fabric I picked up for free a while back.  Nice floral pattern.  The back side of the pads are the mustard linen fabric I had in my stash.

The seats measure 15.25" across at the front and 13" at the back so there is plenty of each fabric.

I had checked out foam rolls at a fabric store at the beginning of the month and the price was $39 but not enough to make all of the pads.

I continued my research.  

I purchased a 1.5" memory top mattress topper for the foam in the pad. They were on sale recently for $50 which is more than enough to make them all with leftovers.  

The triangular shape of the seats will allow me to make good use of the foam and fabric by rotating the pattern.  The funky textures will be put to the underside which will work out alright.

There were some decisions to be made:

1. Zipper closure so I can wash them?  Where does it go? How long does it have to be? Do I have 4 in the right color and length?  Don't have what I need to proceed this morning. Next!

2. Fold over flap at the back.  This makes them not reversible and I would need to velcro the flap to keep it closed.  The math is a bit more complicated. Next!

3. Sew the foam in and see how it goes.  This is the fastest and easiest option. Yes!

The foam was thin enough to cut with scissors but not my fabric ones.  I just traced the shape with a marker.  I rotated the shape so that I could use the cut side for the next one.  Very efficient use of the material.

I cut 4 of these one for each chair.


I placed the printed fabric over the solid fabric and pinned the pattern in place.  I had to add a 1/2 inch seam allowance then a full inch for the foam pad.


I started sewing along the back towards the corner, back stitched the corners and ended just after the last corner leaving most of the back open so I could insert the foam.
The foam is very sticky so it was a bit of a challenge to get it in place but it should help it stay in the envelope.

The twill tape ties were about 15 inches folded in half.  I placed them so they would be aligned with the inside corner of the chair back.  Using twill tape meant I did not have to make ties which made the project move along.  

I pinned the back opening closed and as I went along I placed the folded tie aligned along the pinned seams edge.  

Then, I just sewed the closure seam which also tacked down the ties.  Did some back stitching  where the ties were for added strength. 


It took about 3 hours to make four pads so I am happy with that.

Here's is one on the chair and it looks great.


I have managed to keep my plants on the balcony alive so a small pansy bouquet on the table and I am set to host company!

Saturday, June 29, 2024

Sewing Project - Linen Napkins

I've decided to use cloth napkins instead of paper. I had bought flannel a few days ago for this.  

When I pulled the stuff out to make them I went What?  I am hoarding linen so why am I not using that. 

I pulled out the linen I dyed last year June 22,2023 with my sister.  It was meant to be a table runner but there is plenty.  I just ripped off a strip and started.  The gold is fabric I made a gift for my niece last year.

I made 6 napkins - three navy and three gold.

I made them small.  I started with a 13.75 inch square turned over a .5 inch hem.  I created mitered corners.  I followed this video.

I finally got the idea and the last few went really well.  


Here's the pile of paper napkins I am sending off to the ReUse Center.

I just had to rip the bandaid off because I thought - maybe I should save a few for photographing tablescapes and just said NO!

I have just way too much stuff and it has to go.

I do have a bit of a stash of cloth napkins which I am sure will accommodate any shots I will be taking in the future.

Friday, September 22, 2023

Fabric Coasters - Display


I am very happy with the display I created for my Fabric Coasters.  I used some vintage Tinker Toys to create a stable rack which allows me to display all 22 sets at once. I used some tree ornament hooks which supports up to 4 sets at a time.  I am able to show all the different options all facing the front.  The coasters have all been labeled, inventoried and are ready to go!

Friday, September 15, 2023

Fabric Coasters - Set 2

Another set of coasters done today.

The turquoise set in the corner is fabric I dyed in the microwave with Rit dye.  It worked pretty well.  I had cut the pieces to a bit larger than what I needed so if it shrank or the edges got messy I would still have enough to cut my 5" squares.  

It is interesting the different weights and tightness of weave in linen.  The loosest weave was the blue denim and the rust colored ones. The olive linen was tightly woven. 

Mostly I put in the scraps of flannel I had.  The yellow ones needed white flannel as they were quite thin and the pattern showed through.

This is 22 sets of two coasters.

I am really happy this effort.

The changing of thread for each color took some time but was absolutely necessary.

These measure 4.25 inches square.

I was very fortunate to have a 5 inch and a 4 inch quilting ruler so that made cutter a lot easier.  

The rotary cutter and large cutting mat was the foundational. 

The chop stick for pushing out the corners was the perfect tool for the job. Not too sharp to ensure that the corners were not pushed through.  

The large fabric scissors went well to trim the excess fabric off the corners in one stroke in each direction.

I did have to purchase thread for the wheat colored and the olive colored ones.  That was expensive but worthwhile.

I have started using golf tees to keep my bobbins with their parent spool of thread.  The connectors I spent a lot of money on just broke after a couple uses.

The flannel squares were easy to cut and quickly make as stack so I could just pull them off as needed.

Wednesday, September 13, 2023

Fabric Coasters - Set 1

I've decided to make fabric coasters for sale.

I've chosen to use linen/cotton fabric.  Generally, the outer layers are linen and I have put cotton flannel in the center.

The outer layer is cut to 5 inches square and the flannel layer is cut at 4 inches square.

I sew the flannel to the front piece with a wide seam then sew the 2 outer layers together with a narrower seam leaving a space to turn them out.  

I trim the corners to remove fabric bulk in the corners. I turn them right side out.  Press them flat making sure that the opening slot is well pressed.

I sew a seam really close to the edge all the way around closing the slot at the same time.

This is 11 sets of 2.  I am halfway to where I wanted to be. I have several other colors to make up yet.

Really happy with this day's work.

I am also working on packaging and how I will display them for sale.

Tuesday, September 12, 2023

Sewing Project - Tea Towels


I made a set of tea towels for my niece for her birthday.  A while ago I found a piece of fabric at the thrift store which was a linen/cotton blend and it was mustard color.  Perfect! I said.

I did have to find thread to match so I headed to Walmart on the Monday before school started.  What was I thinking.  The parking lot was jammed and so was the store. I did find what I needed.

I cut the fabric 21 x 30 inches to maximize the fabric I had.  

I had a few problems of my own doing with my sewing machine but with perseverance I solved the issue.  It always purrs like a kitten and I was disturbed when it wasn't but I wanted the job done too. 

I checked my supply of twill tape and found nothing that was not synthetic in a warm color.  I decided to make my own from the fabric itself. I hope it is sturdy enough to stand the wear and tear.

I cut a strip of fabric 2 inches wide and about 18 inches long.  That should be enough. I ironed it in half then opened it and folded it in from both sides. I ironed that flat and sewed it along the open edge.

I cut the strip 4.5 inches long to make this hanging loop.  I decided to place it in the center of the tea towel this time rather than the corner.

This is such gorgeous fabric.  It drapes so beautifully.  The hanging loop in the center makes the tea towel hang shorter which may make a difference.

It is sown into the hem of the tea towel and I double stitched as that is where the most strain will take place.

I am getting better at making mitered corners.  These turned out really well and I added the bit across the corner that secures the folded piece under the miter.

I wanted to add a personal touch which would communicate how much I love her and think about her often.

My sister does a lot of embroidery so I thought I would give it a try.  Should be easy right? Let me say, not so much.  I used the chain stitch and some blue embroidery floss and placed it on the front where the hanging loop was on the back. Top center so she will see every time she uses it.

 Finished size: 19 in W x 28 in L
I am very happy with the end result!  I hope she likes them.

Thursday, June 22, 2023

Dyeing Linen from ReUse

During my visit with  my sister in March I purchased the fixative recommended for keeping the color once dyed.  It meant a trip to town so we did not have time to actually dye the fabric then.

I was back this week so we went ahead with the dyeing of the oatmeal linen.  This was a large piece of oatmeal colored linen that I had picked up from ReUse earlier this year.  I was thinking of  making a table runner.  I wanted the fabric to be navy.

We followed this process which is documented with the dye bottle.   Rit Dyeing Process

The first thing is to mix your dye in enough water to allow the fabric to float easily in the water.  We added salt because this was a natural fiber and some dish soap.  I believe we left the fabric in the dye bath 30 minutes agitating constantly so we took turn with the wooden spoon.

Then the fabric needs to be rinsed until it runs clear.

Then put back into the pot with the fixative.

The last photo there is a couple of sheets that my sister dyed with what was left in the pot.  She did not care how dark the color was just that it was not pure white.

A very successful project.

I appreciate my sister's help and she has the large metal pots, etc which I don't have.

I have the embroidered and the now navy linen.

The 2 sheets that my sister dyed in the left over color bath.

Saturday, February 25, 2023

Sylvia's Simple Shots

I've been waiting for this happiness since I returned the Sunrise Stained Glass Art piece of mine to the window in the dining room.

One day this week the sun was shining brightly despite the temperatures this week.

This is the image on the wall in the living room being created by the stained glass piece in the dining room window.  This is exactly what I was hoping to achieve with this piece of art.  Blissfully happy with this.

The dried flower arrangement are the left overs from the bouquet for Mom's passing in January.  The leaves have dried very nicely, the baby's breath is good, the freesias are slowly falling off but that is okay.


I am back to my regular areobics routine along with the exercises from the physiotherapist.  I expect had I got back into my regular routine this fall I would not had the problems I experienced with my knee but such is life.

What I have learned is that you can not store up fitness.  It is something you have to do regularly or you just lose it.  

I am grateful the lesson was not more painful than it was.  From January 6th to February 25 I am back to about 95% on both the knee and the back.  I spend 1 hour a day between areobics and strength building exercises.

It is good to being feeling myself again.


Yes, it was a cold one again this week.  It has to end sometime.

I have stayed in most of the week. I did have a few commitments I had to do but in little sprints it was okay.


This little and mighty machine came to live at my house this week.  I picked it up from its service on Thursday.

I will be doing an in depth post on this machine later.

I had a conversation with my niece a while back who is a bargain hunter and thrift store shopper.  She had purchased this one and as she had 2 others this one was up for grabs.

With my recent sewing projects one of these will come in very handy for my unPaperTowel project.

I want to make some reusable make up remover pads as well.

I have to get new thread into it before I can use it so that is the next thing.

Bring Her Home by David Bell is a book I finished early in the week. 

This was quite a thriller of a story with a few tense moments and a couple of turns which one is not expecting.

The 2 teenage girls Summer and Haley are missing.  The search finds one girl severely beaten and just barely alive and one dead.  They had been looking for 2 girls and 2 appeared so it was assumed they were the ones being sought.  

Later, we discover another girl was involved and parents grieving received a shock and now there is still one girl missing.

Bill Price, a recent widower, is looking for his daughter Summer.  Tiny clues start adding up to behaviors he could not have anticipated his daughter would have engaged in.  Summer is grieving the loss of her mother.   It was a very good book.

I made a trip to the ReUse Center on Friday and found some goodies.
Some quilted fabric for my sister who has been making casserole carriers
This tiny blown glass snowman is just the cutest. No chips at all.
From the plastic I collected I want to make toggles for the bags to wash make up remover pads in.  They need to be plastic because they will go in the laundry.  They are small pieces so it was recommended that they be washed in a laundry bag.  
The cardboard rolls are for the UnPaperTowel project. 
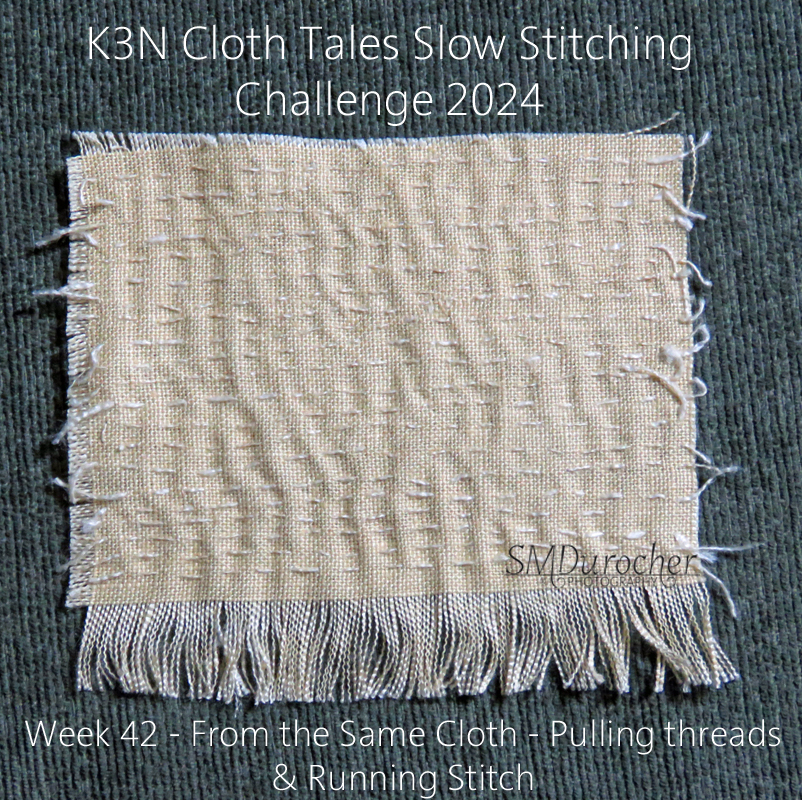
The piece of embroidery is a huge piece of linen.  Yes I checked with a burn test.  I would like to make use of the stitched segment in some what but not sure yet what.  Can it be incorporated into a blanket?  Maybe. There is 2 meters so the other half from the stitch segment would make nice dish towels.  We shall see. 

The Lucky One by Nicholas Sparks follows the tried and true formula for another successful story. His male are really good guys.

Logon Thibault find a photograph while he is on tour in Iraq.  The photo is a beautiful girl with a ferris wheel, 3 large pines and 3 marines in the background.  He experiences getting out of some pretty tight situations alive during his time with the marines. His best friend Victor believes the photo is a good luck charm that is keeping him alive.  After their tour is over and they are back in the USA they get together after a few years of trying to piece their lives back together after seeing combat. Victor suggests that Logan try to find the girl and thank her for keeping him safe. 

Logan finds the girl after a very long walk but does not disclose the reason he has arrived in Hampton.  He gets a job, they fall in love and then disaster strikes and the things he hid come to light.  It does not go well with the girls and he gets ready to head out of town once again.  Through a difficult situation he redeems himself in her eyes.  And as always they live happily ever after. 

Saturday, September 11, 2021

Birthday Gift - Blue and white dinnerware

 My niece and god-daughter is celebrating a birthday and I will be able to see this year!

There is a large box of wonderful stuff ready for her.  

She already knows what is inside so it's okay that it has been identified.

She has just moved into a new house and is working on getting the kids back to school and unpacking and setting up the house.  

I have had this Blue Nordic by Johnson Brothers dinnerware for several years but was not using it to it's full potential.  I want to downsize and when I found out she would love it, it was an easy choice.

I'm not sure she has the piece of furniture in the dining room yet. These good dishes will likely be in their place for Christmas dinner.

I am sure she will enjoy it!

The set includes enough of the pieces for 6 place settings.  The pieces are dinner plates, salad/dessert plates, cereal bowls, soup bowls, and teacup and saucer. They are a family of four so there is enough for one set of grandparents.

The extra pieces include the teapot, cream and sugar and a large serving platter.

I am super happy to have this set going to a good home.

I bought most of it at a thrift store.  I collected tea cups and saucers along the way.  I found the platter at a second hand store. 

I wanted her to have a surprise as well so I made her a linen tea towel and a pale green linen fabric.

My sister and I had a conversation about using linen for bath towels the other day and I managed to find her some linen/cotton fabric she will be trying out. I do have a couple linen tea towels.

This is a perfect color for my niece.  I had a piece just the right size.  Finished size 18 x 27 inches.  I added a hanging loop in one corner and made mitered corners.  On hindsight, maybe the loop should have gone in the middle.

During my visit this summer, she expressed wanting a special silver spoon for a lovely container.

She had a small spoon from Air Canada in the other dish and wanted another.  (Remember when airlines actually used real cultery with their in flight meals?) How things have changed but I digress.

I'm not sure what the chances are of finding another Air Canada spoon but this one is quite similar and can work as a stand in until the better one shows up.

Tied it onto the tea towel with the same twill tape.


Wednesday, June 21, 2017

2018 Nice Cuppa Calendar


I have a Nice Cuppa calendar this year which features wonderful cups.  It includes bone china tea cups, porcelain mugs, earthenware mugs, and ironstone tea cups.  I decided to put the cups up front this year.  I chose items to support the cups as needed.  My collection is small but all are pieces I really love.  Tea is my drink of choice but these vessels can hold coffee or hot chocolate as well.  I have enjoyed the hours of pondering the cup and how to make it shine. I chose flowers, books, table linens, candles and leaves to create a photo that was appealing.

Check out my Calendar Page to find the details.

Thursday, February 23, 2017

Round Manger in Burgundy

I was looking for another die that would do manger/nativity Christmas cards.  I found this die at a local scrapbook store.  The selection was not great because we are just passed the season but I was grateful there were a couple to consider.

I created this Christmas Card with a new die - Creative Die 51-254 Manger by Penny Black.  It measures 2 inches in diameter.  I cut it and the Die-namics Stitched Square Frame from burgundy linen card stock.  I ran the square die again through the Big Shot with non shed gold glitter card stock.  I trimmed it a little bit to leave the tiny border of card color between it and the frame. The frame was adhered to a ivory textured card and the gold glitter square as adhered in the center of the frame.

The Manger die cut is held in place with just a tiny gold star brad which repeats the star shape and means no gluing tiny pieces of paper. Yeah!

The greeting is a Stampin Up Modern Label punchie in the same burgundy linen card stock  with a sentiment punched with the SU Word Window punch.  These are layered then adhered to the card front with 3D foam tape.

Submitting to City Crafter Challenge - 350 - A Few Stitches.  

Monday, May 2, 2016

Mother's Day Card Challenge - Vote for your favorite

I made this card for the Mother's Day Card Challenge at Paper Garden.  They are a Canadian company. You can check them and their products by following the link above.

I started with their Aura Haviland Blue Linen card stock.  I then cut the Spellbinder A2 Ribbon Threader die from their Esse Pearlized White card stock.  The designer paper layer is from the Recollections series from Michaels.  I cut the piece 3 1/8 inches x 3 3/8 inches and adhered it above the slits in the die cut.  I then selected a green seam binding ribbon which coordinated with the green in the designer paper.  I wrapped it around the back of the diecut and pulled it through the ribbon threader slots till they met in the middle then I tied it into a nice bow.  I trimmed the ends at a slant with scissors.   The greeting was designed with a small oval frame Label 2 from the Stampin Up Noteworthy Labels stamp set in Certainly Celery.  The greeting is from Teeny Tiny Wishes Stamp Set.  This was put onto another piece of the Pearlized White card stock and trimmed by hand.  I distressed the edges and adhered it above the bow with 3D foam tape. The full threader layer was then adhered to the blue card front.    I cut a blue flower from the scrap of designer paper and adhered it in the top right hand corner of the card with 3D foam tape.

Check out the all the cards and vote for your favorite.

Here's a scan of the several sheets of card stock that Paper Garden sent me to make a card for their challenge.  My mom's favorite color is blue so I chose the blue linen and white pearl paper. I will be able to make several more cards with rest.  Thanks Tiffany for the card stock.

The Winners are listed here.