Showing posts with label bling zot. Show all posts

Sunday, March 30, 2025

Cards - A7 - Die Cuts

Another few cards today.  Again, A7 (5.25x7.25 inch) envelopes.

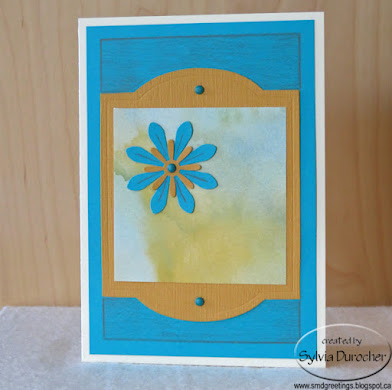
I started with an ivory card base.  I cut a piece of textured turquoise card stock to leave a small border.  

I cut a Tim Holtz Cameo Frame die cut from left over Stampin Up More Mustard card stock from yesterday's session. Trimmed a piece of watercolor designer paper to fit the middle of the die cut. 

The floral accent is a large daisy punchie in turquoise, topped with a small More Mustard one held in place with a turquoise mini brad. 

The cabinet die cut was then adhered to the turquoise layer with 2 more blue mini brads top and bottom.

I added the finishing border with a warm grey colored pencil and also added lines on the large daisy die cut.  A white insert and an ivory envelope to finish it off.

For this card the base is SU Tempting Turquoise card stock in 12x12. 

I used the negative piece from the Cameo Frame die cut to layer onto the card front leaving a tiny border. 

I placed a piece of the watercolor designer paper behind the More Mustard layer. 

I cut a Sizzix Leaf Stem die cut from warm green card stock then embellished it would pencil crayons. I cut a couple more leaves and added them below the opening.

I added a pencil crayon line along the inside of the die cut in a warm grey.

A white insert and an ivory envelope were added.

For this card, I chose a warm green card base. 

I ripped left over card stock in the More Mustard and the Tempting Turquoise and layered them with a piece of the watercolor designer paper.

I cut a flower with the Sizzix Flower Daisy #4 die from turquoise card stock.  I glued it to the front of the card with Scotch Quick Dry adhesive.

I added some texture to the flower with colored pencils. 

I mounted a tiny button in the center of the flower with a Bling Zot.

A white insert and an ivory envelope completes the card.

Wednesday, November 8, 2023

Christmas Cards - Joyeux Noel - Blue


Another set of French Christmas cards. These feature blue paste paper my sister and I made years ago.

I chose Stampin Up Brocade Blue card stock for this set.  I cut a layer of Whisper White to leave a small border all the way around.

I cut the paste paper 3.5 inches wide and 4.75 inches tall. I aligned the Memory Box Grand Joyeux Noel thinlit along the top edge top edge up and cut with magnetic platform. The cutting has created many little pieces that I had to make sure to collect.  I adhered the die cut to the white layer with tape and quick dry adhesive around the Noel word to keep it stuck down. I then had to find the right piece for the noel O and E and stick those on with quick dry adhesive. 

The accents were cut with the Martha Stewart large snowflake punch and the Stampin Up Ornament punch. I used a tiny navy star brad for the dot on the J and a blue round sequin in the middle of the snowflake. I adhered a blue star confetti in the middle of the ornament with a Bling Zot. I drew a line to the top with a fine blue marker. A tiny blue sequin was placed for the dot on top of the J. 

Thursday, November 24, 2022

Sympathy Card - Silver and Green Checkerboard

Sympathy card for a friend who lost his wife this week.

The card is Stampin Up Soft Suede.

The decorative paper is handmade paper which has been screen printed with the exact color of green and silver stripes in a checker board pattern. 

I made it a DSP Split card by cutting the paper at 3.5 inches and turning over the top piece to see the wheat colored handmade paper.  

I added triangles of the same card stock which crisscross each other so the meeting point is off center.  This provided a nice place to put the butterfly punchie (Martha Stewart) in the beige card stock on the left hand side.  It is adhered with a Bling Zot glue dot.

I added an appropriate white quarter sheet insert on the inside with an A2 white envelope.

Mailing this off tomorrow.

Friday, March 12, 2021

Cards - Thanks - Cricut

I wanted to use the rest of the acrylic ink backgrounds I made for these cards so I did not have leftovers hanging about. 

I searched my Cricut cartridges to see which had "thank you" greetings.   I found this one in the Don Juan cartridge. The size of the letters were wide enough for me to put 3D foam tape behind them so I went for it. 

This was cut at 1.5" tall and 4.75" wide. I trimmed the background to fit leaving an even border all the way around on a true blue A2 card base.

Adhered the background and added a bling heart in the top left hand corner.

I chose a yellow A2 (4.25" x 5.5") card base for this card.   

I chose five small handmade paper flowers held in place with green tiny brads. 

I adhered the greeting with 3D foam tape.

It was spattered with the Chartreuse Leaf green ink.


Again, a medium blue card base in A2 size. 

Trimmed the acrylic ink background and adhered it to the card front.

I placed a small silver butterfly in the top left hand corner with a Bling Zot.

Spattered with Prussian Blue ink.

I will have to find a place to donate these. Maybe Compassion House.  Done!