Showing posts with label Sizzix Winged Beauties. Show all posts

Tuesday, June 11, 2024

Card - Slow Stitch - Pink & Brown Stripes

With my challenge slow stitch project finished for this week I needed another.

I just dipped into my stash of scraps and chose coordinating strips of fabric.

I started with the print and added solids that matched. I hand stitched them in the quilt as you go fashion onto a foundation cloth. Once I was done I trimmed the piece to 4x6 inches. I stitched a brown seam binding all the way around. 

I placed it onto a SU Regal Rose A7 card base and stitch it in the 4 corners. I added the button and the double butterfly accent with stitches as well.  

The butterfly accent was created with the Sizzix Wingged Beauties die set for the brown and Martha Stewart butterfly punch for the pink in the same color as the card base.  I added a white insert and white envelope. 

Unfortunately, the card box does not handle these bigger cards so well.

Wednesday, February 14, 2024

Card - Butterfly Sympathy

I created a simple sympathy card for my aunt who lost my uncle recently.

I chose a deep burgundy card in the A2 landscape orientation.

I added a piece of warm purple paste paper trimmed to leave a bit of border top and bottom.

I cut a large butterfly with the Sizzix Winged Beauties thin die set from gold on deep purple cardstock.

I added a gold foil body to the butterfly and adhered it with double sided tape.

Thursday, July 20, 2023

Set of Cards

I made a set of cards with one single sheet of designer paper.  The design is by graphic45 - Couture Collection - Gorgeous - I agree it is a beautiful floral paper. Rich colors and a dramatic black background.  This paper measures 12x12 inches. Cutting 4 inch strips I ended up with 6 pieces for A2 cards. With the direction of the design all the cards were created in the portrait orientation.

Next I selected card bases for these cards.  With the colors in the paper there was lots to choose from.  Finally, I chose Old Olive, Lost Lagoon, and Dusty Durango.

For card 1 I cut the layer down from the top and flipped the piece to show off the blue striped backside. I then added a strip of orange card stock across the split.

I added a Decorative Label greeting mounted with 3D foam tape. A white quarter sheet insert finished the card.

For card 2 I did the same layout but put the stripes on the bottom this time.  I laid a length of So Saffron ribbon across the split.

The base this time is Lost Lagoon.

I layered silk flowers in warm tones and a small gold sequin onto a tiny black brad to create the floral accent which I mounted on the bottom left hand side.  The brad was pushed through the designer paper keeping all layers together.

This layer was then adhered to the card front with double sided tape.

A white quarter sheet insert was added.
This is card 3.

Here I split the layer top to bottom instead of side to side. Once split I flipped the small piece and taped back the designer paper so I could handle it as a full piece.

I added a length of Apricot Appeal grosgrain ribbon over the split and taped the ends to the back.

I added a Dusty Durango butterfly accent on the bottom right side.  The butterfly was cut with the Sizzix Winged Beauties thin dies.  I used my steel plate to ensure all the tiny spaces were well cut. I wrapped black thread around the body of the butterfly and left the ends to be the antennae.  Adhered with double sided tape.

Quarter sheet insert completed the card.


Card 4 has an Old Olive card base.  

The designer paper was left at 4.00 x 5.25 inches.  

I wrapped a length of Baja Breeze ribbon across the middle and taped the ends to the back.  

I added a Artisan Label greeting with black letters which was adhered with 3 D foam tape over top of the ribbon on the right hand side.

A quarter sheet white insert completed the card.


Card 5 is similar to card three.

This time the ribbon is So Saffron which is wrapped over the designer paper top to the bottom with the ends taped to the back of the layer.

I added some Candy Dots to the left of the ribbon in pink tones to coordinate with the large flower near the bottom of the card.

A white quarter sheet insert on the inside.


Card 6 repeats the lay out of the DSP split with the striped paper on the bottom.  

A length of wide Tango Tangerine ribbon across the split with ends taped to the back.

I found 2 tiny turquoise blue buttons in my stash.  They are adhered to the ribbon with Bling Zots.

A white insert on the inside.

This makes a nice set of card with enough variety to be interesting.  Versatile in that some have greetings and others are left blank to used for any occasion.

Happy with this set which will given as a gift.

Sunday, March 21, 2021

Cards - All Occasion for my box

From the kits prepared for Compassion House a year ago I made a few cards for my upcoming family birthdays.

This is beautiful deep teal card base with a half circle of decorative paper, caramel seam binding tied on the fold, with a butterfly accent.  

The butterfly cut from deep teal with the Sizzix Winged Beauties thinlit set mounted on a ivory circle to highlight it's shape.


On this card it is a true blue A2 card base with polka dot designer paper in the half circle with the navy seam binding tied on the fold. 

Same Sizzix Winged Beauties thinlits set diecut on a white circle. 


Same supplies of the first just arranged in the portrait orientation.

On this true blue card base I added a circle greeting above the butterfly accent.


A bright orange card base with a geometric patterned half circle with a Hampton Arts tree diecut and a circle greeting. 

 A couple of nice male themed birthday cards with the same supplies as those above. 

The greetings are color printed and punched with the Modern Label punch by Stampin Up.


Sunday, April 5, 2020

Sympathy Card - Butterflies

I made this card for a family who lost their father and granddad to COVID19.  Very sad!

I started with a dark blue green card base.

I added a layer of warm toned designer paper - K&Company - Addison Swirl Collage which was adhered to the card front.

I added a piece of vellum on the left hand side, folded over on the top and bottom and adhered to the inside of the card with tape.

I cut butterflies with the Sizzix Winged Beauties thinlit set.  Large and medium are layered onto each other and adhered to the vellum.

I punched a Scallop Circle from the green card stock, a 1 3/8 inch circle from pink and an ivory 1 1/2 inch circle greeting in ivory.  These were layered then adhered to the card front with 3D foam tape.

Friday, March 23, 2018

Large Butterfly Card

Since there was one last piece of this designer paper I chose to make up this card.  I had rejected the card for this kit because the card color was too dark for black ribbon. 

In this case, I chose light ribbon, a light sequin and tiny white brad. 

As an alternative, I chose not to cut the lovely designer paper to a square and trimmed it to leave a large border.  It measures 5 inches wide by 3.75 inches tall. 

Again, the large butterfly is Stampin Up Beautiful Butterflies die cut from vellum. The small one cut with the Sizzix Winged Beauties thinlits from same as the card.

Wednesday, March 21, 2018

Ready 2 Go Stack Kit - No Greetings

I created this card to add to a couple of other kits to make a stack kit.

I chose a WeRMemoryKeepers - Funfetti - Confetti. I loved the variety of colors in this paper which allows making different cards with the same sketch.  I cut it to 4 inch squares. I chose a golden yellow card. The square was adhered aligned to the left side.

I wrapped a length of black grosgrain ribbon across the card front and taped the ends to the inside of the card.

The vellum butterfly was cut with the Stampin Up Beautiful Butterflies die where you fold the paper and cuts the large butterfly.  The colored butterfly was cut with the Sizzix Winged Beauties thin lits. I layered these and held them in place with a tiny black brad with a tiny black sequin for the head.  The kit includes green, blue, orange and magenta cards.

You can find the details here.


The details for the flower card are here.

Monday, January 22, 2018

Card Club Kit - Set 4 - Card 3

I chose the designer made by Doodlebug Designs - Chocolate Decadence.  It was trimmed to 4.00 x 5.5 inches.   It was adhered to the warm brown card front.

I cut a large butterfly with the Sizzix Winged Beauties thinlet set from bronze metallic card stock.  I placed it onto the oval kraft tag and used a push pin to create a hole in body of the butterfly. Push the brad into the hole and turn over and spread prongs apart.

Cut the 3D foam tape in half and place them onto the back of the tag.  Add the ginger ribbon and trim the ends with scissors.  Remove the release paper from the tag and adhere it to the card front.


Tuesday, October 17, 2017

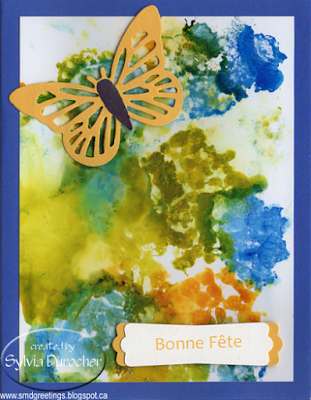
Decorative Paper Cards to the Gallery

I love the colors on this decorative paper too.  It's so much fun to make and each piece is unique so not easily replicated when it turns out so well.

I trimmed the decorative paper to leave a large border on the royal blue card base.

I die cut a yellow butterfly with the Sizzix Winged Beauties framelit set.  I used a navy marker to color in his body.  It was adhered to the card front with 3D foam tape.  I turned up it's wings a big to add more dimension.

I chose a french greeting for this one the same yellow.  It was printed and punched with the Stampin Up Modern Label punch.  I punched another from the same card stock as the butterfly. I cut it in half crosswise and glued each half offset to the right and left sides.  It was adhered with 3D foam tape as well.

Another card which would do nicely for a male recipient.  I chose a pea green card.

I cut the decorative paper to leave a small border on the card.

I adhered with quick dry adhesive the 3 gears. The are layered with the largest first and the others over the first.  It nice to have them related to each other.  These were cut with the Tim Holtz Gadget Gears die in 3 colors - rust, pea green and true blue.

I added 3 gold square brads in the bottom right hand corner to add some dimension.


My wedding cards sell well at the gallery so I chose to make another.

I selected a white card and adhered to the front a piece of bubble paper featuring teal, purple and green.

I punched a white heart with the Stampin Up Sweetheart punch and embossed it with a Cuttlebug Juli's Garden.  It was adhered to the card front with a white brad to which I added an iridescent flower sequin.

I punched birds with the Stampin Up Bird Builder punch. One teal one purple. I added white wings embossed with the Cuttlebug Swiss Dots folder. The birds were adhered with 3D foam tape. I added white branches to ground the birds.

The card has 2 "Congratulations" greetings included one in each French and English. They were punched with the Modern Label punch and will fit nicely between the ends of the branches below the birds.

Thursday, August 31, 2017

Sympathy & Card Set

I made this card for a friend who lost her husband recently.  They had recently moved to BC after his retirement and he passed very suddenly.

I used some designer paper from Michaels called Teal Paisley.  I love the watercolor effect of this paper with the colors ranging from turquoise to green.   I cut the paper into 4" squares. Here I have ripped it in half and shifted the piece up and down.
I stamped the sentiment from Stampendous in Green Tea Versamark and embossed it in clear powder.  I ripped the to and bottom of the greeting and adhered it in the center of the card.
I punched a butterfly with a Martha Stewart punch from warm green card stock and adhered it above and to the left of the sentiment.

I made a set of cards that coordinates for her to use as she needs during this difficult time.  The butterfly die in white was cut with the Sizzix Winged Beauties die.


The memorial service is today and my brother in law will be by his sister's side.  I have spent many a Christmas Eve with this couple unwrapping "Treasures".  He will be missed.

Wednesday, November 4, 2015

Card - Special Invitation


I was asked to make this card by one friend for another who is going through a transition in her life.

I started with an ivory parchment card in half sheet size (letter folded in half).  I then cut a Bazzil Mocha Divine textured piece of card stock down to 8.00x5.00 inches.  I wrapped a wide gold ribbon across the top and another across the bottom and wrapped the ends to the back and taped them down.  I then chose a piece of warm taupe cotton lace.  I pulled a length of ivory & gold 1/8 inch satin ribbon through it then taped it's ends to the back of the brown layer.  I used a Zot to hold the center down.  I color printed the words in brown onto vellum and then embossed it when clear powder. I cut it with the largest framelit from the Apothecary set. I added brown small flower punchies from the same card stock as the accent layer and then an iridescent flower sequin held in place with a tiny gold brad at each end .  This will help to keep everything together. I added large Zots to each corner for an extra measure of adhesion. I die cut a butterfly with the largest framelit from the Sizzix Winged Beauties set from the same brown textured card stock.  I held it in place with 3 small Zots on the body allowing the wings to come away from the card.  This adds a great dimension to the card. 

Tuesday, August 11, 2015

Sympathy - Butterflies

I made this card for the mother of a former co-worker Kim who succumbed to cancer recently at a much too young age.

I started with a kraft card and stamped it with SU Itty Bitty Background in Starfruit.  I cut my 12x12 Karen Foster Lime Twist scrapbook paper into nine 4 inch squares.  I ripped the square into uneven pieces ensuring that I did not have a white ripped edge.  I adhered them to the right and left edges of the wide card.  I cut a butterfly with one of the Sizzix Winged Beauties dies which I adhered over the gap between the SCP pieces.  I then added an oval color printed greeting which I ran the same ink pad around the edge to create a bit of contrast.  I mounted the greeting with 3D foam tape.


I made some cards for her because this is a time when folks are helping and pitching in and it's always nice to respond with a token of appreciation but shopping is not the priority.  I made these tall with the basic same layout as the sympathy card.  With no greeting, they can be used as needed.  I selected 2 colors from the scrapbook paper in the deep red orange and the deep blue green. The butterflies were cut from textured pearl card stock.