Showing posts with label colored pencils. Show all posts

Friday, April 4, 2025

Cards - A2 - Scraps on my desk

The card base is dark brown textured cardstock.  

I cut a piece from a scrap of this gold and kraft polka dot card stock to leave a small border and adhered it to the card front.

I glued a strip of the card base card stock across the front aligned to the top.

I cut a bird on a branch with the Tim Holtz die and adhered it on with Scotch Quick Glue.

I used a gold sharpie marker to add an eye to the bird and some marks on the cardstock strip and branch.

A white insert and an off white envelope.  Yeah!

I chose a Stampin Up Kiwi Kiss card base for this card.

I cut a piece of SU designer paper which was just begging to be colored.  I used some Prismacolor pencils to color the main flower and the surrounding leaves.  I left the lilies white.

This layer was adhered to the card front with double sided tape.

Really simple but effective.

A white insert and envelope and another hits the stash.


Another Kiwi Kiss card base with a totally different card front.

The designer paper is a leftover.  I cut the layer leaving a small border then I cut it again and turned over the small piece to show the script back side.  I taped these together with clear tape.  It was adhered to the card front.

I added a narrow strip of dark brown cardstock over the join.  

I cut a bird on the branch again this time in Baja Breeze and used quick dry glue attached him along the strip.

A white quarter sheet insert and a matching envelope.


A cute baby card.  I painted this little bear a few weeks ago for my Macro Monday challenge on Flickr. 

I turned it into a card.  I trimmed it to the 3x3 size which is the limit for MM.

I layered it onto dark brown cardstock leaving a nice border.

I mounted it onto a Baja Breeze card base.

Dug into my stash of greetings and added this 2" oval punchie mounted with 3D foam tape.

Added a quarter sheet insert and an envelope.


Sunday, March 30, 2025

Cards - A7 - Die Cuts

Another few cards today.  Again, A7 (5.25x7.25 inch) envelopes.

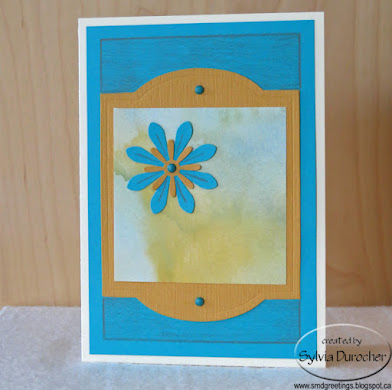
I started with an ivory card base.  I cut a piece of textured turquoise card stock to leave a small border.  

I cut a Tim Holtz Cameo Frame die cut from left over Stampin Up More Mustard card stock from yesterday's session. Trimmed a piece of watercolor designer paper to fit the middle of the die cut. 

The floral accent is a large daisy punchie in turquoise, topped with a small More Mustard one held in place with a turquoise mini brad. 

The cabinet die cut was then adhered to the turquoise layer with 2 more blue mini brads top and bottom.

I added the finishing border with a warm grey colored pencil and also added lines on the large daisy die cut.  A white insert and an ivory envelope to finish it off.

For this card the base is SU Tempting Turquoise card stock in 12x12. 

I used the negative piece from the Cameo Frame die cut to layer onto the card front leaving a tiny border. 

I placed a piece of the watercolor designer paper behind the More Mustard layer. 

I cut a Sizzix Leaf Stem die cut from warm green card stock then embellished it would pencil crayons. I cut a couple more leaves and added them below the opening.

I added a pencil crayon line along the inside of the die cut in a warm grey.

A white insert and an ivory envelope were added.

For this card, I chose a warm green card base. 

I ripped left over card stock in the More Mustard and the Tempting Turquoise and layered them with a piece of the watercolor designer paper.

I cut a flower with the Sizzix Flower Daisy #4 die from turquoise card stock.  I glued it to the front of the card with Scotch Quick Dry adhesive.

I added some texture to the flower with colored pencils. 

I mounted a tiny button in the center of the flower with a Bling Zot.

A white insert and an ivory envelope completes the card.

Monday, October 21, 2024

Inktober - 21 Sunrise

Inktober 2024 Challenge

21 Sunset

I penciled my rough sketch.

I finished it with my dip pen and the black acrylic ink on the mixed media paper.

I used colored pencils for my color today.  The good old Laurentian pencils I used in school (some may be from that time but many are not).


Sunday, October 20, 2024

Inktober - 20 Sunrise

Inktober 2024 Challenge

20 - Sunrise

I penciled my outline sketch which were just the hills and the sun.  I used my black marker to create the lines in the hills by hand.

I used the watercolor pencil to color the sun yellow and a  store brand to put in the orange. 

I need to get a good set of watercolor pencils.


Saturday, October 19, 2024

Inktober 2024 - 19 Feather

Inktober 2024 Challenge

19 - Feather

I used my fountain pen with blue black ink to trace my penciled sketch.  It is not permanent.

I then doodled in some of the spaces.

I used watercolor pencils and colored pencils to fill in the shapes. 

Wednesday, September 18, 2024

Cards - SC Christmas - Colored Pencil

I worked on more Christmas cards this morning.

I chose to use images I have drawn digitally.  This is my Bethlehem which I had to resize to accommodate this card size but that was easy. It was printed on ivory 65lb card stock.

I used colored pencils and colored the sky, the sand dunes and the windows. 

I cut the large star with the Sizzix Star & Starbursts die in silver card stock. I then punched the others with a CM Star Border punch. Large star adhered with 3D foam and the littles with QuickDry Adhesive.

The image was then adhered to the card with double sided tape, the white insert adhered with glue stick and a strip of d/s tape with carrier on the flap.  This is a self closing card made with 1/2 sheet of 12x12 navy card stock.

I really love how this one came out.

This is an angel a drew digitally based on a wicker angel I saw in a garden center at Christmas many years ago.

Subtle blue background, metallic halo, green metallic on the wings, a red dress with a green and gold border at the bottom.

A bit of flesh color on the face.

A self closing card from a 6x12 inch piece of card stock.  I adhered the drawing onto the card with a white insert opposite.  A length of double sided tape with carrier on the the flap.


A nativity I drew a few years ago. 

A subtle night sky, a yellow star with a wooden stable. 

The figures were colored with traditional blue for Mary and brown for Joseph. Just a wee head for Jesus.

Subtle blue sky, green and tan for the ground background.

Drawing adhered to the card, a blank white insert (not sure if I will regret this later when I have to handwrite the sentiment), carrier tape on the flap. 

Card is 6x12 navy blue linen card stock.


Thursday, December 1, 2022

Card Exchange - Dec - Triangle Trees

These are my December exchange cards.  I used the beautiful screen printed decorative paper again because the colors where Christmasy.

I selected a beige card base.

I cut some triangle trees from solid card stock. For this card it was a warm green then I cut the decorative paper a bit smaller leaving a border all the way around.

I used pencil crayons in browns and greens to create a soft background and for the tree trunk at the bottom. I then adhered the Christmas Tree over top.

I added a red star sequin at the top of the tree and gold ones around the rest of the card.  These are adhered with Bling Zot glue dots.


For this card on the right a very similar layout to the top one.  This time I used a Very Vanilla card base.

Same warm green solid card stock for the tree.  

Again, a color pencil background and tree trunk.  A red star sequin at the top of the tree.

The small stars were punched from gold card stock with my Creative Memories star border punch. This is the largest of the one in the border.  I adhered them with Scotch Quick Dry liquid glue as it has a very fine point on the bottle.

I used the green pencil crayons to add some rays to the stars.

A seasonal insert was added as well as a white envelope and they are ready to go.

Saturday, May 1, 2021

Christmas Card Challenge - Pencil Crayon on Kraft

I chose pencil crayons on kraft card stock for my challenge in May.  

I printed the main image from the Gentle Peace stamp set onto kraft card stock.  I then spent a pleasant evening coloring them with pencil crayons. Laurentian pencils I found the nicest to use.  I ran the black pencil along the edges to remove the lightest of the edge.

I chose a light blue card base to coordinate with the image as well as a strip of warm green to put behind the Holy Family image. 

I printed the sentiment onto kraft card stock, flagged the ends, ran a black pencil crayon along the edges and 

adhered it with 3D foam tape.

Adding a seasonal insert and an envelope and they are ready for the card box.


This next card I coordinated the card base with the edge of the frame of the stained glass window.  I chose a Pea Green textured card base.

I chose a warm brown strip of card stock to coordinate with Joseph's garment.

Both the main image and sentiment has black pencil crayon edges.

The sentiment is adhered with 3D foam tape.

This card has blue in the rays and a light mustard yellow in the window behind the family.

I chose a blue card base and a piece of coordinating card stock.  I added a bit of texture on the light piece with pencil crayon.


This card has a warm green card base onto which I rubbed gold pencil crayon to match the gold in the stained glass frame.  

I adhered the main image onto a layer of gold paper and trimmed around leaving a small border.

I cut the ends of the sentiment square this time.

I did a similar technique last year in March 2020.


Wednesday, April 15, 2020

Colored Pencil Birthday Card

This is a large birthday card for a friend who recently moved to be with family.

I did pencil crayon piece a little while ago.

I trimmed the coloring book page to leave an even border when placed onto a large half sheet card.

I chose a warm green card and folded  the letter 8.5 x 11 inch piece in half.

I added a blue layer of card stock to repeat the blue in the artwork on the front.

I added a large banner greeting above the art work with 3D foam tape.

Tuesday, March 26, 2019

Card Making Session - Art Cards with Pencil Crayons

I have been getting together with a friend to make cards once a month. My regular card club has been cancelled due to lack of participation.

I worked on Art Cards which needed to be colored.  I chose color pencils this time instead of watercolor and the water brush which I used last time.

I selected some blues and purples for this card. 

The greetings were printed in black on vellum and clear embossed with clear powder.  They were wrapped across the paint brush layer and the ends were folded to the back.  This layer was adhered to the front of a black card.

Tiny black brads were then placed on either side of the greeting through holes made with a push pin.  The prongs were press apart on the inside of the card.

I placed a blank white insert in the inside of the card.

The 3 designs and greetings are part of a greeting card gift set which will be donated to a fundraiser
at the end of April.


Monday, June 6, 2016

House Cards

I created these cards for a monthly card exchange group.
I had cut a couple when I made this card so I chose to use the second one here.   The front layer was cut from white cardstock with the Folk Art Festival cartridge and the Cricut.  I cut the shadow from royal blue card stock.  I then layered a piece of red behind the heart and yellow behind the windows.  I created a hill with some green card stock which I just cut free hand.  I punched the sun from yellow using a circle punch and placing only a corner of the piece in the punch.  It needed something and I considered spattering but could not decide on a color so I chose pencil crayons instead.  I added some depth to the green hill and pulled some grass growing from it.  I created subtle clouds in the sky with grey and blue.  Pulled some sun rays from the yellow sun in the corner.  I added a bird in the sky with a black fine tip marker.

For this card I had printed this crooked house clip art which is available for free on several websites. I colored it digitally then printed it. I fussy cut around the edge leaving a narrow white border.  I create a grass layer with some ripped card stock which I glued down and trimmed to the card edge. I punched a sin with a circle punch and adhered it in the top left hand corner.  I created a sidewalk to the front door with a piece of white card stock cut by hand.  I adhered the house over the sidewalk. I pulled out the pencil crayons and added some depth.  Yellow sun rays from the sun, smoke from the chimney in grey, cloud was grey and blue, green grass growing up and a subtle image of a tree on the right hand side with green and brown. The embellished white layer was adhered to a navy card base which matched the house roof.

These cards are headed to their new homes today.

Tuesday, May 10, 2016

Macro Photo Challenge - Pencil Crayons

I took this photo of pencil crayons against a coloring book page.  I chose sunflowers of course.  I placed the focus on the yellow pencil.  I'm happy with how it turned out.  With the craze of adult coloring books many people are trying to recapture the calm of focusing your attention.

Submitted to

Macro Monday 2

Flicker - Macro Mondays - "When I was a Child"  I spent hours putting crayon pencil to coloring book pages. Time with peace and quiet.

Saturday, April 4, 2015

Card - HB Buttons

A birthday card for a beautiful little girl who is celebrating later this month.  I will see her this weekend so I got the card ready.
I printed the greeting and colored it with pencil crayons.  I chose primary colors - red, blue, pink, green, and yellow.  I added 5 large buttons held in place with large Zots.  I added the stitching around the buttons with a black marker.

Saturday, June 14, 2014

June Photo a Day Challenge - Week 2

Here are this week's photos for this challenge hosted by Kati at Kati's Little Corner.  We could post every day or once a week.

Day 8 - Childhood

I chose a coloring book and Laurentien Pencil Crayons.  I filled many coloring books in my childhood.  I loved staying inside the lines and making it look really nice according to me.  I had my name on each of my crayons so I would not lose them to siblings. When there is lots of kids things can get territorial at times.  I loved coloring because it was an individual activity and quiet time.


Day 9 - Macro

This is a yellow dragonfly and you can see her looking at me and my camera wondering what is going on!  I loved the focus I was able to get on the nearly invisible wings.  I took tons of shots to get this one.


Day 10 - Upside Down

I staged this photo because I wanted similar shapes in different colors and one was upside down.  I wanted a shape that it was obvious that it was different. Not sure I was all together successful in that aspect. These vases are complementary in their shape so it accommodated the closeness better. I chose to put the metallic on in the center because the others were more solid.  The fact that it has a reflection adds interest.  The black was has some reflection as well.


Day 11 - Jewellery

I chose the jewellery I wear most every day because I don't often change it.  On a special occasion I may wear something different but on average this is it.  I like pieces in silver.  A Timex watch, a brooch that I hang my reading glasses on when I don't need them, a magnetic bracelet, a white gold cross, and a set of Stella Dot Hammered Ball stud earrings.

Day 12 - Flower

I chose this Alberta Rose photo. They are blooming right now. I try each year to get a few good photo of this great pink flower. They can range from very deep pink to almost white.  I will keep an eye out for them on the back country roads.


Day 13 - Shadow


This is a picture I took of my sister and I.  We had been out on photo shoot for a few hours capturing all the cool things in nature around where she lives. There had been birds, flowers, ponds, cattails, dragonflies, and much more. At one point, I saw this shot and I'm glad I did not miss it.


Day 14 - Red White and Blue

I'm working on a stash of decorative paper using a variety of techniques.  Today, I chose these colors so I could include it in this challenge.  I rubbed the with wax candle to create a bit of a resist.  Then, I painted the paper with Tim Holtz Distress Stain in Faded Jeans and Aged Mahogny which I had dabbed onto a palette and then spritz with water. I applied it to the paper with a foam brush.  It was feeling a little blah so I decided to take a piece of acetate and brush some blue onto it with the dauber end.  It create these light brush strokes.  I then placed the acetate paint side down onto the paper and they squished and became much more visible.  I really like the way it turned out.


Monday, January 28, 2013

Card Club - Jan - Washi Tape

I used black and white Washi Tape on this card.  I placed the wider one on the bottom of the card.  A piece of card stock that coordinates with the image is placed above the tape.  The narrow black tape is added above the card stock. I selected several digital stamps from Beccy's Place to create the accent. The accent is printed in black and has been colored with pencil crayons.  With this kit I included wedding accents with ivory Washi Tape and metallic card stock.

Friday, November 30, 2012

Card - Pet Christmas 3

Here's my third Christmas cards for pets.  I selected a kelly green card which matched the foil paper I had selected as a background.  I layered the dog onto another piece of the same card stock.  The dog image is from MelonHeadz Illustrations.  I colored him black with pencil crayons and made the bow red and green for Christmas.  I punched a SU! Modern Label punchie in the kelly green and layered a SU! Word Window greeting onto it.  The greeting is stamped in red with a small clear stamp. 

Let me know which of the three cards is your favorite.

Would you prefer to have your own pet's picture on your cards?

Card - Pet Christmas 2

Here's my second card for pet Christmas cards.  I let the designer paper provide the greeting for the card.  I have selected a light blue card which highlights both Merry Christmas and Happy Holidays in the DP.  This dog is colored brown with pencil crayons and the bow in the same red and green. The dog image is from MelonHeadz Illustrations.

Thursday, February 26, 2009

Card Club - February - Candle

This card again lends itself to many color combinations. Pinks, blues, and purples for girl cards and navy & brown for guys. I used colored pencils to add some dimension and texture to the candle and flame. The vellum greeting is inserted through a slit in the fold to give a clean card back. Works great.