Showing posts with label spattered. Show all posts

Wednesday, October 16, 2024

Inktober 2024 - 16 Floral Trio

Inktober 2024 Challenge

16 - Floral Trio

I used a Micron Black Marker on Canson Fluid Mixed Media 154lb paper. 

I drew the funky flowers by hand with the marker on the 5x7 paper.

I added a couple of swatches of fall colored watercolor.

I spattered orange, brown and yellow onto the flowers.


Saturday, January 29, 2022

Card Exchange - January - Watercolor Birds


I have been busy so my Card Exchange cards are almost late.  I decided to use the small bird image I used for the thank you project I did in December.  This time I wanted to actually paint the birds.   I prepared my pieces of watercolor paper with different background colors.  The paper is 3.5 inches wide and I just applied a wash down the sheet changing the colors as I went. It was taped down and allowed to dry completely.

I trimmed the pieces of watercolor paper to squares roughly having a different color in each square.  I traced the bird onto the center of the square by placing the line drawing below my watercolor onto my light table. I used a permanent black fine Sharpie marker to trace the image.  I then used the colors I had mixed for the backgrounds to color the bird accordingly.

Then I matched the card base to the bird color.  The one on the left is Close to Cocoa and the right is Bashful Blue.  I added a length of Soft Suede grosgrain ribbon across the card and taped the ends under the focal element.  The birds are attached with 3D foam tape.  I spattered the cards with a bit of brown watercolor.

These are off to my partners.

Sunday, December 5, 2021

Winter Birthday Card

A birthday for my Dad who celebrates his birthday this week.

I will see him tomorrow.

Dark green A2 card base, spattered with Gleams White acrylic paint.

I cut 3 trees with the Hampton Art Tree thin die.  I chose dark and warm green card stock.

I added a bit of white to the dark one I put in front.

A SU Modern Label punchie greeting in the bottom right adhered with 3D foam tape.

Tuesday, May 18, 2021

Seniors Week - June 7-13 2021 - Card Donations

This is the reusing of a nature printing I made many years ago.  

Nature Printing is a process that involves using real leaves, acrylic paint and white card stock.  I spattered the prints with watercolor after they were dry.

I trimmed the green leave nature print to leave a small border.  I adhered it to the front of a medium green card base.

I added a sentiment made with a Stampin Up Modern Label punch from the same green card stock as the card base and a color printed SU Word Window punchie.  This layer was adhered with 3D foam tape.


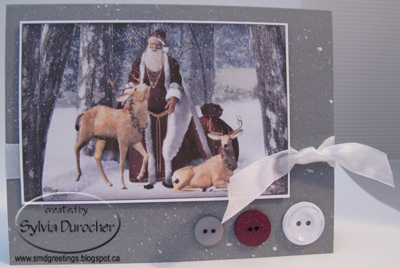
This card was made with an old card kit prepared for a class at a women's residence. 

The grey card base was punched with a circle border punch.  The sentiment is held in place with a metal circle pronged through the card front.   I added 3 daisy confetti held in place with tiny black brads. The insert is the full half sheet so it will show through the punched border.

I am using up old card kits which did not get used in class.  There was a time when I prepared more kits because I was not sure how many participants would show up. Later, I got smart and made participants pay in advance so I only prepared the number of kits which were paid for.

This card has a lavender card base with coordinating designer paper in the diamond pattern.  Trimmed to leave a small border.

The gold border was wrapped around and the ends were taped to the back.  The purple Lattice die cut was adhered to the designer paper too. Then this layer was adhered to the card front.

I added a flower accent and a Stampin Up Modern label sentiment where the purple punchie was offset from the white one. This was adhered with 3D foam tape.

Another old kit.  

This card has a black card base with a piece of striped warm blue green designer paper trimmed to leave a small border.  I wrapped the ivory grosgrain ribbon and taped the ends to the back. This was adhere to the front of the card.

The three hexagon shapes in the same color scheme as background were cut from designer scrap book paper with Spellbinder Hexagon Nestabilities set. These were adhered aligned along the ivory ribbon. 

I added a ivory tag sentiment with navy cording.  It was adhered with 3D foam tape.

The stack of card is growing!  I delivered them on Friday, May 21st.  They were gratefully accepted.

Friday, March 12, 2021

Cards - Thanks - Cricut

I wanted to use the rest of the acrylic ink backgrounds I made for these cards so I did not have leftovers hanging about. 

I searched my Cricut cartridges to see which had "thank you" greetings.   I found this one in the Don Juan cartridge. The size of the letters were wide enough for me to put 3D foam tape behind them so I went for it. 

This was cut at 1.5" tall and 4.75" wide. I trimmed the background to fit leaving an even border all the way around on a true blue A2 card base.

Adhered the background and added a bling heart in the top left hand corner.

I chose a yellow A2 (4.25" x 5.5") card base for this card.   

I chose five small handmade paper flowers held in place with green tiny brads. 

I adhered the greeting with 3D foam tape.

It was spattered with the Chartreuse Leaf green ink.


Again, a medium blue card base in A2 size. 

Trimmed the acrylic ink background and adhered it to the card front.

I placed a small silver butterfly in the top left hand corner with a Bling Zot.

Spattered with Prussian Blue ink.

I will have to find a place to donate these. Maybe Compassion House.  Done!

Friday, March 5, 2021

Christmas Card Challenge - March - Large Greetings Small Cards

I continued my large greeting Christmas Cards making with the aim to create A2 (4.25"x5.5") sized cards. 

I continued to use the Winter Frolic Cricut Cartridge. This greeting is 3.5" T x 3.5" W. I cut it from Champagne pearl card stock and paired it with an ivory card base.   

The acrylic ink background features royal purple color with some bright spots.

I used copper accents layers with the crown is part of the shift layer of the greeting then I cut stars with the Sizzix Star#2 die.  

These were adhered to the acrylic ink background and the large greeting was adhered with 3D foam tape.

I spattered it with copper acrylic color, a toothbrush and straight edge.


 This next card I chose a blue green piece of acrylic ink background on glossy photo paper.  It was trimmed from 4x6 to 3.75 x 5 inches.

It was adhered to a white card base.

The pearl white large greeting was mounted aligned to the bottom of the background with 3D foam tape.  

I added a silver star in the upper left hand corner.  It was cut with the Sizzix die.

It was spattered with an iridescent liquid acrylic.


Another ivory card with the champagne large greeting.  

I cut the crown from gold card stock and adhered with double sided tape. 

I added sequins in gold and copper adhered with Bling Zots. 

Since the copper was out this one was spattered at the same time as the other.

I added seasonal quarter inserts and white envelopes and they are ready for December 1st.

Wednesday, August 26, 2020

Exchange Cards - Warm Spattered Paper

I made a couple more cards with the spattered paper I created on this day.

  This paper featured some simple brown geometric repeated squares pattern on an ivory background.  It is by Creative Imaginations - Art Warehouse - Danielle Johnson. It needed some sprucing up so I chose some brown and red acrylic color and spattered it. I did add a bit of black which looks charcoal here.

I chose a terra cotta colored card base for this card.  I created a floral accent from yellow, red and orange flowers and a black sequin.  The large handmade paper was colored with the same red color from the spattered paper. Matches well.  The accent is held together with a yellow tiny brad. 

I ripped the piece of spattered paper which left a space for the card color to show through. I tied a piece of black thread around the top piece before adhering it to the card front.

The floral accent was adhered to the card front with 3D foam tape.


This card features a deep red card base.

I created another floral accent with silk flowers and small black sequin. 

I taped the ends of the black sequin string to the back of the spattered paper with tape. I then positioned the floral accent to the left of center. The paper was then adhered to the card front.  I added 3 black sequins on the right hand side. 

These are in the mail tomorrow morning.


Saturday, August 15, 2020

Cards - Spattered Paper

Another couple

of cards with spattered 12x12 designer paper. 

 This time, I paired it with a grey card base to coordinate with the grey swirl in the design.

I added a turquoise grosgrain ribbon and teal handmade paper flowers with rhinestone in their centers.

The flowers are attached with Bling Zots.


This card has the same grey card base.

I have added a black grosgrain ribbon taped to the back then a shorter piece knotted onto it.  Then this layer was adhered to the card base with double sided tape.

The swirl on the bottom is black despite the scan not really showing it very well which is why I chose black accents.

I used a punched Stampin Up Modern Label greeting then offset it with a black one to repeat the color.  It is adhered to the card front with 3D foam tape.

Versatile layouts with tall and wide ones with this paper.

Friday, August 14, 2020

Exchange Cards - Spatter Cardstock

I made a couple of cards with the the great spattered card stock I made a while ago.  I loved how I was able to get ink splotches!  The original 12x12 card stock is by Teresa Collins - Giving Thanks.

I started with card bases in Stampin Up Bermuda Bay. 

I used Nick Bantock's Cerlean Blue and Chrome Yellow liquid acrylic as well as white pearl Gleams acrylic paint on this card stock. 

I found some large die cut flowers in aqua.They needed a bit of a texture so I used the same colors again on the large handmade paper flowers.  Then I added a pearl white flower die cut made with the Stampin Up Flower Fair thin-let set.  I layered a deep teal flower then a smaller deep yellow one held in place a deep teal mini brad.  This was assembled into an accent.

I cut the spattered card stock to 4.00 x 5.25 inches and adhered it to the card front.  I added  a ripped strip of silver metallic card stock.  I then adhered the flower accent with 3D foam tape. I added a quarter sheet insert.


This card as very similar pieces. 

The ripped strip is pearl white cardstock. It was adhered to the card from then trimmed it to the card edges.

The flower accent has a deep yellow mini brad in its' center.

I love the swirls of grey in this card stock.   I chose their layout to determine where I was going to place the flowers.

These are headed out to the mail box.


Friday, May 1, 2020

Christmas Card Challenge - May - Large Words

The theme for the May Christmas Card Challenge is Large Words.

I chose the Poppy Stamps Magnificent Merry thin die for my large greeting.  I selected a quarter sheet of 110lb white card stock.  First I printed "Christmas" in Night of Navy in the bottom right hand corner.
Then I ran the quarter sheet through my Big Shot aligning the die with the printed word. I pulled the word out of the sheet and made sure I kept the negative spaces in the m&e.
I used a light warm blue chalk above the curve.  I did the same with the negatives spaces from the M and E.
I used a dark warm blue chalk on the "merry" word.  I cut a piece of bond paper for the back.  Added a couple of strips of double sided tape behind the word and returned the darker blue word back into place including the small negative pieces.  I then punched white snowflakes for above the curve and blue ones for below.  I am really happy with this one!

Here's my inspiration card which I found on Splitcoast Stampers.

I worked on improving the process. 

If I kept one piece white and  watercolored the other then it would be easy to just switch them.  The green piece was a companion background to the one on this card. I cut both quarter sheet peices with the Magnificent Merry thin lit making sure I did not lose the negative space pieces in the m and e.

I put scotch tape on the back of the large piece, turned it over and just plunked the die cut into the hole. I put the negative pieces in as well.  The advantages are the colors all match.  In the blue one I had to do the negative pieces separately.  Once the tape was well burnished from the back to ensure the die cut would stay put I trimmed the quarter sheet to leave a tiny border of the warm green card. 

I created the color printed banner greeting, fussy cut to the edge, and adhered it to the card front with 3D foam tape. I adhered a shed free silver glitter star to intersect the "merry" with a bling glue dot.  I used a bit of the Stampin Up Watercolor Wonder crayons on the original background so I just spattered this card with some of the same colors.

Now I have 2 cards that are the opposite of each other. This one spattered with white acrylic paint.

I will certainly use this die again now that I have found this technique.

Saturday, January 4, 2020

Star Birthday Card

I made a special card for someone who celebrates a birthday early in the year. 

A friend requested a special card and I know the recipient`s favorite color is purple.

I started with a deep purple card base. I added a layer of gold card stock. I then added designer paper pieces which had been splattered with gold acrylic paint. The designer paper is by Scrap Ease - Fleur de Lis - Amethyst. 

I added stars cut with the Stampin Up Star Framelits larger one in deep purple and smaller one in the same gold card stock as the background.  These were adhered together and adhered to the card front with 3D foam tape.

I added a banner of the gold card stock on the bottom piece of designer paper and added a white ribbon and a white greeting.

Friday, November 16, 2018

R2Go Christmas Stack - Gold, Red, Green

I cut the Merry Christmas layer with one of the thinlets from the Sizzix Square set which is 3.75 inches square.  I cut the Christmas green layer to 4 inches square.  These are adhered together. I used a push pin to create the 2 holes for the brads - Star Glitter and Green Pine tree brads.

I spattered the red card base with gold Gleams acrylic paint and let it sit till it was dry - a couple hours. Once dry I wrapped a piece of ivory and gold metallic organza ribbon around the card front and taped the ends to the card front under where the greeting will cover.

I cut the 3D foam tape square into 4 pieces and placed them in the four corners.  I then adhered the greeting square over the taped ribbon ends leaving even border top and bottom.

Glue the quarter sheet insert inside.


I cut the metallic gold NOEL layer with the Tim Holtz Bracket die.

I used a push pin to create the hole in the middle of the O in NOEL and pushed the brad through and spread the prongs apart on the back. 
Inny Outie Bow - Put one end of the ribbon through the left hand hole then repeat with the other end through the right hand hole. Cross the ends on the back and reinsert the ends through the opposite hole from the back. Pull gently to take up the slack. 

I cut the 3D foam tape square in 4 and put on on each corner.  I then adhered the NOEL layer to the front of the green card.

Trimmed the ends of the ribbon with scissors and glued the quarter sheet insert on the inside of the card.

Wednesday, May 9, 2018

Cards to Gallery

I started with this silver glitter dragonfly die cut that arrived in a card from one of my card exchange buddies.

I chose brush paper in a deep blue for the background.  It has been spattered with pearl white acrylic ink.

I chose a Pacific Point card and adhered the decorative paper leaving a small border.  I attached the dragonfly with a tiny silver brad.

I then added 5 silver flower sequins at the bottom of the card again held in place with tiny silver brads.

A great card for any occasion.


This features a bird hole in the aqua teal decorative paper.  The base was painted then I spattered it with teal acrylic ink.

I cut a hole in the paper with the Stampin Up Bird Mover & Shaper die.  I placed a piece of white card stock behind which was embossed with the Cuttlebug Swiss Dots folder. 

I have offered birthday greetings in French and English.  The greeting printed in grey and were cut with the Stampin Up Modern Label punch.  They have 3D foam tape on the back to adhered to the card front should the user want a greeting.

This card features paste paper in a warm blue color.  I cut to it leave a small border.

I added a pearl white large star die cut made with the Sizzix Star die and placed it in the top two thirds of the card. 

I added some fiber which repeated that color tone and wrapped it around the decorative paper layer.  I then adhered the star layer to the front of a medium blue card base.

I have provided Thanks greetings in both French and English.   These have adhesive on the back which allows the user to place the greeting of their choice below the fiber.

They were again cut with the Stampin Up Modern Label punch.


Monday, April 24, 2017

HB Purple Watercolor Flower

I made a card for my grand niece who celebrates her next week.

I watercolored the flower with my water brush and solid watercolor crayons.  Once, dry I trimmed it and mounted it to a piece of black card stock.  Then adhered it to the front of a purple card.

I added a greeting punched with the Stampin Up Modern Label punch.  It was color printed in purple on white card stock. It is adhered to the card front with 3D foam tape.

Once the card was complete I spattered it. I dipped a wet toothbrush into my left over paint on my palette and ran it across a metal tool in my box.  This repeats the color I used and adds some texture to the card.

I gave her some similar cards which she can color as she desires.

Thursday, December 8, 2016

Art Canvas - Fern

I created another mixed media canvas for the show tomorrow.

I chose the photo for this piece which is a fern from my 2015 Alberta Road Trip Calendar.

I selected the colors for the canvas from the photo and painted a ombre pattern in greens from dark near the bottom to light at the top.  I let it dry overnight.  Once dry, I spattered the canvas with white paint which quickly dried.

I mounted the fern photo to a layer of black card stock leaving a small border.  This layer was adhered to the bottom left hand corner.  It is mounted to the canvas with 3D foam tape.  I colored the sides of the foam tape with a black marker before putting it in place.

Being put into the Miniature Show at the gallery this weekend.

I'm also submitting the Nature Leaf mixed media piece I created a while back.


Tuesday, August 9, 2016

Decorative Paper Cards

We had a good day on Saturday. Today, more cards for the Gallery.

I created these sentiment layers which have the words in the middle of the frame line.  I printed them on a white quarter sheet then trimmed it. I chose a piece of blue acrylic paper and ripped the bottom edge.  Trimmed it to leave a border inside the border.  Adhere to the sentiment layer then that layer to the card front on a textured navy card.  Punched a navy star from the same card stock as the card and adhered it to the card front with 3D foam tape.

This card features ink applied with a sponge onto Whisper White card stock.  Colors are Melon Mambo, Crushed Curry and Rich Razzleberry.  I printed the greeting in RR directly onto the decorative paper.  I punched a large daisy flower from the Crushed Curry card stock to match the card.  I glued the decorative layer to the card front. Placing the large daisy going with the movement in the pattern I drew a stem and leaves with a black marker.  I then adhered the daisy punchie and the black centre to coordinate with the stem. 

This card features spattered dots of liquid purple ink which has silver mixed into it. You can see the silver pooled to the center. 
I printed the sentiment directly onto the decorative paper.  It was trimmed to fit the card front leaving a border. It was then adhered to the purple card front.
I die cut the candle with the QuikKutz die which cuts the solid and decorative one.  The decorative one and the flame is silver foil.  Adhered the candle layers together then glued the candle to the card front.

Friday, April 1, 2016

Christmas Card Challenge - April - Green/Foliage

It's time again for my monthly Christmas Card Challenge.  The challenge for April is Green / Foliage.  Foliage could be pine trees, wreaths, evergreen branches, Christmas tree, poinsettias, holly, and much more.
My choice is  a green wreath on a window with a night sky behind on a deep red card. I pulled the Cuttlebug Holly Wreath die and folder combination from my die storage, which I have never used. I chose dill textured card stock. First, I cut the wreath with the sizzlet die then ran it through the embossing folder to add the textured design.  I cut the window from white card stock with the Memory Box Grand Madison Window die.  I spritzed a piece of navy card stock with white acrylic paint to create a night sky and adhered it behind the window.  The element was adhered to card front aligned along the top edge.  I then adhered the wreath centered on the window.  A bling Zot holds the red thread bow over the embossed one on the die.  I color printed the greeting onto white card stock and cut it with the Stampin Up Bitty Banners Framelits thin dies.  I adhered it  below the window.

Wednesday, July 29, 2015

Washi Tape Cross Section

I made the card based on a challenge sketch.  I chose Stampin Up Washi Tape for the elements.  I used Hello Honey from at Happiness Is Project Life Accessory Pack, Bermuda Bay from the Everyday Adventure and the other is Crushed Curry from the Cherry on Top set. I placed them 90 degree angles to each other in the bottom left hand corner on a white card. I cut a couple of them down to half the width to add interest. Once the tape was applied a spattered the piece with Bermuda Bay ink. I chose a More Mustard card and a button to match. I stamped the greeting from the Noteworthy stamp set in black and then added a layer of black between the card and the washi tape layer.  I knotted some black string into the button then adhered it to the card front with a Zot. 
Submitting this card to the following challenges:
Stampin Celebration Sketch 109

Wednesday, July 1, 2015

Christmas Card Challenge - July - St. Nick Spatter Buttons

It's time for the Christmas Card Challenge again.  This month it is Santa/St. Nick / Spattering / Buttons.  Santa could be die cut, stamped, color printed. Spattering could be paint, ink or some other color medium.  Buttons could be chipboard, real, die cut. All kinds of options. Be inspired!


I chose a St. Nick I found on-line which has a rich colored tunic, a snowy grey background and majestic stags.  I color printed it in the size I needed.  I trimmed it leaving a white border.  I dug through my button collection to see what I had that matched either the tunic or the stags.  I chose a grey card which matched well with the background in the picture. I spattered white pearl acrylic paint on the front of the card with a spatter tool then sent them aside to dry.  Once dry, I wrapped a piece of white seam binding around the card front and knotted it on the right hand side.  I repeated the colors in buttons - white, burgundy and grey.  These are held in place with Zots.
Submitted to the following challenges:
Sparkles Christmas Card Challenges - Anything Goes 

Monday, November 25, 2013

Card Club - November - Glittered Deer

Christmas cards are the order of the day today!  We are making 8 cards - 2 of each design.
I did several things ahead.  The chipboard deer were colored with Tim Holtz Gathered Twigs Distress Stain.  Once dry I applied Deco Art Twinkle Gold Glitter paint.  Thank goodness I did this early in September.  I also spattered black card stock with gold acrylic paint.  Once dry I cut into pieces of 3.5" wide then cut them with the TH Cabinet die. This gives me only 1 notch on each side.  I punched a 1.75" circle from High Gloss Gold Paper with my Stampin Up circle punch, also a Modern Label from the same card stock.  I printed my greeting in black on ivory card stock and punched it with the SU word window. I selected an ivory card.  I adhered the black/gold background die cut to the card front. I glued the gold "moon" circle aligned with the curve on the black die cut.  I glued the greeting to the label and mounted to the bottom of the card with 3D foam tape.  I then adhered the glittered chipboard deer above the greeting placing his head over the gold "moon" circle.